
Spoolinup COP installed, Evo IX MR.


Spoolinup COP installed, Evo IX MR.
I finally got the Spoolinup COP unit installed. This is a revised unit that has used coils that fit under the OEM valve cover. Install was easy although you really had to stretch the passenger side wire to the limit and zip tie it down but it fits.

You can see the wire there, it just bends up and to the left and then zip it down.


It fits!!! I love the OEM look.
I should point out that I put in brand new plugs and a DIY grounding kit I made out of 4 gauge wire and some gold eyelet connectors. Everyone should do this mod. It is simple to do and keeps voltage stable at 14 volts no matter what you turn on including the A/C. I did it to both of my Evo's and got the same results, I HIGHLY recommend it and believe it needs to be done.
Impressions:
Started right up!!!! Absolutely recommend it. Should be this way from the factory. Plugs gaped at .26. Just a smoother Evo to drive.
It goes on the dyno tomorrow, hopefully we can get more power out of it. I will update tomorrow.
You can see the wire there, it just bends up and to the left and then zip it down.
It fits!!! I love the OEM look.
I should point out that I put in brand new plugs and a DIY grounding kit I made out of 4 gauge wire and some gold eyelet connectors. Everyone should do this mod. It is simple to do and keeps voltage stable at 14 volts no matter what you turn on including the A/C. I did it to both of my Evo's and got the same results, I HIGHLY recommend it and believe it needs to be done.
Impressions:
- Idle is smoother, plain and simple.
- Car drives smoother
- When the RPM's drop it doesn't get rough down low in the RPM's, just smoother.
- MAYBE faster spool-up? Certainly smoother boost onset the car just feels better all around when you hit the gas in any gear, inspires confidence.
- When I put my A/C on, idle no longer rough and VERY stable.
Started right up!!!! Absolutely recommend it. Should be this way from the factory. Plugs gaped at .26. Just a smoother Evo to drive.
It goes on the dyno tomorrow, hopefully we can get more power out of it. I will update tomorrow.
Last edited by High_PSI; Oct 5, 2010 at 06:47 PM.
No it does not but I bet the tuner could get more power out of it. Your timing will advance until detonation, with this ignition detonation is less likely as you have a much stronger spark especially in the upper RPM's so more power is to be found for sure.


Trending Topics


This is what I did essentially.
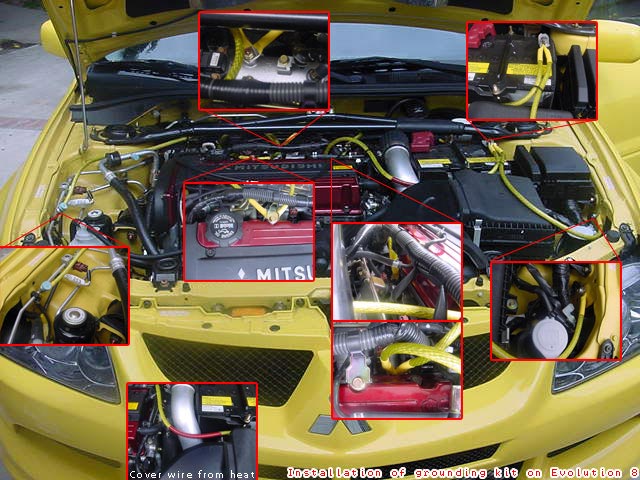
This is the thread I sourced, I did exactly that, and it works perfectly. You have no idea especially those of you who have a sports meter kit. Watch your volts drop to 13.8 instead of 12.2 when you turn everything on, and it is so cheap to make and install, just do it.
battery to body

neg terminal to tranny

rear of head

head to intake and fire wall

passenger fender


Your welcome. I recommend doing this to ANY Evo ESPECIALLY with an ignition or COP kit. It works and voltage is MUCH more stable, I promise


This is the thread I sourced, I did exactly that, and it works perfectly. You have no idea especially those of you who have a sports meter kit. Watch your volts drop to 13.8 instead of 12.2 when you turn everything on, and it is so cheap to make and install, just do it.
Originally Posted by bishiboy
DIY Ground Kit for $20
I went to a local car stereo shop, bought approx 8ft (actually 272cm) of 4 Gauge power wire (in cool transparent red) and 12 - 5/16" gold eyelet connectors for $20.
I measured for the sections I wanted and cut, striped, crimped and soldered the connectors on. Install was straight forward, I only had to remove part of my HKS suction kit (You'll have to remove your airbox). My impressions afterward: no big difference in Idle, bottom end seems much smoother, no hesitation or bucking in low rpms, top end rush in very smooth.
The hardest part was removing and installing the bolt on the back of the head that hold the engine hoist connection on, kinda cramped. I glad I didn't spend $69-$300!!
Here's my section lengths and pics to follow:
- Driver's side fender to neg terminal: 38cm
- neg term to top of tranny: 62cm
- top of tranny to back of head (engine hoist attachment): 45cm
- Head to intake: 25cm
- intake to fire wall: 15cm
- fire wall to passenger fender: 85cm
battery to body
neg terminal to tranny
rear of head
head to intake and fire wall
passenger fender
Your welcome. I recommend doing this to ANY Evo ESPECIALLY with an ignition or COP kit. It works and voltage is MUCH more stable, I promise
Dyno soon. It'll be a Mustang Dyno
MODS
Pics of my grounding kit.


Such a simple and effective mod to do.
MODS
- AMS FMIC
- AMS LICP
- AMS TURBO BACK EXHAUST W/RESONATED TEST PIPE
- HKS RS INTAKE
- SYNAPSE BOV
- AEM TRU-BOOST
- GSC S1 CAMS
- SPOOLINUP COP
- DIY GROUNDING KIT
- ACT XTSS CLUTCH
- JDM REAR
- SWIFT SPEC R SPRINGS
- VOLK TE37'S 18"
- SHIFTER BUSING KIT UNDER HOOD AND AT SHIFTER
- PORTED TURBO & EXHAUST MANIFOLD
- EVO POWER MODS 02 DUMP
Pics of my grounding kit.
Such a simple and effective mod to do.