Sabrina's Got Wood!!!

 Jun 26, 2011, 08:56 PM
#32
Evolving Member
iTrader: (1)
Join Date: May 2010
Location: SF
Posts: 249
Likes: 0
Received 0 Likes
on
0 Posts
I can get my car up on jack stands in less than 5 minutes, so no thank you wooden ramps. This is literally putting your life on the line.
How long will this wooden ramp last over years of use? Will it lose its strength over time after being soaked with automotive chemicals and moisture?
How long will this wooden ramp last over years of use? Will it lose its strength over time after being soaked with automotive chemicals and moisture?
Jun 26, 2011, 09:19 PM
#33
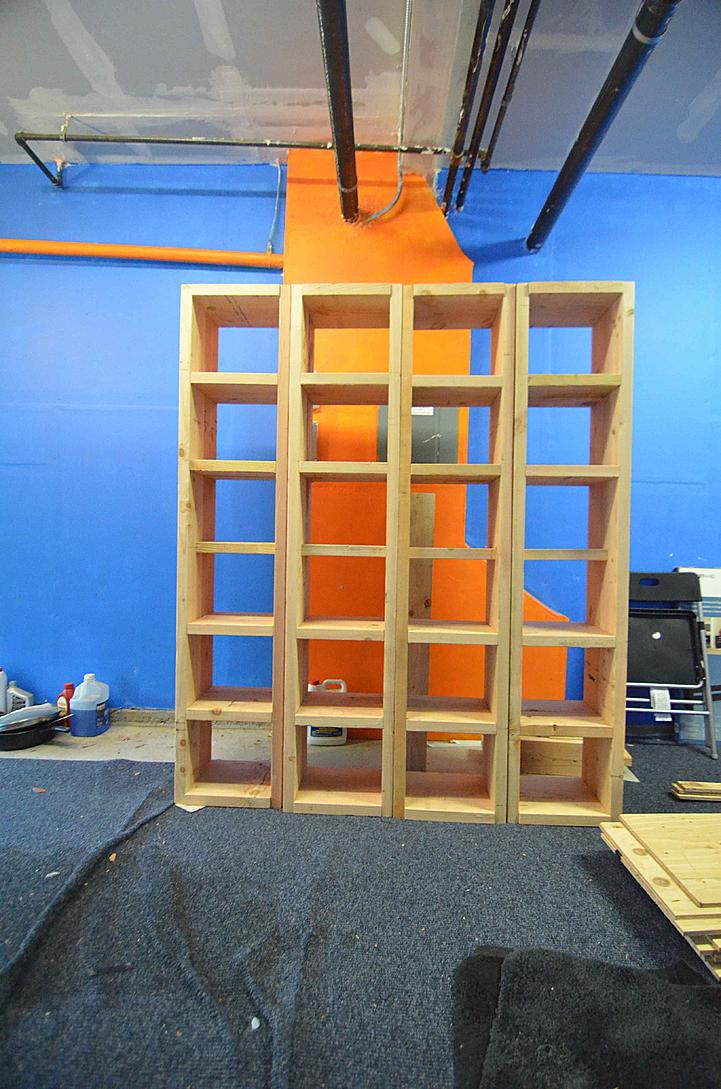
Looks like I'll have to wait 2 months when I get back from my business trip to finish my ramp project. Today I finished the frames (a lot of 3 1/2" screws!!!) but was unable to come up with ramp design yet...  I decided to stop because I still had to clean up the garage and eat dinner and pack.
Before you all go raggin' on the picture of the ramp, it's only mockup for getting design ideas. So make sure you read this before you skip to the pics!!! As far as the design, I want something compact that I can assemble but can still be very strongf
For those of you who want to know how much I've spent so far, here's the material cost (enough for 4 12x72x15" and material left over for ramp and cutting fixtures):
2"x6"x12' lumber = $87.75
2"x12"x10' lumber = $10.54
0.451" plywood = $13.17 (would be $29.51 but they only charged me for one)
Cutting lumber = $10.00
3 1/2" screws = $29.98
2 1/2" screws = $8.47
Pencil = $2.00
Total = $162.01 (no tax)
Logged about 16 hours of labor so far. Not bad I think.
But that means so far I've spent over $160 dollars and 2 days assembling a new shelving system for my garage, but at least in 2 months I'll be able to drive onto that shelf.


I decided to stop because I still had to clean up the garage and eat dinner and pack.Before you all go raggin' on the picture of the ramp, it's only mockup for getting design ideas. So make sure you read this before you skip to the pics!!! As far as the design, I want something compact that I can assemble but can still be very strongf
For those of you who want to know how much I've spent so far, here's the material cost (enough for 4 12x72x15" and material left over for ramp and cutting fixtures):
2"x6"x12' lumber = $87.75
2"x12"x10' lumber = $10.54
0.451" plywood = $13.17 (would be $29.51 but they only charged me for one)
Cutting lumber = $10.00
3 1/2" screws = $29.98
2 1/2" screws = $8.47
Pencil = $2.00
Total = $162.01 (no tax)
Logged about 16 hours of labor so far. Not bad I think.
But that means so far I've spent over $160 dollars and 2 days assembling a new shelving system for my garage, but at least in 2 months I'll be able to drive onto that shelf.
Jun 26, 2011, 10:17 PM
#36
Looks like I'll have to wait 2 months when I get back from my business trip to finish my ramp project. Today I finished the frames (a lot of 3 1/2" screws!!!) but was unable to come up with ramp design yet... I decided to stop because I still had to clean up the garage and eat dinner and pack.
Before you all go raggin' on the picture of the ramp, it's only mockup for getting design ideas. So make sure you read this before you skip to the pics!!! As far as the design, I want something compact that I can assemble but can still be very strongf
For those of you who want to know how much I've spent so far, here's the material cost (enough for 4 12x72x15" and material left over for ramp and cutting fixtures):
2"x6"x12' lumber = $87.75
2"x12"x10' lumber = $10.54
0.451" plywood = $13.17 (would be $29.51 but they only charged me for one)
Cutting lumber = $10.00
3 1/2" screws = $29.98
2 1/2" screws = $8.47
Pencil = $2.00
Total = $162.01 (no tax)
Logged about 16 hours of labor so far. Not bad I think.
But that means so far I've spent over $160 dollars and 2 days assembling a new shelving system for my garage, but at least in 2 months I'll be able to drive onto that shelf.
I decided to stop because I still had to clean up the garage and eat dinner and pack.Before you all go raggin' on the picture of the ramp, it's only mockup for getting design ideas. So make sure you read this before you skip to the pics!!! As far as the design, I want something compact that I can assemble but can still be very strongf
For those of you who want to know how much I've spent so far, here's the material cost (enough for 4 12x72x15" and material left over for ramp and cutting fixtures):
2"x6"x12' lumber = $87.75
2"x12"x10' lumber = $10.54
0.451" plywood = $13.17 (would be $29.51 but they only charged me for one)
Cutting lumber = $10.00
3 1/2" screws = $29.98
2 1/2" screws = $8.47
Pencil = $2.00
Total = $162.01 (no tax)
Logged about 16 hours of labor so far. Not bad I think.
But that means so far I've spent over $160 dollars and 2 days assembling a new shelving system for my garage, but at least in 2 months I'll be able to drive onto that shelf.
I am no carpenter (my dad was), but I would think you might need some X style supports in each little box to keep it from rocking forward or backward with the cars motion.
It looks nice so far though. Are you planning on adding lights of some sort? I think lights would also be a nice addition to this (one of the reasons I liked the pic I added earlier in the thread).
Jun 26, 2011, 10:21 PM
#37
im not to sure i like the stacked wood on the sides. i would have used a 2x12. X bracing is a must IMO. putting wood in like you have it does not stop it from flopping foward when the 2 side boards cave outwards.
i really like the idea though. i just think it needs improvement. mainly for your own safety. remember IF ''always and IF'' you get trapped under that car it will be hell for someone to get you out. and not to mention the pain and possible death you could face.
i really like the idea though. i just think it needs improvement. mainly for your own safety. remember IF ''always and IF'' you get trapped under that car it will be hell for someone to get you out. and not to mention the pain and possible death you could face.
Jun 26, 2011, 11:56 PM
#38

the "stacking" (not actually stacking) is fine, and there are no side boards on it to cave so i don't think you're looking at it right. the 2x6's are the part the wheels will sit on, the stands don't have any side pieces on them right now. post #33 shows exactly how they will sit on the ground
it would be hell for someone to get you out from under a car with jackstands. at least if this collapses the car is still at least 4" higher in the air than it would have otherwise been, unless the wood magically explodes somehow.
i like the idea, but a jack and jackstands are more practical for me as i dont have the space to store something like this =)


 Jun 27, 2011, 01:41 AM
#41
Man.... I'm suprised at how many people underestimate the strength of wood! If designed correctly, an evo would be chump weight on stands like that! And most of the time, people OVER engineer things made of wood, because of the lack of knowledge...and the latter could be said as well, as sometimes people put TOO much faith in wood and use inadequte sized wood, soft wood, untreated wood or improper bracing and building material (lenght of nails or glue, etc)
As those stands sit, they are very unsafe... all those vertical boards are like dominos, so when the force of the car stopping or moving on those boards occurs, its like hitting that first domino, only this time, they all collapse at once..lol...... 2 things could easily change that.. the cheaper being 1 piece of 2x4 cross braced from the bottom of one end (on the side of the ramp) to the top of the other end... nailed to each supporting board...and do the opposite on the other end..start at the top...so basically from the side, both baords would create an "x" ... or buy a solid piece of wood, and "finish" the sides, nailed to each supprting board.
Now I have a vision in my head lol and won't be happy until I build my own ramps...hahahaha....I really like the idea of the bottle jacks and lights
Jun 27, 2011, 10:18 AM
#44
Once you get plywood on the sides, those ramps will be solid!
Don't forget to cut a couple ovals in the plywood for handles. Makes moving them much easier.
I use (2) 2x6 x 30" long (pine) and place them about 3/4 of the way up my Rhino Ramps w/ no support in the center. You cant even see the 2x6 flex.
I'd make a couple supports for the ramps, drill a hole through the last vertical on the ramp section, into the first vertical on the flat and use a 1/2" bolt w/ washers and a wing nut to temporarily secure the two when moving the car.
Jun 27, 2011, 03:06 PM
#45
Newbie
iTrader: (2)

Join Date: Oct 2008
Location: Canada
Posts: 16
Likes: 0
Received 0 Likes
on
0 Posts
Once you get plywood on the sides, those ramps will be solid!
Don't forget to cut a couple ovals in the plywood for handles. Makes moving them much easier.
I use (2) 2x6 x 30" long (pine) and place them about 3/4 of the way up my Rhino Ramps w/ no support in the center. You cant even see the 2x6 flex.
I'd make a couple supports for the ramps, drill a hole through the last vertical on the ramp section, into the first vertical on the flat and use a 1/2" bolt w/ washers and a wing nut to temporarily secure the two when moving the car.
Don't forget to cut a couple ovals in the plywood for handles. Makes moving them much easier.
I use (2) 2x6 x 30" long (pine) and place them about 3/4 of the way up my Rhino Ramps w/ no support in the center. You cant even see the 2x6 flex.
I'd make a couple supports for the ramps, drill a hole through the last vertical on the ramp section, into the first vertical on the flat and use a 1/2" bolt w/ washers and a wing nut to temporarily secure the two when moving the car.