
Doing the clutch. Ball joints. Damn you!

Thread Starter

Joined: May 2003
Posts: 1,267
Likes: 7
From: Holding over the VOR
Doing the clutch. Ball joints. Damn you!
Chaps...
I'm in the process of doing my clutch.
I'm at the stage where I need to get the lower ball joints shaft out of it's pinch in order to pull the axle.
I've got the pinch bolt out. I took the caliper and rotor off for good measure. Disconnected the sway bar end link mounting, and the silly brake cooling ducts.
I can NOT get the shaft of the ball joint to pull out of the pinch though! I have pry bar, BFH, etc. nothing. Car is garaged, low mileage, and no winters.
Questions...
1. Should I go with more BFH?
2. Is there a ball joint separator that can be used for that ball joint? It's directly below the axle, and I can't think of how one would work?
3. If it matters, I'm fairly certain these are the whiteline ball joints because the boots are yellow.
Anybody have any advice, or HTFU?
Thanks crew!

FYI when you go to re install the ball joint, use a big flat head or a small chizzle and spread that pinch joint out a little before trying to reinstall it. Also make sure that you have the ball joint notch facing the right way. Hope this helps.


A couple of things you could try would be to first spray some penetrating oil on the balljoint and the knuckle its connected into.
Heat it up with a heat gun and then when its warm hit the lower control arm in the center or as close to the center as possible with the hammer. Doing this method works better when the shock is still connected that way it keeps the hub knuckle from moving and the lower control arm is free to move.
Heat it up with a heat gun and then when its warm hit the lower control arm in the center or as close to the center as possible with the hammer. Doing this method works better when the shock is still connected that way it keeps the hub knuckle from moving and the lower control arm is free to move.

If you have a harbor freight nearby, they sell a separator tool that pushes the joint downward and you just use an impact on the separator's bolt to free it up. Works fantastic, doesn't hurt the joint whatsoever, and it's like $20. This guy:
http://www.harborfreight.com/3-4-qua...tor-99849.html
I use it for tie rod ends and ball joints. Doing the rear suspension would have been a royal PITA without this thing.
http://www.harborfreight.com/3-4-qua...tor-99849.html
I use it for tie rod ends and ball joints. Doing the rear suspension would have been a royal PITA without this thing.
Trending Topics

That method doesn't work very well with lower ball joints on evos. It works fine on tie rod ends like in the video, but very spotty on lower ball joints especially evo type.
I use one of these and a standard Pryzilla. Pops even nasty rusted ones off in 2 seconds.
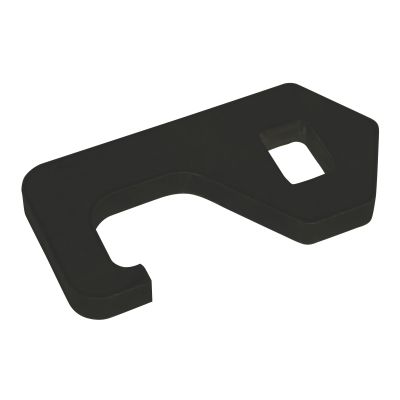
I use one of these and a standard Pryzilla. Pops even nasty rusted ones off in 2 seconds.
Thread Starter
Joined: May 2003
Posts: 1,267
Likes: 7
From: Holding over the VOR
1. I'm not replacing the ball joints, so I don't want to fubar them, and since they're the LOWER ones, it's a huge pita.
2. I didn't spray any penetrating oil on because I don't want it to get into the boot, and ruin whatever grease is packed into the ball joint itself.
3. I also didn't want to use heat because, even with my torch... it's too close to the boot, and it'll melt it.
4. Todd... with that harbor freight puller (that's the one I kept seeing come up in searches), do you put a dowel or something on the other end to press the joint out (mine is recessed into the hubs pinch), or do you use that to separate the lower control arm and the hub?
5.
Going to get back at it now fellas, so thanks a TON for the tips, and keep them coming if I'm missing something. I'll report back with how I got it... I'll probably even make a quick how to.
The method I showed you won't mess up the ball joint at all. For the record I've removed both lower ball joints with this method no problem. You don't hit the ball joint but the side of the knuckle that it goes into. I used a jack to make the suspension compress up just about and inch and then used my hammer on the ball joint. After two hits it popped out and took literally 10 seconds per side.
No, but if you are really interested I can take one next week when I'm back in the shop though.
The hook end slides over the front edge of the control arm, about halfway between the ball joint and the K member (I prefer closer to the K member) with the hole end hanging below.
You slide a prybar (I have a 38" one I call Pryzilla, but smaller ones will work) through the hole in the tools, then put the end of the prybad at the inner end of the control arm/k member.
Pull down on the end of the prybar and depending on where you place the tool and the length of your prybar, it equates to hundreds of pounds of force.... they pop right out with minimal effort.
The evo/lancer/outlander style suspensions with the stupid end link through the control arm makes it slightly more effort since you are pulling against the sway bar force too, but not noticeable until you do a regular on that mounts the links on the struts and notice how stupid easy they are in comparison.
Thread Starter
Joined: May 2003
Posts: 1,267
Likes: 7
From: Holding over the VOR
No, but if you are really interested I can take one next week when I'm back in the shop though.
The hook end slides over the front edge of the control arm, about halfway between the ball joint and the K member (I prefer closer to the K member) with the hole end hanging below.
You slide a prybar (I have a 38" one I call Pryzilla, but smaller ones will work) through the hole in the tools, then put the end of the prybad at the inner end of the control arm/k member.
Pull down on the end of the prybar and depending on where you place the tool and the length of your prybar, it equates to hundreds of pounds of force.... they pop right out with minimal effort.
The evo/lancer/outlander style suspensions with the stupid end link through the control arm makes it slightly more effort since you are pulling against the sway bar force too, but not noticeable until you do a regular on that mounts the links on the struts and notice how stupid easy they are in comparison.
Matrho... I'm going to yutz with your method as well...
Thread Starter
Joined: May 2003
Posts: 1,267
Likes: 7
From: Holding over the VOR
Alright... just an update in case anyone who searches wants helpful advice.
My LBJ's would not come out, on either side. 4# sledge... no. Large pry bar... no.
It is what it is, but I elected to pop the upper ball joint/tie rod end, and the 2 bolts for the strut. I have impact tools, so it was much quicker, and much less painful. Yes... I'm going to have to get an alignment, but c'est la vie.
To anyone else interested... I'm fairly certain I tore one of the CV boots during the process, so that will now need to be replaced.
My advice... if you're going this route, and you blast the lower ball joint with a few solid whacks, and your pry bar isn't doing it... just go the alignment route.
Lastly... I also could NOT get the drivers side axle to pop out. Passenger side, no big... drivers side. No way.
So I wrapped a webbed strap (think ratchet strap) around the green piece, careful not to yutz up the metal cuff, and had a friend pull steadily out while I raged on the green piece from underneath with a pry bar. It popped pretty easily that way.
Next... the output shaft! Then... THE WORLD!