How To: Make Fog Lights funtional WITH PARKING LIGHTS
 Jan 12, 2007, 09:56 AM
#1
Evolving Member
Thread Starter
iTrader: (10)
Join Date: Jul 2006
Location: Enola, PA
Posts: 104
Likes: 0
Received 0 Likes
on
0 Posts
How To: Make Fog Lights funtional WITH PARKING LIGHTS
I did this on my IX to where when I turn on JUST MY PARKING LIGHTS. I did this with no complications to the wiring or anything else. I will say though, that getting into the area where the main plug is for the headlight assembly was a little tricky. But anyways, here is the way I did and if you have any questions, feel free to pm me.
TOOLS REQUIRED:
*Pliers
*Electrical Crimpers
*Electrical Tape or Shrink Tubing (if you know what and how to use it)
*Wire T-Taps (2) and MALE spade connectors (2) T-Taps w/info
*In-Line Fuse (can be found at local auto-parts store along with t-taps)
*Assortment of MINI spade fuses and regular fuses (depending on type of in-line fuse you buy)
*Approx 12" of 18 guage wire
PROCEDURE:
1. Open your hood and locate the LEFT (drivers) headlight assembly. Take notice to where your FOG LIGHT BULB and connector are. They should be all the way on your left looking down into the engine. This is one connector you will be using.
2. Next locate the MAIN HARNESS PLUG that plugs into the back of the headlight assembly. You will have to cut some of the protective plastic off in order to access the proper wire.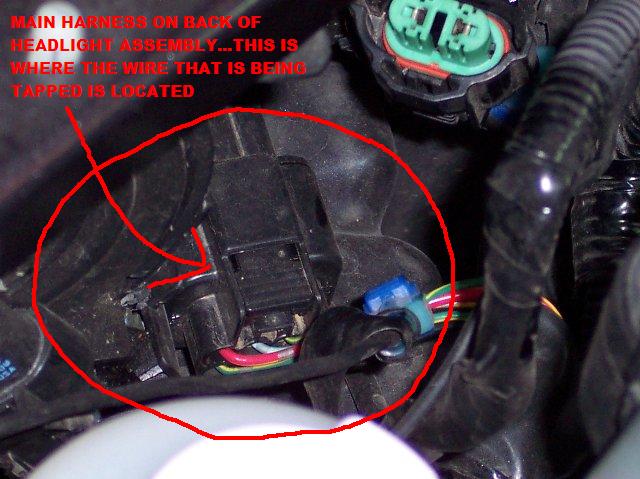
3. The first thing that we will be working with is the FOG LIGHT plug. You will notice that there are 2 wires coming from it (black & red). We will be using the RED wire for this. Take one of your wire taps and pliers and squeeze the tap onto the RED wire. Make sure that you squeeze pretty hard to ensure that the wire has been tapped.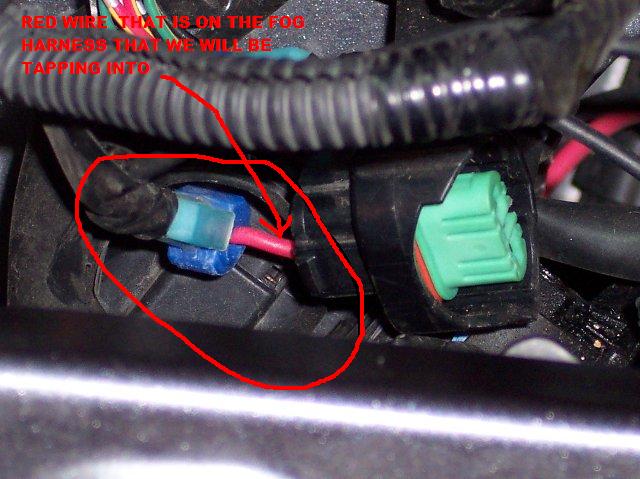
4. Next we will be locating the wire that we will be tapping into on the MAIN HEADLIGHT HARNESS. It is a GREEN/YELLOW wire on the top left of the harness as you are looking DOWN into the engine bay. This is where getting a pair of pliers, your hand, and the t-tap all in that little space a pain in the butt. Locate the GREEN/YELLOW wire and install a t-tap onto that wire.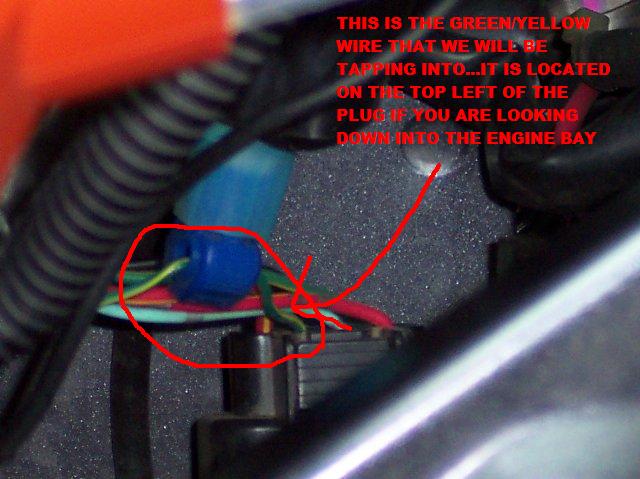
5. After you have the 2 t-taps installed on the RED wire on the fog light harness and the GREEN/YELLOW wire on the main harness, we will assemble the connecting wire that holds the in-line fuse. Take your 12" piece of wire and put your in-line fuse in there (preferrably the middle but whereever you would like is fine). Then take the 2 MALE spade connectors and but them on each end of the wire. This is where the ELECTRICAL TAPE/SHRINK TUBING comes into play. Ensure that if you are using SHRINK TUBING, you put it on BEFORE you crimp the connectors.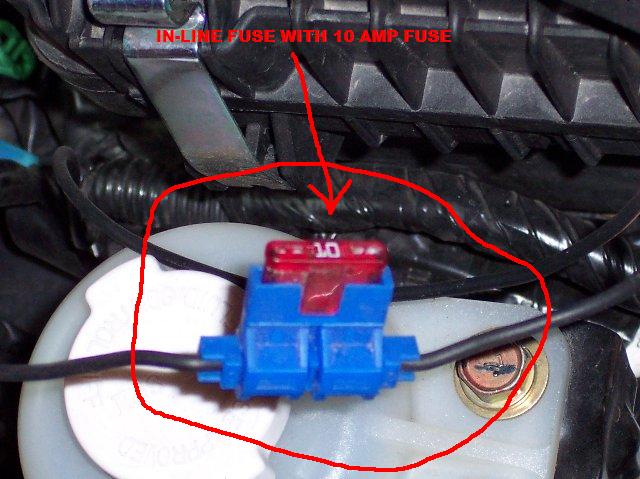
6. Now we will be replacing one of the original fuses in the fuse box in the engine bay. This is the box right by the battery. This is where the MINI SPADE FUSE come in. I can only describe which fuse you will be replacing by picture. So here it is. http://www.flickr.com/photos/badasse...7600937483803/
7. Next install that connecting wire between the 2 t-taps by just inserting them. Make sure that you have them securily pushed in.
8. Lastly, install a 10 amp fuse in your in-line fuse. Make sure that all connections are tight and no bare metal is visible or touching anything.
9. Turn on your parking lights and make sure they work. If they don't at first, try pushing your fog light switch. I think that is what I had to do to mine the first time. From then on out, your fog lights should come on WHENEVER YOU TURN ON YOUR PARKING LIGHTS.
I hope this helps everybody out and if you have any other questions/comments, feel free to pm me.
Jeremy
Last edited by 2006MRevo; Dec 10, 2007 at 10:46 PM.

 Jan 12, 2007, 11:31 AM
#4
Evolving Member
iTrader: (2)

Join Date: Oct 2006
Location: New Jersey
Posts: 261
Likes: 0
Received 0 Likes
on
0 Posts
Not wishing to be a Debbie Downer, but that seems like a huge amount of work to get that effect.
The last 3 cars I've owned the same effect has been possible by finding the relay that controls when the fogs can come on (in most standard applications this relay is triggered by the main beam power). then you tap that relay with the parklights power, so it's a single wire between two relays.
These relays are usually in the same location, usually near the inside fuse box (I haven't checked the evo, and I don't have fogs so I can't check.
What this does is allows your fogs to get power when your parking lights have power (you just change the way the 'smart' switch is switched. There is no need to add fuses or tap actual power into anything other than where it currently gets it's power from - thus it's much less 'risky'.
When it comes to car electronics relays are your friend.
Just my 2 cents on the process.
Jan 12, 2007, 12:49 PM
#6
Evolving Member
Thread Starter
iTrader: (10)
Join Date: Jul 2006
Location: Enola, PA
Posts: 104
Likes: 0
Received 0 Likes
on
0 Posts
There may be. I know when I had my 02 Cougar, all I did was reverse the relay and the fogs would stay on even when I the high beams. The cougar had switch tho so that could just turn on the fogs/parking. I will look for this relay and see if I can't come up with something else. I did this because I knew it worked.

Trending Topics
Jan 12, 2007, 09:04 PM
#9
Newbie

Join Date: Jul 2005
Location: Anacortes, Washington
Posts: 43
Likes: 0
Received 0 Likes
on
0 Posts
So can you still turn the fog lights off or are they always on with the parking lights now? Does the Highbeam switch still work where the fogs shut off when high beams are on?
Jan 12, 2007, 10:31 PM
#10
Evolving Member
Thread Starter
iTrader: (10)
Join Date: Jul 2006
Location: Enola, PA
Posts: 104
Likes: 0
Received 0 Likes
on
0 Posts
The way the fog lights work with this method is:
*they are on WHENEVER the PARKING lights are on therefore they are still on with the low beam
*the fog light switch is not functional this way
*the lights will REMAIN ON even when the high beams are on
I will try to find a different method as well involving the relays in the dash.
*they are on WHENEVER the PARKING lights are on therefore they are still on with the low beam
*the fog light switch is not functional this way
*the lights will REMAIN ON even when the high beams are on
I will try to find a different method as well involving the relays in the dash.
Jan 14, 2007, 06:12 PM
#12
DRLs?
Has anyone tried to wire the fogs as DRLs? Good idea? Bad idea?
What I'd really like is to have the front only parking lights as DRLs. Like the C5 'Vette. I think the yellow lights on the C5 show up much better in day light than do white lights.
What I'd really like is to have the front only parking lights as DRLs. Like the C5 'Vette. I think the yellow lights on the C5 show up much better in day light than do white lights.


