
Side mirror removal & Ganador install

Thread Starter
Evolving Member
iTrader: (1)
Joined: Dec 2006
Posts: 201
Likes: 3
From: Location, Location!
Side mirror removal & Ganador install
The intent of this thread is to help assist those who do not know how to remove the stock side mirrors, along with tips on installation of the Rexpeed Ganador powered mirrors.
If you plan on doing this swap, I'd recommend printing this out & reading through it before actually tackling the job. It's a fairly easy swap, but it's better to have a grip on what you might encounter to lessen any possible trips to the hardware/auto store...
What you'll need:
- 10mm wrench (box end or short socket on 1/4" drive)
- very small, thin disposable philips screwdriver (will need to bend it 90 degrees unless you want to remove door panel)
- medium sized phillips head screwdriver
- wirestripping tool and/or dykes
- 4 screws that are 1/2" long, but have a narrower, beveled head than those provided with mirrors
- thin wire connectors (unless you plan on soldering or twisting the wires)
STOCK MIRROR REMOVAL:
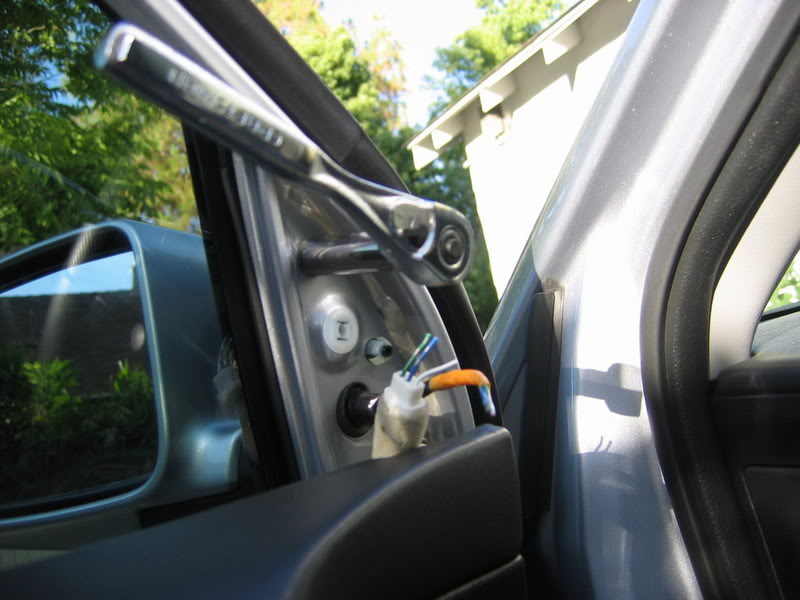
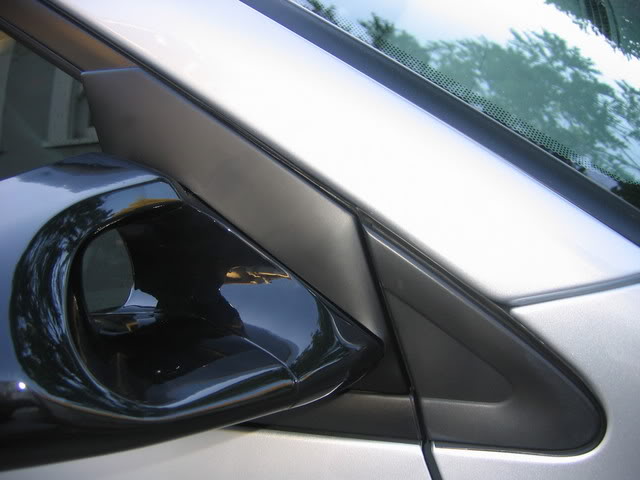
1. Open your driver side door and locate the mirror access panel seen below. Use your small, thin screwdriver to carefully pry it away from underneath by the bottom corner as shown. If you try to pry it out anywhere else, you risk discoloration of the plastic (fatigue) or tearing/indentation of the door panel material, which doesn't do well when pressured.
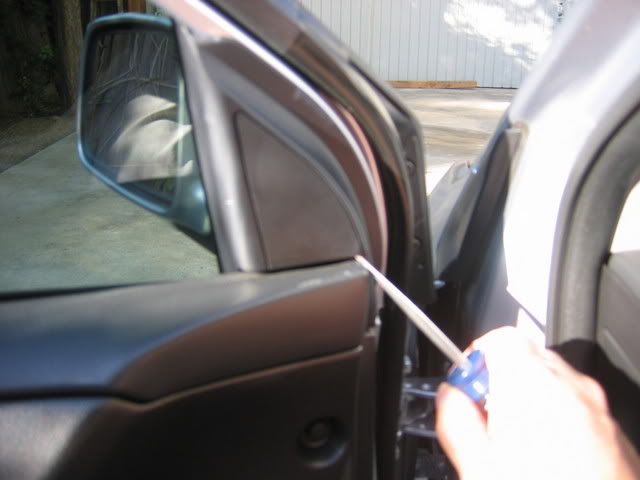
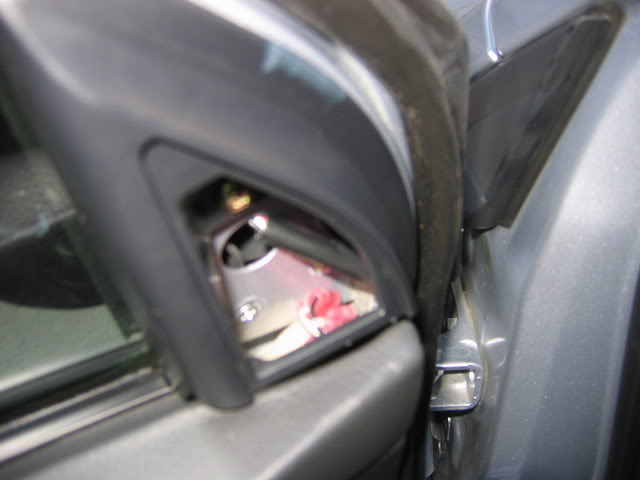
2. Now you can see the screw that holds the larger housing to the inside of the door. Remove this screw and pull the housing away from the door.
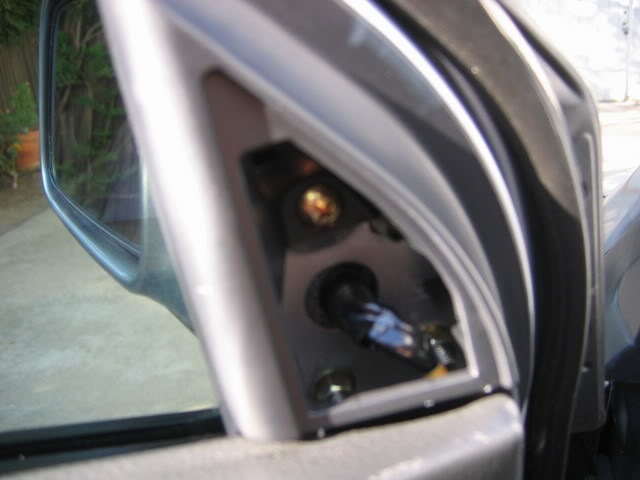
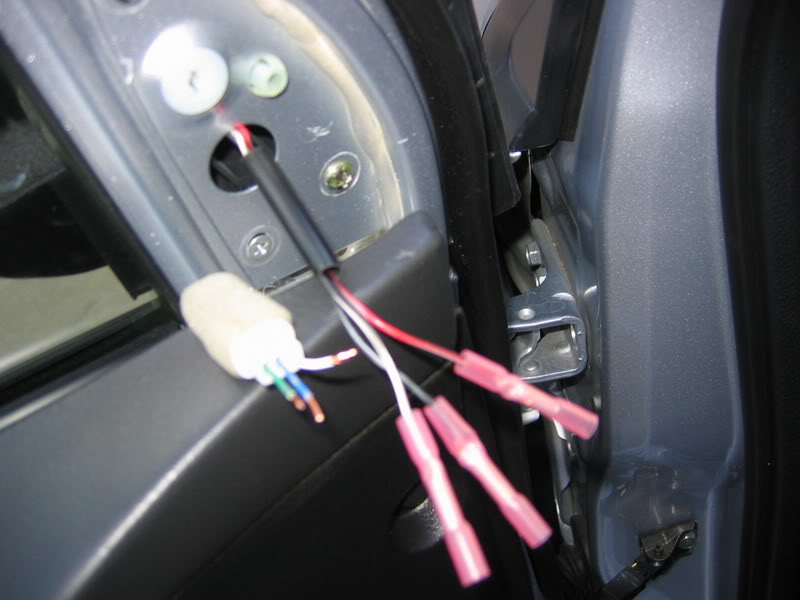
3. Now use the dykes or wirecutters to cut the power wires to the mirror. You'll want to cut them closer to the mirror side, but leaving enough wire to work with if using crimped connectors.
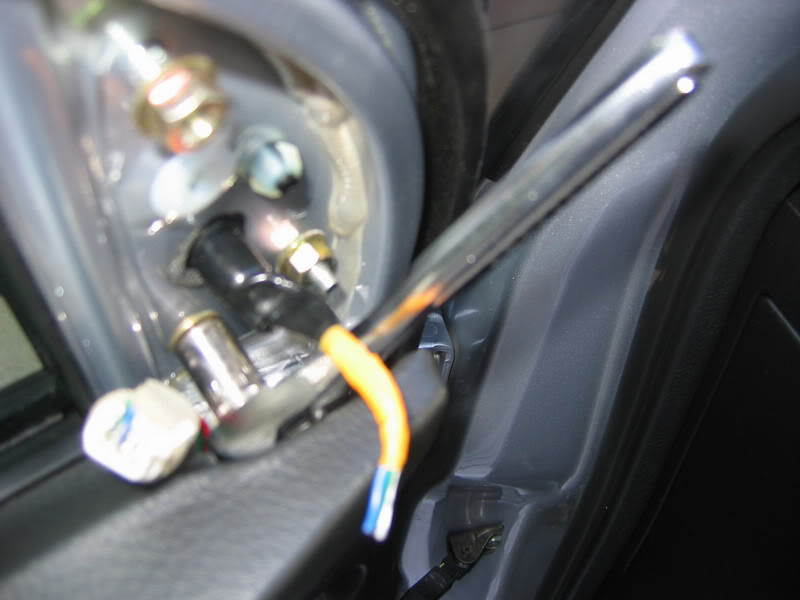
4. Now start removing the three 10mm nuts that hold the mirror on. Once you break them loose, they can easily be removed by hand. But don't actually remove the mirror until you've gone through step 5.
A shorty 10mm socket should fit just inside the door so you can break the lower one loose (but a 10mm wrench will work just as well):
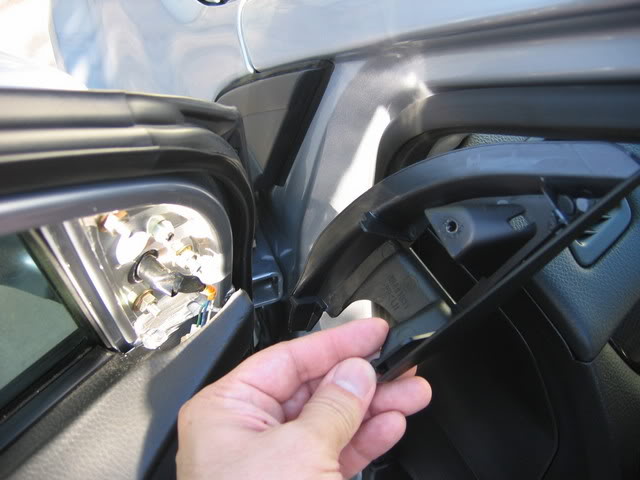
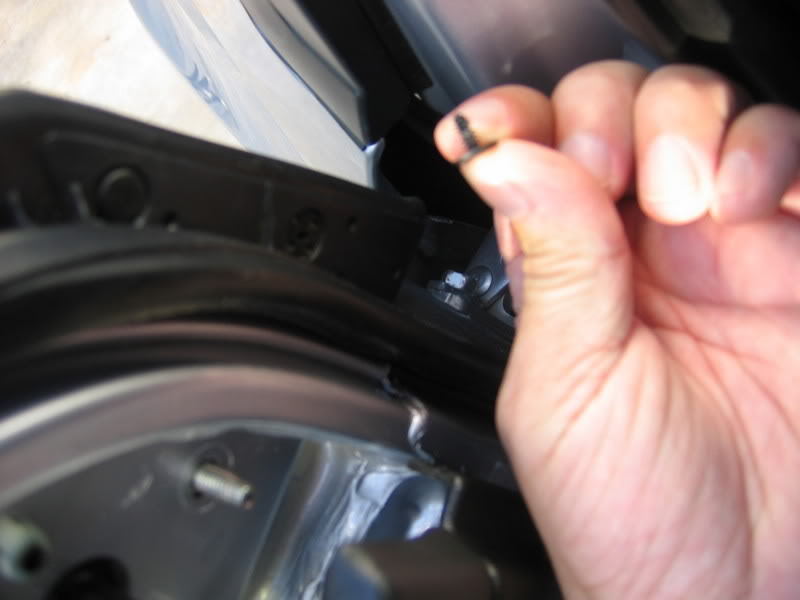
5. On the forwardmost part of the mirror base, there are two small push-fasteners that hold the weather sealant to the mirror base. A striaght pull will remove these and seperate the mirror from the weatherstripping.
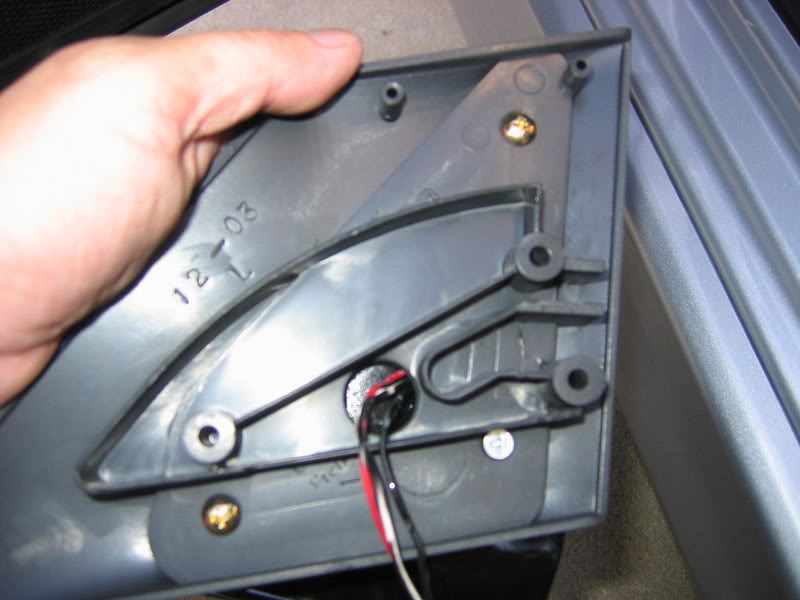
6. Now you can remove the stock mirror from your car!

INSTALLATION OF REXPEED GANADOR MIRROR:
1. Locate the driver's side Rexpeed Ganador mirror and the matching mirror base and mate them up against one another. Align the 3 holes and fasten the base to the mirror with the screws. Note how I used a different screw on the bottom right hole. The screws provided have a wider lip and the molding at that spot is too close to the hole for the standard screw to go all the way in. That's what the 1/2" long beveled head screw is for.
2. Feed the wires from the Rexpeed Ganador mirror through the hole in the door and align the holes, make sure that the wiring is pulled all the way through, then start installing the screws that hold the mirror in place, but don't tighten them down all the way (step 3 explains this). I didn't remove the door panel during this change-out, so the bottom screw was tricky (tight space). I opted to use another 1/2" screw (the silver colored screw on the bottom left in pic below), and I used a small pocket screwdriver that I had bent at a 90 degree angle in order to screw it in from the top. Once the screws are in place (but not tightened down all the way), go to Step 3.
3. You'll need to tighten the 3 screws just enough so that the mirror stays in place without you supporting it, but so that it can still be moved by hand. When you get the screws like this, gently close the door and make sure that your mirror is properly aligned to the other exterior parts around it:
When you get it properly aligned, tighten the screws down. Bear in mind if you're not using some of the screws that Rexpeed provides you with, they can be easier to strip out than the factory screws, depending on length & coarseness of thread.
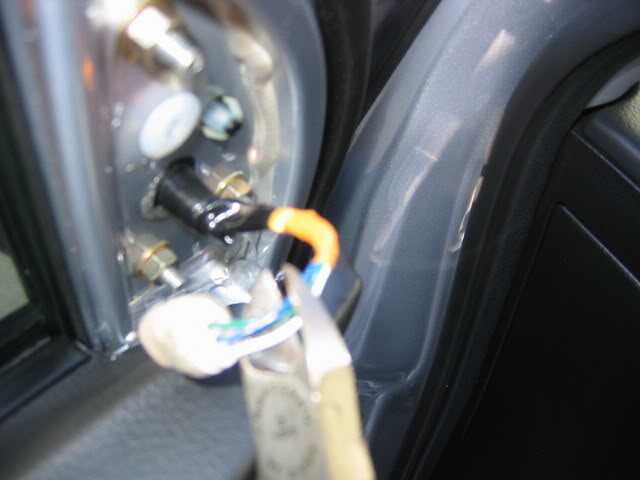
4. Remove the heat shrink tubing from the wire set and cut it down to 2-3" (or however long you want it). I didn't even end up shrinking the tubing, but used it only to keep the wires from getting too messy. Cut your wires down to a more practical length, then strip them & prep them for connection to the ones off of the factory mirror harness:
5. Connect the wires as follows (thanks to PTevo for originally posting this configuration in March of '07):
driver side: red-blue, black-green, white-white
pass. side: white-white, red-blue, black-yellow
After connecting the three wires, put your key in and power up the electrical in the car and make sure that the mirror is responding to the mirror remote accordingly. If it is, then proceed to step 6.
6. Tuck the completed wiring down into the door cavity and replace the housing.
Now replace the access panel:

7. Enjoy your new Rexpeed Ganador mirrors!!!
If you plan on doing this swap, I'd recommend printing this out & reading through it before actually tackling the job. It's a fairly easy swap, but it's better to have a grip on what you might encounter to lessen any possible trips to the hardware/auto store...
What you'll need:
- 10mm wrench (box end or short socket on 1/4" drive)
- very small, thin disposable philips screwdriver (will need to bend it 90 degrees unless you want to remove door panel)
- medium sized phillips head screwdriver
- wirestripping tool and/or dykes
- 4 screws that are 1/2" long, but have a narrower, beveled head than those provided with mirrors
- thin wire connectors (unless you plan on soldering or twisting the wires)
STOCK MIRROR REMOVAL:
1. Open your driver side door and locate the mirror access panel seen below. Use your small, thin screwdriver to carefully pry it away from underneath by the bottom corner as shown. If you try to pry it out anywhere else, you risk discoloration of the plastic (fatigue) or tearing/indentation of the door panel material, which doesn't do well when pressured.
2. Now you can see the screw that holds the larger housing to the inside of the door. Remove this screw and pull the housing away from the door.
3. Now use the dykes or wirecutters to cut the power wires to the mirror. You'll want to cut them closer to the mirror side, but leaving enough wire to work with if using crimped connectors.
4. Now start removing the three 10mm nuts that hold the mirror on. Once you break them loose, they can easily be removed by hand. But don't actually remove the mirror until you've gone through step 5.
A shorty 10mm socket should fit just inside the door so you can break the lower one loose (but a 10mm wrench will work just as well):
5. On the forwardmost part of the mirror base, there are two small push-fasteners that hold the weather sealant to the mirror base. A striaght pull will remove these and seperate the mirror from the weatherstripping.
6. Now you can remove the stock mirror from your car!
INSTALLATION OF REXPEED GANADOR MIRROR:
1. Locate the driver's side Rexpeed Ganador mirror and the matching mirror base and mate them up against one another. Align the 3 holes and fasten the base to the mirror with the screws. Note how I used a different screw on the bottom right hole. The screws provided have a wider lip and the molding at that spot is too close to the hole for the standard screw to go all the way in. That's what the 1/2" long beveled head screw is for.
2. Feed the wires from the Rexpeed Ganador mirror through the hole in the door and align the holes, make sure that the wiring is pulled all the way through, then start installing the screws that hold the mirror in place, but don't tighten them down all the way (step 3 explains this). I didn't remove the door panel during this change-out, so the bottom screw was tricky (tight space). I opted to use another 1/2" screw (the silver colored screw on the bottom left in pic below), and I used a small pocket screwdriver that I had bent at a 90 degree angle in order to screw it in from the top. Once the screws are in place (but not tightened down all the way), go to Step 3.
3. You'll need to tighten the 3 screws just enough so that the mirror stays in place without you supporting it, but so that it can still be moved by hand. When you get the screws like this, gently close the door and make sure that your mirror is properly aligned to the other exterior parts around it:
When you get it properly aligned, tighten the screws down. Bear in mind if you're not using some of the screws that Rexpeed provides you with, they can be easier to strip out than the factory screws, depending on length & coarseness of thread.
4. Remove the heat shrink tubing from the wire set and cut it down to 2-3" (or however long you want it). I didn't even end up shrinking the tubing, but used it only to keep the wires from getting too messy. Cut your wires down to a more practical length, then strip them & prep them for connection to the ones off of the factory mirror harness:
5. Connect the wires as follows (thanks to PTevo for originally posting this configuration in March of '07):
driver side: red-blue, black-green, white-white
pass. side: white-white, red-blue, black-yellow
After connecting the three wires, put your key in and power up the electrical in the car and make sure that the mirror is responding to the mirror remote accordingly. If it is, then proceed to step 6.
6. Tuck the completed wiring down into the door cavity and replace the housing.
Now replace the access panel:
7. Enjoy your new Rexpeed Ganador mirrors!!!


Trending Topics


Thread Starter
Evolving Member
iTrader: (1)
Joined: Dec 2006
Posts: 201
Likes: 3
From: Location, Location!

Newbie
Joined: Feb 2009
Posts: 74
Likes: 0
From: Australia
Sorry to bump such an old topic...
But anyone with issues with their rexpeed ganador mirrors?
I just installed one that I had sitting in my cupboard for a while and the left hand mirror doesn't show any portion of the car at all even at full tilt right?!?!
Like if I sit in my seat, adjust the mirror to the full angle right, I hafta put my head all the way past the center console before being able to see the rear door handle....
The mirror is sitting flush to the car, so fitment is right, just that the mirror won't move any closer...
My friend has had one for a while, and it's not like that, but his one, the clear coat has bubbled like crazy and looks like **** :S
Thread Starter
Evolving Member
iTrader: (1)
Joined: Dec 2006
Posts: 201
Likes: 3
From: Location, Location!
Sorry to bump such an old topic...
But anyone with issues with their rexpeed ganador mirrors?
I just installed one that I had sitting in my cupboard for a while and the left hand mirror doesn't show any portion of the car at all even at full tilt right?!?
...My friend has had one for a while, and it's not like that, but his one, the clear coat has bubbled like crazy and looks like **** :S
I bought mine in '07 and they still look brand new. The clear coat on your buddy's mirrors might have had a bubble or fish eye (or maybe it got nicked/chipped at some point).

Newbie
Joined: Feb 2009
Posts: 74
Likes: 0
From: Australia
Thanks for the reply man.
I took the mirror off and undid everything to add washers in so it tilted the mirror ever so slightly inwards....
The other problem was that the mirror is hitting the inside edge of the housing, so I retook everything off, drilled the holes slightly to the side a bit, then remounted it so the 'plate' at the back shifted further outwards and then remounted it.
It's better now, but the outside edge of the mirror now sticks outside the housing and there's like a 5mm gap behind the mirror and the housing so you can see straight into it!! And even now it's at full tilt inwards, but still can't see any portion of the car
So lets say even if I can full tilt the mirror inwards more, the mirror will stick out even more on the outside edge!!!
It seriously seems like the angle of the housing hasn't been done right and even if I can get the mirror to work, it'll stick out at least a 1cm+!!!
As for my friend's one, he got it in 2008.
Maybe the sun here is stronger and causing it bubble up.... :S

Edi-no-son, sounds like you may have a LHD mirror set up on a RHD car or vice versa. I got a set of Ganador mirrors for my LHD Supra from Japan and had the same problem. I assumed they were the same.