
Removing the rear differential (diff)


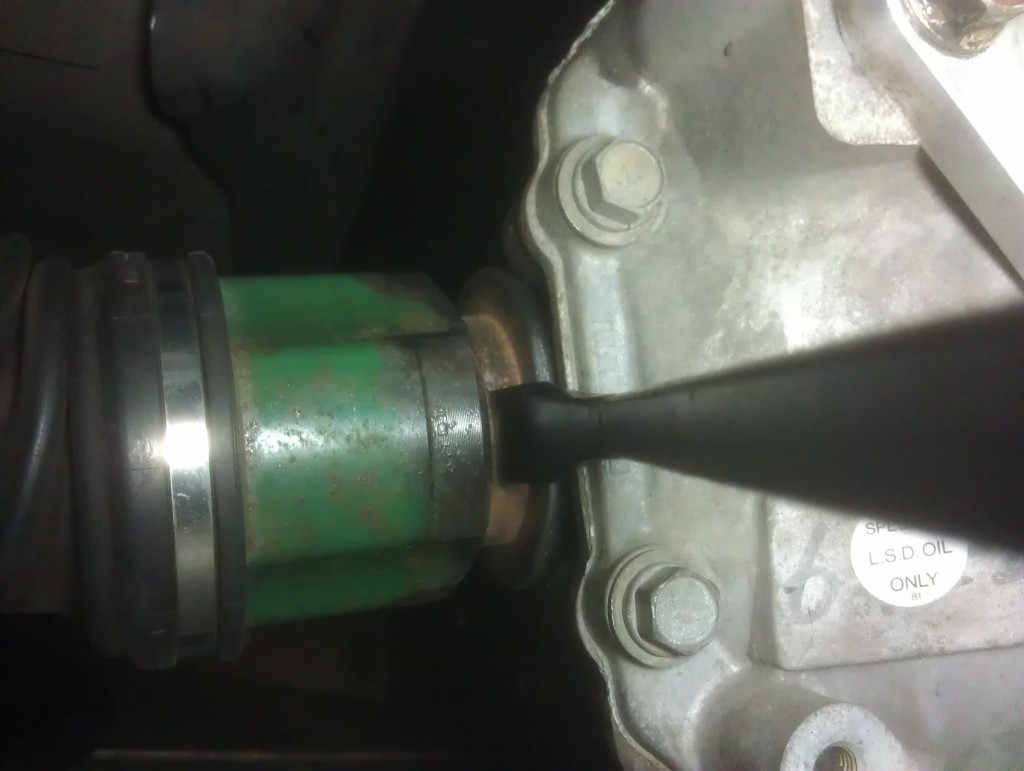
There's a bump on the back side of the diff case/rear cover, where one of the bolts for the back cover goes in. You can use that as a fulcrum for your pry par. Rotate the axle so that you've got the most amount of area to sit the end of the pry par under:
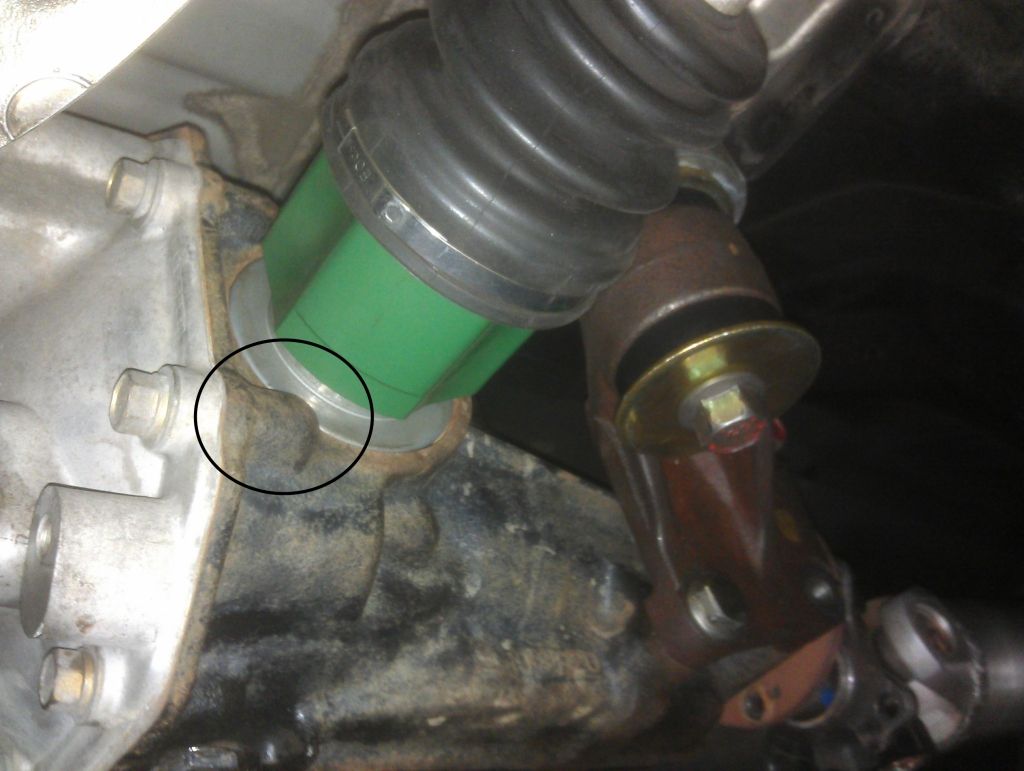
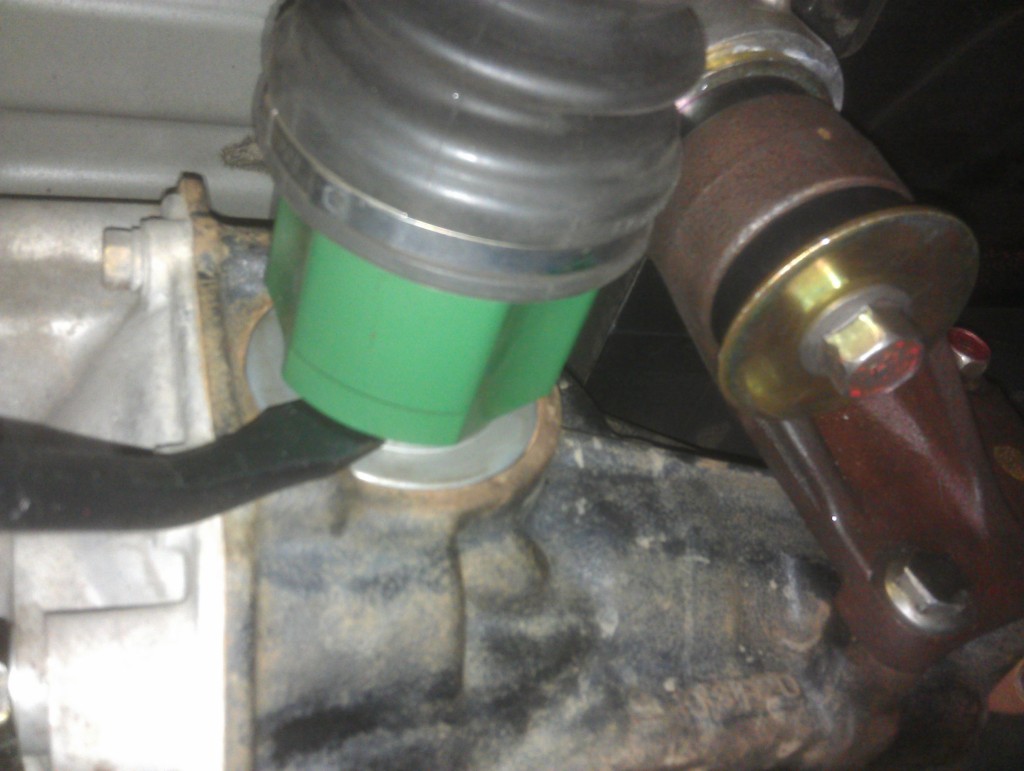
You can also use the entire flat vertical edge of the rear diff (this is on the passenger side, with the axle already popped out 3/8" or so):
Keep in mind that it may be easier to pop the axles out slightly just to get it past the snap ring groove while it's still up/mounted to the car. Once the diff is fully disconnected (both 19mm head bolts that attach the diff's mounting ears to the car, and the three 17mm head bolts on the back of the diff) it's difficult to use the prybars to pop the axles out because the diff will flop around and move as you try to get leverage.
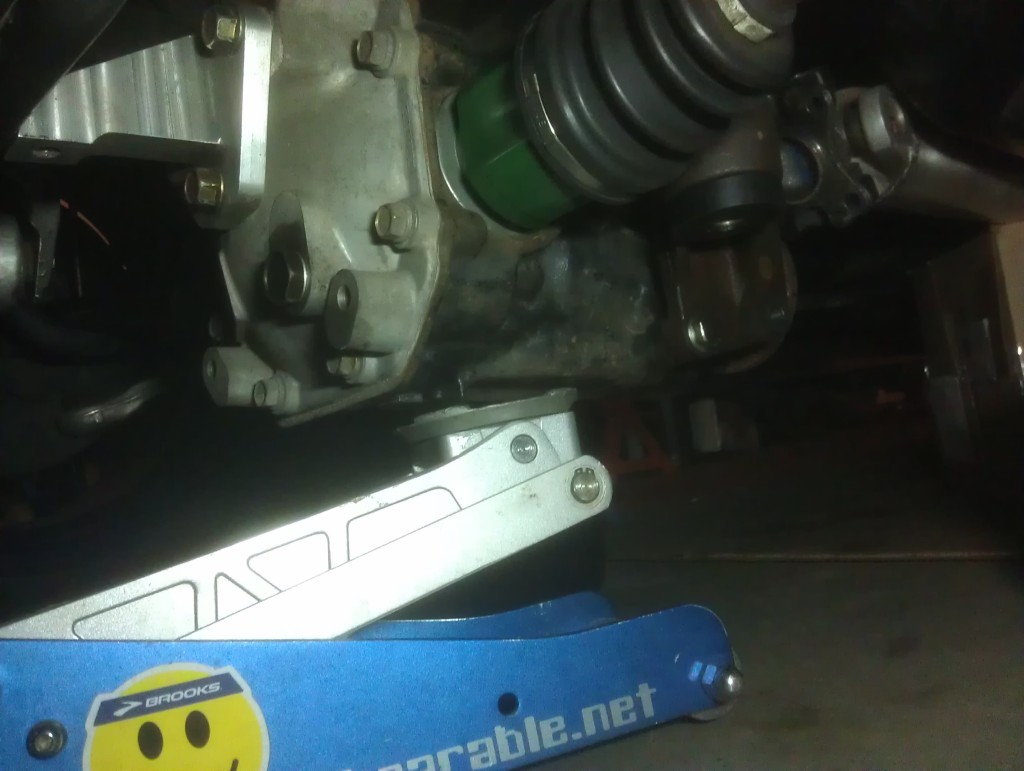
A pic of how I use a HF jack to lower the diff and control its height during the process:
You can also use the entire flat vertical edge of the rear diff (this is on the passenger side, with the axle already popped out 3/8" or so):
Keep in mind that it may be easier to pop the axles out slightly just to get it past the snap ring groove while it's still up/mounted to the car. Once the diff is fully disconnected (both 19mm head bolts that attach the diff's mounting ears to the car, and the three 17mm head bolts on the back of the diff) it's difficult to use the prybars to pop the axles out because the diff will flop around and move as you try to get leverage.
A pic of how I use a HF jack to lower the diff and control its height during the process:
thanks man that is exactly what I was looking for, I tried and Idk about this "gently" business. Mine seem to be a little stubborn.
Last edited by black_beauty; Apr 23, 2012 at 11:59 AM.
Maybe "gently" wasn't the right word. You do have to use some force to generate enough leverage with the prybar (depending on how long the prybar is of course). But it very easy to do with the right tool/technique.


Awesome thread, doing this tomorrow.
Here are the torque specs for future reference:
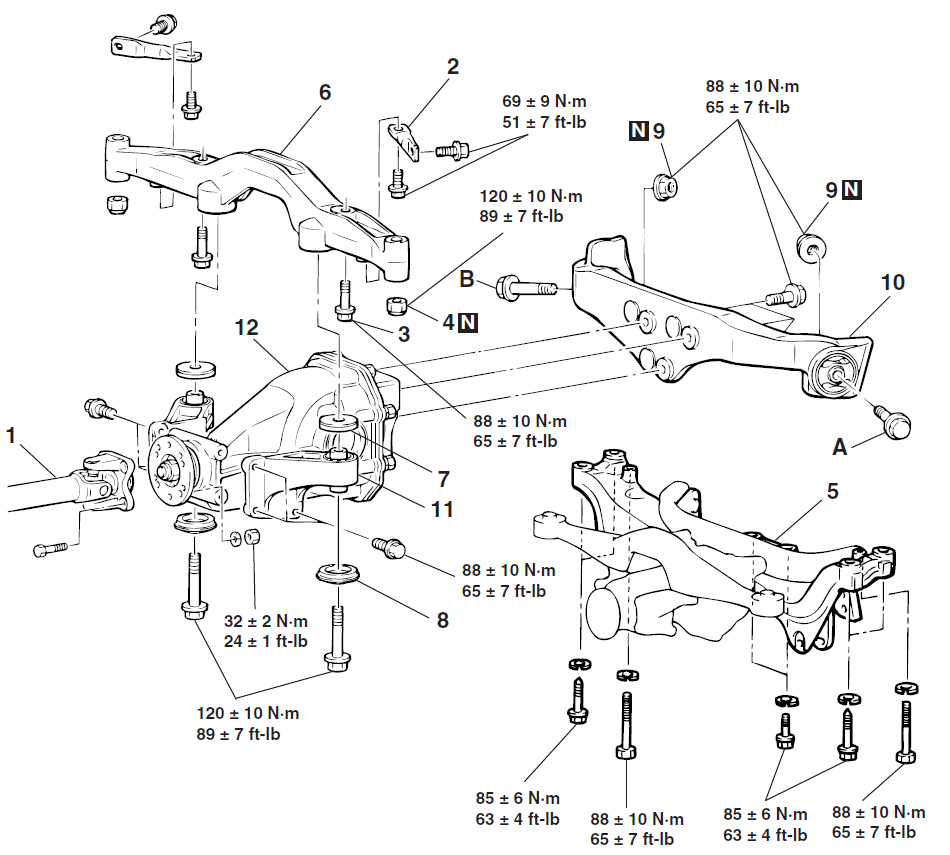
DIFFERENTIAL CARRIER ASSEMBLY
Propeller shaft and differential companion flange connecting nut - 32 � 2 N�m (24 �1 ft-lb)
Differential mount bracket bolt - 88 � 10 N�m (65 � 7 ft-lb)
Differential mount bracket to differential support member connecting bolt - 120 � 10 N�m (89 � 6 ft-lb)
Differential support member mounting bolt - 88 � 10 N�m (65 � 7 ft-lb)
Differential support arm to differential carrier mounting bolt - 73 � 12 N�m (54 � 9 ft-lb)
Differential support arm mounting nut - 73 � 12 N�m (54 � 9 ft-lb)
Rear crossmember mounting bolt - 88 � 10 N�m (65 � 7 ft-lb)
Toe control bar mounting bolt - 69 � 9 N�m (51 � 7 ft-lb)
Differential cover bolt - 36 � 5 N�m (26 � 4 ft-lb)
Drain plug - 64 � 4 N�m (47 � 3 ft-lb)
Filler plug - 49 � 9 N�m (37 � 6 ft-lb)
Drive gear and limited slip differential case mounting bolt - 84 � 4 N�m (62 � 3 ft-lb)
Companion flange self-locking nut - 186 � 29 N�m (137 � 21 ft-lb)
Bearing cap bolt - 37 � 2 N�m (27 � 1 ft-lb)
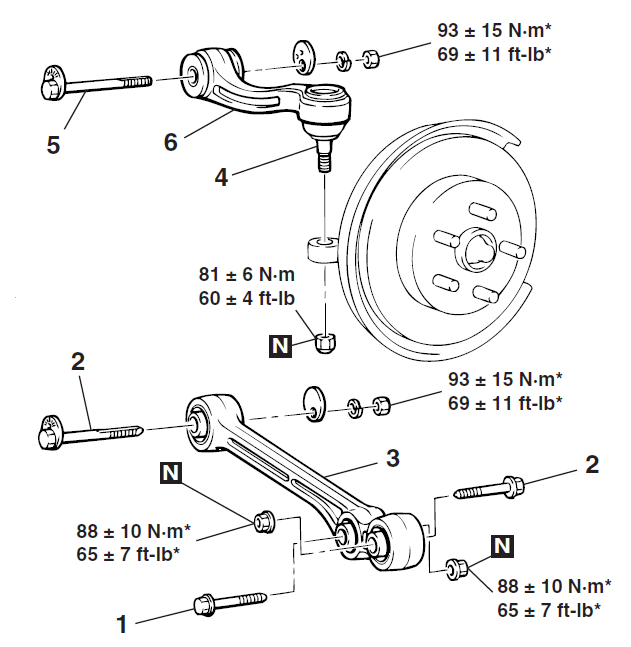
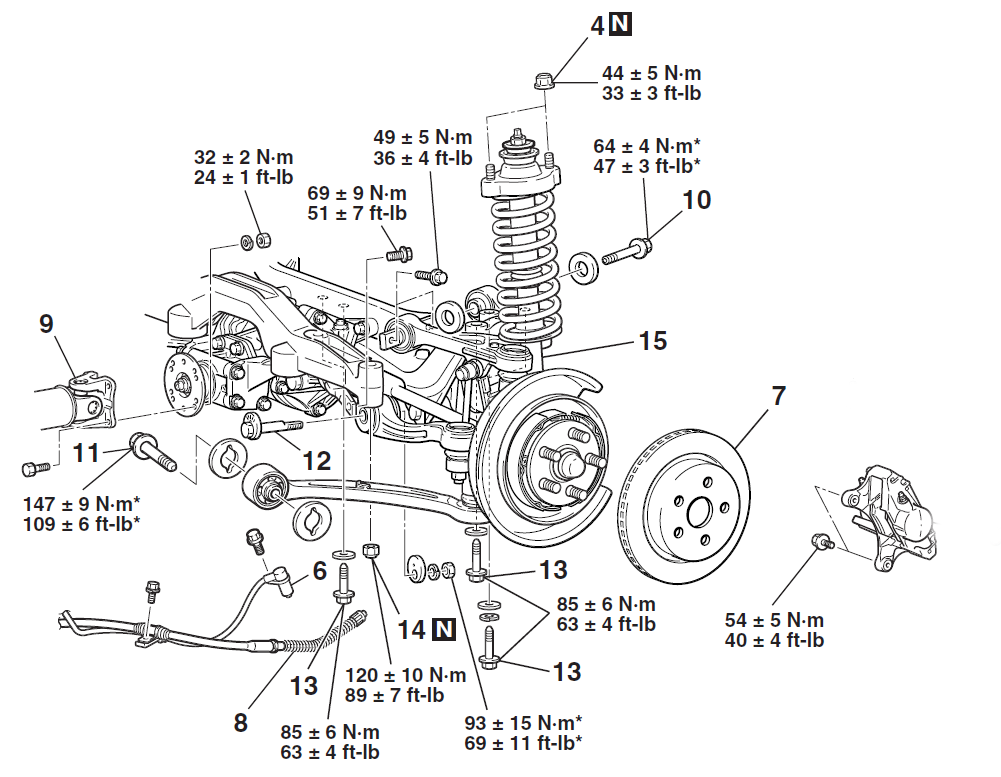
REAR SUSPENSION ASSEMBLY
*:To prevent bushings from breakage, the parts indicated by * should be temporarily tightened, and then fully tightened with the vehicle on the ground in the unladen condition.
TRAILING ARM MOUNTING BOLT - 147 � 9 N�m* (109 � 6 ft-lb)*
LOWER ARM CONNECTION - 88 � 10 N�m* (65 � 7 ft-lb)*
LOWER ARM ASSEMBLY MOUNTING BOLT (Camber Adjustment) - 93 � 15 N�m* (69 � 11 ft-lb)*
LOWER ARM ASSEMBLY TO SHOCK ABSORBER CONNECTING BOLT - 88 � 10 N�m* (65 � 7 ft-lb)*

Here are the torque specs for future reference:
DIFFERENTIAL CARRIER ASSEMBLY
Propeller shaft and differential companion flange connecting nut - 32 � 2 N�m (24 �1 ft-lb)
Differential mount bracket bolt - 88 � 10 N�m (65 � 7 ft-lb)
Differential mount bracket to differential support member connecting bolt - 120 � 10 N�m (89 � 6 ft-lb)
Differential support member mounting bolt - 88 � 10 N�m (65 � 7 ft-lb)
Differential support arm to differential carrier mounting bolt - 73 � 12 N�m (54 � 9 ft-lb)
Differential support arm mounting nut - 73 � 12 N�m (54 � 9 ft-lb)
Rear crossmember mounting bolt - 88 � 10 N�m (65 � 7 ft-lb)
Toe control bar mounting bolt - 69 � 9 N�m (51 � 7 ft-lb)
Differential cover bolt - 36 � 5 N�m (26 � 4 ft-lb)
Drain plug - 64 � 4 N�m (47 � 3 ft-lb)
Filler plug - 49 � 9 N�m (37 � 6 ft-lb)
Drive gear and limited slip differential case mounting bolt - 84 � 4 N�m (62 � 3 ft-lb)
Companion flange self-locking nut - 186 � 29 N�m (137 � 21 ft-lb)
Bearing cap bolt - 37 � 2 N�m (27 � 1 ft-lb)
REAR SUSPENSION ASSEMBLY
*:To prevent bushings from breakage, the parts indicated by * should be temporarily tightened, and then fully tightened with the vehicle on the ground in the unladen condition.
TRAILING ARM MOUNTING BOLT - 147 � 9 N�m* (109 � 6 ft-lb)*
LOWER ARM CONNECTION - 88 � 10 N�m* (65 � 7 ft-lb)*
LOWER ARM ASSEMBLY MOUNTING BOLT (Camber Adjustment) - 93 � 15 N�m* (69 � 11 ft-lb)*
LOWER ARM ASSEMBLY TO SHOCK ABSORBER CONNECTING BOLT - 88 � 10 N�m* (65 � 7 ft-lb)*
Last edited by golgo13; Aug 25, 2012 at 06:34 PM.
Which bushings do people refer to when they talk about replacing rear diff bushings? A, B, C? All?


I'd like to be the 3rd person to say that dropping the diff was quite simple and didnt require nearly as many things to be removed in order to get it out.
1) Jack up the car and set it on jack stands
2) Drain the fluid
3) Remove the axle back portion of your exhaust
4) Unbolt sway bar end links
5) Pop axles loose. You will not have enough room just yet to get them out but definatly pop them loose now
6) Unblolt driveshaft
7) Unbolt 3 17mm bolts holding diff to mustache bar
8) Unbolt 2 diff side mounts making sure to have a jack positioned under there to balance the weight of the diff.
9) Slowly lower it down, pull out one axle and then pull out the other one and viola it is out.
Hmmm, I wonder if I could have gotten away without removing my exhaust (RMR in my case). Im not sure if it gave me easier access to my passenger side endlink. Without looking under my car I am not sure. Oh well, I was just glad that I didnt have to pop off control arms and all that other crap.

Evolved Member
Joined: May 2011
Posts: 964
Likes: 0
From: New Zealand
I'd like to be the 3rd person to say that dropping the diff was quite simple and didnt require nearly as many things to be removed in order to get it out.
1) Jack up the car and set it on jack stands
2) Drain the fluid
3) Remove the axle back portion of your exhaust
4) Unbolt sway bar end links
5) Pop axles loose. You will not have enough room just yet to get them out but definatly pop them loose now
6) Unblolt driveshaft
7) Unbolt 3 17mm bolts holding diff to mustache bar
8) Unbolt 2 diff side mounts making sure to have a jack positioned under there to balance the weight of the diff.
9) Slowly lower it down, pull out one axle and then pull out the other one and viola it is out.
1) Jack up the car and set it on jack stands
2) Drain the fluid
3) Remove the axle back portion of your exhaust
4) Unbolt sway bar end links
5) Pop axles loose. You will not have enough room just yet to get them out but definatly pop them loose now
6) Unblolt driveshaft
7) Unbolt 3 17mm bolts holding diff to mustache bar
8) Unbolt 2 diff side mounts making sure to have a jack positioned under there to balance the weight of the diff.
9) Slowly lower it down, pull out one axle and then pull out the other one and viola it is out.
Evolved Member
Joined: May 2011
Posts: 964
Likes: 0
From: New Zealand
I just can't get the axles out, any tips/hints or something stupid I might be doing?
Edit: Should mention, it seems as if I can't get enough slide room to slide them out of the diff.
Last edited by AndyCT9W; May 5, 2013 at 10:02 PM.