
Quaife Front LSD Install

Quaife Front LSD Install
Quaife Front LSD Install:

Tools needed:
- slide hammer
- regular hammer
- breaker bar
- impact gun
- vise
- socket set
- 32mm socket
- torque wrench
- pliers
- pry bar
- flathead screwdriver
- o-ring pick
- lotsa rags
- red loctite
Parts removal:
1) Jack up car, place on jackstands
2) Remove front wheels
3) Remove lower tie bars
4) Remove downpipe (support cat-back somehow as the rest of the exhaust will hang off the o2 sensor wiring)
5) Drain x-fer case and tranny fluid
6) Using a set of pliers, straighten out cotter pin at the CV shaft nuts and remove them
7) Have someone step on the brakes while you crack loose the CV shaft nuts with a breaker bar and 32mm socket
8) Remove both driver and passenger side CV shafts. Using a pry bar, pop the axle cups out from the transfer case and tranny side (the passenger side axle cup requires you to use a hammer and pry bar to pop out)
9) Unbolt the lower strut bolts (note which direction the upper bolt is pointed, there is an arrow on it)
10) Unbolt the three nuts on the upper strut mount, remove strut
11) You can now turn the hub assembly to the side and remove the CV shafts (I would find a way to support the weight of the hub while it's unbolted from the strut so you don't put too much load on the steering rack tie rods)
12) Use the slide hammer and remove the inner shafts
13) Remove transfer case cover bolts
14) Use a screw driver and carefully pry transfer case cover off
- make sure all the bolts are out before prying the cover off, there are 7 of them
15) Remove front diff carrier assembly from transfer case
The Diff Swap:
1) Chuck the front diff carrier assembly onto a vise to crack the ring gear bolts loose (I was able to use one of the gear teeth as an �edge� to prevent it from turning on the vise)
2) Remove ring gear, clean all oil off ring gear bolts and bolt holes (I wiped mine down as much as possible, then blasted them w/ air)
2) Separate the two halves of the front diff carrier cover (I used a hammer and screw driver to chisel it open)
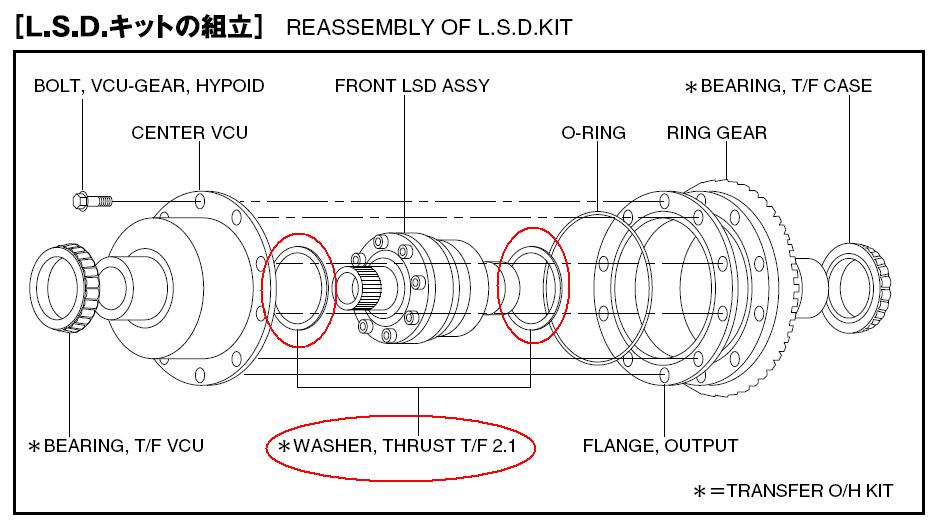
3) Remove stock front diff, swap over thrust washers to quaife, and reinstall quaife into the carrier housing
4) You can now change the carrier o-rings if you have them
5) Reassemble the two halves of the front diff carrier assembly
- Be sure to lube the o-ring and mating surfaces to avoid any possible o-ring rolling or pinching.
- The flange surfaces of the two halves should mate together w/ little effort. If there is a gap between the two flange surfaces, separate them and check to make sure the plastic thrust washers (circled in red above) are centered
6) Assemble ring gear to front diff carrier housing. Use red loctite on all bolts. Torque to 50-58 ft-lbs.
- I was unable to torque the ring gear bolts on my vise. It kept slipping off. I ended up just using an impact wrench on all the bolts in a cross pattern.

7) Change transfer case cover o-rings (the small o-ring and its� install location are circled in red above)
Parts Reassembly:
1) Lube inside surface of transfer case for cover o-rings
2) Reinstall front diff carrier assembly into transfer case
3) Reinstall transfer case cover
4) Assemble inner shafts to CV shafts (I could not get either side CV shaft to snap in place when installing the inner shafts in the car first)
5) Reinstall inner/CV shaft assemblies
6) Reinstall strut assemblies
7) Have someone step on the brakes while you torque the CV shaft nuts to spec (167 +/- 21 ft-lbs), reinstall cotter pin
8) Fill up tranny and transfer case fluids
9) Reinstall downpipe
10) Reinstall lower tie bars
11) Reinstall wheels
Check for leaks. Go for a test drive and feel the difference of having a front LSD!
Referenced from this document: http://www.seedwiki.com/page.cfm?doc...ile=cp_lsd.pdf
Relevant Fastener Torque Specs:
ring gear bolts - 54 +/- 4 ft-lbs
transfer case cover bolts - 17 +/- 2 ft-lbs
drain plug - 24 +/- 2 ft-lbs
filler plug - 24 +/- 2 ft-lbs
downpipe to o2 housing bolts - 37 +/- 4 ft-lbs
downpipe to cat bolts - 37 +/- 7 ft-lbs
lower tie bar bolts - 37 +/- 7 ft-lbs
upper strut mount bolts - 33 +/- 3 ft-lbs
strut to hub bolts - 123 +/- 7 ft-lbs
CV shaft nut - 167 +/- 21 ft-lbs
wheel lug nuts - 73 +/- 7 ft-lbs
Disclaimer:
Do this mod at your own risk. Understand the risks involved in this type of project before you proceed. I am in no way responsible for whatever damages may occur as a result of your work.
Tools needed:
- slide hammer
- regular hammer
- breaker bar
- impact gun
- vise
- socket set
- 32mm socket
- torque wrench
- pliers
- pry bar
- flathead screwdriver
- o-ring pick
- lotsa rags
- red loctite
Parts removal:
1) Jack up car, place on jackstands
2) Remove front wheels
3) Remove lower tie bars
4) Remove downpipe (support cat-back somehow as the rest of the exhaust will hang off the o2 sensor wiring)
5) Drain x-fer case and tranny fluid
6) Using a set of pliers, straighten out cotter pin at the CV shaft nuts and remove them
7) Have someone step on the brakes while you crack loose the CV shaft nuts with a breaker bar and 32mm socket
8) Remove both driver and passenger side CV shafts. Using a pry bar, pop the axle cups out from the transfer case and tranny side (the passenger side axle cup requires you to use a hammer and pry bar to pop out)
9) Unbolt the lower strut bolts (note which direction the upper bolt is pointed, there is an arrow on it)
10) Unbolt the three nuts on the upper strut mount, remove strut
11) You can now turn the hub assembly to the side and remove the CV shafts (I would find a way to support the weight of the hub while it's unbolted from the strut so you don't put too much load on the steering rack tie rods)
12) Use the slide hammer and remove the inner shafts
13) Remove transfer case cover bolts
14) Use a screw driver and carefully pry transfer case cover off
- make sure all the bolts are out before prying the cover off, there are 7 of them
15) Remove front diff carrier assembly from transfer case
The Diff Swap:
1) Chuck the front diff carrier assembly onto a vise to crack the ring gear bolts loose (I was able to use one of the gear teeth as an �edge� to prevent it from turning on the vise)
2) Remove ring gear, clean all oil off ring gear bolts and bolt holes (I wiped mine down as much as possible, then blasted them w/ air)
2) Separate the two halves of the front diff carrier cover (I used a hammer and screw driver to chisel it open)
3) Remove stock front diff, swap over thrust washers to quaife, and reinstall quaife into the carrier housing
4) You can now change the carrier o-rings if you have them
5) Reassemble the two halves of the front diff carrier assembly
- Be sure to lube the o-ring and mating surfaces to avoid any possible o-ring rolling or pinching.
- The flange surfaces of the two halves should mate together w/ little effort. If there is a gap between the two flange surfaces, separate them and check to make sure the plastic thrust washers (circled in red above) are centered
6) Assemble ring gear to front diff carrier housing. Use red loctite on all bolts. Torque to 50-58 ft-lbs.
- I was unable to torque the ring gear bolts on my vise. It kept slipping off. I ended up just using an impact wrench on all the bolts in a cross pattern.
7) Change transfer case cover o-rings (the small o-ring and its� install location are circled in red above)
Parts Reassembly:
1) Lube inside surface of transfer case for cover o-rings
2) Reinstall front diff carrier assembly into transfer case
3) Reinstall transfer case cover
4) Assemble inner shafts to CV shafts (I could not get either side CV shaft to snap in place when installing the inner shafts in the car first)
5) Reinstall inner/CV shaft assemblies
6) Reinstall strut assemblies
7) Have someone step on the brakes while you torque the CV shaft nuts to spec (167 +/- 21 ft-lbs), reinstall cotter pin
8) Fill up tranny and transfer case fluids
9) Reinstall downpipe
10) Reinstall lower tie bars
11) Reinstall wheels
Check for leaks. Go for a test drive and feel the difference of having a front LSD!
Referenced from this document: http://www.seedwiki.com/page.cfm?doc...ile=cp_lsd.pdf
Relevant Fastener Torque Specs:
ring gear bolts - 54 +/- 4 ft-lbs
transfer case cover bolts - 17 +/- 2 ft-lbs
drain plug - 24 +/- 2 ft-lbs
filler plug - 24 +/- 2 ft-lbs
downpipe to o2 housing bolts - 37 +/- 4 ft-lbs
downpipe to cat bolts - 37 +/- 7 ft-lbs
lower tie bar bolts - 37 +/- 7 ft-lbs
upper strut mount bolts - 33 +/- 3 ft-lbs
strut to hub bolts - 123 +/- 7 ft-lbs
CV shaft nut - 167 +/- 21 ft-lbs
wheel lug nuts - 73 +/- 7 ft-lbs
Disclaimer:
Do this mod at your own risk. Understand the risks involved in this type of project before you proceed. I am in no way responsible for whatever damages may occur as a result of your work.
Last edited by marksae; Apr 3, 2005 at 02:18 PM.
Install pics:
Axle cup popped out:

Inner shaft removed w/ slide hammer:

Transfer case cover removed:

Front diff carrier assembly:

Stock front diff inside carrier:

Inside of transfer case:

Transfer case cover:

Carrier disassembled:

Quaife installed inside carrier assembly:

O-ring pick:

CV Shaft with inner shaft installed:

Inner shaft removed w/ slide hammer:
Transfer case cover removed:
Front diff carrier assembly:
Stock front diff inside carrier:
Inside of transfer case:
Transfer case cover:
Carrier disassembled:
Quaife installed inside carrier assembly:
O-ring pick:
CV Shaft with inner shaft installed:


Originally Posted by DarkMastyr
noticeable difference while driving?

Trending Topics

Slide Hammer
I bought a dent puller from Kragen and modified it to work like the slide hammer in the shop manual. I just drilled the fitting out to 17/64" and ran a M8x1.25 tap through it. I then used an old exhaust manifold stud I had laying around from my old DSMs and it worked like a charm. Here are the pics:


Originally Posted by rlazer5000
Nice man, awesome install instructions......how much did did the LDS cost u and how much time did it take u to install? Thanks!
The total install time took me about 14 man-hours because I was figuring stuff out. I didn't have the right tools either, so I ended up buying an impact gun. If I were to do the install again, it would probably take me 8-10 hours taking my time and working by myself.
Originally Posted by marksae
I bought a dent puller from Kragen and modified it to work like the slide hammer in the shop manual. I just drilled the fitting out to 17/64" and ran a M8x1.25 tap through it. I then used an old exhaust manifold stud I had laying around from my old DSMs and it worked like a charm. Here are the pics:
Thanks
Awesome, if only I were a rich man! I would have one of these, and some Gram Lights 57F's coupled to some TEIN RA's. Talk about a track monster!
Great write-up. This is kind of a major project for the everyday shade-tree mech, but I am sure that it can be done.
Great write-up. This is kind of a major project for the everyday shade-tree mech, but I am sure that it can be done.
Originally Posted by Evo8RA
One more point of clarification. It seems it was not necessary to unbolt the control arm ball joint from the hub. Is this correct?
Thanks
Thanks
Thanks for the great write up !
Did anyone happen to notice IF it was very hard to spin one front wheel after installing this unit ? I was tuning one front wheel with the car off the air and it had a lot of resisitance and did not feel "right" I did not have a quaife before so I dont know if this is normal or not ? Thanks
Did anyone happen to notice IF it was very hard to spin one front wheel after installing this unit ? I was tuning one front wheel with the car off the air and it had a lot of resisitance and did not feel "right" I did not have a quaife before so I dont know if this is normal or not ? Thanks
Last edited by DynoFlash; Apr 6, 2005 at 10:10 PM.