
Multi tool: tire press. equalizer / deflator / boost leak test assist, etc.


Thread Starter
Newbie
Joined: Apr 2009
Posts: 66
Likes: 0
From: Indiana
Multi tool: tire press. equalizer / deflator / boost leak test assist, etc.
I created a write up for this tool a long time ago for a jeep forum I'm also on. This will work very well for the EVO community also (Drag, SCCA, daily driven).
This is not only for tires but will assist in a boost leak test(read to bottom)
I hope this helps a few of you.
***Edit: Do this at your own risk. I am not responsible for any injuries or damage you may do*** Guess I should put this...lol
Inflating or deflating tires can be tricky when you're trying to get equal pressure in both front or back tires.
Even if you run different pressures in the front compared to the rear, you ideally want the 2 front tires being the exact same pressure and you want the rear two being the exact same pressure.
With the above in mind, here's a tool you can create that will solve those problems.
It works quickly and does two tires at a time. Boost leak portion at the end.
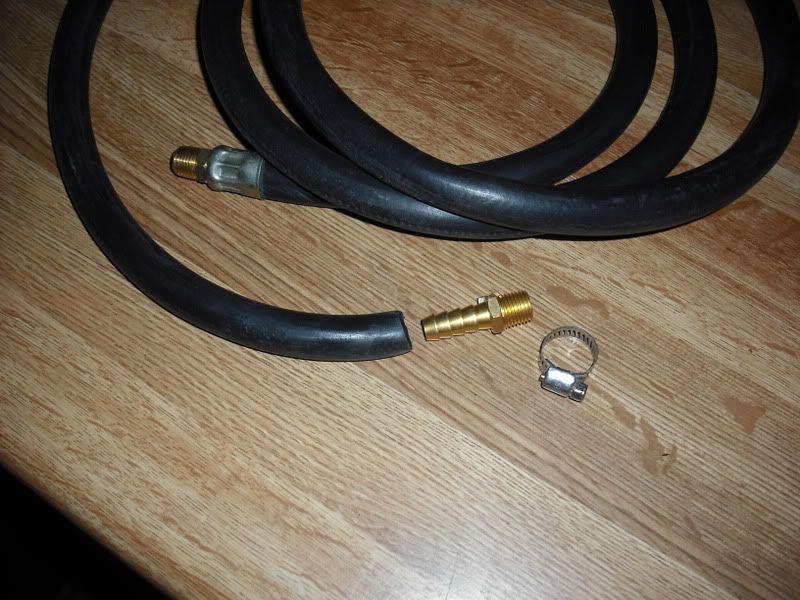
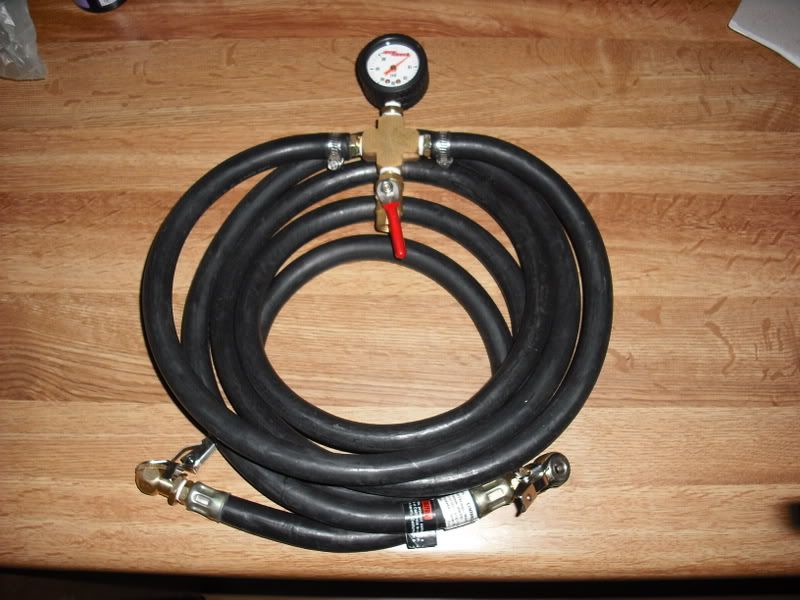
Parts needed:
1. A roll of pipe thread seal tape : $0.49 at Harbor Freight
2. 3/8" X 8' - 15' Air hose with 1/4" male ends (At least this length) : $3.99 at Harbor Freight
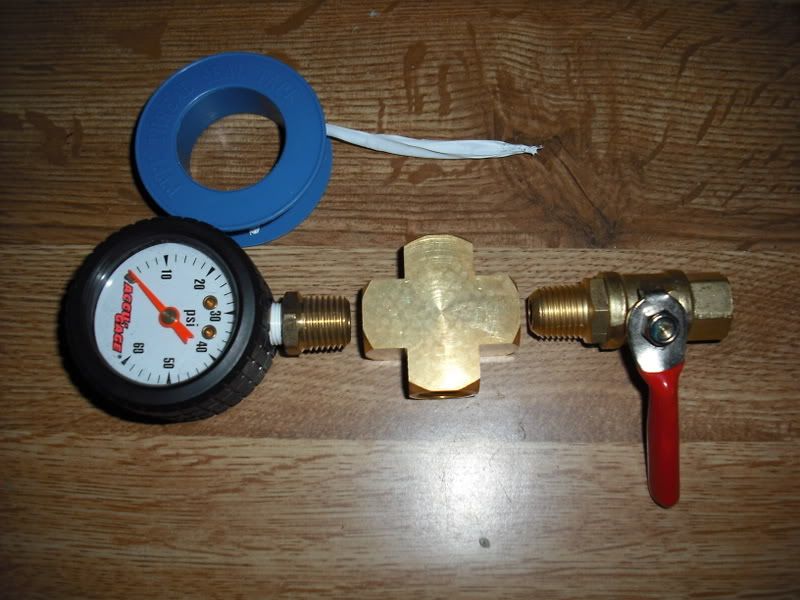
3. 1/4" NPT Coupler-cross. (A 4 way brass connector) : $$2.89 at Harbor Freight
4. 3/8" Barb fitting 1/4" male ends with clamp (2 of them) : $1.89 each at Harbor Freight
5. Tire chuck 1/4" female end with clip (2 of them) : $2.99 each at Harbor Freight
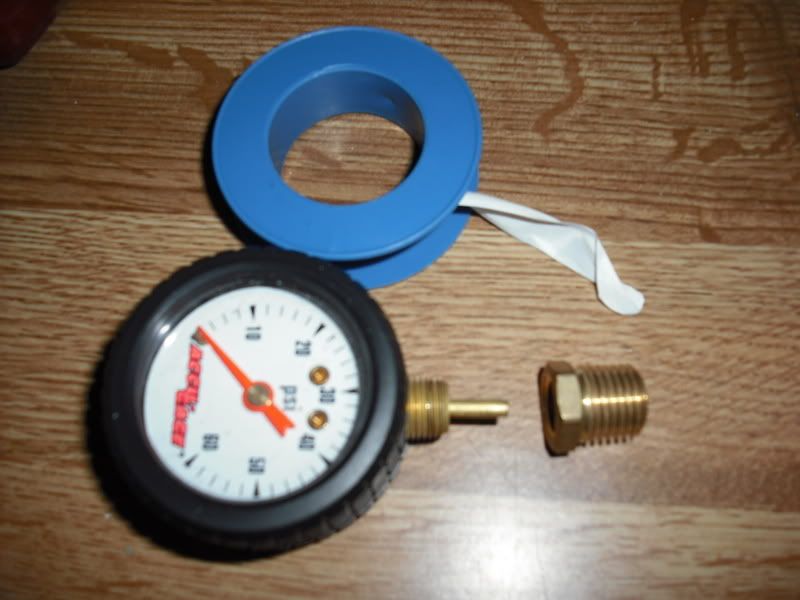
6. Tire guage : $? Had it already
7. 1/8" X 1/4" NPT brass connector : $1.88 at Auto Zone
8. 1/4" full port ball valve : $7.96 at Home Depot
Total: $26.70 not counting the cheap air guage
All the parts

Open the hose up and cut it where you would like the deflator/inflator device.
Once cut, insert the 3/8" hose barb and tighten down the clamp.
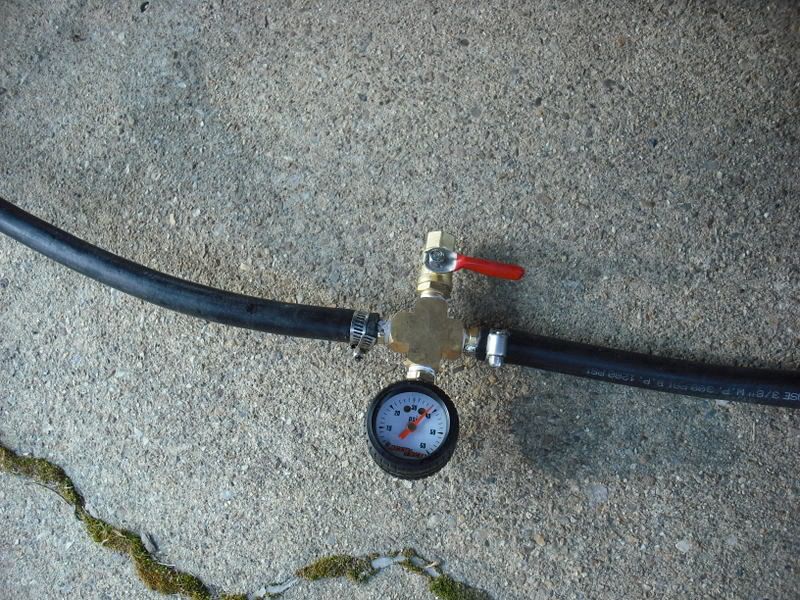
Now grab your air guage and see if the tip unscrews. Mine did and you can see from this pic it has a 1/8" threads under it. We need it to be 1/4" so take your 1/8" - 1/4" adapter and screw it onto the tire guage.
Remember to use thread tape on all threads.
Screw the guage and the full port ball valve into the 1/4" 4 way connector.
Remember to use the thread tape on all threads.
Screw the air hoses into each side of the 4 way connector.
Remember to use the thread tape on all threads.
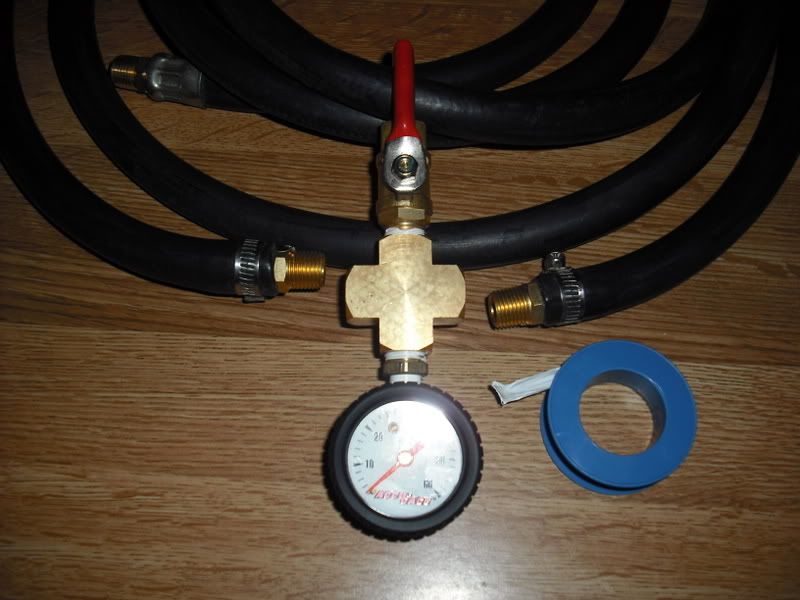
Screw the tire chucks on the other side of the hose.
The clips on the chucks actually hold the chucks in place for you.
Remember to use thread tape on all threads.
Now go hook it up to your two front tires.
Once both tires are hooked up, the two tires will equallize their pressures. You can see this in the guage. To drop the pressure, turn the red valve on the valve (seen in red on the device). Air will release. Close the valve and check the air pressure again. If you need to let more out, open the valve again. It's as easy as that
*****NOTE***** You can also add a male end to the valve so you can hook your compressor's hose directly to this to add equal pressure as well.
****Boost leak portion is next post!****f
This is not only for tires but will assist in a boost leak test(read to bottom)
I hope this helps a few of you.
***Edit: Do this at your own risk. I am not responsible for any injuries or damage you may do*** Guess I should put this...lol
Inflating or deflating tires can be tricky when you're trying to get equal pressure in both front or back tires.
Even if you run different pressures in the front compared to the rear, you ideally want the 2 front tires being the exact same pressure and you want the rear two being the exact same pressure.
With the above in mind, here's a tool you can create that will solve those problems.
It works quickly and does two tires at a time. Boost leak portion at the end.
Parts needed:
1. A roll of pipe thread seal tape : $0.49 at Harbor Freight
2. 3/8" X 8' - 15' Air hose with 1/4" male ends (At least this length) : $3.99 at Harbor Freight
3. 1/4" NPT Coupler-cross. (A 4 way brass connector) : $$2.89 at Harbor Freight
4. 3/8" Barb fitting 1/4" male ends with clamp (2 of them) : $1.89 each at Harbor Freight
5. Tire chuck 1/4" female end with clip (2 of them) : $2.99 each at Harbor Freight
6. Tire guage : $? Had it already
7. 1/8" X 1/4" NPT brass connector : $1.88 at Auto Zone
8. 1/4" full port ball valve : $7.96 at Home Depot
Total: $26.70 not counting the cheap air guage
All the parts
Open the hose up and cut it where you would like the deflator/inflator device.
Once cut, insert the 3/8" hose barb and tighten down the clamp.
Now grab your air guage and see if the tip unscrews. Mine did and you can see from this pic it has a 1/8" threads under it. We need it to be 1/4" so take your 1/8" - 1/4" adapter and screw it onto the tire guage.
Remember to use thread tape on all threads.
Screw the guage and the full port ball valve into the 1/4" 4 way connector.
Remember to use the thread tape on all threads.
Screw the air hoses into each side of the 4 way connector.
Remember to use the thread tape on all threads.
Screw the tire chucks on the other side of the hose.
The clips on the chucks actually hold the chucks in place for you.
Remember to use thread tape on all threads.
Now go hook it up to your two front tires.
Once both tires are hooked up, the two tires will equallize their pressures. You can see this in the guage. To drop the pressure, turn the red valve on the valve (seen in red on the device). Air will release. Close the valve and check the air pressure again. If you need to let more out, open the valve again. It's as easy as that
*****NOTE***** You can also add a male end to the valve so you can hook your compressor's hose directly to this to add equal pressure as well.
****Boost leak portion is next post!****f
Last edited by INEVOIX; May 29, 2009 at 03:49 PM.
Thread Starter
Newbie
Joined: Apr 2009
Posts: 66
Likes: 0
From: Indiana
You may be wondering how this will help with a boost leak test.
Well it's simple.
We all know it's a pain to hold the tire inflator portion to the nipple on the boost leak tester.
As mentioned above, add a male end the the valve part of the multi-tool. Now you can connect your compressor hose directly to the multi-tool.
Steps:
1. Turn your compressor down to the desired PSI....lets say 20 PSI
2. Turn the valve off on your multi-tool
3. Connect compressor hose to your new multi-tool (you can verify PSI on the guage you put on the multi-tool.
4. Place boost leak tester on vehicle
5. Connect the tire chuck to the nipple on the boost leak tester
6. Slowly turn the valve open and watch the guage.
7. With a spray bottel containing soapy water, spray all your hoses where leaks may be.
8. Once finished, detatch the compressor hose from your new multi-tool.
9. Leave the tool attached to the boost leak tester so it will bleed off the pressure.
10. Once pressure is gone, remove and put things back together.
This now allows you to let the compressor run while you track down all those pesky leaks. You will now also not have to have someone watch your boost guage in the car. It can all be done by yourself using the multi-tool, boost leak tester and a compressor.
In this pic, you will see the compressor hose(orange) connected to your new multi-tool. You will also see one leg of the tool connected to the boost leak tester.

I hope this helps someone.
If you really want to, you can build one that will equallize pressure in all 4 tires at once.
Good luck
Well it's simple.
We all know it's a pain to hold the tire inflator portion to the nipple on the boost leak tester.
As mentioned above, add a male end the the valve part of the multi-tool. Now you can connect your compressor hose directly to the multi-tool.
Steps:
1. Turn your compressor down to the desired PSI....lets say 20 PSI
2. Turn the valve off on your multi-tool
3. Connect compressor hose to your new multi-tool (you can verify PSI on the guage you put on the multi-tool.
4. Place boost leak tester on vehicle
5. Connect the tire chuck to the nipple on the boost leak tester
6. Slowly turn the valve open and watch the guage.
7. With a spray bottel containing soapy water, spray all your hoses where leaks may be.
8. Once finished, detatch the compressor hose from your new multi-tool.
9. Leave the tool attached to the boost leak tester so it will bleed off the pressure.
10. Once pressure is gone, remove and put things back together.
This now allows you to let the compressor run while you track down all those pesky leaks. You will now also not have to have someone watch your boost guage in the car. It can all be done by yourself using the multi-tool, boost leak tester and a compressor.
In this pic, you will see the compressor hose(orange) connected to your new multi-tool. You will also see one leg of the tool connected to the boost leak tester.
I hope this helps someone.
If you really want to, you can build one that will equallize pressure in all 4 tires at once.
Good luck
Last edited by INEVOIX; May 29, 2009 at 03:45 PM.


 .
.
Trending Topics

Thread
Thread Starter
Forum
Replies
Last Post
navypaul
Evo How To Requests / Questions / Tips
24
Sep 16, 2015 12:19 PM
StreetThisEvo
Evo Engine / Turbo / Drivetrain
22
Jul 23, 2012 03:48 AM
Ted B
Evo How Tos / Installations
3
Jan 12, 2011 12:44 AM
SS Performance
Evo 'For Sale' External Engine / Power
4
Jun 3, 2009 04:25 PM
tlcoll1
Evo Engine / Turbo / Drivetrain
3
Apr 23, 2009 05:19 PM