
HOW TO: Install of Nagisa Front Fender Brace

HOW TO: Install of Nagisa Front Fender Brace
Here is a breif install write up on the Nagisa Gacchiri Front Fender Braces for the EVO. I have Voltex front fenders and side skirts, so my pics and installation may vary slightly compared to if you have OEM fenders and side skirts. . .
Here is a link to the Nagisa Auto Gacchiri Front Fender Braces:
http://www.more-japan.com/nagisa-aut...on-8-9-mr.html
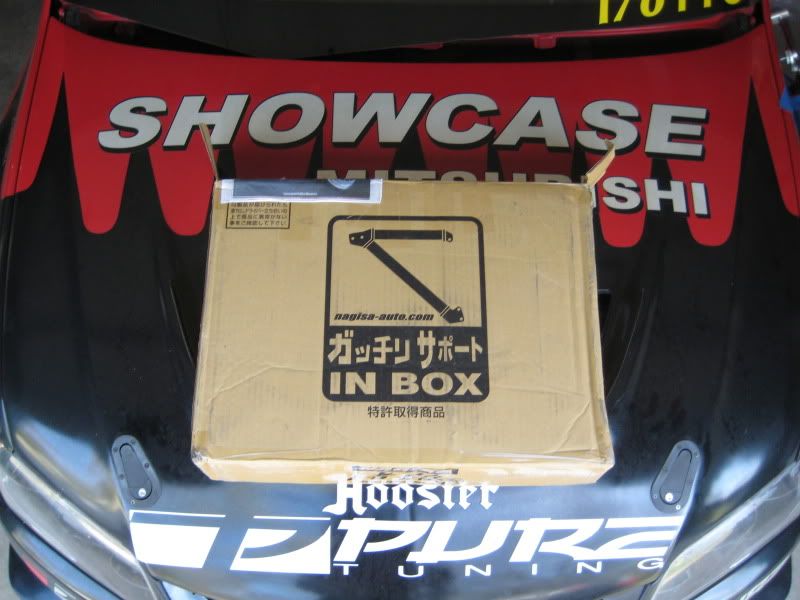
Pics of the braces as delivered and mocked up on the car. If you install them like this they will NOT help and they may fall off and kill innocent bystanders
On to the install. First you need to remove the front bumper, then the front fenders. Jack up the car, support it on jack stands, then remove the necessary bolts and screws. Front bumper removal is NOT shown here. NOTE - some pics are from the left side and some are from the right side.
In the engine bay there are 3 bolts and 1 screw.

Then remove the 1 bolt and 1 screw from the front area of the fender.

Then remove the 2 bolts from the lower area of the fender behind the side-skirt.

Then unclip the plug for the side-marker light and remove the 1 bolt that you will need to get to from inside the door jam area.

Now you should be able to remove the front fender. After the fender is removed you will need to remove the two bolts holding on the lower front door hinge, and one bolt from the upper hinge. It helps to have someone hold the door in place so it and the hinges don't shift. Install the fender brace and reinstall the bolts back into the hinges. This will hold the brace in place for the next steps.
Lower hinge:

Upper hinge:

For the upper middle mounting point you have a hex nut that has to be slid in behind this 1" hole. If you have freakishly large hands you may want to ask for assistance from a tiny girlyman


For the final mounting point at the very front you will need to . . . drill your poor Evo. Pick the largest bit you have that will still fit within the hole of the brace. There does not appear to be any wiring behind this area, so drill with confidence. After you have opened up the holes, you fish the nut-plate in from the 1" circular hole in front of the brace. The picture just shows the general orientation of the nut plate - it actually slides inside the hole.


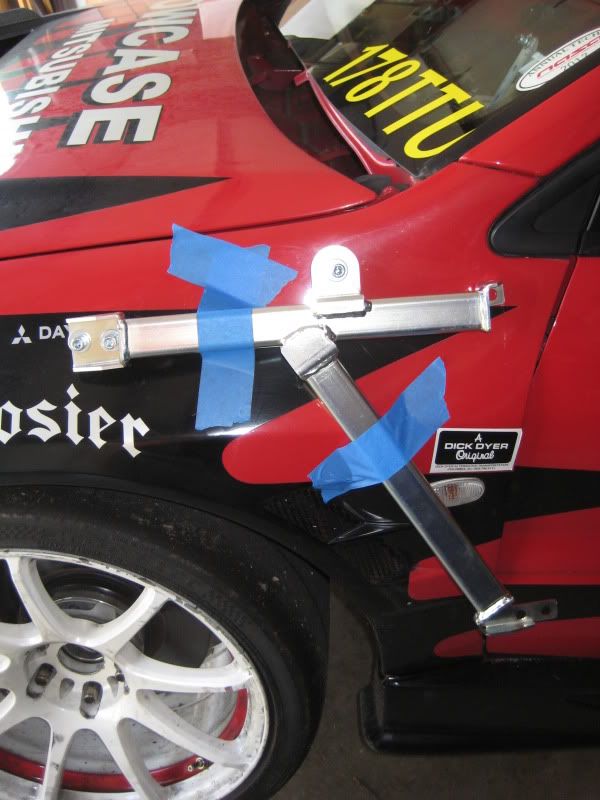
Final pic installed . . .

Fit and finish is top notch. Everything lines up as it should. I have several other Nagisa items on my car and everything from this company works and fits as advertised. Some folks say they don't feel a difference with these braces. Some folks say that these braces completely changed the handling of their car. I will give feedback after I run my next race. Please feel free to comment. Thanks, and enjoy!
EVOlutionary
Here is a link to the Nagisa Auto Gacchiri Front Fender Braces:
http://www.more-japan.com/nagisa-aut...on-8-9-mr.html
Pics of the braces as delivered and mocked up on the car. If you install them like this they will NOT help and they may fall off and kill innocent bystanders
On to the install. First you need to remove the front bumper, then the front fenders. Jack up the car, support it on jack stands, then remove the necessary bolts and screws. Front bumper removal is NOT shown here. NOTE - some pics are from the left side and some are from the right side.
In the engine bay there are 3 bolts and 1 screw.
Then remove the 1 bolt and 1 screw from the front area of the fender.
Then remove the 2 bolts from the lower area of the fender behind the side-skirt.
Then unclip the plug for the side-marker light and remove the 1 bolt that you will need to get to from inside the door jam area.
Now you should be able to remove the front fender. After the fender is removed you will need to remove the two bolts holding on the lower front door hinge, and one bolt from the upper hinge. It helps to have someone hold the door in place so it and the hinges don't shift. Install the fender brace and reinstall the bolts back into the hinges. This will hold the brace in place for the next steps.
Lower hinge:
Upper hinge:
For the upper middle mounting point you have a hex nut that has to be slid in behind this 1" hole. If you have freakishly large hands you may want to ask for assistance from a tiny girlyman
For the final mounting point at the very front you will need to . . . drill your poor Evo. Pick the largest bit you have that will still fit within the hole of the brace. There does not appear to be any wiring behind this area, so drill with confidence. After you have opened up the holes, you fish the nut-plate in from the 1" circular hole in front of the brace. The picture just shows the general orientation of the nut plate - it actually slides inside the hole.
Final pic installed . . .
Fit and finish is top notch. Everything lines up as it should. I have several other Nagisa items on my car and everything from this company works and fits as advertised. Some folks say they don't feel a difference with these braces. Some folks say that these braces completely changed the handling of their car. I will give feedback after I run my next race. Please feel free to comment. Thanks, and enjoy!
EVOlutionary
Last edited by EVOlutionary; Apr 28, 2012 at 10:00 PM.

nice write up! as these come from the factory on some cars, im sure there is some benefit in them. with all the cost cutting measures they go thru, i cant see them tossing on a part nobody sees for no good reason.


You can see in the pictures that Mitsu has a sheet metal version welded in place to connect the upper and rear-lower fender areas, but certainly does not do as much as the beefy aftermarket units. . .

Fit and finish is top notch. Everything lines up as it should. I have several other Nagisa items on my car and everything from this company works and fits as advertised. Some folks say they don't feel a difference with these braces. Some folks say that these braces completely changed the handling of their car. I will give feedback after I run my next race. Please feel free to comment. Thanks, and enjoy!
EVOlutionary
EVOlutionary

Trending Topics

The car handled the best it ever has after the install. Turn-in felt much more precise. The car got faster and faster all year, but I made some other changes too, so I can't say exactly how much was due to the Nagisa Fender Braces. I would consider them a wise investment for a race car.

http://www.more-japan.com/nagisa-aut...on-8-9-mr.html
And found this with a quick GOOGLE search.
http://www.motoiq.com/magazine_artic...ke-system.aspx
And found this with a quick GOOGLE search.
http://www.motoiq.com/magazine_artic...ke-system.aspx

Thread
Thread Starter
Forum
Replies
Last Post
EVOlutionary
For Sale - Wheels / Tires
19
Nov 12, 2012 08:49 PM