
HOW TO: Replace alternator from the top

Thread Starter
Newbie
Joined: Jul 2005
Posts: 98
Likes: 0
From: Knoxville TN
HOW TO: Replace alternator from the top
Please read all before doing this as you may want to reorder the way you do things.
Reason for replacement:
Battery light and brake light came on. Poor and choppy idle.
Tools:
Socket set 10-14mm
1/2 socket or breaker bar, an extension may be needed
smallish allen wrench
car jack
2 or 3 bungee cords
3 hands
zip ties
Process:
Disconnect the battery
Remove passenger side wheel
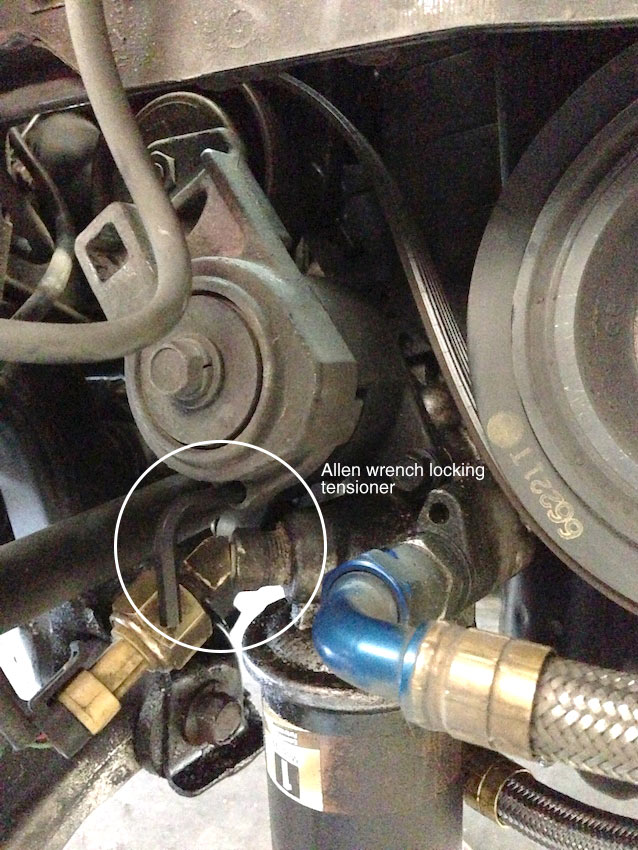
Locate the belt tensioner. At the top of the tensioner is a 1/2 socket slot.

I had to use an extension on the tensioner due to my massive oil cooler line . The factory lines may allow you to just use a breaker bar.
Notice the hole/slot on the bottom of the tensioner. You'll want to slide an allen wrench slightly into that hole. Twist the tensioner counter clockwise until you can slide the allen into the rear hole to lock the tensioner.
Slide the belt off the alt and move it forward (towards the front bumper) to get it out of the way.
Release the tensioner back as it blocks the large bottom alt bolt.
Remove fuel rail / move it to the side
http://www.evotuners.net/forums/f20/...injectors-427/
I completely removed mine but I don't think it was necessary as I believe you can just move it to the side. Basically need the FPR out of the way (maybe just take that off?)
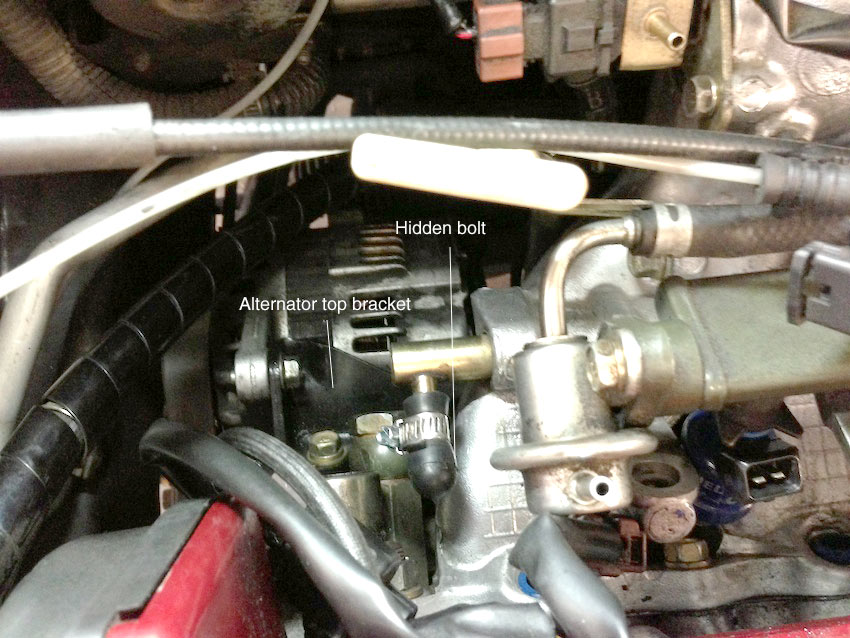
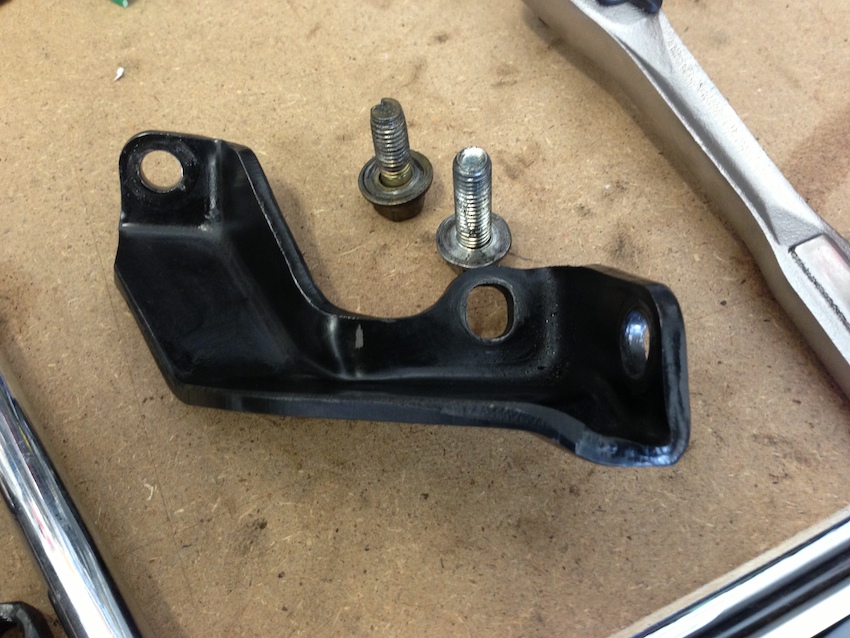
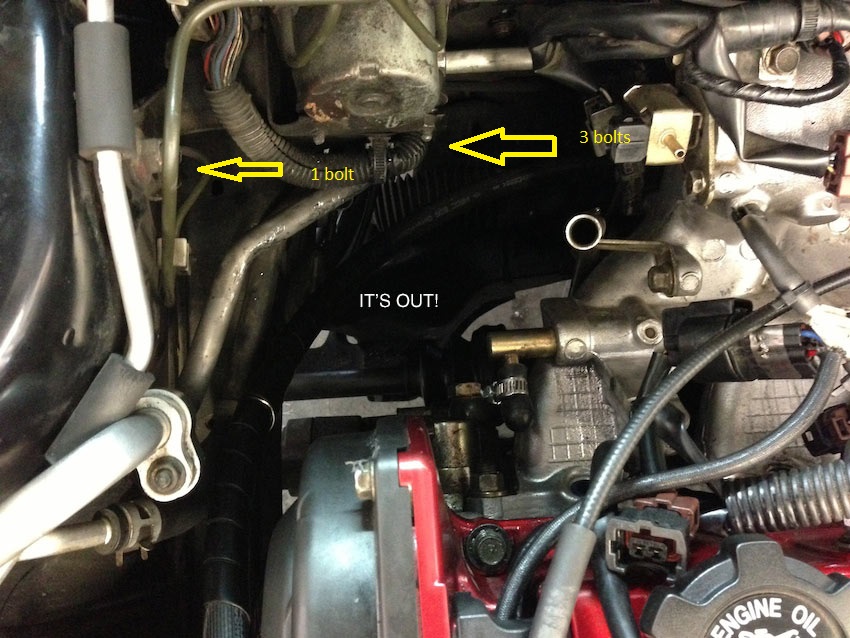
Remove the top alt bracket, one bolt into the alt itself and 2 into the block. One of the bolts is out of view under the manifold.\
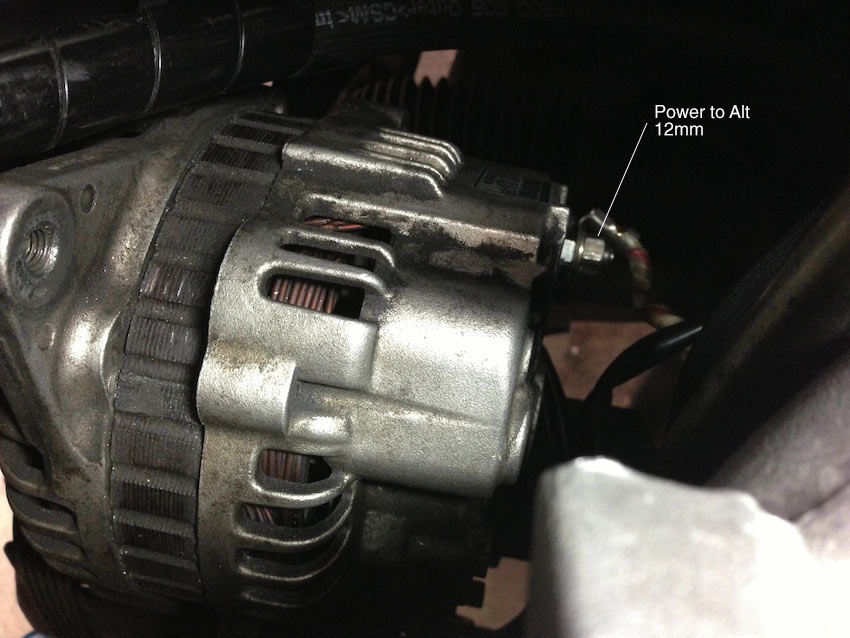
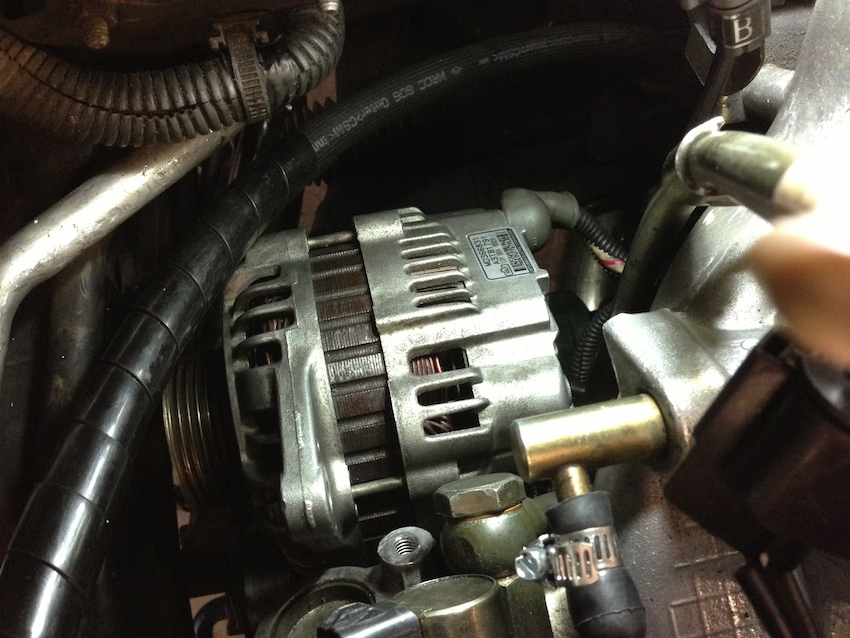
Remove power and cables from alt. The power gave me some troubles as it spun the wire and the bolt behind it. I had to break the black plastic piece to get a second wrench in there to loose them up. Normal this part should be easy. There is also a clipped in wire on the back side of the alt, pull that out too.
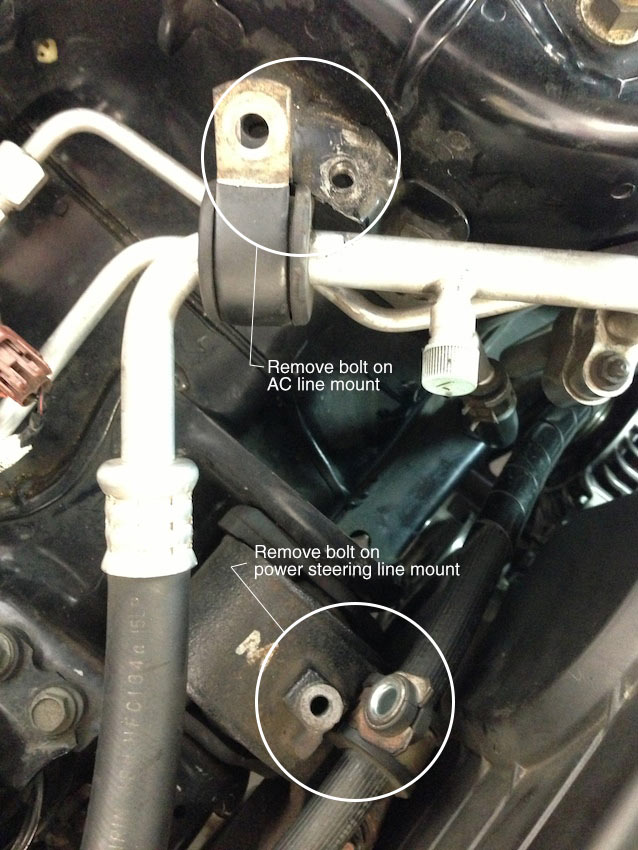
Now remove the bolts on the AC and power steering bracket as in the pic. You'll push and pull on those and need the slack
Next remove the large lower alt bolt. You should be able to move the alt forward to better access the nut on the driver side of the alt. Now push the large bolt out towards the passenger side. The tensioner will have to be back in normal operating position in order to pull the bolt out.
Once the alt is detached you can carefully set it down inside the rear of the engine bay.
Remove the dip stick
Now you're going to attach bungee cords to the hood and alt to better help you manipulate the alt. My cords only fit in the holes for the lower bolts. I used 3 cords, one the hood clasp and one in a hole on the passenger side of the hood and attached to one cord going to the atl.
Now for the fun part!
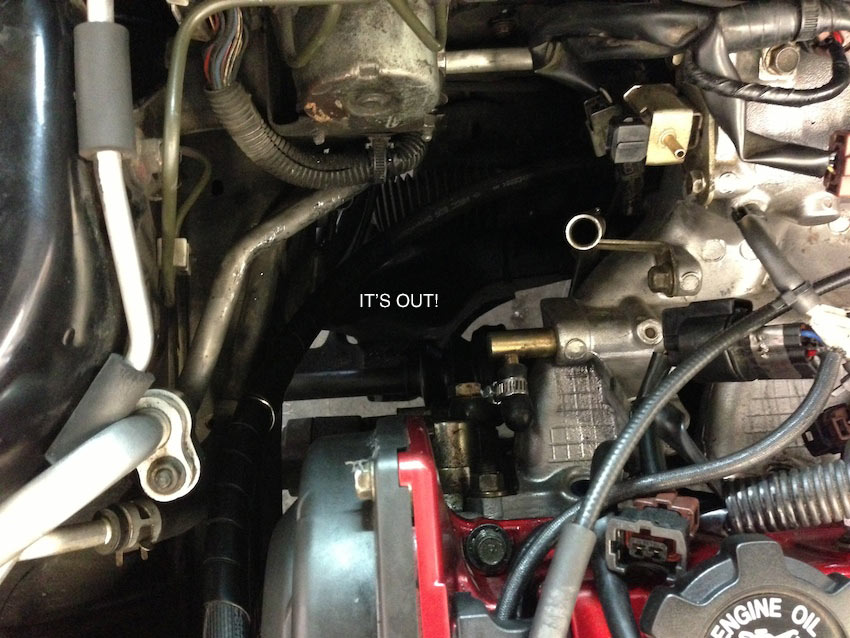
Start pulling, pushing, cursing, kicking, throwing, punching and pull that thing out.
You'll see in the pic I got mine wedged and almost out, little turning and tugging and she popped right out!

High five yourself
Now slap that new alt on the bungee and drop her in (not easy).
Little tip: If your bungee cords don't fit in the top hole on the alt use a zip tie to create a way to attach the bungee, you'll use this later.
Once I got the new one alt in I flipped it around (I dropped it in upside down) and attached the bungee to the top hole for help me move it into place easily.
This is were the 3rd hand is used. You may need someone to help you get the lower large bolt in as it's pretty hard to hold the alt in place and slide the larger bolt in through the wheel well.
Now replace everything.
I charged the battery for a while before I started it up.
Have fun and good luck
Reason for replacement:
Battery light and brake light came on. Poor and choppy idle.
Tools:
Socket set 10-14mm
1/2 socket or breaker bar, an extension may be needed
smallish allen wrench
car jack
2 or 3 bungee cords
3 hands
zip ties
Process:
Disconnect the battery
Remove passenger side wheel
Locate the belt tensioner. At the top of the tensioner is a 1/2 socket slot.
I had to use an extension on the tensioner due to my massive oil cooler line
. The factory lines may allow you to just use a breaker bar.Notice the hole/slot on the bottom of the tensioner. You'll want to slide an allen wrench slightly into that hole. Twist the tensioner counter clockwise until you can slide the allen into the rear hole to lock the tensioner.
Slide the belt off the alt and move it forward (towards the front bumper) to get it out of the way.
Release the tensioner back as it blocks the large bottom alt bolt.
Remove fuel rail / move it to the side
http://www.evotuners.net/forums/f20/...injectors-427/
I completely removed mine but I don't think it was necessary as I believe you can just move it to the side. Basically need the FPR out of the way (maybe just take that off?)
Remove the top alt bracket, one bolt into the alt itself and 2 into the block. One of the bolts is out of view under the manifold.\
Remove power and cables from alt. The power gave me some troubles as it spun the wire and the bolt behind it. I had to break the black plastic piece to get a second wrench in there to loose them up. Normal this part should be easy. There is also a clipped in wire on the back side of the alt, pull that out too.
Now remove the bolts on the AC and power steering bracket as in the pic. You'll push and pull on those and need the slack
Next remove the large lower alt bolt. You should be able to move the alt forward to better access the nut on the driver side of the alt. Now push the large bolt out towards the passenger side. The tensioner will have to be back in normal operating position in order to pull the bolt out.
Once the alt is detached you can carefully set it down inside the rear of the engine bay.
Remove the dip stick
Now you're going to attach bungee cords to the hood and alt to better help you manipulate the alt. My cords only fit in the holes for the lower bolts. I used 3 cords, one the hood clasp and one in a hole on the passenger side of the hood and attached to one cord going to the atl.
Now for the fun part!
Start pulling, pushing, cursing, kicking, throwing, punching and pull that thing out.
You'll see in the pic I got mine wedged and almost out, little turning and tugging and she popped right out!
High five yourself
Now slap that new alt on the bungee and drop her in (not easy).
Little tip: If your bungee cords don't fit in the top hole on the alt use a zip tie to create a way to attach the bungee, you'll use this later.
Once I got the new one alt in I flipped it around (I dropped it in upside down) and attached the bungee to the top hole for help me move it into place easily.
This is were the 3rd hand is used. You may need someone to help you get the lower large bolt in as it's pretty hard to hold the alt in place and slide the larger bolt in through the wheel well.
Now replace everything.
I charged the battery for a while before I started it up.
Have fun and good luck


Thread Starter
Newbie
Joined: Jul 2005
Posts: 98
Likes: 0
From: Knoxville TN

Or....
You can remove the driver's side motor mount bolt. Jack the front (passenger side) of the engine up an inch or two, which gives you plenty of room to pull the alternator out.
The 2 minutes it takes to put the jack under the engine, and remove the bolt, saves 15-20 minutes of struggling with bolts and pulling the alternator out.
I've R&Red 2 alternators on Evos. Both took about 20 minutes tops.

Any available pictures of that bottom bolt? I'm following this now and I think I looked at the wrong bolt because there is no freaking way that can come out from underneath.
Trending Topics
So....My experience was a little different but this may help others. When you go through the process and finally remove the ALT bracket. I still had another bracket in my way. It was connected to a bolt under my cam gears cover and behind a pulley so I couldn't remove it.
So we had to come up with another solution. 4 additional bolts and made it a lot easier! ABS module.
Once you remove those bolts the ABS module can be manipulated and gives you a lot more room to play with.
Another tip: On the alternator itself, there is a spacer where the long lower bolt goes. Make sure that is in correctly before dropping it in or it won't fit. Don't overlook it or you won't be able to get it on and will have to pull it out again.


I just did mine and removed the alternator bracket and the oil dip stick and it almost came right out.
I would say this can be a 90min job to remove and install using the ABS bracket method.
A+ guys thank you very much for this writeup.
I would say this can be a 90min job to remove and install using the ABS bracket method.
A+ guys thank you very much for this writeup.

Newbie
Joined: Oct 2012
Posts: 12
Likes: 0
From: Colorado
Yes, thanks for the write-up and pix... I am definitely not looking forward to this. A shop I trust says they'll do it for $160 in labor. Would you say this job is worth it? 
Part of me wants to tackle this because I like doing my own work... plus I'm cheap. Plus, I should go ahead and do the timing belt, serpentine belt, water pump... anything else while I'm in there cursing? My car has 112K miles.
Part of me wants to tackle this because I like doing my own work... plus I'm cheap. Plus, I should go ahead and do the timing belt, serpentine belt, water pump... anything else while I'm in there cursing? My car has 112K miles.
Thread Starter
Newbie
Joined: Jul 2005
Posts: 98
Likes: 0
From: Knoxville TN
If you like working on your car I'd just do it myself. $160 isn't that bad. I have never used a shop other than for an engine rebuild. That's totally up to you though.
Yeah I'd do all that stuff while your at it. Good luck!
Yeah I'd do all that stuff while your at it. Good luck!
May be doing this in the near future as I think mine may be going out, but I just wanted to make sure on one thing. The wire going to the alternator that connects to the battery is a white with red stripe 8ga wire or so that connects to the 100amp fusable link on the battery terminal right?