
installing redline goods steering wheel cover on stripped wheel


Thread Starter
Evolving Member
iTrader: (5)
Joined: Nov 2010
Posts: 110
Likes: 0
From: southern Indiana
installing redline goods steering wheel cover on stripped wheel
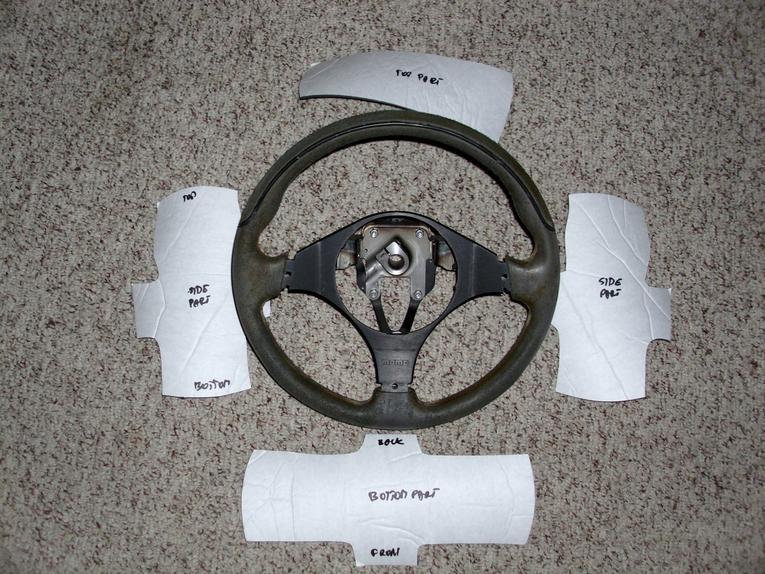
My wheel started to peel on the top perforated leather part. I tried to glue it down but the leather had shrunk and it started coming off everywhere as I pulled so I broke down and bought the redline goods leather wrap. Quality is excellent! It�s the only wrap that I could find that actually covers the leather on the spokes of the wheel as well as the wear surface.
On ordering.
I learned this the hard way but if you peel the original leather all off you will need to order the padding kit as well. It costs extra but the feel is amazing when done. The redline goods leather wrap for the evo is made to go over top of the factory leather. It says it on the evo page IMPORTANT: this cover is installed ONTO factory leather, without removing it!
http://www.redlinegoods.com/Evo8shiftboot.php
On the ordering form there is a section at the bottom that mentions to insert in the comments if your wheel does not have the factory leather covering.
IMPORTANT: If your factory wheel DOES NOT have a leather/vinyl skin on it please mention that in the comments below! Our wraps are direct replacements for factory skins and if your wheel doesn't have one the wrap has to be sized differently to fit your wheel!
Ignore that. Only certain wheels are sized both with and without the cover. So if you are planning on removing the leather then order the foam kit. If you leave the factory leather just order the wrap.
So I started with a bare evo wheel. If you do peel it off around the perforated leather there is a groove in the inner wheel structure. If you just wrap it as is you may be able to feel the indention. My solution was to use a large rubber O-ring that I cut and super glued into the open groove in the wheel.

As you can see in the corners I squeezed another oring into the groove with the other to close up the gap. Don�t worry if it sticks out because you can grind it down with a dremel sanding disk. Don�t grind the wheel just the oring.

I slightly scuffed the wheel with a scotch brite and layed out the foam kit.

I test fit the foam several times so I knew the point it would wrap all the way around. Then the moment of truth. Peel back the paper on half the foam and start placing the sticky side at the point on the wheel it was during the test fit. (you can sharpie places on the foam and wheel to help you line it up)

Trim flush with the wheel on the spokes. Do the same method on the other three parts of the foam. Test fit several times with paper on, mark with sharpie on foam and wheel, unpaper half and start aligning marks and progressively work your way along. Be patient and take your time.
On ordering.
I learned this the hard way but if you peel the original leather all off you will need to order the padding kit as well. It costs extra but the feel is amazing when done. The redline goods leather wrap for the evo is made to go over top of the factory leather. It says it on the evo page IMPORTANT: this cover is installed ONTO factory leather, without removing it!
http://www.redlinegoods.com/Evo8shiftboot.php
On the ordering form there is a section at the bottom that mentions to insert in the comments if your wheel does not have the factory leather covering.
IMPORTANT: If your factory wheel DOES NOT have a leather/vinyl skin on it please mention that in the comments below! Our wraps are direct replacements for factory skins and if your wheel doesn't have one the wrap has to be sized differently to fit your wheel!
Ignore that. Only certain wheels are sized both with and without the cover. So if you are planning on removing the leather then order the foam kit. If you leave the factory leather just order the wrap.
So I started with a bare evo wheel. If you do peel it off around the perforated leather there is a groove in the inner wheel structure. If you just wrap it as is you may be able to feel the indention. My solution was to use a large rubber O-ring that I cut and super glued into the open groove in the wheel.

As you can see in the corners I squeezed another oring into the groove with the other to close up the gap. Don�t worry if it sticks out because you can grind it down with a dremel sanding disk. Don�t grind the wheel just the oring.

I slightly scuffed the wheel with a scotch brite and layed out the foam kit.
I test fit the foam several times so I knew the point it would wrap all the way around. Then the moment of truth. Peel back the paper on half the foam and start placing the sticky side at the point on the wheel it was during the test fit. (you can sharpie places on the foam and wheel to help you line it up)

Trim flush with the wheel on the spokes. Do the same method on the other three parts of the foam. Test fit several times with paper on, mark with sharpie on foam and wheel, unpaper half and start aligning marks and progressively work your way along. Be patient and take your time.
Thread Starter
Evolving Member
iTrader: (5)
Joined: Nov 2010
Posts: 110
Likes: 0
From: southern Indiana
Continued

Attachment 224997
Looks a little like poop. Don�t get worried yet. Keep squeezing the foam around places it comes loose, forming it to the wheel shape. I used electrical tape to hold trouble spots.
On the actual leather wrap watch redlines videos several times to understand what you have to do. Much of it is eyeballing with plenty of patience. Choose a stitching pattern and make sure you repeat it every stitch.
I started at the bottom of the wheel with my stitching. Make your knots on the inside of the wrap so the tag ends are hidden. Key thing is only go a couple stitches and pull and work with your fingers and pull more. Until the gap looks nice and centered. You want the leather to pull together and touch. If it�s hanging open then you need to pull it more and work it with your fingers. Pay attention to what they do in redline's videos.

If you see any parts you don�t like (which is probably the first part you started doing just like me, you learn as you go) now is the time to go back and redo that area. They gave me plenty of thread.
The fun part comes when your putting the three plastic covers back on the wheel. You will have to trim the leather back but not all the way like you did the foam. Leave approx. �� of leather hanging over. Use something like a small screw driver and super glue to fold the leather over and glue to the wheel inner structure. For reinstalling the spoke plastic trim I used black silicone on the back side to hold them on. You can use the electrical tape to squeeze them on till the silicone dries.


DONE!

Newbie
Joined: Dec 2012
Posts: 47
Likes: 2
From: Central NJ
wow man that looks really really good. I think I might give this a shot soon because my stock leather is pretty nasty on my steering wheel and when its humid out the leather actually comes off on my hands  Thanks for making this! -Brian
Thanks for making this! -Brian

Thread Starter
Evolving Member
iTrader: (5)
Joined: Nov 2010
Posts: 110
Likes: 0
From: southern Indiana
Thanks. I'm happy with it and the feel is so nice! I like the padding kit.
If you order a wrap make sure you know what your getting since redline doesn't have a downsized wrap for a stripped wheel. Jack actually didn't recommend pulling off the leather but mine was delaminating so bad I took it off and since i did remove the leather thats why I needed the foam kit.
Stripped evo wheel - order a regular wrap plus the foam padding.
wrap for over stock leather - order regular wrap no padding.
If you want to wrap over the stock leather and have a padding kit then you need to speak to them about doing that.


Thread
Thread Starter
Forum
Replies
Last Post
mishimoto
Vendor Announcements
21
Oct 16, 2016 12:05 AM
nerdbotSKRA
04-06 Lancer Ralliart How To Requests / Questions / Tips
13
Jan 28, 2012 12:41 PM