
Evo X Budget SQ Build / RF System Removal


Thread Starter
Newbie
Joined: Jun 2010
Posts: 39
Likes: 0
From: Canada
Evo X Budget SQ Build / RF System Removal
Hi all,
I did this few months ago during my summer vacation, but I figured I'd share my build log on this forum. Might be helpful to some, or at least give ideas.
So here's the list of parts used :
Deadening : B-Quiet Ultimate
Headunit : Pioneer DEH-80PRS
Frontstage Amp : Pioneer GM-D9500F
Subwoofer Amp : Arc Audio KS300.2
Tweeters : Seas 27TFAN/C
Midrange : Dayton RS180-4
Subwoofer : Dayton RSS315HO-4 12"
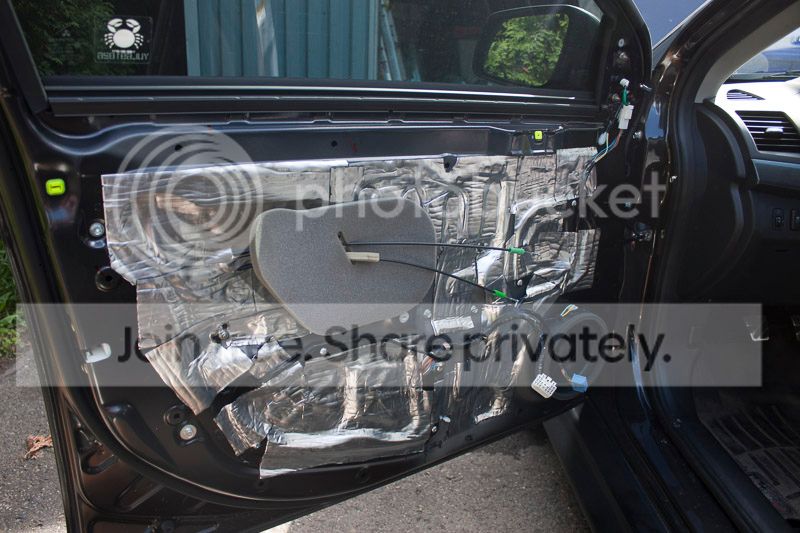
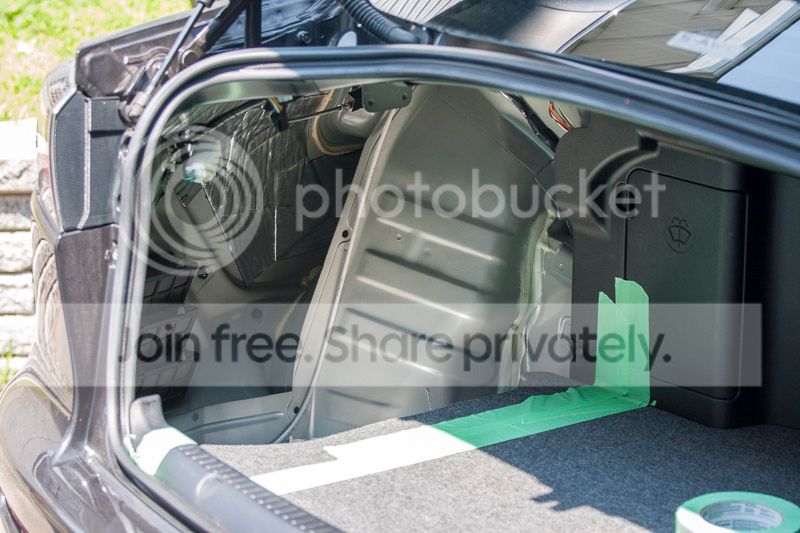
My first step was to add some deadening to the panels. I only did the front doors and the trunk, and didn't do 100% coverage, but instead let my ear decide when the panel was deadened enough. Some places didn't really need any deadening, others areas required multiple layers and other places, just seems like nothing would be enough (rear quarter panels and spare tire area).


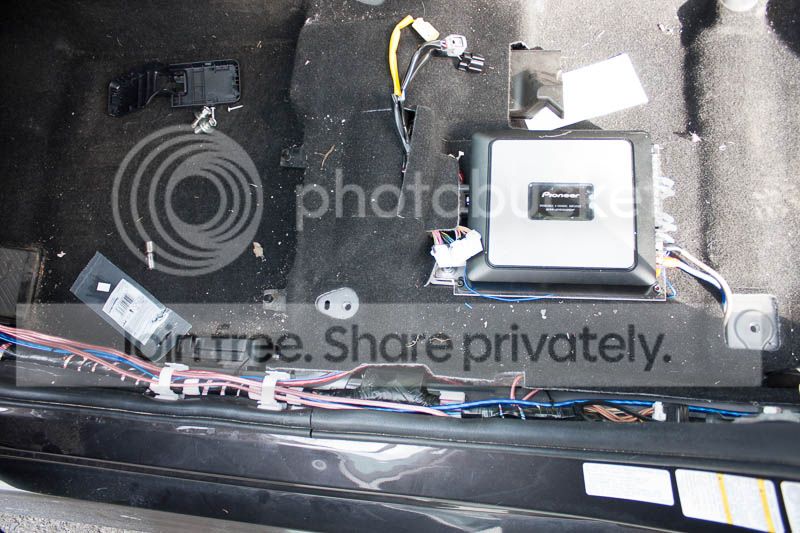
I installed the frontstage amp under the driver seat where the RF amp was and made a lexan support for it that bolts onto the studs for the factory amp. The sub amp is between the rear seats and the plastic cover in the trunk. I attached it to the metal bars directly in the bottom, and with an aluminum flat bar at the top. All holes are drilled and tapped to use machine screws. The wires are passed along the door trims and under the carpet to reach their respective amps.


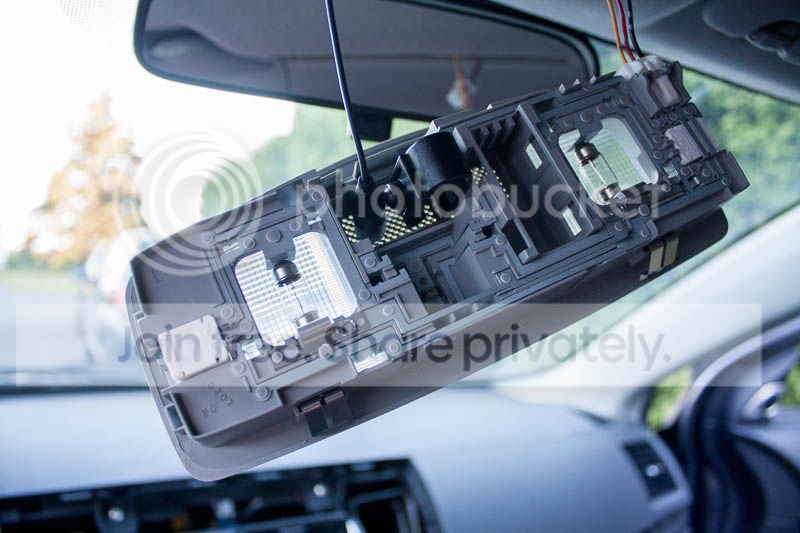
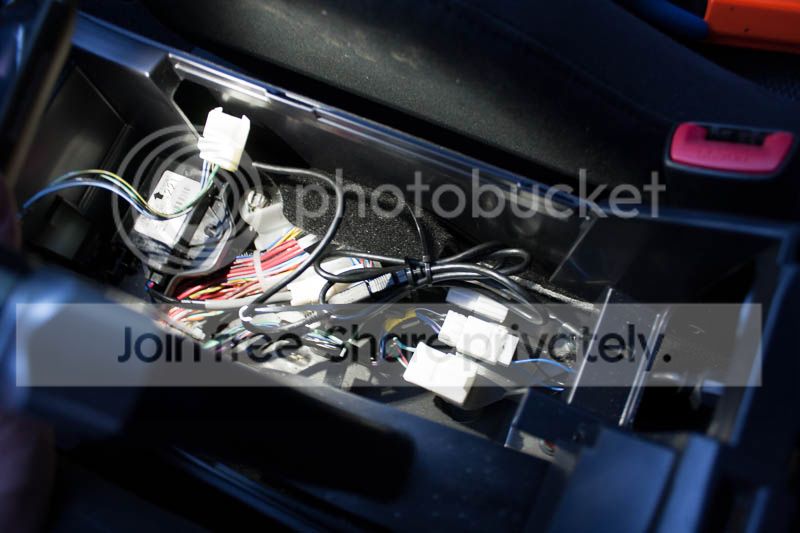
The headunit installation is nothing really special. I used the Scosche dash kit and wire harness and PAC SWI-PS steering wheel adapter. The only notable things are the bluetooth mic that I installed in place of the factory unit (performance seems so-so, so I may have to move it as people complain that they hear the car more than me when I'm on the highway), and the USB ports that I relocated using panel mount USB extensions. So I now I have one USB port in the back of pocket in the Scosche adapter, and the other inside the arm rest.


I installed the 7" speakers in the factory location. I needed to build up some spacers to get them to fit in there, so I glued two MDF rings together to get 1�" thick rings. I also had to cut off a small piece of the speaker basket to get it to settle properly (useless bracket used for DVC versions, I suppose). I also coated the MDF with bed liner to protect it from the elements. Just a heads up for someone who tries this for the first time, ALWAYS predrill screw holes in MDF as it splits very easily. For the speaker wires, I used a small length of perforated steel band that I buffed to remove any sharp edges to prevent cutting wires or the rubber boot as I passed it through. It takes a bit of fiddling around, but it's so much easier than anything else I've used before. I also used some of the same steel band to attach the tweeters in the stock areas.


Finally, the longest portion of the project was building a fiberglass box for the subwoofer.
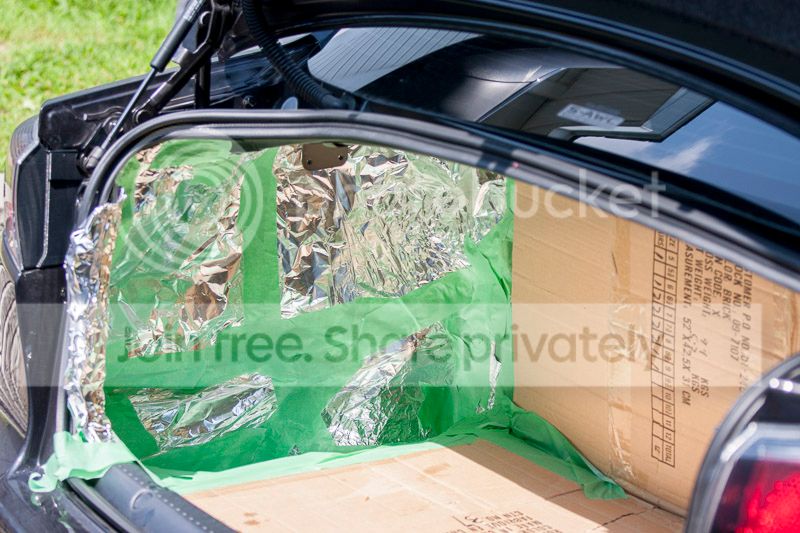
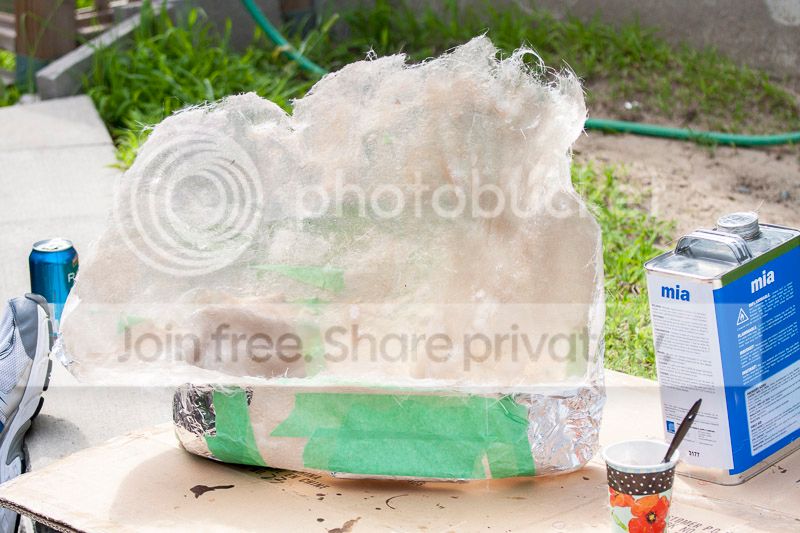
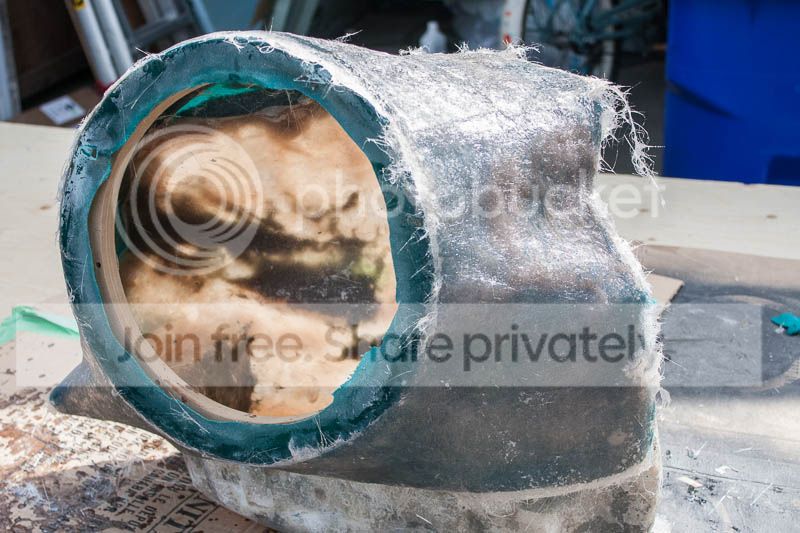
I started off by laying heavy duty foil and taping up the whole area where the box would go. Once satisfactorily covered, I proceeded with the application of resin and chopped mat. I did two layers in the car before carefully removing it to work outside for the rest. I strengthened it up with about 8~10 layers for about 3/8" to 1/2" total thickness.
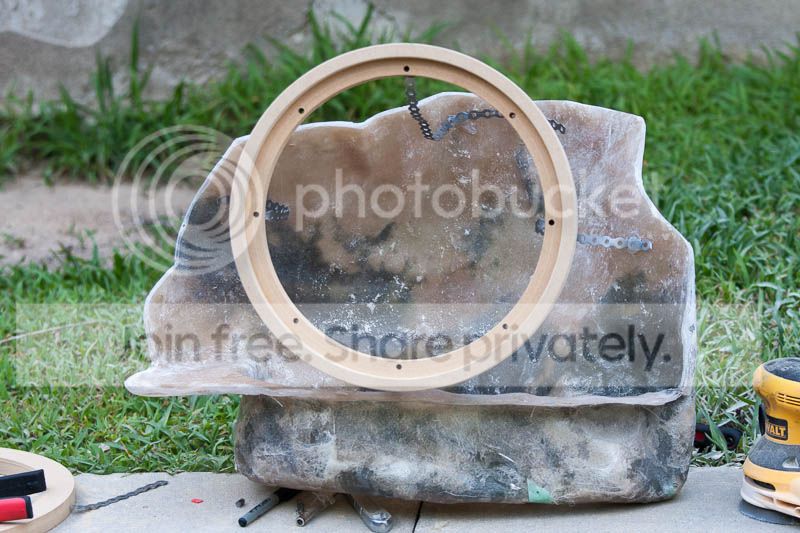
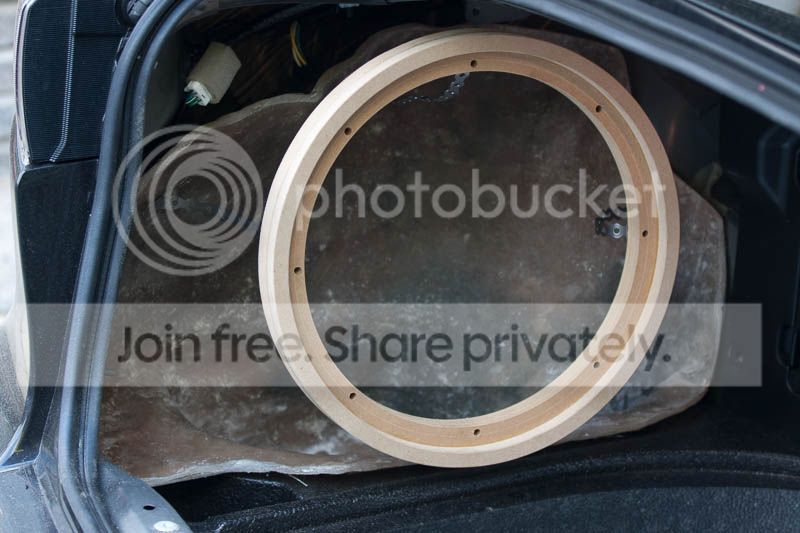
I then built a couple rings out of MDF to make the subwoofer baffle. A first to mount the sub to out of 3/4" MDF and a second to flush mount it, out of 1/2" MDF. I drilled out the holes to mount the sub to intall T-Nuts in them. I used some more perforated metal bands to mount the baffle to the first half of the fiberglass box I had made.
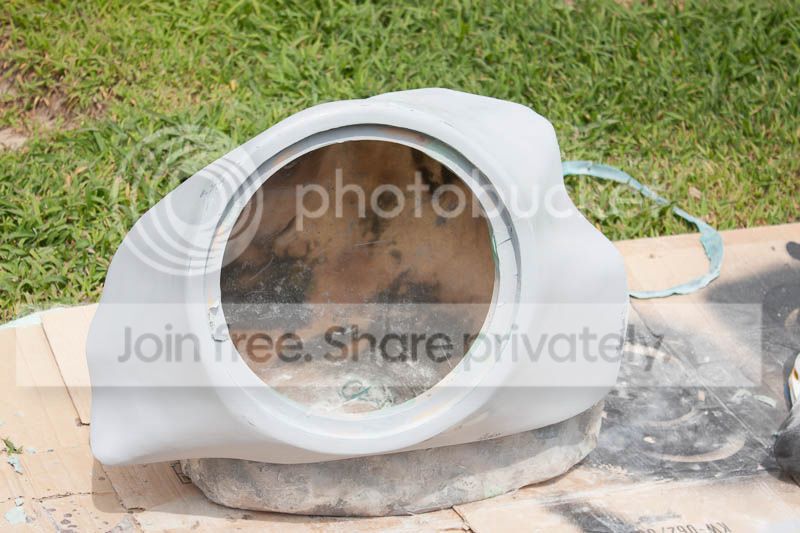
After a quick test-fit in the car, and some bending, I got the baffle to sit where I wanted it and I could proceed to wrap it in fabric which I then coated in resin. After it cured, I just piled on some more resin / chop mat until it sounded nice and dead when knocking on it. I did use some short strand fiberglass body filler to fill out weird crevices that made it awkward to stuff fiberglass into to make the layering of the mat simpler and less likely to get air pockets.
After it was built up enough, I finished out the shape with some body filler and sanded, added filler, sanded, filler, sand, fill, sa, f, s... you get the picture. Once I was happy with it, I primed it, sanded, primed, sanded... just twice this time.... and gave it a few coats of flat black paint while making sure the screw holes were covered as I didn't want any of that in the threads.
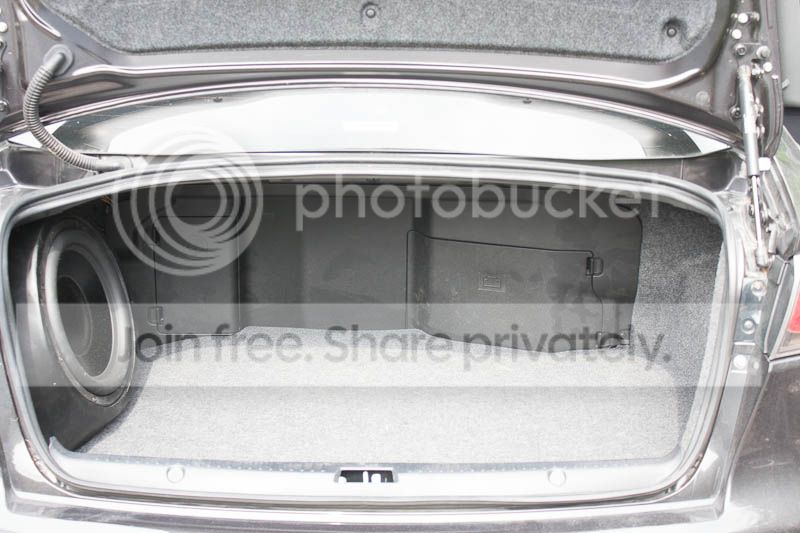
A quick hole in the back to get the wire through and some hot glue to seal it back up, and the sub was ready for installation. And FINALLY, it was time to drop the whole thing into the trunk and wire it all up.
I installed the fused and ground distribution blocks in the top of the trunk area where they are easy to access, but still out of sight.


That pretty much sums it up. The whole project took me about 60 hours... with a few drinks here and there... and the fact that I had to reassemble the car into working order at the end of each day as I wasn't working on it at home.
I hope this can be useful to some !
I did this few months ago during my summer vacation, but I figured I'd share my build log on this forum. Might be helpful to some, or at least give ideas.
So here's the list of parts used :
Deadening : B-Quiet Ultimate
Headunit : Pioneer DEH-80PRS
Frontstage Amp : Pioneer GM-D9500F
Subwoofer Amp : Arc Audio KS300.2
Tweeters : Seas 27TFAN/C
Midrange : Dayton RS180-4
Subwoofer : Dayton RSS315HO-4 12"
My first step was to add some deadening to the panels. I only did the front doors and the trunk, and didn't do 100% coverage, but instead let my ear decide when the panel was deadened enough. Some places didn't really need any deadening, others areas required multiple layers and other places, just seems like nothing would be enough (rear quarter panels and spare tire area).


I installed the frontstage amp under the driver seat where the RF amp was and made a lexan support for it that bolts onto the studs for the factory amp. The sub amp is between the rear seats and the plastic cover in the trunk. I attached it to the metal bars directly in the bottom, and with an aluminum flat bar at the top. All holes are drilled and tapped to use machine screws. The wires are passed along the door trims and under the carpet to reach their respective amps.


The headunit installation is nothing really special. I used the Scosche dash kit and wire harness and PAC SWI-PS steering wheel adapter. The only notable things are the bluetooth mic that I installed in place of the factory unit (performance seems so-so, so I may have to move it as people complain that they hear the car more than me when I'm on the highway), and the USB ports that I relocated using panel mount USB extensions. So I now I have one USB port in the back of pocket in the Scosche adapter, and the other inside the arm rest.


I installed the 7" speakers in the factory location. I needed to build up some spacers to get them to fit in there, so I glued two MDF rings together to get 1�" thick rings. I also had to cut off a small piece of the speaker basket to get it to settle properly (useless bracket used for DVC versions, I suppose). I also coated the MDF with bed liner to protect it from the elements. Just a heads up for someone who tries this for the first time, ALWAYS predrill screw holes in MDF as it splits very easily. For the speaker wires, I used a small length of perforated steel band that I buffed to remove any sharp edges to prevent cutting wires or the rubber boot as I passed it through. It takes a bit of fiddling around, but it's so much easier than anything else I've used before. I also used some of the same steel band to attach the tweeters in the stock areas.


Finally, the longest portion of the project was building a fiberglass box for the subwoofer.
I started off by laying heavy duty foil and taping up the whole area where the box would go. Once satisfactorily covered, I proceeded with the application of resin and chopped mat. I did two layers in the car before carefully removing it to work outside for the rest. I strengthened it up with about 8~10 layers for about 3/8" to 1/2" total thickness.
I then built a couple rings out of MDF to make the subwoofer baffle. A first to mount the sub to out of 3/4" MDF and a second to flush mount it, out of 1/2" MDF. I drilled out the holes to mount the sub to intall T-Nuts in them. I used some more perforated metal bands to mount the baffle to the first half of the fiberglass box I had made.
After a quick test-fit in the car, and some bending, I got the baffle to sit where I wanted it and I could proceed to wrap it in fabric which I then coated in resin. After it cured, I just piled on some more resin / chop mat until it sounded nice and dead when knocking on it. I did use some short strand fiberglass body filler to fill out weird crevices that made it awkward to stuff fiberglass into to make the layering of the mat simpler and less likely to get air pockets.
After it was built up enough, I finished out the shape with some body filler and sanded, added filler, sanded, filler, sand, fill, sa, f, s... you get the picture. Once I was happy with it, I primed it, sanded, primed, sanded... just twice this time.... and gave it a few coats of flat black paint while making sure the screw holes were covered as I didn't want any of that in the threads.
A quick hole in the back to get the wire through and some hot glue to seal it back up, and the sub was ready for installation. And FINALLY, it was time to drop the whole thing into the trunk and wire it all up.
I installed the fused and ground distribution blocks in the top of the trunk area where they are easy to access, but still out of sight.


That pretty much sums it up. The whole project took me about 60 hours... with a few drinks here and there... and the fact that I had to reassemble the car into working order at the end of each day as I wasn't working on it at home.
I hope this can be useful to some !

Thread
Thread Starter
Forum
Replies
Last Post
MODDICTION
Evo 'For Sale' Wheels / Tires
154
Mar 19, 2018 06:57 PM
rstchris
For Sale/WTB - Engine / Drivetrain / Power
7
Jul 23, 2015 04:21 PM