


HOW TO: 5v USB + 12v Outlet Power


HOW TO: 5v USB + 12v Outlet Power
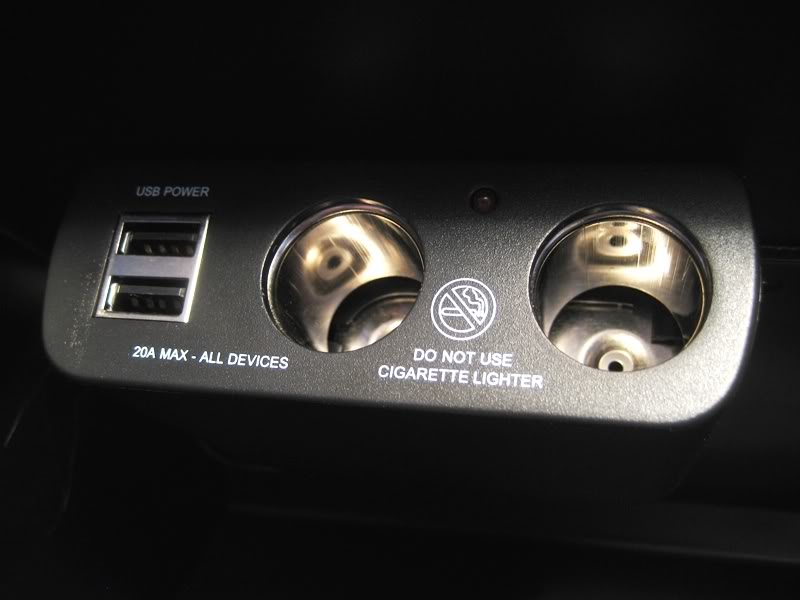
This might be a nice useful tutorial for some of you that are looking to add some ways to power an external 2.5'' hard drive, charge a phone, or power other miscellaneous 12v cigarette adapter ready devices.
Tools needed:
- Philips head screwdriver
- Pliers
- Drill
- Drill bit to drill pilot holes for screws (I used 1/16'' bit)
- Hole saw (I used 1'' diameter so I can fit a lot of cables through it to run behind the dash)
Parts needed:
- Zip ties
- Cigarette/USB multi-use car charger (http://www.amazon.com/Multi-Use-Car-...1655923&sr=8-3)
- Cigarette lighter socket (http://www.amazon.com/Parts-Express-...1655997&sr=8-1)
- Quick spice vampire clips (http://www.amazon.com/Pico-1558PT-El...1656037&sr=1-4)
You may substitute any of those things for a product you may like better; that's just what I chose. I liked the multi-use charger because of it's nice mounting legs and dual USB ports. I can power a 2.5'' external hard drive for my Pioneer AVIC, and have my phone charge at the same time. You can always run USB extension cables through the center console and to your cup holders or wherever you want to bring power to.
1st: Take the glove box out of your car. (open it, squeeze the sizes in and pull down, pop the little air piston off the right side, then swing it all the way down to the floor and lift it gently off the hinges)
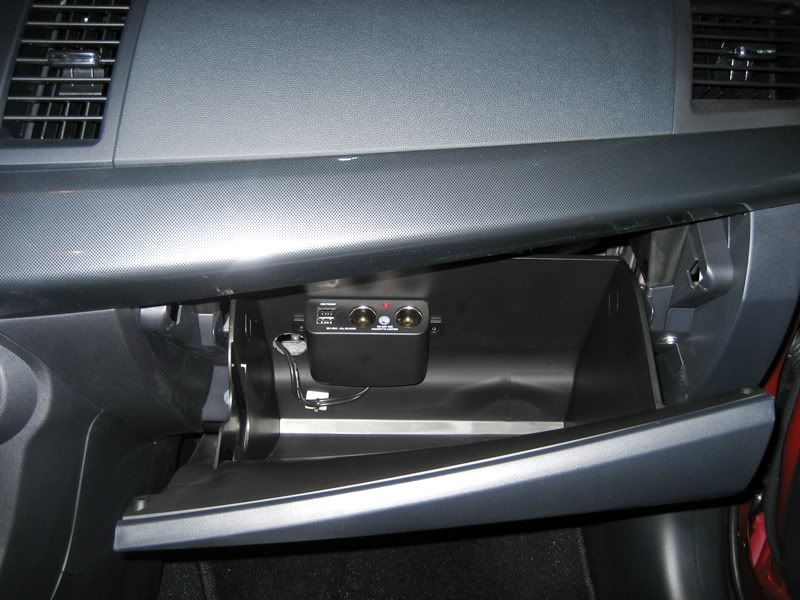
2nd: Mount the charger unit in the glove box. Be positive of where you're going to mount it so it doesn't interfere with anything when you actually put it in the car and open/close the glove box. Note that it can't be mounted too high because when you have things plugged in, you don't want them crunching in there when you close it. It also can't be mounted too low because of the way the glove box closes.. the hinge has about a 1.5'' wall that extends up from the bottom. You'll want to drill two small pilot holes where you want to mount it, then use the small screws it came with for mounting. Here's where I chose to mount mine.

3rd: Drill your hole to route cables through now that you know where your charger unit is mounted. I didn't find it necessary to use the drill with my hole saw because it's just soft plastic. Turning it slowly by hand will ensure a good cut through without screwing anything up cosmetically. Again, make sure the hole is up high enough from the bottom of the glove box so you don't slam cables in the hinge. I used a large 1'' hole so I can fit the cigarette lighter 12v adapters through it, as well as USB cables.


4th: Next, take it out to your car so we can wire it up. I chose just to splice into the existing cigarette lighter to make it super easy. That way it switches on when you turn on the car, and switches off when you turn off the car.
You have to take apart the center console, which is actually VERY easy. I found a short tutorial on how to do it here: https://www.evolutionm.net/forums/ev...-rattling.html Basically all you do is pop out the card holder by pulling up on it, then pull up on the cup holder and remove that piece.. then unscrew the two screws holding on the shift boot portion and pull it up & out... done.
Use the quick splice connectors to connect the green factory cigarette lighter wire to positive, and the black factory cigarette lighter wire to negative on your cigarette socket you bought. You'll probably have to use pliers close them all the way so it makes contact thoroughly. It should look like this:

5th Drop the 12v cable from glove box down behind and into the center console. It's all open space back there, so it's very easy. I found it easier to sit in the passenger seat and put my left hand up inside the center console portion while feeding the 12v cable from the glove box down in with my right hand. You should now be able to connect them up. Bundle up your slack wire with a zip tie and stick it behind the glove box. You can use more zip ties in other places so you don't get anything rattling around.
6th: Before putting everything back together, verify power is reaching the unit by turning the ignition key to accessory. Red light = good.

7th: Reassemble your interior and you're done!
Finished product:
Last edited by wiretap; May 6, 2009 at 06:23 PM.

Cigarette lighter socket
One suggestion, you can just cut off the male cigarette lighter socket from the charger and splice the power and ground wire directly to switched 12v source and a ground of your choice. That way you remove one extra connector and can directly solder the wires together.
I would suggest just connecting to the original OEM cigarette lighter source(s) instead of adding a spare connector. (since it's only + & - )
Nice write up.
One suggestion, you can just cut off the male cigarette lighter socket from the charger and splice the power and ground wire directly to switched 12v source and a ground of your choice. That way you remove one extra connector and can directly solder the wires together.
I would suggest just connecting to the original OEM cigarette lighter source(s) instead of adding a spare connector. (since it's only + & - )
Nice write up.
Yes, you can hard wire if you want. I just chose to use the cigarette lighter socket thing for easy quick removal if I wanted to swap out for some other unit that might come along in the future.
I didn't measure it out, but I'm 90% sure it would fit in the center console cubby. (under the arm rest) The only thing about that is.. how to plug in things once it's in there. It would be very difficult given the space constraint.
I didn't measure it out, but I'm 90% sure it would fit in the center console cubby. (under the arm rest) The only thing about that is.. how to plug in things once it's in there. It would be very difficult given the space constraint.
Last edited by wiretap; May 6, 2009 at 07:26 PM.
Yes, you can hard wire if you want. I just chose to use the cigarette lighter socket thing for easy quick removal if I wanted to swap out for some other unit that might come along in the future.
I didn't measure it out, but I'm 90% sure it would fit in the center console cubby. (under the arm rest) The only thing about that is.. how to plug in things once it's in there. It would be very difficult given the space constraint.
I didn't measure it out, but I'm 90% sure it would fit in the center console cubby. (under the arm rest) The only thing about that is.. how to plug in things once it's in there. It would be very difficult given the space constraint.
Thanks
Size is listed on Amazon. It's correct.
Product Dimensions: 4 x 3 x 1 inches
If you use the included screw mounts (they're removable), it adds another inch on the width you need, so 5 inches.
Product Dimensions: 4 x 3 x 1 inches
If you use the included screw mounts (they're removable), it adds another inch on the width you need, so 5 inches.
 Thanks
Trending Topics


I noticed that the unit has 2 USB connectors.. can you plug in say and iPhone & something else at the same time and have use of both of them?
I was under the impression you couldn't do this with the AVIC-F series...
thanks for all the great write-ups wiretap! It's a big help!
I was under the impression you couldn't do this with the AVIC-F series...
thanks for all the great write-ups wiretap! It's a big help!
Thanks.
The two USB connectors on that unit in the glovebox are just power only, nothing more. It's for powering and charging USB devices like cell phones and hard drives.
The AVIC unit has one USB data cable that I also routed into my glovebox. That way I can plug in my 100GB portable hard drive and access all my music & movies. It uses one of these cables since the AVIC only supplies 500mA over USB:

The small end connects to the hard drive, the power portion connects to the box I installed in the glovebox, and the data portion attaches to the AVIC's USB cable.
The two USB connectors on that unit in the glovebox are just power only, nothing more. It's for powering and charging USB devices like cell phones and hard drives.
The AVIC unit has one USB data cable that I also routed into my glovebox. That way I can plug in my 100GB portable hard drive and access all my music & movies. It uses one of these cables since the AVIC only supplies 500mA over USB:
The small end connects to the hard drive, the power portion connects to the box I installed in the glovebox, and the data portion attaches to the AVIC's USB cable.

Newbie
Joined: Dec 2010
Posts: 51
Likes: 0
From: PA
hey sorry to bringing this thread back after so long but would you be able to give me a more better description of how you are able to play music off your hard drive through the box in the glove box. I just want to be able to plug in my USB drive or iphone and play music off there if that is possible.

hey sorry to bringing this thread back after so long but would you be able to give me a more better description of how you are able to play music off your hard drive through the box in the glove box. I just want to be able to plug in my USB drive or iphone and play music off there if that is possible.

Thread
Thread Starter
Forum
Replies
Last Post
wiretap
Evo X Electrical / Audio / Security
68
Aug 15, 2011 08:22 PM
