
How to : Speaker install

Thread Starter
Newbie
Joined: Jan 2008
Posts: 7
Likes: 0
From: New Jersey
How to : Speaker install
Hi guys. Im new here. I've owned an evo X for a year now and have done a few things here and there with my vehicle. I decided to take pics of my speaker install. My vehicle is an 08 non-SSS GSR (no rockford sound system).
Some misc. info before we start :
- Speaker size for the evo X on all four corners are 6 1/2"
- I've re-used the factory mounting brackets. This method will destroy your factory speakers!
- The speakers I have installed are polk audio db651
- The tools used are a philips head screwdriver, small flat head, plastic panel tool, el cheapo soldering iron, a bit of solder, small hand saw, small wire snips
- Yellow wire on the speaker harness is positive, light green is negative
Step 1 - Remove the door panel and speaker!
- Lets identify what we need to remove on the door panel before we begin prying.
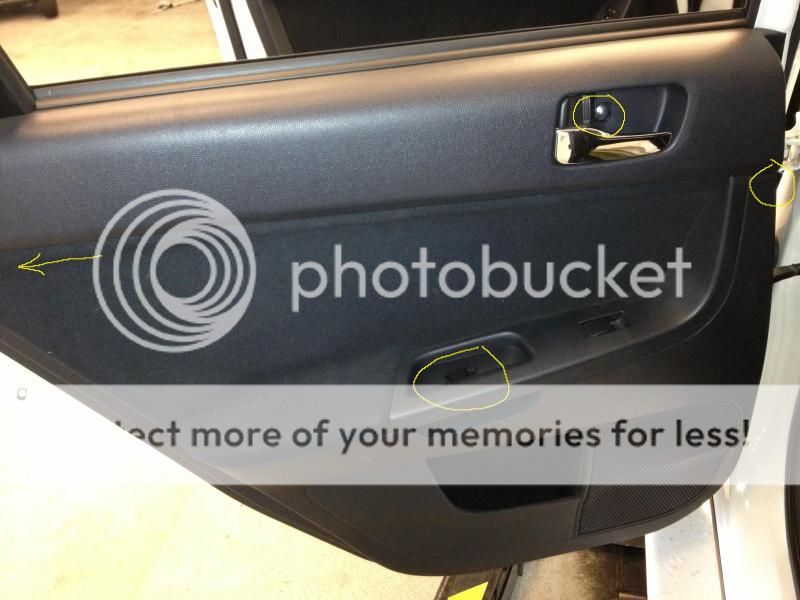
- This is a picture of a rear door panel. The yellow shows where the screws will be. The arrow shows where the 3rd screw will be on a front door panel.
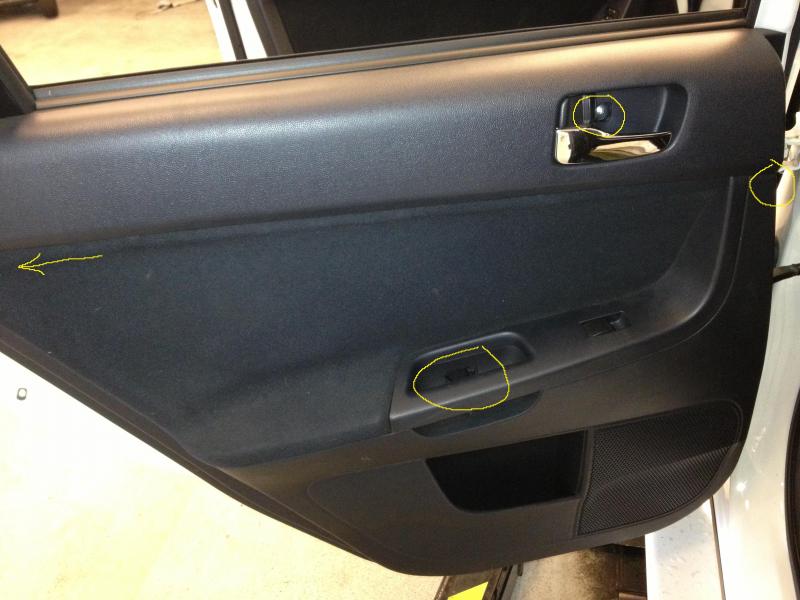
- The door lever and door panel handle screws are covered by small panels that can pop out with a small flathead. The third screw has a plastic "cap" on it that can also be popped up with a small flathead. No worries, the cap is attached to the screw.
- Secondary notes : Silver screw is for door lever, black screw is for door handle, plastic cap screw is for either left or right side of door panel, depending on which door panel is being removed
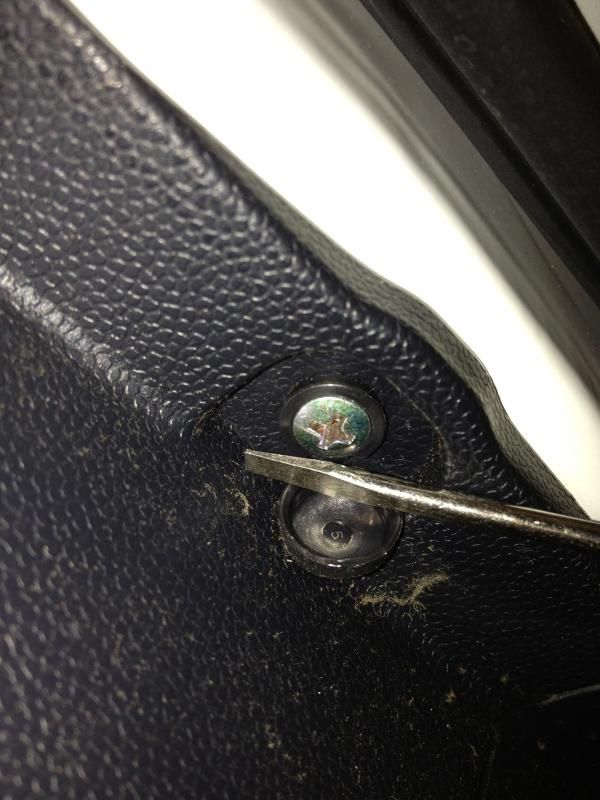
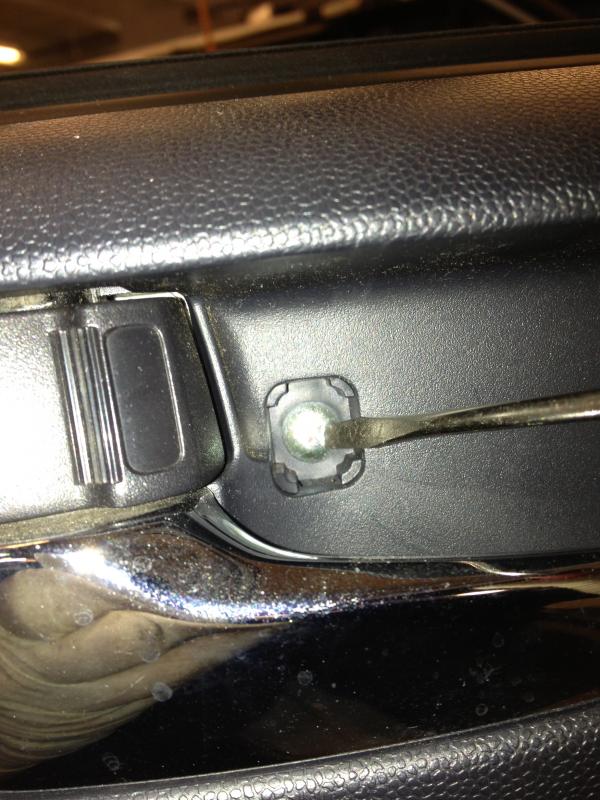
Close ups of the screws :

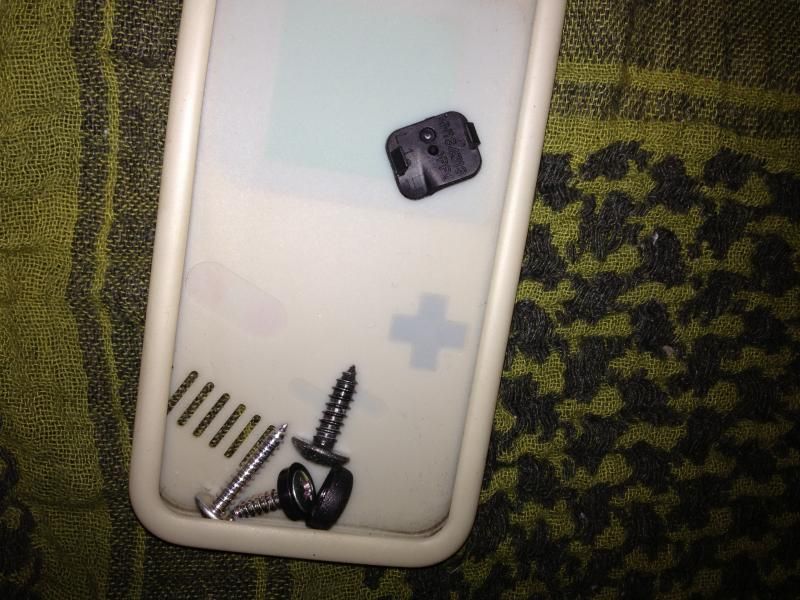
this is what you should end up with :
We can now pry the panel off! When you have the panel completely clipped off, be careful since you have the door lock actuator cables, and window switch harnesses still clipped into the panel.
Secondary notes : If removing a front door panel, the tweeter panel can easily pop up and out before the panel is removed. If you hear something drop while pulling the door panel off, dont be alarmed, it's just a plastic clip that can be reinstalled into the door panel.
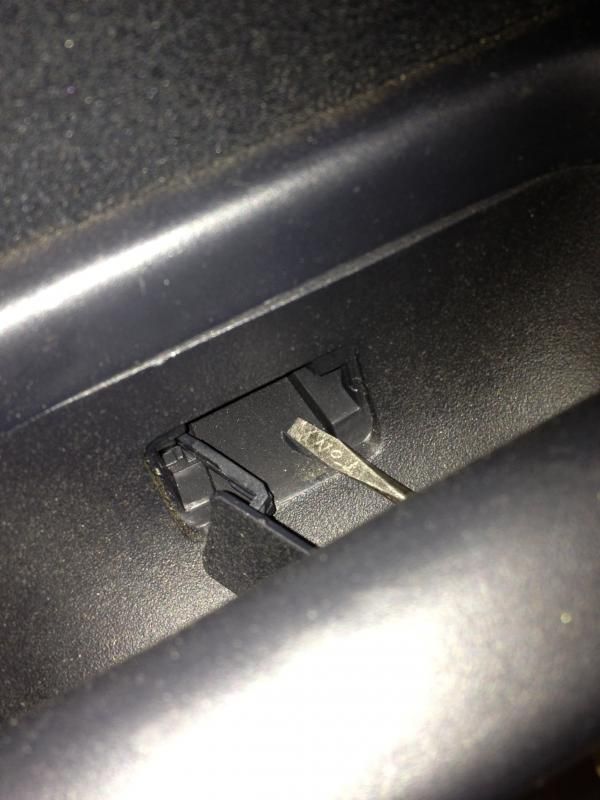
Door lock actuator cables :
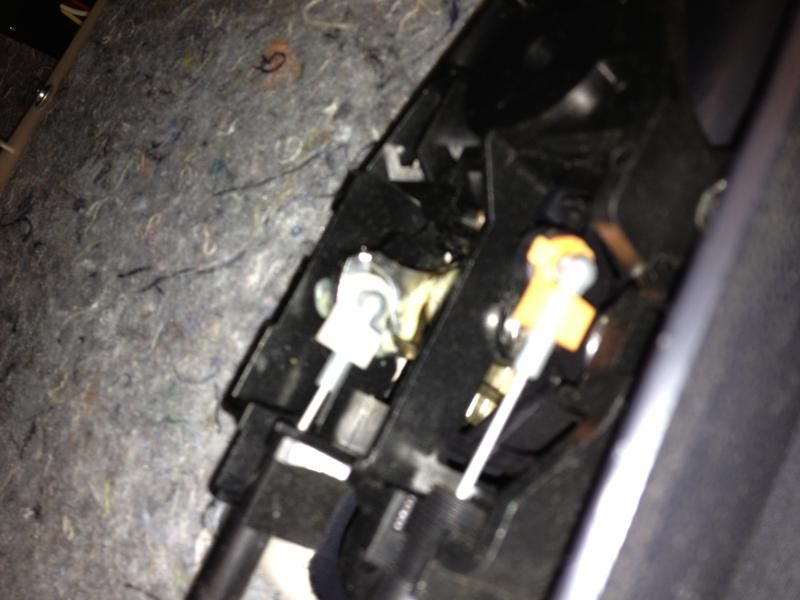
Window Switch harness :

Door panel clips that can fall off :

My apologies for the poor image quality!
Step 2 - stock speaker removal, bracket modification and speaker install.
The factory speaker is removed by twisting it counter clockwise on the door itself.
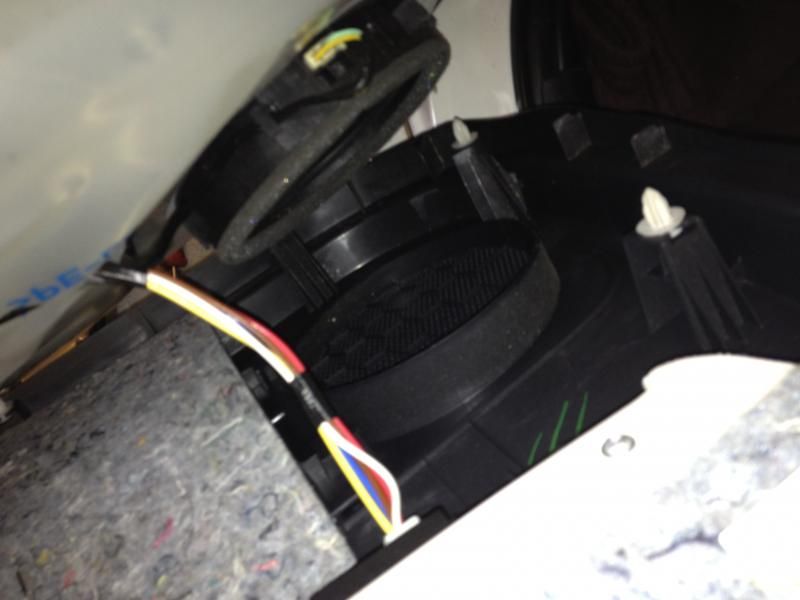
Heres a pic of the crappy factory speaker in all its glory (or lack thereof). I have outlined in yellow where I will be cutting to fit the aftermarket speaker. It's important that you be careful around the stock speaker's wires.

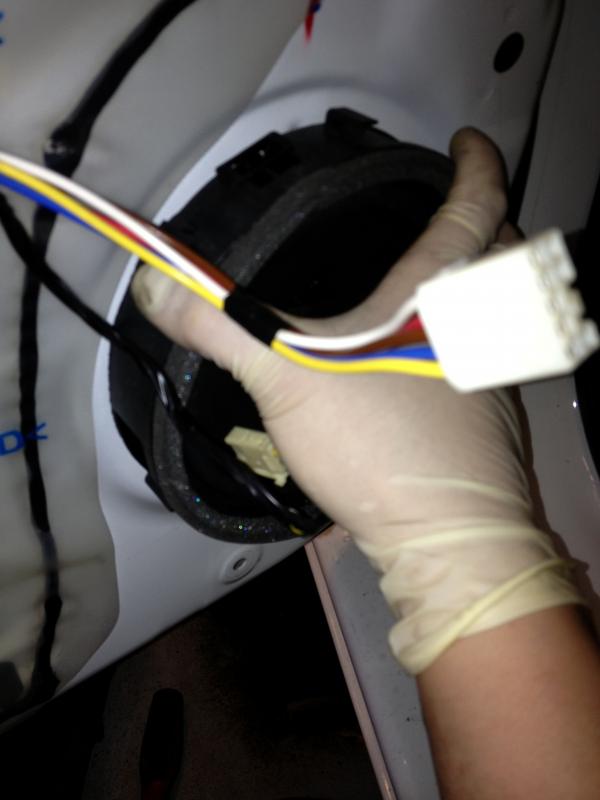
You can remove most of the speaker by hand. Here's a pic of a tear down and the wires that you should save.
you can nip around the plastic that the wire is attached to.
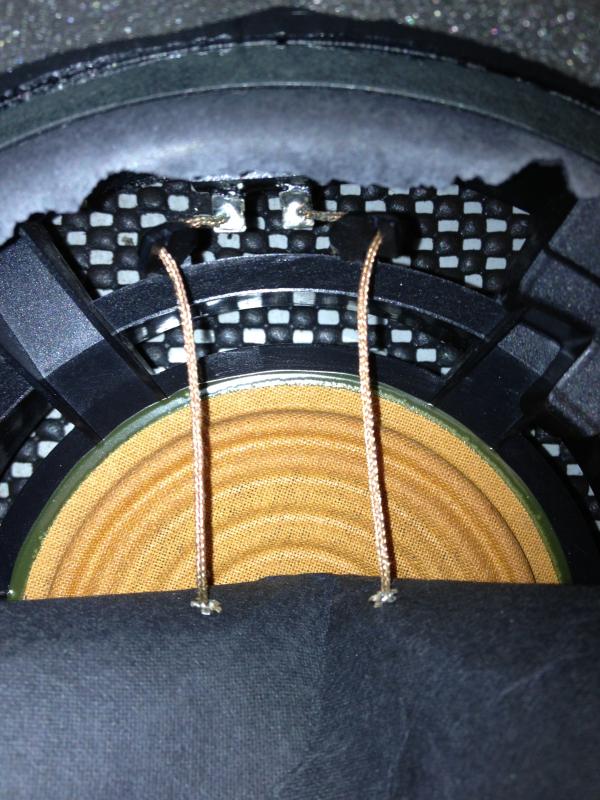
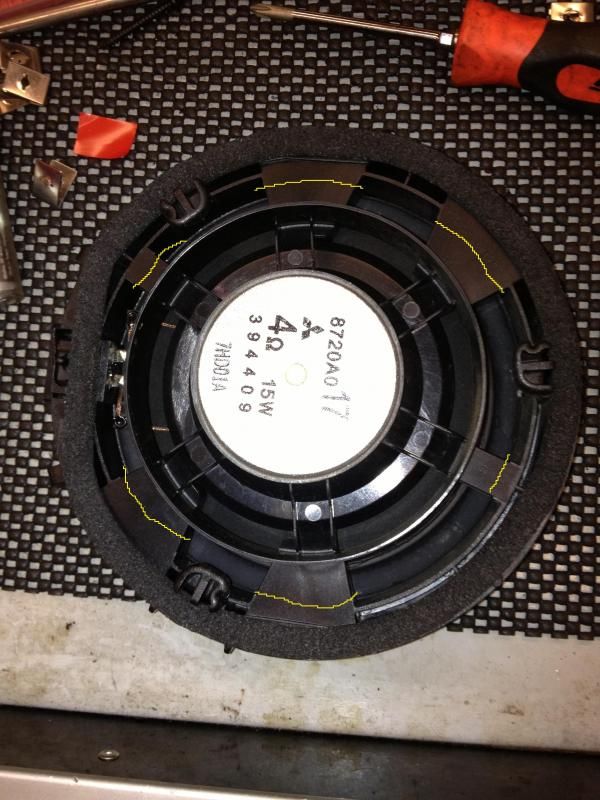
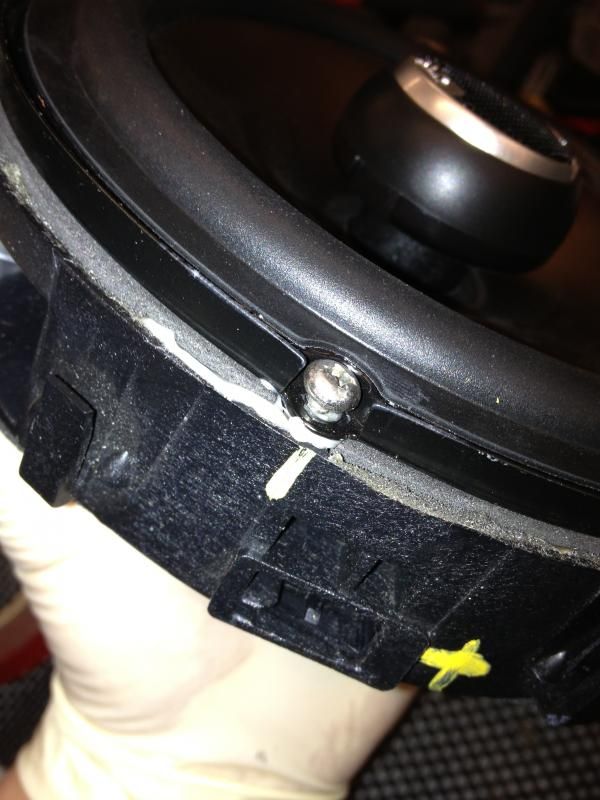
Here is the factory speaker mount "skeleton" after our cutting and removal of the factory speaker. When trimming, be sure there is enough removed to fit the aftermarket speakers magnets. The polk audio magnets are huge compared to factories.
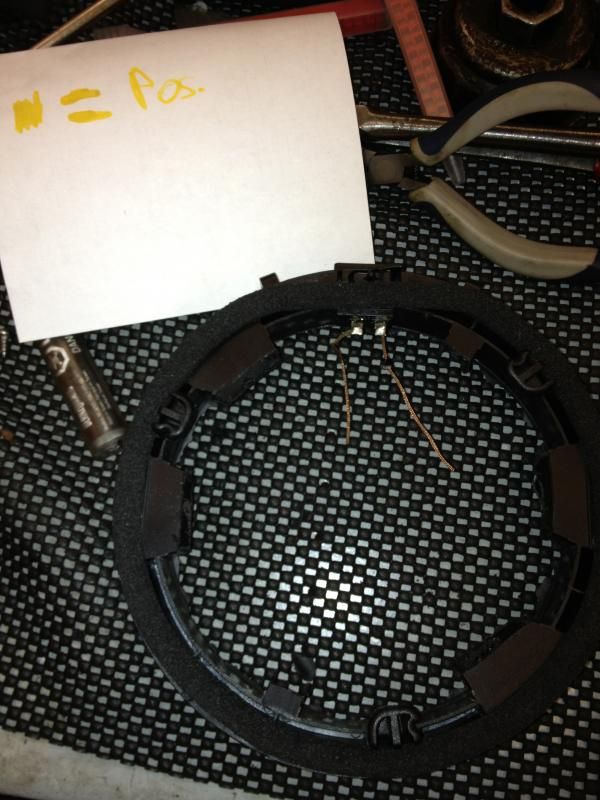
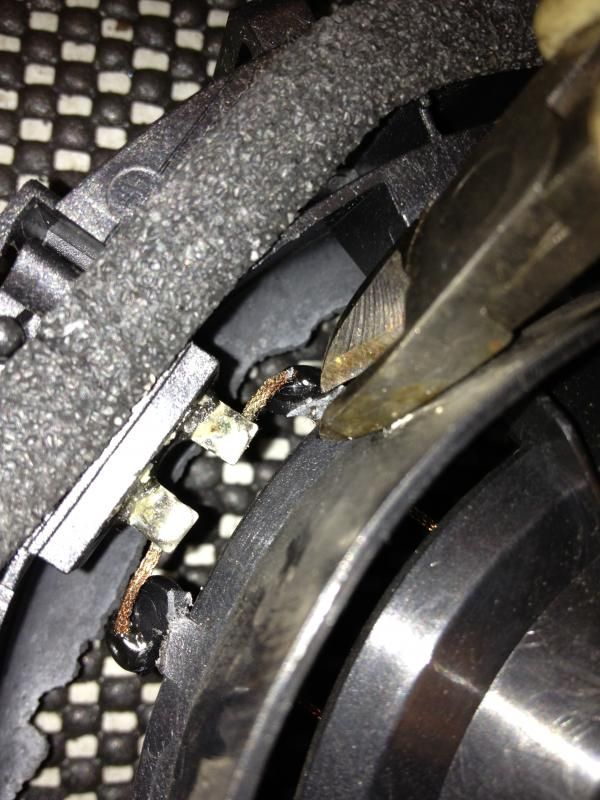
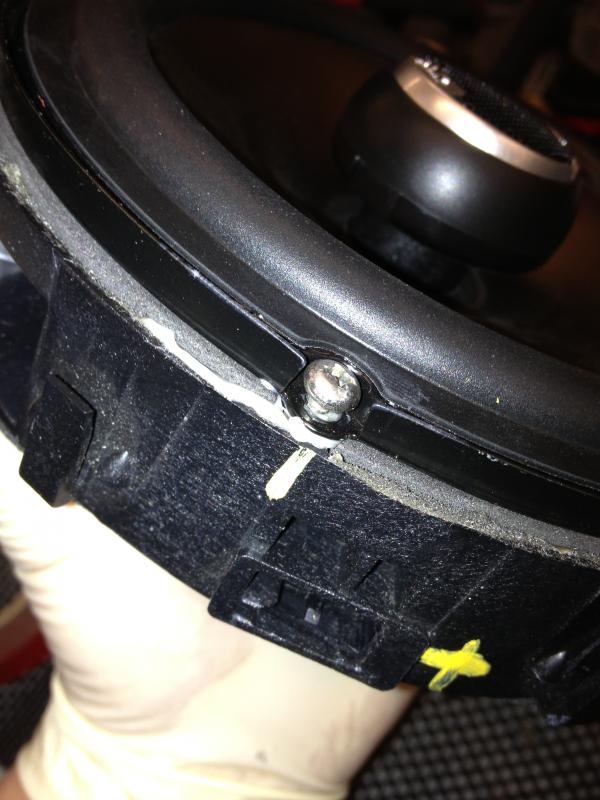
This is how I mounted the Polk's to the factory speaker mount. I found a good position for the back to be easily connected and marked where the screws would go. I used screws where I could and for the areas that I didnt, I filled the skeleton with epoxy and installed screws as it dried.
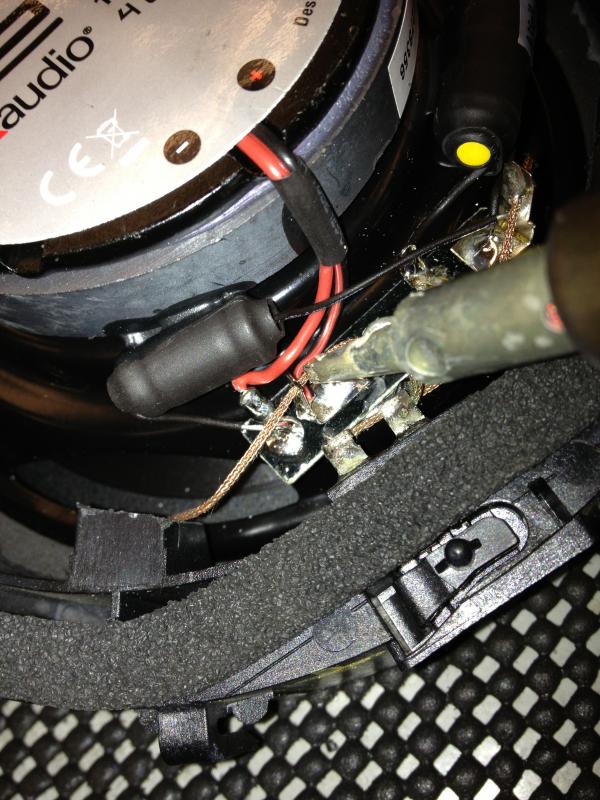
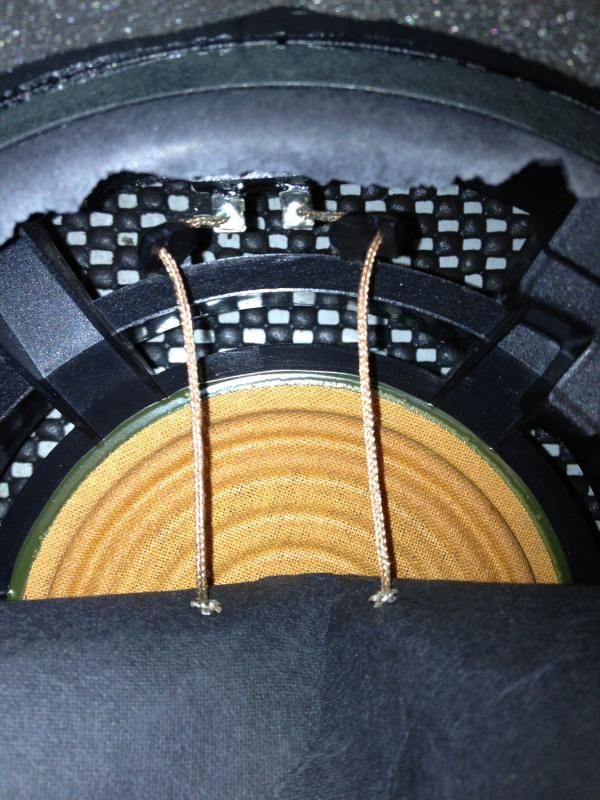
After thats all set we can solder the stock wiring into our new speakers
Step 3 - Re-install and enjoy better sound!
A few things to remember when re-installing - Dont forget to clip in the door lock actuator cables and clip them back into their proper housings. Double check to make sure all clips are on the door panel. Double check all electrical connections! After every door has a new speaker, always check to make sure the speaker is working before installing the door panel.
Polk db650 with directional tweeter :

When it's all said and done, crank some tunes and enjoy your upgraded sound!
I installed a Pioneer AVH-x3500BT yesterday with a new faceplate and harness. I also mounted the bluetooth microphone inside the headliner light switches. I regret not taking pics of the install. If I decide to install an aux connection with an rca adapter, I'll be sure to take pics for you guys. It's easier than you think!
More how-to's to come - Front brake install, complete coolant flush, accessory belt change. See you guys and thanks for reading.
Some misc. info before we start :
- Speaker size for the evo X on all four corners are 6 1/2"
- I've re-used the factory mounting brackets. This method will destroy your factory speakers!
- The speakers I have installed are polk audio db651
- The tools used are a philips head screwdriver, small flat head, plastic panel tool, el cheapo soldering iron, a bit of solder, small hand saw, small wire snips
- Yellow wire on the speaker harness is positive, light green is negative
Step 1 - Remove the door panel and speaker!
- Lets identify what we need to remove on the door panel before we begin prying.
- This is a picture of a rear door panel. The yellow shows where the screws will be. The arrow shows where the 3rd screw will be on a front door panel.
- The door lever and door panel handle screws are covered by small panels that can pop out with a small flathead. The third screw has a plastic "cap" on it that can also be popped up with a small flathead. No worries, the cap is attached to the screw.
- Secondary notes : Silver screw is for door lever, black screw is for door handle, plastic cap screw is for either left or right side of door panel, depending on which door panel is being removed
Close ups of the screws :
this is what you should end up with :
We can now pry the panel off! When you have the panel completely clipped off, be careful since you have the door lock actuator cables, and window switch harnesses still clipped into the panel.
Secondary notes : If removing a front door panel, the tweeter panel can easily pop up and out before the panel is removed. If you hear something drop while pulling the door panel off, dont be alarmed, it's just a plastic clip that can be reinstalled into the door panel.
Door lock actuator cables :
Window Switch harness :
Door panel clips that can fall off :
My apologies for the poor image quality!
Step 2 - stock speaker removal, bracket modification and speaker install.
The factory speaker is removed by twisting it counter clockwise on the door itself.
Heres a pic of the crappy factory speaker in all its glory (or lack thereof). I have outlined in yellow where I will be cutting to fit the aftermarket speaker. It's important that you be careful around the stock speaker's wires.
You can remove most of the speaker by hand. Here's a pic of a tear down and the wires that you should save.
you can nip around the plastic that the wire is attached to.
Here is the factory speaker mount "skeleton" after our cutting and removal of the factory speaker. When trimming, be sure there is enough removed to fit the aftermarket speakers magnets. The polk audio magnets are huge compared to factories.
This is how I mounted the Polk's to the factory speaker mount. I found a good position for the back to be easily connected and marked where the screws would go. I used screws where I could and for the areas that I didnt, I filled the skeleton with epoxy and installed screws as it dried.
After thats all set we can solder the stock wiring into our new speakers
Step 3 - Re-install and enjoy better sound!
A few things to remember when re-installing - Dont forget to clip in the door lock actuator cables and clip them back into their proper housings. Double check to make sure all clips are on the door panel. Double check all electrical connections! After every door has a new speaker, always check to make sure the speaker is working before installing the door panel.
Polk db650 with directional tweeter :
When it's all said and done, crank some tunes and enjoy your upgraded sound!
I installed a Pioneer AVH-x3500BT yesterday with a new faceplate and harness. I also mounted the bluetooth microphone inside the headliner light switches. I regret not taking pics of the install. If I decide to install an aux connection with an rca adapter, I'll be sure to take pics for you guys. It's easier than you think!
More how-to's to come - Front brake install, complete coolant flush, accessory belt change. See you guys and thanks for reading.
Last edited by tronix; Apr 4, 2013 at 05:41 PM.

Hi guys. Im new here. I've owned an evo X for a year now and have done a few things here and there with my vehicle. I decided to take pics of my speaker install. My vehicle is an 08 non-SSS GSR (no rockford sound system).
Some misc. info before we start :
- Speaker size for the evo X on all four corners are 6 1/2"
- I've re-used the factory mounting brackets. This method will destroy your factory speakers!
- The speakers I have installed are polk audio db651
- The tools used are a philips head screwdriver, small flat head, plastic panel tool, el cheapo soldering iron, a bit of solder, small hand saw, small wire snips
- Yellow wire on the speaker harness is positive, light green is negative
Step 1 - Remove the door panel and speaker!
- Lets identify what we need to remove on the door panel before we begin prying.
- This is a picture of a rear door panel. The yellow shows where the screws will be. The arrow shows where the 3rd screw will be on a front door panel.
- The door lever and door panel handle screws are covered by small panels that can pop out with a small flathead. The third screw has a plastic "cap" on it that can also be popped up with a small flathead. No worries, the cap is attached to the screw.
- Secondary notes : Silver screw is for door lever, black screw is for door handle, plastic cap screw is for either left or right side of door panel, depending on which door panel is being removed
Close ups of the screws :

this is what you should end up with :
We can now pry the panel off! When you have the panel completely clipped off, be careful since you have the door lock actuator cables, and window switch harnesses still clipped into the panel.
Secondary notes : If removing a front door panel, the tweeter panel can easily pop up and out before the panel is removed. If you hear something drop while pulling the door panel off, dont be alarmed, it's just a plastic clip that can be reinstalled into the door panel.
Door lock actuator cables :
Window Switch harness :
Door panel clips that can fall off :

My apologies for the poor image quality!
Step 2 - stock speaker removal, bracket modification and speaker install.
The factory speaker is removed by twisting it counter clockwise on the door itself.

Heres a pic of the crappy factory speaker in all its glory (or lack thereof). I have outlined in yellow where I will be cutting to fit the aftermarket speaker. It's important that you be careful around the stock speaker's wires.
You can remove most of the speaker by hand. Here's a pic of a tear down and the wires that you should save.
you can nip around the plastic that the wire is attached to.
Here is the factory speaker mount "skeleton" after our cutting and removal of the factory speaker. When trimming, be sure there is enough removed to fit the aftermarket speakers magnets. The polk audio magnets are huge compared to factories.
This is how I mounted the Polk's to the factory speaker mount. I found a good position for the back to be easily connected and marked where the screws would go. I used screws where I could and for the areas that I didnt, I filled the skeleton with epoxy and installed screws as it dried.
After thats all set we can solder the stock wiring into our new speakers

Step 3 - Re-install and enjoy better sound!
A few things to remember when re-installing - Dont forget to clip in the door lock actuator cables and clip them back into their proper housings. Double check to make sure all clips are on the door panel. Double check all electrical connections! After every door has a new speaker, always check to make sure the speaker is working before installing the door panel.
Polk db650 with directional tweeter :

When it's all said and done, crank some tunes and enjoy your upgraded sound!
I installed a Pioneer AVH-x3500BT yesterday with a new faceplate and harness. I also mounted the bluetooth microphone inside the headliner light switches. I regret not taking pics of the install. If I decide to install an aux connection with an rca adapter, I'll be sure to take pics for you guys. It's easier than you think!
More how-to's to come - Front brake install, complete coolant flush, accessory belt change. See you guys and thanks for reading.
Some misc. info before we start :
- Speaker size for the evo X on all four corners are 6 1/2"
- I've re-used the factory mounting brackets. This method will destroy your factory speakers!
- The speakers I have installed are polk audio db651
- The tools used are a philips head screwdriver, small flat head, plastic panel tool, el cheapo soldering iron, a bit of solder, small hand saw, small wire snips
- Yellow wire on the speaker harness is positive, light green is negative
Step 1 - Remove the door panel and speaker!
- Lets identify what we need to remove on the door panel before we begin prying.
- This is a picture of a rear door panel. The yellow shows where the screws will be. The arrow shows where the 3rd screw will be on a front door panel.
- The door lever and door panel handle screws are covered by small panels that can pop out with a small flathead. The third screw has a plastic "cap" on it that can also be popped up with a small flathead. No worries, the cap is attached to the screw.
- Secondary notes : Silver screw is for door lever, black screw is for door handle, plastic cap screw is for either left or right side of door panel, depending on which door panel is being removed
Close ups of the screws :
this is what you should end up with :
We can now pry the panel off! When you have the panel completely clipped off, be careful since you have the door lock actuator cables, and window switch harnesses still clipped into the panel.
Secondary notes : If removing a front door panel, the tweeter panel can easily pop up and out before the panel is removed. If you hear something drop while pulling the door panel off, dont be alarmed, it's just a plastic clip that can be reinstalled into the door panel.
Door lock actuator cables :
Window Switch harness :
Door panel clips that can fall off :
My apologies for the poor image quality!
Step 2 - stock speaker removal, bracket modification and speaker install.
The factory speaker is removed by twisting it counter clockwise on the door itself.
Heres a pic of the crappy factory speaker in all its glory (or lack thereof). I have outlined in yellow where I will be cutting to fit the aftermarket speaker. It's important that you be careful around the stock speaker's wires.
You can remove most of the speaker by hand. Here's a pic of a tear down and the wires that you should save.
you can nip around the plastic that the wire is attached to.
Here is the factory speaker mount "skeleton" after our cutting and removal of the factory speaker. When trimming, be sure there is enough removed to fit the aftermarket speakers magnets. The polk audio magnets are huge compared to factories.
This is how I mounted the Polk's to the factory speaker mount. I found a good position for the back to be easily connected and marked where the screws would go. I used screws where I could and for the areas that I didnt, I filled the skeleton with epoxy and installed screws as it dried.
After thats all set we can solder the stock wiring into our new speakers
Step 3 - Re-install and enjoy better sound!
A few things to remember when re-installing - Dont forget to clip in the door lock actuator cables and clip them back into their proper housings. Double check to make sure all clips are on the door panel. Double check all electrical connections! After every door has a new speaker, always check to make sure the speaker is working before installing the door panel.
Polk db650 with directional tweeter :
When it's all said and done, crank some tunes and enjoy your upgraded sound!
I installed a Pioneer AVH-x3500BT yesterday with a new faceplate and harness. I also mounted the bluetooth microphone inside the headliner light switches. I regret not taking pics of the install. If I decide to install an aux connection with an rca adapter, I'll be sure to take pics for you guys. It's easier than you think!
More how-to's to come - Front brake install, complete coolant flush, accessory belt change. See you guys and thanks for reading.

Thread
Thread Starter
Forum
Replies
Last Post
4g94T
For Sale - Engine / Drivetrain / Power
7
Oct 4, 2015 12:05 PM
4g94T
For Sale/WTB - Engine / Drivetrain / Power
1
Sep 24, 2015 09:40 AM
MrEvo2nv
For Sale - Part Outs
40
Feb 25, 2009 08:50 PM