
Evolved Member
Quote:
I likes
thanks! But that was so long ago. Some things have changed. Originally Posted by Mistaken
This is the cleanest look IMO.I likes

Evolved Member
Quote:
What does it look like now?Originally Posted by Evo Tengoku
thanks! But that was so long ago. Some things have changed.


Quote:
[IMG]
 [/IMG]
Originally Posted by masterklide
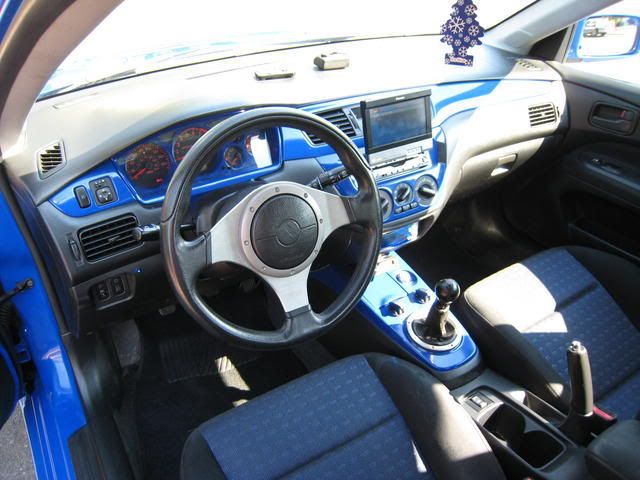
here's mine.. [IMG]
[/IMG]
Too much blue in my opinion. Looks like your parking brake has a viagra problem. Too many blue pills?
Evolving Member
Quote:
LOLOriginally Posted by wizzo 8
Too much blue in my opinion. Looks like your parking brake has a viagra problem. Too many blue pills?
 good one.
Evolving Member
Quote:


Originally Posted by aznj
just wanted to post up what i did on a slow day at work
--Thats a sick idea!!!!
+1


I love it
its different
iam going to do mine like that
thanks
its different
iam going to do mine like that
thanks


Evolved Member
My friend at the body shop just finished painting my dash trim pieces in GG just like the car.
Tomorrow morning they'll install them; afterwords I'll update this post.


there not sanded or buffed yet.
what you guys think?
we'll my friend at the body shop was busy this morning, so I took all the pieces home and started sanding them myself, i cut the sand paper in 1"x2" squares and started slowly sanding, actually I'm not really pushing its more like your feeling it with the sandpaper underneath your finger, you can actually feel any imperfections with this sand paper. (hey 3M how about a sponsorship? LOL)
next Saturday they'll get buffed and installed, here are some more pics.

this is the sand paper that was used, its made for dry sanding made by 3M 1500 grit, Velcro grip

your looking to remove all the dust particles and any fish eyes , you want a nice smooth finish.

almost finished sanding the radio surround piece

after almost 4 hours their just about finished, the light and dark spots are the dust residue that's not cleaned off yet.
they still need to be buffed .

here's what it should look like when the sanding is finished, the whole piece should be uniform in finish, when they get polished it should have a constant wet look.

Almost looks like the stock color after sanded in the pic

i assume if I had to pay for this and they charge around $80.00 hour, it took me 4 hours to sand taking my time, a body shop would not take this long, and the finish wont be this good unless you pay for it, plus painting and they still need to be buffed and reinstalled, don’t forget the removal its got to cost at least 4-500 dollars???
Tomorrow morning they'll install them; afterwords I'll update this post.
there not sanded or buffed yet.
what you guys think?
we'll my friend at the body shop was busy this morning, so I took all the pieces home and started sanding them myself, i cut the sand paper in 1"x2" squares and started slowly sanding, actually I'm not really pushing its more like your feeling it with the sandpaper underneath your finger, you can actually feel any imperfections with this sand paper. (hey 3M how about a sponsorship? LOL)
next Saturday they'll get buffed and installed, here are some more pics.
this is the sand paper that was used, its made for dry sanding made by 3M 1500 grit, Velcro grip
your looking to remove all the dust particles and any fish eyes , you want a nice smooth finish.
almost finished sanding the radio surround piece
after almost 4 hours their just about finished, the light and dark spots are the dust residue that's not cleaned off yet.
they still need to be buffed .
here's what it should look like when the sanding is finished, the whole piece should be uniform in finish, when they get polished it should have a constant wet look.
Almost looks like the stock color after sanded in the pic
i assume if I had to pay for this and they charge around $80.00 hour, it took me 4 hours to sand taking my time, a body shop would not take this long, and the finish wont be this good unless you pay for it, plus painting and they still need to be buffed and reinstalled, don’t forget the removal its got to cost at least 4-500 dollars???

Evolved Member
Quote:


Originally Posted by Aussie_8MR
Nothing special - Stock Evo 8MR seats, suede wheel, Sabelt harness.
nothing special??
u'r RHD thats special for me, very nice