
"How-To" custom fiberglass pillar gauge pods


Thread Starter
Evolved Member
Joined: May 2007
Posts: 606
Likes: 0
From: Ft Worth
"How-To" custom fiberglass pillar gauge pods
Ok, not sure how many of you have wondered how to make a custom A-Pillar gauge pod, but I figured it would be a good thing to contribute. The look is a lot different from the traditional pillar pods. It looks great and it will get tons of attention anywhere you go. I have used this method for 2 gauges but have yet to make one for 3. Play around with it and you should be able to work out your own design.
First you need to gather the material that you will be using in this project. Here is the list:
(1) Plastic Drop Cloth for speedy clean up: $2.00
(1) Mix and Measure bucket: $1.00
(2) Disposable paint brushes: $.50 each
(1) Disposable gloves: $1.00
(1) Fiberglass Resin Kit (hardener included): $10.00
(1) Yard of fleece material (color does not matter): $2.00
(1) Hot Glue Gun: $2.00
(1) Package of glue sticks: $2.00
(1) 1 foot long PVC pipe with 2�? ID (Home Depot): $2.00
(1) Assortment pack of sandpaper: $5.00
(1) Tube of Bondo Spot Putty: $2.00
(1) Can of High Build Sandable Primer
(1) Scissors
(1) Plastic Mitre Box (used to make straight cuts in the PVC): $5.00
(1) Fine toothed Hacksaw
(1) Bottle of cleaner/degreaser
(1) Roll of paper towels
Some extra tools that are good to have that will make the process faster and easier are:
Dremel
Cutoff wheels for Dremel
Sanding drums for Dremel (60 grit #440 or #408 and 120 grit #444 or #432)
High-Speed Cutters (#115 and #199)
Razor Blade
Old clothes
The first thing to do is cut the PVC to make the pods. I usually measure 2" and make a mark on the PVC. Or if you have a Mitre Box, its usually marked in inches. You then cut the PVC into how many pods you will need (1 - 3).
The A-pillar trim is then removed and wrapped in tinfoil to prevent the original part from being damaged by the fiberglass resins.
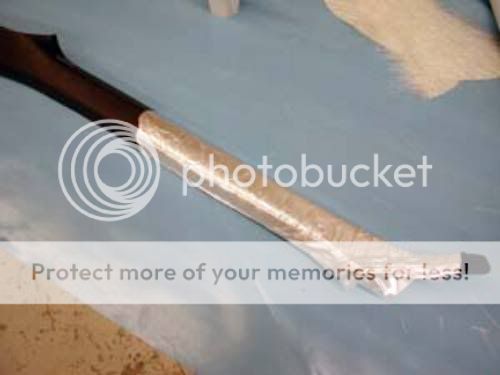
A layer of fiberglass matte is applied to the area with a mix of resin and hardner. Be sure to read the recommended mixing consistency on whichever brand you choose. I recommend at least 3 layers of this or more to make it very strong. When hardened, the part is removed from the pillar trim as well as the foil. Trim the excess fiberglass to the shape and size that you desire.
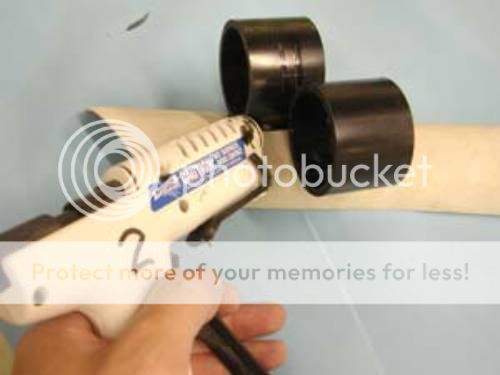
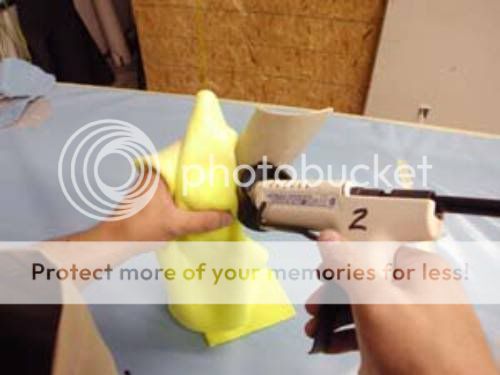
Cut a couple of PVC pieces for the gauges. You will want 2" ID (inside diameter). This can be bought at any local hardware store. After they are cut you will place them in position and hot glue them down to the shell you made earlier. Just a few dabs of glue. This isn't a final position.
Once the hot glue is dried it's a good idea to test fit it into its final position to ensure that all the parts look correct and present the driver with the best viewing capability. If the angles are off and not to your liking, then you can now pull the cups off and readjust them. Once you have them in the position you like, hot glue them down as much as possible.

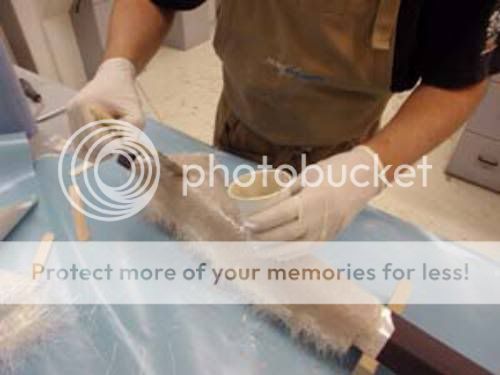
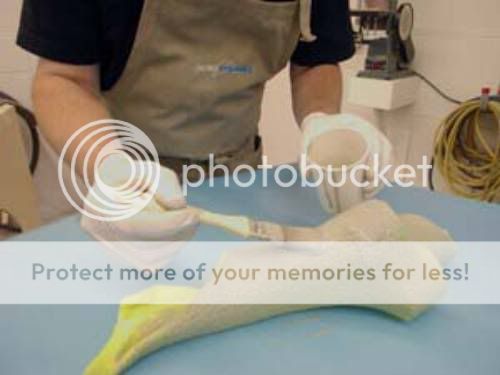
After that you will need to pull out the fleece material and wrap it over the outer surface of the entire assembly. By playing with different tensions, the overall shape of the pod can be manipulated to obtain the desired effect.
Once happy with the final appearance, the fabric is coated with another mixture of resin and hardner. In this picture a mixture of resin, hardner, and fiberglass powder was used. NOTE: Fiberglass powder is not required. So don't stress about not having it.
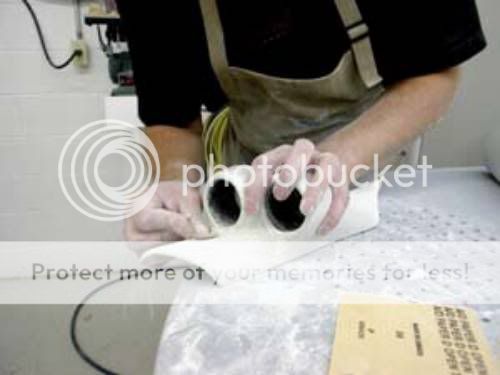
Once its dry, the excess fabric is trimmed and sanding begins. Several progressive grits are used until the desired surface finish is attained, either for vinyl or paint. I highly recommend using a Dremel for this part. Sanding by hand sucks and takes a lot longer. Start off with the 60 grit sanding drums and sand the entire pillar. The idea here is to start off working with the 60 grit course drums and finish with the finer 120 grit ones. You will want to use a slow speed and keep a very light pressure for a more effective sanding. For those doing it by hand, keep working your way down to the finer sandpaper.
If you notice, while you're sanding, there are sanding lines or grooves in the fiberglass. Its ok. You don't have to keep sanding until those are gone. Once you have it to a point where it's somewhat smooth, use the cleaner/degreaser and clean it. Its also a good idea to test fit the gauges. Use a Dremel or file the inside of the PVC cups until the gauges fit snug.
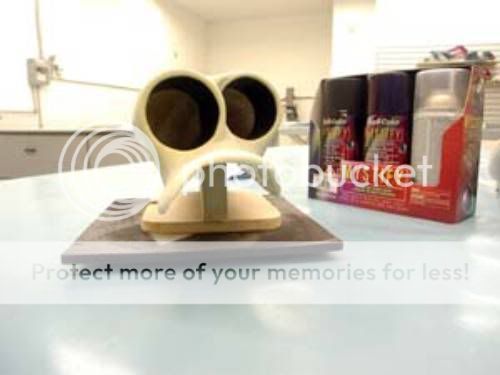
Now take the High Build spray primer and spray 2 coats onto it. Let it dry for about 30-45 minutes. Once that is done you will notice that the primer got rid of some of the light scratches. Now you will need the Bondo spot putty. Knead it as directed and apply it to the entire fiberglassed area. Applying slight pressure and a thin coat. You will need to let this dry for about an hour. I usually place it in the sun to speed up the process. *NOTE* You can also use body filler. I recommend Evercoat Rage Gold.
After the first spot putty layer is dry, take a 220 grit sand paper and begin to smooth it out. Don't be afraid to use slight pressure. What the spot putty did was fill in any pinholes and deep scratches. Once you think that you have it smooth, clean it again using the cleaner/degreaser. Now spray another 2 coats of the High build primer. Once it is dry examine it for any other scratches, ridges, unsmoothed areas, pinholes, ect. If you find any, use the spot putty to fill the scratches and pinholes and a 400-grit sandpaper to smooth out the ridges and such. Repeat this process until completely smooth. It should look similar to this:
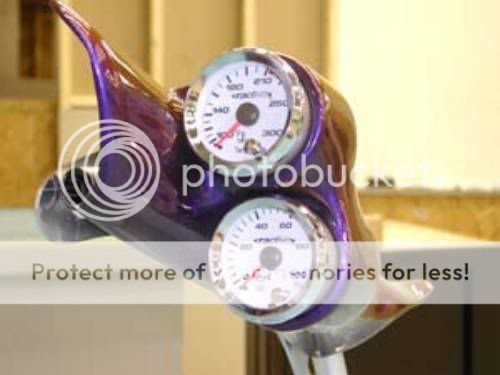
From here, I would go ahead and add 2-3 more coats of primer, let dry, and then sand with a 600-800 grit sandpaper. It should be ready for paint.

Here is the finished product. The assembly can then be mounted into position and your choice of gauges can be installed and wired up. The paint was still wet in this picture so the gauges weren't push all the way in.
If any of you need help, don't hesitate to let me know.
SeRious08
First you need to gather the material that you will be using in this project. Here is the list:
(1) Plastic Drop Cloth for speedy clean up: $2.00
(1) Mix and Measure bucket: $1.00
(2) Disposable paint brushes: $.50 each
(1) Disposable gloves: $1.00
(1) Fiberglass Resin Kit (hardener included): $10.00
(1) Yard of fleece material (color does not matter): $2.00
(1) Hot Glue Gun: $2.00
(1) Package of glue sticks: $2.00
(1) 1 foot long PVC pipe with 2�? ID (Home Depot): $2.00
(1) Assortment pack of sandpaper: $5.00
(1) Tube of Bondo Spot Putty: $2.00
(1) Can of High Build Sandable Primer
(1) Scissors
(1) Plastic Mitre Box (used to make straight cuts in the PVC): $5.00
(1) Fine toothed Hacksaw
(1) Bottle of cleaner/degreaser
(1) Roll of paper towels
Some extra tools that are good to have that will make the process faster and easier are:
Dremel
Cutoff wheels for Dremel
Sanding drums for Dremel (60 grit #440 or #408 and 120 grit #444 or #432)
High-Speed Cutters (#115 and #199)
Razor Blade
Old clothes
The first thing to do is cut the PVC to make the pods. I usually measure 2" and make a mark on the PVC. Or if you have a Mitre Box, its usually marked in inches. You then cut the PVC into how many pods you will need (1 - 3).
The A-pillar trim is then removed and wrapped in tinfoil to prevent the original part from being damaged by the fiberglass resins.
A layer of fiberglass matte is applied to the area with a mix of resin and hardner. Be sure to read the recommended mixing consistency on whichever brand you choose. I recommend at least 3 layers of this or more to make it very strong. When hardened, the part is removed from the pillar trim as well as the foil. Trim the excess fiberglass to the shape and size that you desire.
Cut a couple of PVC pieces for the gauges. You will want 2" ID (inside diameter). This can be bought at any local hardware store. After they are cut you will place them in position and hot glue them down to the shell you made earlier. Just a few dabs of glue. This isn't a final position.
Once the hot glue is dried it's a good idea to test fit it into its final position to ensure that all the parts look correct and present the driver with the best viewing capability. If the angles are off and not to your liking, then you can now pull the cups off and readjust them. Once you have them in the position you like, hot glue them down as much as possible.
After that you will need to pull out the fleece material and wrap it over the outer surface of the entire assembly. By playing with different tensions, the overall shape of the pod can be manipulated to obtain the desired effect.
Once happy with the final appearance, the fabric is coated with another mixture of resin and hardner. In this picture a mixture of resin, hardner, and fiberglass powder was used. NOTE: Fiberglass powder is not required. So don't stress about not having it.
Once its dry, the excess fabric is trimmed and sanding begins. Several progressive grits are used until the desired surface finish is attained, either for vinyl or paint. I highly recommend using a Dremel for this part. Sanding by hand sucks and takes a lot longer. Start off with the 60 grit sanding drums and sand the entire pillar. The idea here is to start off working with the 60 grit course drums and finish with the finer 120 grit ones. You will want to use a slow speed and keep a very light pressure for a more effective sanding. For those doing it by hand, keep working your way down to the finer sandpaper.
If you notice, while you're sanding, there are sanding lines or grooves in the fiberglass. Its ok. You don't have to keep sanding until those are gone. Once you have it to a point where it's somewhat smooth, use the cleaner/degreaser and clean it. Its also a good idea to test fit the gauges. Use a Dremel or file the inside of the PVC cups until the gauges fit snug.
Now take the High Build spray primer and spray 2 coats onto it. Let it dry for about 30-45 minutes. Once that is done you will notice that the primer got rid of some of the light scratches. Now you will need the Bondo spot putty. Knead it as directed and apply it to the entire fiberglassed area. Applying slight pressure and a thin coat. You will need to let this dry for about an hour. I usually place it in the sun to speed up the process. *NOTE* You can also use body filler. I recommend Evercoat Rage Gold.
After the first spot putty layer is dry, take a 220 grit sand paper and begin to smooth it out. Don't be afraid to use slight pressure. What the spot putty did was fill in any pinholes and deep scratches. Once you think that you have it smooth, clean it again using the cleaner/degreaser. Now spray another 2 coats of the High build primer. Once it is dry examine it for any other scratches, ridges, unsmoothed areas, pinholes, ect. If you find any, use the spot putty to fill the scratches and pinholes and a 400-grit sandpaper to smooth out the ridges and such. Repeat this process until completely smooth. It should look similar to this:
From here, I would go ahead and add 2-3 more coats of primer, let dry, and then sand with a 600-800 grit sandpaper. It should be ready for paint.
Here is the finished product. The assembly can then be mounted into position and your choice of gauges can be installed and wired up. The paint was still wet in this picture so the gauges weren't push all the way in.
If any of you need help, don't hesitate to let me know.
SeRious08


Evolving Member
Joined: Jun 2007
Posts: 368
Likes: 0
From: Wheaton, Illinois
yea thats my only concern, would your airbags get in the way of that? bc if it does then its not soemthin i really wanna throw on my car, bc i do get tired of check in my car temp n all that by clicking my button
Just leave it on the temp. That's what I do. I rarely need to know my mileage (and I don't give a sh*t about the average speed/MPG stuff), so I just leave it on the engine temp 24-7.
Thread Starter
Evolved Member
Joined: May 2007
Posts: 606
Likes: 0
From: Ft Worth
Well, I thought of that, but the guage pods can be made for any car. Besides, I believe that the pillar airbags only drop from a side impact. If thats the case then the pods would never even come 'towards' the driver.
In the videos that I have seen, the actual plastic pillar peals off towards the windshield at the top and then blocked by the steering wheel airbag.
I guess when it comes to having a custom look you have to take the good with the bad. Same concept as individuals that swap steering wheels for racing wheels. They are removing a safety device that could save their life. I'm sure that you could remove the pillar airback with this same concept if it really mattered.
Trending Topics
I understand your logic. I guess I'd just be worried that you might be wrong somehow and I'd have an oil pressure gauge crush my skull.
Fear is a powerful thing, you know?
Fear is a powerful thing, you know?
Thread Starter
Evolved Member
Joined: May 2007
Posts: 606
Likes: 0
From: Ft Worth
I totally understand, but there are many many people that 'just don't care'. They want the look more than anything. So I posted this how-to for everyone.
I will soon be working on other fiberglass stuff that doesn't involve airbags.
Now if anyone is willing to mail me the center trim piece, I can custom mold some guage pods to it for them. I would do it for free + shipping for a trial and error piece. I will be doing mine soon as well.
I will soon be working on other fiberglass stuff that doesn't involve airbags.
Now if anyone is willing to mail me the center trim piece, I can custom mold some guage pods to it for them. I would do it for free + shipping for a trial and error piece. I will be doing mine soon as well.
Last edited by SeRious08; Jun 14, 2007 at 09:20 AM.
I totally understand, but there are many many people that 'just don't care'. They want the look more than anything. So I posted this how-to for everyone.
I will soon be working on other fiberglass stuff that doesn't involve airbags.
Now if anyone is willing to mail me the center trim piece, I can custom mold some guage pods to it for them. I would do it for free + shipping for a trial and error piece. I will be doing mine soon as well.
I will soon be working on other fiberglass stuff that doesn't involve airbags.
Now if anyone is willing to mail me the center trim piece, I can custom mold some guage pods to it for them. I would do it for free + shipping for a trial and error piece. I will be doing mine soon as well.
Evolving Member
Joined: May 2007
Posts: 216
Likes: 0
From: Toronto
that looks awsome and not so hard to do!
one quetsion. Fiberglass Resin Kit (hardener included) <<< where can you buy this?
also looking forward to your other add on ideas. and do you have an installed picture of the gauges? just wanna see how purple fits in with lancer 08. thanks!
one quetsion. Fiberglass Resin Kit (hardener included) <<< where can you buy this?
also looking forward to your other add on ideas. and do you have an installed picture of the gauges? just wanna see how purple fits in with lancer 08. thanks!
(Correct me if I'm wrong, but I'm fairly sure I'm not. The tach is on the left side in the example pictures.)
Thread Starter
Evolved Member
Joined: May 2007
Posts: 606
Likes: 0
From: Ft Worth
that looks awsome and not so hard to do!
one quetsion. Fiberglass Resin Kit (hardener included) <<< where can you buy this?
also looking forward to your other add on ideas. and do you have an installed picture of the gauges? just wanna see how purple fits in with lancer 08. thanks!
one quetsion. Fiberglass Resin Kit (hardener included) <<< where can you buy this?
also looking forward to your other add on ideas. and do you have an installed picture of the gauges? just wanna see how purple fits in with lancer 08. thanks!
And I know you weren't bashing the write up. Send me that center trim piece and I can hook you up with some gauge pods.

