
Rear Camera Installed

Thread Starter
Evolved Member
Joined: Aug 2007
Posts: 633
Likes: 0
From: DC
Rear Camera Installed
Yes, the rear camera is installed. Its works great. Easy to install and integrates like OEM.
Its late so ill post pics tomorrow but I have plenty of details so anyone will be able to do this with no questions.
Ill explain the whole thing from taking off the dash to running the cable under the scuff guards and through the dash to terminations and cable management.
It automatically turns on when you put the car in reverse. great field of vision and clarity.
Thread Starter
Evolved Member
Joined: Aug 2007
Posts: 633
Likes: 0
From: DC
Well I haven't been able to post pics yet But I will as soon as my server comes back online.
I used the Pioneer ND-BC2 camera.
Taking the Lancer apart is easy as sliced bread. That thing is snappier than Legos.
It was a grand total of 9 screws. Everything else from the trunk to the head unit, trim, glove box and scuff guards is all plastic snaps.
Tools required are:
Philips head
wire cutters / strippers
coat hanger
wire splice connector butts ( radio shack )
tap in squeeze connectors ( radio shack )
I followed the how to in both these sections:
http://www.mitsubishiforum.com/m_139348/tm.htm
https://www.evolutionm.net/forums/sh...d.php?t=297254
the Nav cover pulls of the same as the cd unit cover does.
The trick to this whole things is that the 08 US Lancer does not have a wire harness to use in the back to make your connections. You need to find an old computer case with the LED and HDD led activity connections. ( you know the lights for the case that attach to the mother board ) to fab your 2 out of 4 wire connections. For the other two you use 22-18 awg wire tap connections.
The other task / slight challenge is to fish the wire to the back of the car. I went through the cabin along the driver side under the scuff guards. They just pop off.
I ran the cable into the trunk and created /drilled a hole in the bottom of the spare tire area, sealed it silicone and mounted the camera with the adhesive supplies. It looks completely stock.
**NOTE**
There is an S Video connection on the back of the Nav Unit. Im going to test this port this week and see if it provides video out. Perhaps it could be used to display video / DVD to another screen and does not cutout while in motion!?!?
Anyways, there is plenty of room for running wire through the dash and fishing was a breeze. As soon as my server is up and running Ill post a ton of pics on it.
Here is the pin out for your connections on the back of the Nav. Its the top row of the only 12 pin connection that does not have a wire harness.
Pin 1 - not used
Pin 2 - not used
Pin 3 - Video in
Pin 4 - not used
Pin 5 - Ground
Pin 6 - Camera recognition
The bottom row is not used at all.
If you can get them down to 100k each, you can always host them on EvoM... Otherwise maybe a free site online?
Last edited by Blacksheepdj; Dec 7, 2007 at 06:50 AM.
Thread Starter
Evolved Member
Joined: Aug 2007
Posts: 633
Likes: 0
From: DC
How To REAR CAMERA INSTALL
The Rear Camera Installation
The Parts You Will Need
http://www.automationinstaller.com/camerainstall/33.JPG
Start by removing the glove box.
Press in on both sides of the glove box. It will drop to a half out position. Pop off the air piston on the right side. It is hooked on with a plastic arrow clip. Once the air piston is popped off, let the glove box hang all the way down / open and pull forward / towards the passenger seat to remove.
http://www.automationinstaller.com/camerainstall/27.JPG
http://www.automationinstaller.com/camerainstall/25.JPG
Now you can see a single screw to remove the right most plastic trim.
http://www.automationinstaller.com/camerainstall/23.JPG
Unscrew this piece to expose the single screw for the wanna be carbon trim piece.
http://www.automationinstaller.com/camerainstall/21.JPG
http://www.automationinstaller.com/camerainstall/20.JPG
After removing the single screw the trim piece pops off. It takes a little prying to get it to start to pop off. It is held on by 10 or so plastic clips. Take your time and distribute your force as to not pry at just one clip at once. Here is a pic of the backside of the trim piece.
http://www.automationinstaller.com/camerainstall/49.JPG
After the trim is removed then you need to unscrew the few screws holding the caution flash and seat belt lights.
http://www.automationinstaller.com/camerainstall/19.JPG
It has two clips on each side that you press towards each other and then pull forward / towards you.
http://www.automationinstaller.com/camerainstall/18.JPG
Now its time to take off the NAV face plate. It is not screwed in at any location yet there are three points along the lower frame / face plate - in the same area where the flasher and seat belt indicator was located that it is clipped to. Pry at each side until it pops off. Start with the sides and then go the the middle. Once you have the bottom popped loose start at the top and pry it away from the dash. I used just my fingers for all of this. I would try and stay away from a flat head screw driver. Too much of a chance of marking something up.
Here is a look at the back of the NAV face plate so you can get an idea of how it is held on.
http://www.automationinstaller.com/camerainstall/51.JPG
There are four screws that hold the NAV in Place. Remove them.
http://www.automationinstaller.com/camerainstall/16.JPG
http://www.automationinstaller.com/camerainstall/17.JPG
I used a towel to drape over the shifter and bottom edge of the NAV opening when i pulled the unit out as to not scratch anything.
http://www.automationinstaller.com/camerainstall/3.JPG
Disconnect the black antenna cable, grey foam covered cable and the 3 white plastic wire harnesses. Your navi should now be free.
You would most likely want to go where you can set the nav on a flat work surface. Its time to attach camera parts.
I used the Pioneer ND-BC2. There is a BC3 out now I believe but they should work the same.
On the back of the NAV you will find on the right side there is a 12 pin connection block with nothing connected. Keep this pin out in mind.
Pin 1 - not used
Pin 2 - not used
Pin 3 - Video in
Pin 4 - not used
Pin 5 - not used
Pin 6 - Camera recognition
You need to splice into two wires on the left connection block and create a custom harness on the right 12 pin block.
Here is a picture of the completed work.
http://www.automationinstaller.com/camerainstall/36.jpg
http://www.automationinstaller.com/camerainstall/37.jpg
http://www.automationinstaller.com/camerainstall/38.jpg
http://www.automationinstaller.com/camerainstall/39.jpg
http://www.automationinstaller.com/camerainstall/40.jpg
http://www.automationinstaller.com/camerainstall/41.jpg
http://www.automationinstaller.com/camerainstall/42.jpg
http://www.automationinstaller.com/camerainstall/43.jpg
The left splices are the red and black power for the camera.
The right splices are the video in and recognition on pin 3 and 6.
ONLY PIN 3 and 6 need to be connected. They are connected to the RCA end of the camera. I cut the RCA ( also known as a phono jack ) off and used butt splices from radio shack to connect them to a PC speaker connection which fits perfectly as your custom wire harness.
The left splices are 22 - 18 AWG wire taps that are tapped onto the black wire and white with black stripe wire on the far left harness. This provides power to the Pioneer unit.
See: http://www.mitsubishiforum.com/m_139348/tm.htm for more details.
I don't have pics for how I ran the cable to the back of the car but I will explain.
With the nave out there is plenty of room to fish the camera cable. You need to select where you want the camera mounted first. The camera has to be fished from the back of the car to the front. Obviously. You don't want to have to finagle the camera unit through the car. To get the wire from the rear bumper to inside the cabin I drilled a small hole, just big enough for the wire at the bottom of the spare tire wheel well. I sealed the hole with silicone. There is plenty of space to fish the camera over the interior of the bumper and out the license plate lighting gap which is just above the actual license plate. Duh! Here is another pic.
http://www.automationinstaller.com/camerainstall/54.JPG
Now to get the rest of the cable to the front, use a coat hanger. Straighten it out and make a tight loop at the ends. You don't want to scratch anything. Put the back seats down and fish through the corner, where the seat meets the door. With any luck on the first try it will slide down into the scuff guard at the bottom of the door. You know, that plastic cap that is at the bottom of every door on the frame of the car. Each one of those door sills pops up and off. Even the plastic on the door pillar pops off. Just use your fingers and pry around. Like I said earlier, this car is like Legos, everything is snappy.
Fish the cable up the front and then zip tie up over your pedals. There lots of places to secure to. Just do a neat job so no cable comes down. You wouldn't want to have a wire get in your way while driving. Use the same coat hanger to fish up through the hole in the dash from the vacated NAV unit.
Attach the brain of the pioneer to the bottom of the nave and wire tie all access cable to the back side of the unit. There is plenty of room so you don't have to get real creative.
***NOTE**** There is an S-Video port on the back of the nav. I don't know what this port is for yet but I hooked up a S-Video cable and ran it to the glove box for possible future use.
http://www.automationinstaller.com/camerainstall/7.JPG
http://www.automationinstaller.com/camerainstall/10.JPG
http://www.automationinstaller.com/camerainstall/28.JPG
So you should be ready to plug everything back up and test it out.
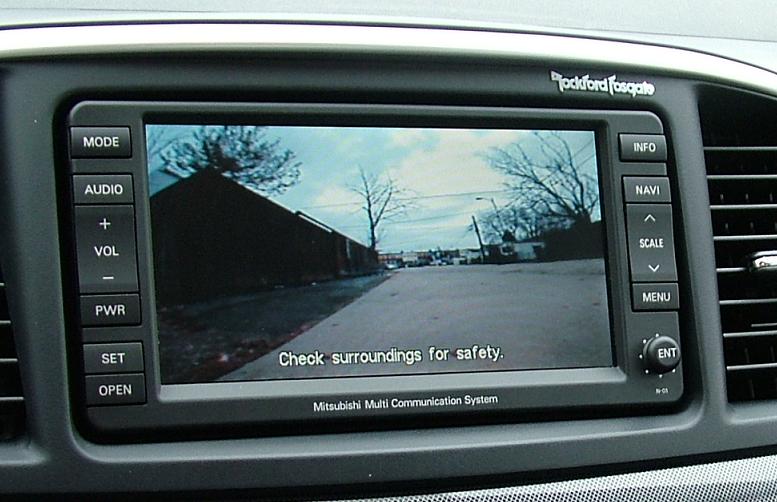
When you start the car the unit will briefly install an internal update and then reboot itself. Be sure to keep your foot on the brake or engage the E brake to be sure you don't go anywhere. If everything is OK you should see whats behind you when you put it in reverse.
http://www.automationinstaller.com/camerainstall/1.JPG
If you don't see and image, if the screen goes black but you see the "check surroundings " text, pull the unit out and flip your custom harness. ( basically switching the connection ) you might have it cabled backwards. I had this problem. I wasn't sure which part of the RCA plug i clipped off was video in and video trigger. No big deal. So long as you made a good connection its just a matter of flipping the custom wire harness.
Here is the final look
http://www.automationinstaller.com/camerainstall/30.JPG
You can now go into the Setup Menu by holding "Set" and "Nav" together for 5 seconds. The Camera tab should be active now.
I will follow up with my findings on the S-Video Hookup.
I will answer any question I can.
Good Luck
Last edited by elpoole; Apr 19, 2008 at 01:25 PM. Reason: Picture size
Trending Topics


Evolving Member
Joined: Jun 2007
Posts: 347
Likes: 0
From: Albany
niceee man, could you tell me where you got the camera from? and where does it go? does it go in that circle cut out in the bumper? i would only want one if it goes there because otherwise it would be pointless for me. but im thinking maybe the s-video is for a monitor out, like for rear headrest monitors that you can watch dvds on while driving. i think you should hook something up to it that displays s video and see if the nav will recognize it. because in the setup menu there was a spot for another display but it was NA just like camera was.
Thread Starter
Evolved Member
Joined: Aug 2007
Posts: 633
Likes: 0
From: DC
The Nav does not recognize the S-Video out / In. I tried it with a monitor and I got nothing. Im not sure what its for yet. I read elsewhere that the Rear DVD for Outlanders actually use other wires built into one of the harnesses to transfer video data. Im still working on figuring out what the hell that S-Video is for. One would think its an obvious rear display output!
I used a Pioneer ND-BC2 Camera. Got it from ebay at $149.00 Its supposed to be one of the better ones but who knows. I would say its clarity is Fair and it adjusts well to ambient light. Night shots are clear and sun glare is not a problem so far.
You can use other cameras. You would wire them the exact same way. There are tons of camera options out there. What you are looking for is a camera that has a wide angle and low lux.
It does not go in the circle cutout in the bumper. Check out the pics I posted. The Pioneer that I used has self adhesive on the back of the bracket. I used a zip tie on the cable behind the bumper just it case it didnt hold. I wouldnt want my camera just draggin down the road if it fell off. Its been 27 - 40 degrees in washington dc plus rain and snow the last few days and so far its stayed tight.
Last edited by elpoole; Jan 5, 2008 at 08:05 PM.