


How to Install Rear Transmission mount/roller, plus upgrade


How to Install Rear Transmission mount/roller, plus upgrade
This forum is a work in progress for me. I will be installing the Rear Transmission Mount/roller on both my 03 5speed OZ rally and my 04 Auto ES Lancers. I have ordered some brand new mounts off ebay.
I have also added in some DIY urethane inserts to make them stronger so they won't go bad again. Typically, the mounts on a 02-06 Lancer go bad after the first 2 years. I got my urethane from http://www.energysuspensionparts.com...%20Inserts.asp Their ebay store is http://stores.ebay.com/Energy-Suspension . All you have to do is follow their dirrections. It was very easy. I went with the 60A formula.
Here are the pics of the new mounts and then with the inserts.
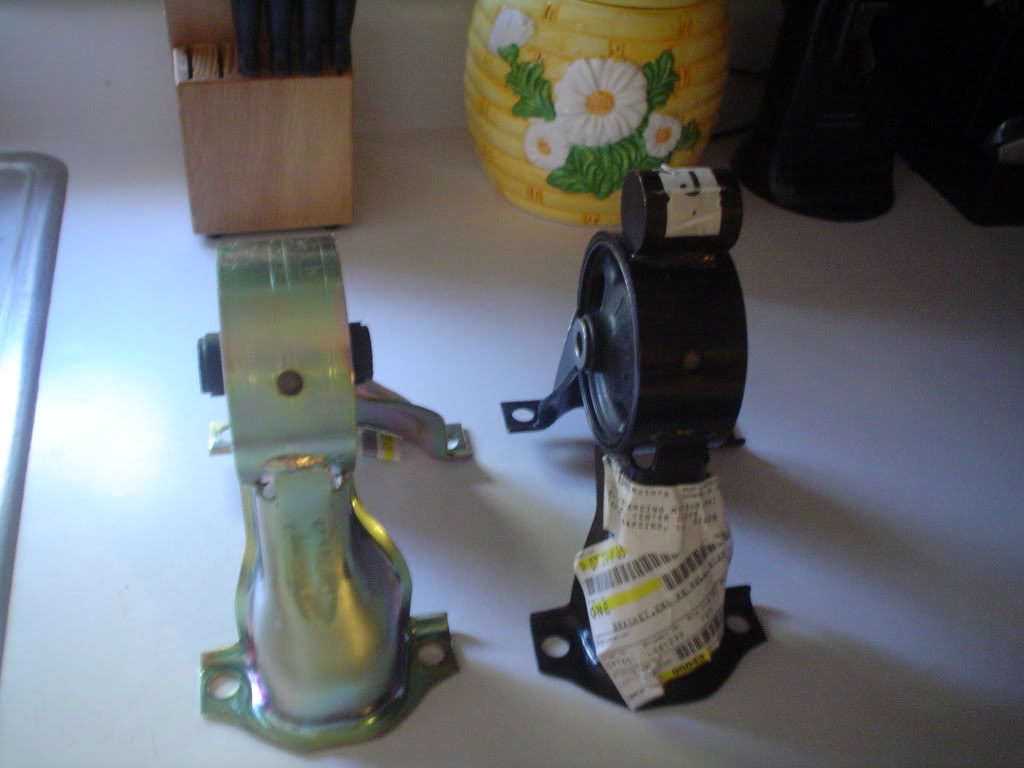


I believe the one with the weight on top is for a 5 speed. I have also noticed there seems to be some rust on my old ones. I figure it will do it to the new ones. I decided to give them both a coat of black paint. The 5 speed on came black, I just wanted to give it an extra coat.
As you can tell from the pictures, there doesn't seem to be much difference in the mounts. They both look like they mount the same and the hole in the mount is in the exact same place as each other. The only differences is that one mount is black and has a weight on it and they both have different inserts inside the mount. One seems to have more insert than the other. I don't know how much of a difference it makes, but you may be able to use them on either one. It would probably work best if you take out the insert and do a complete fill of urethane as I have seen on a write up on here. I am showing this for anyone who can find the parts cheap at a junkyard or whereever and its for the other transmission. After I am done with this project, I will be selling the old mounts. PM me if interested.
More to come.
Here is a write up I found by Myszkewicz on how to completely fill in your old mounts if you want a solid once piece design https://www.evolutionm.net/forums/sh...ight=diy+mount
I have also found this write up https://www.evolutionm.net/forums/sh...ad.php?t=21905 It was a sticky that for some reason, I didn't see. I still plan to do mine, I just plan to do mine alittle different and show both an auto and 5 speed.
10/21/08 Success
I finished the 03 OZ in 2 1/2 hours. I will be doing the write up after I complete the 04 ES. It wasn't all that bad really. I would much rather do this project than my other one I did putting on a ss clutch line. Ramps are a plus on this and as I said, its not all that hard, its just positioning and going back and forth between which bolts to take off last.
10/22/08 Success again.
I finished the 04 Auto ES in 1 hour, 17 min this time. Half as much as the first. I found 2 differences this between the auto and manual. One the manual, the bolt nearest the transmission thats to the roller mount, its harder to get to because the transmission is too close. You'll need either a flared wrench or to jack the transmisison up after you take out the bolt that holds the mount to the bracket. The other difference is how easy it was to fish out the mount and bracket after you take out all the bolts. There seems to be less wiring and hoses in the way in the auto than the manual. I doesn't make a difference, but it just seemed easier this time.
The write up.
Tools needed
Phillips head screwdriver
Flat head screwdriver
17mm combination wrench
14mm combination wrench
17mm, 14mm socket and a 3/8 driver
14mm socket and a smaller driver
Braker bar or iron pipe. (most useful thing here)
Jack and Jackstand
Ramps (way better to use)
Get the car up on ramps.

Take off the plastic clips to the splash shield. There will be two of them.

Take off the wishbone (crossmember) using a 17mm socket and driver. 2 bolts at the front, one at the back.


Take off the bolt that holds the bracket to the mount in the front. Thats the last bolt holding in the crossmember, hold it while you take out the bolt.

Take out the 4 bolts to the mount. There are 2 in the front and 2 in the back. I couldn't get pics of the of the rear bolts, but the are on the subframe near the cat converter. You'll have to feel for those two. The front two are very easy on an auto. For the manual, the bolt to the right in the pic, you will have to go ahead and take out the bolt the holds the mount to the bracket, and jack up the transmission to get enough clearance, or get a flared 14mm wrench, which would be best.

Next, if you haven't already, take out the bolt holding the bracket to the mount.

There will be 3 17mm bolts holding the bracket to the transmission. It is best to access the bolts the drivers side from under the hood. You'll have to take off the top part of the intake. The lower bolt you can get from underneath. You may want to loosen the bolt to the driverside from under, and take out from the top with a rachet.


They are ready to pull out, just pull them out from there you took off the intake one at a time.
Put them back in in reverse order. Put the bolts in but do not tighten them. You'll need some play in them to line up the rest of the bolts and the bolt that mounts the bracket to the mount. After you got them all started, just tighten them down to spec. I don't see a way to get a torque wrench in, so I just tightened them as best as possible. Don't forget to put your crossmember and intake back on.
This project was pretty simple and isn't as bad as the board makes it out to be. I would just set aside 3 hours or so to do it. Get that 14mm flared wrench, it would have saved me 20 to 30 min on the manual OZ. That pipe or braker bar is your best friend, you'll have to use it on every bolt. Just getting in and out at angles to each bolt is the hardest part. Also, I didn't have any problems putting the bolt back through either mount, I didn't have to jack up the tranny to get it an an angle. If anyone is interested, I am cleaning up my old mounts from both and will be selling them. They wheren't in as bad shape as I thought. They would be good mounts to use the urethane fill in. PM if interested. I will post pics soon.
I have also added in some DIY urethane inserts to make them stronger so they won't go bad again. Typically, the mounts on a 02-06 Lancer go bad after the first 2 years. I got my urethane from http://www.energysuspensionparts.com...%20Inserts.asp Their ebay store is http://stores.ebay.com/Energy-Suspension . All you have to do is follow their dirrections. It was very easy. I went with the 60A formula.
Here are the pics of the new mounts and then with the inserts.
I believe the one with the weight on top is for a 5 speed. I have also noticed there seems to be some rust on my old ones. I figure it will do it to the new ones. I decided to give them both a coat of black paint. The 5 speed on came black, I just wanted to give it an extra coat.
As you can tell from the pictures, there doesn't seem to be much difference in the mounts. They both look like they mount the same and the hole in the mount is in the exact same place as each other. The only differences is that one mount is black and has a weight on it and they both have different inserts inside the mount. One seems to have more insert than the other. I don't know how much of a difference it makes, but you may be able to use them on either one. It would probably work best if you take out the insert and do a complete fill of urethane as I have seen on a write up on here. I am showing this for anyone who can find the parts cheap at a junkyard or whereever and its for the other transmission. After I am done with this project, I will be selling the old mounts. PM me if interested.
More to come.
Here is a write up I found by Myszkewicz on how to completely fill in your old mounts if you want a solid once piece design https://www.evolutionm.net/forums/sh...ight=diy+mount
I have also found this write up https://www.evolutionm.net/forums/sh...ad.php?t=21905 It was a sticky that for some reason, I didn't see. I still plan to do mine, I just plan to do mine alittle different and show both an auto and 5 speed.
10/21/08 Success
I finished the 03 OZ in 2 1/2 hours. I will be doing the write up after I complete the 04 ES. It wasn't all that bad really. I would much rather do this project than my other one I did putting on a ss clutch line. Ramps are a plus on this and as I said, its not all that hard, its just positioning and going back and forth between which bolts to take off last.
10/22/08 Success again.
I finished the 04 Auto ES in 1 hour, 17 min this time. Half as much as the first. I found 2 differences this between the auto and manual. One the manual, the bolt nearest the transmission thats to the roller mount, its harder to get to because the transmission is too close. You'll need either a flared wrench or to jack the transmisison up after you take out the bolt that holds the mount to the bracket. The other difference is how easy it was to fish out the mount and bracket after you take out all the bolts. There seems to be less wiring and hoses in the way in the auto than the manual. I doesn't make a difference, but it just seemed easier this time.
The write up.
Tools needed
Phillips head screwdriver
Flat head screwdriver
17mm combination wrench
14mm combination wrench
17mm, 14mm socket and a 3/8 driver
14mm socket and a smaller driver
Braker bar or iron pipe. (most useful thing here)
Jack and Jackstand
Ramps (way better to use)
Get the car up on ramps.
Take off the plastic clips to the splash shield. There will be two of them.
Take off the wishbone (crossmember) using a 17mm socket and driver. 2 bolts at the front, one at the back.
Take off the bolt that holds the bracket to the mount in the front. Thats the last bolt holding in the crossmember, hold it while you take out the bolt.
Take out the 4 bolts to the mount. There are 2 in the front and 2 in the back. I couldn't get pics of the of the rear bolts, but the are on the subframe near the cat converter. You'll have to feel for those two. The front two are very easy on an auto. For the manual, the bolt to the right in the pic, you will have to go ahead and take out the bolt the holds the mount to the bracket, and jack up the transmission to get enough clearance, or get a flared 14mm wrench, which would be best.
Next, if you haven't already, take out the bolt holding the bracket to the mount.
There will be 3 17mm bolts holding the bracket to the transmission. It is best to access the bolts the drivers side from under the hood. You'll have to take off the top part of the intake. The lower bolt you can get from underneath. You may want to loosen the bolt to the driverside from under, and take out from the top with a rachet.
They are ready to pull out, just pull them out from there you took off the intake one at a time.
Put them back in in reverse order. Put the bolts in but do not tighten them. You'll need some play in them to line up the rest of the bolts and the bolt that mounts the bracket to the mount. After you got them all started, just tighten them down to spec. I don't see a way to get a torque wrench in, so I just tightened them as best as possible. Don't forget to put your crossmember and intake back on.
This project was pretty simple and isn't as bad as the board makes it out to be. I would just set aside 3 hours or so to do it. Get that 14mm flared wrench, it would have saved me 20 to 30 min on the manual OZ. That pipe or braker bar is your best friend, you'll have to use it on every bolt. Just getting in and out at angles to each bolt is the hardest part. Also, I didn't have any problems putting the bolt back through either mount, I didn't have to jack up the tranny to get it an an angle. If anyone is interested, I am cleaning up my old mounts from both and will be selling them. They wheren't in as bad shape as I thought. They would be good mounts to use the urethane fill in. PM if interested. I will post pics soon.
Last edited by Juan Martinez; Oct 22, 2008 at 02:42 PM.


Subscribed, I am doing this on my 03 auto once I get the front mount in, so this thread should help a ton. BTW how much was the silver one for an auto? I scored the same exact one on my local craigslist for $20 and couldn't compare it to autozone prices cause they didn't have it.
I paid 41.99 plus shipping on ebay, then he had a 5 speed one for 61.99. he only charged 16.00 shipping. It was the one that was posted here on the forums a few weeks ago. Great deal, but not as good as yours. Did you get yours new?
yeah brand new OEM one some guy had sitting around said he was going to start a mobile auto thing and never got around to it and had it for $25 and i told him $20 and he said he would have taken less, just wanted it gone so I still gave him the 20 stack
Trending Topics
Yeah I was just about to take the hit and go to the stealership and I was like what the heck i'll try it, and what do ya know. I found my OZ odometer on there a while back 48k miles for $60