
Fiberglass Enclosure Tutorial


One question that I have that has been bugging me for days. How did you get the seatbelts out and back in. I saw one had a slit cut in it, but what about the one that had the top shroud removed (the other piece you glassed). I didn't see any cuts or anything. I am going to try this project next weekend and I need all the specific of this. Oh, I really didn't understand you explanation on how you got it to mount back in place without the stock clips and stuff...does it just sit in there not connected at all? e-mail me if it is easier. tuner_freek2004@yahoo.com 
Originally Posted by 03OZ_tuner
One question that I have that has been bugging me for days. How did you get the seatbelts out and back in. I saw one had a slit cut in it, but what about the one that had the top shroud removed (the other piece you glassed). I didn't see any cuts or anything. I am going to try this project next weekend and I need all the specific of this. Oh, I really didn't understand you explanation on how you got it to mount back in place without the stock clips and stuff...does it just sit in there not connected at all? e-mail me if it is easier. tuner_freek2004@yahoo.com
 .
.
I didn't have to use the stock clips because it was a close fit and it's very tight on its place.
Alright Flip, you talked me into it. I started the Fiberglass Deck lid today and I got everything taped and the first layer of glass drying right now. I saw what you meant about the center seatbelt. I got that out. I am following your steps to the T and getting good results so far...any words of wisdom before I remove the mold in the morning? I will keep you posted.
Originally Posted by 03OZ_tuner
Alright Flip, you talked me into it. I started the Fiberglass Deck lid today and I got everything taped and the first layer of glass drying right now. I saw what you meant about the center seatbelt. I got that out. I am following your steps to the T and getting good results so far...any words of wisdom before I remove the mold in the morning? I will keep you posted.
Got the mold off and threw down a second layer and I should sand tomorrow. How did you cover up the rest on the stock square speaker holes when you installed the rings? I have been trying to figure that one out too. I am considering putting two small wooden dows to tilt the speakers toward the front of the car. But how did you cover the rest of that square without oozing Bondo everywhere?
Originally Posted by 03OZ_tuner
Got the mold off and threw down a second layer and I should sand tomorrow. How did you cover up the rest on the stock square speaker holes when you installed the rings? I have been trying to figure that one out too. I am considering putting two small wooden dows to tilt the speakers toward the front of the car. But how did you cover the rest of that square without oozing Bondo everywhere?
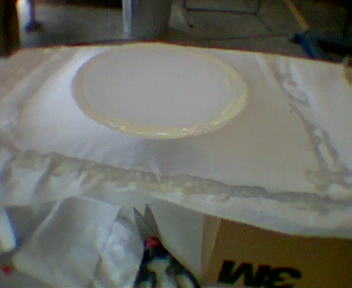
You can also look at this pictures when I was fleecing the enclosure.


Last edited by AznFlip; Nov 9, 2005 at 08:41 PM.
Thanks bro. I will get a few shots tomorrow morning when I start...federal holidays are great  Sorry for not getting the pics sooner. I I will start the fleecing tomorrow morning cause I am hittin the rack soon.
Sorry for not getting the pics sooner. I I will start the fleecing tomorrow morning cause I am hittin the rack soon.
Originally Posted by 03OZ_tuner
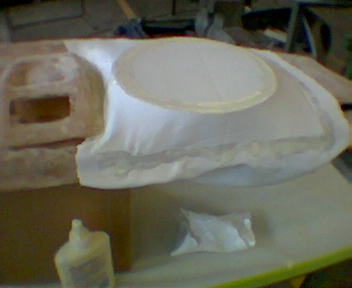
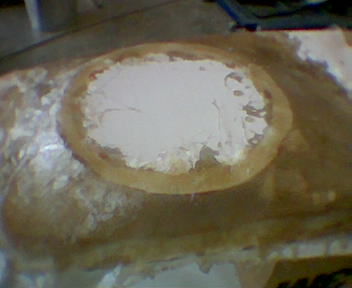
Here's some pics to tide you over until I am done. I finished the bondo today and should finish sanding in the morning.
Btw, what kind of speakers you'll be using?
I already test fitted both speakers and made sure they fir right. I am running 6.5" Lightning Audio 3-ways. I will be doing a tutorial myself on converting the door grills to speaker pods for a set of Blitz Audio 6.5" components with the tweeter in the door next to the door handle. I'll post more pics after paint. I haven't decided on black or yellow for the color of it yet. What you think?
Originally Posted by 03OZ_tuner
I already test fitted both speakers and made sure they fir right. I am running 6.5" Lightning Audio 3-ways. I will be doing a tutorial myself on converting the door grills to speaker pods for a set of Blitz Audio 6.5" components with the tweeter in the door next to the door handle. I'll post more pics after paint. I haven't decided on black or yellow for the color of it yet. What you think?
 .
.Well it depends on your interior color theme. But if I have to chose, I'll buy a piece of black vinyl fabric.
I am going all black and yellow inside. I had it black blue and yellow before but the blue looks kinda cheesy. I am going for subtle yellow accents. just a few pieces. I am painting the rear pillars black and was wondering if black was too mych or set it off with yellow with yellow speakers. After seeing the idea, what do you think
Originally Posted by 03OZ_tuner
I am going all black and yellow inside. I had it black blue and yellow before but the blue looks kinda cheesy. I am going for subtle yellow accents. just a few pieces. I am painting the rear pillars black and was wondering if black was too mych or set it off with yellow with yellow speakers. After seeing the idea, what do you think
Newbie
Joined: Nov 2005
Posts: 13
Likes: 0
From: Manistique, Mi
How crazy is this, I was actually thinking about doing this to my Evo when I get it! I am starting to learn to do fiberglass work by making a Satellite radio mount for my Neon.  If all goes well, I'll have a dime sized bar, going from above the center bezel, and wrap around the little holder up there and stop next to the top left air vent. If all goes well Ill post pics of it, then when I get the Evo, Ill just hack the bottom off of it, and apply a new mount.
If all goes well, I'll have a dime sized bar, going from above the center bezel, and wrap around the little holder up there and stop next to the top left air vent. If all goes well Ill post pics of it, then when I get the Evo, Ill just hack the bottom off of it, and apply a new mount.