
infected's 2013 RVR SE AWD

Thread Starter
Evolving Member
Joined: Sep 2013
Posts: 265
Likes: 1
From: Calgary, AB
Thread Starter
Evolving Member
Joined: Sep 2013
Posts: 265
Likes: 1
From: Calgary, AB
Update on the oil caps; they have all 5 colors back in stock now, black band.
Rad caps only available in black.
Strut caps available in red, blue, silver, or black.
This isn't a group buy of any sort as I've checked with the Mods; just a one time offer while I head over. Let me know by Nov 20th if you'd like me to bring anything back.
Rad caps only available in black.
Strut caps available in red, blue, silver, or black.
This isn't a group buy of any sort as I've checked with the Mods; just a one time offer while I head over. Let me know by Nov 20th if you'd like me to bring anything back.
Thread Starter
Evolving Member
Joined: Sep 2013
Posts: 265
Likes: 1
From: Calgary, AB
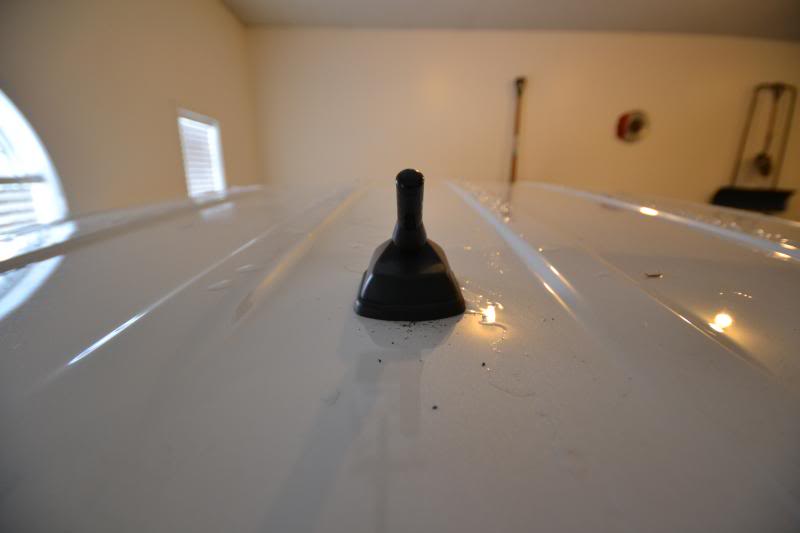
17. Stubby Antenna
I found it strange the RVR had such a long antenna. Usually most modern production cars are integrated or have the shark fin instead.
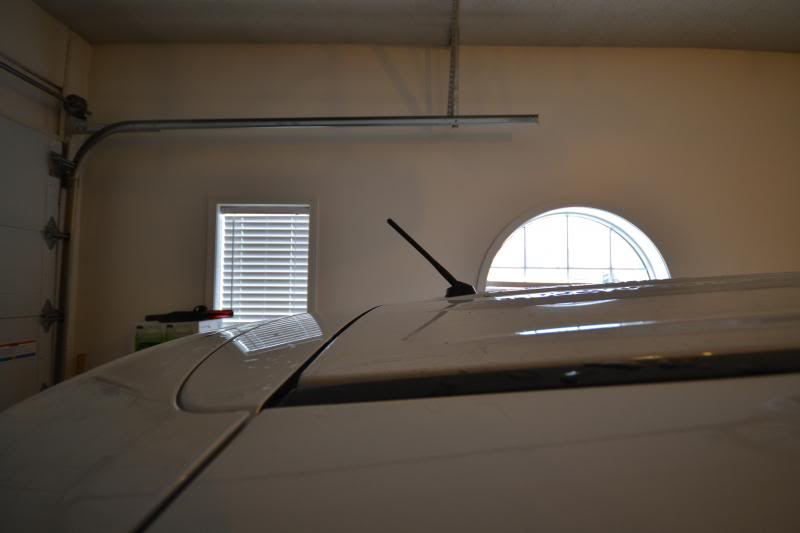
The antenna simply twists off. Unlike this...
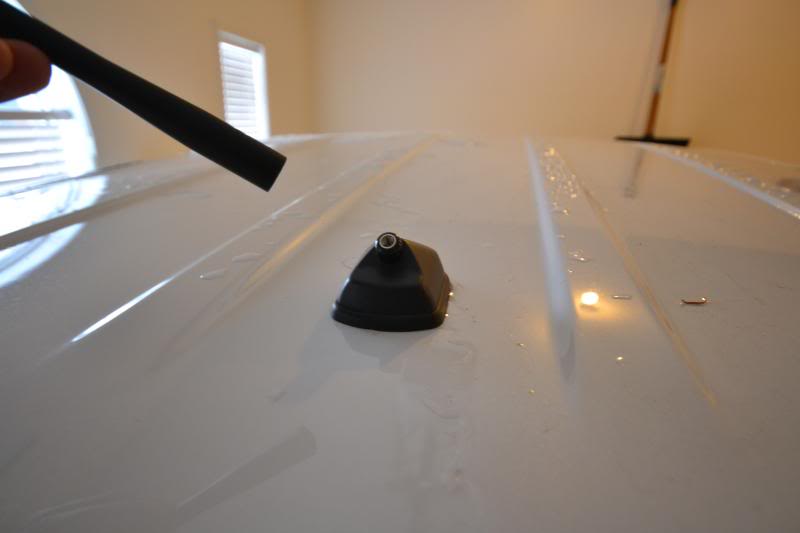
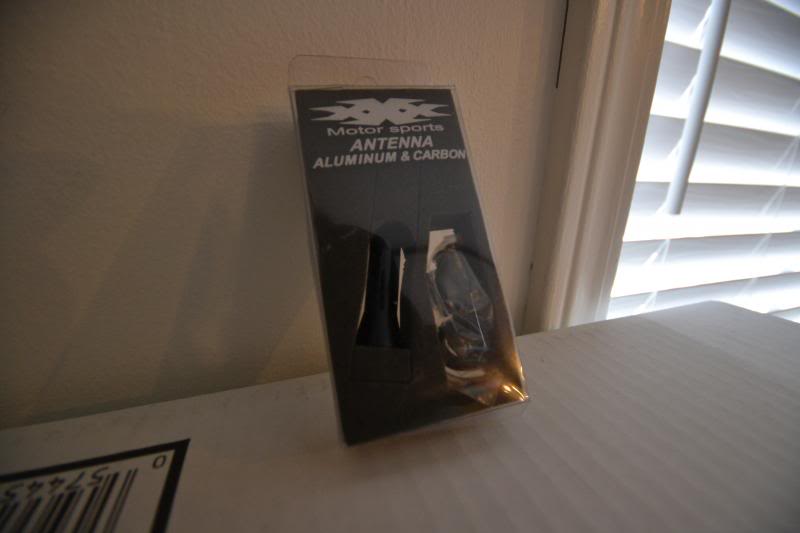
The new antenna I picked up was the shortest I could find. It also has a carbon fiber ring around the neck which is a nice touch.
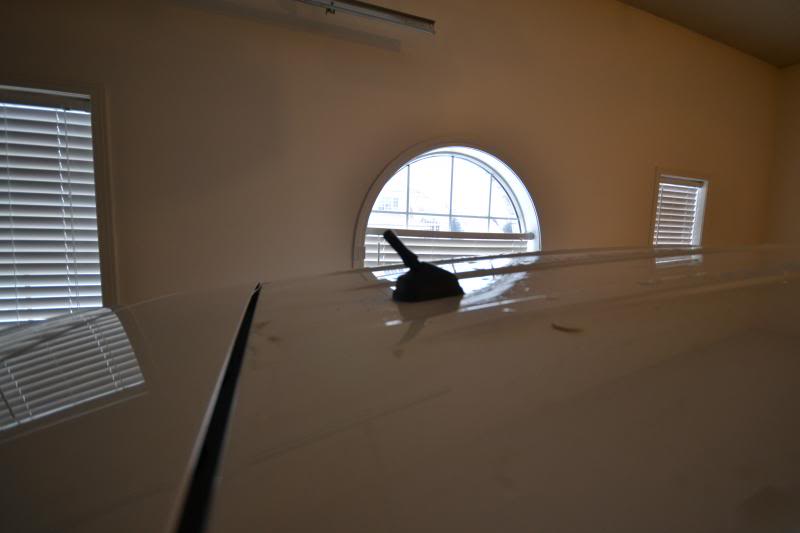
Profile shot of the original versus the stubby.

The new antenna comes with a kit of different size inserts and spacers. Install the insert before twisting the new antenna on.
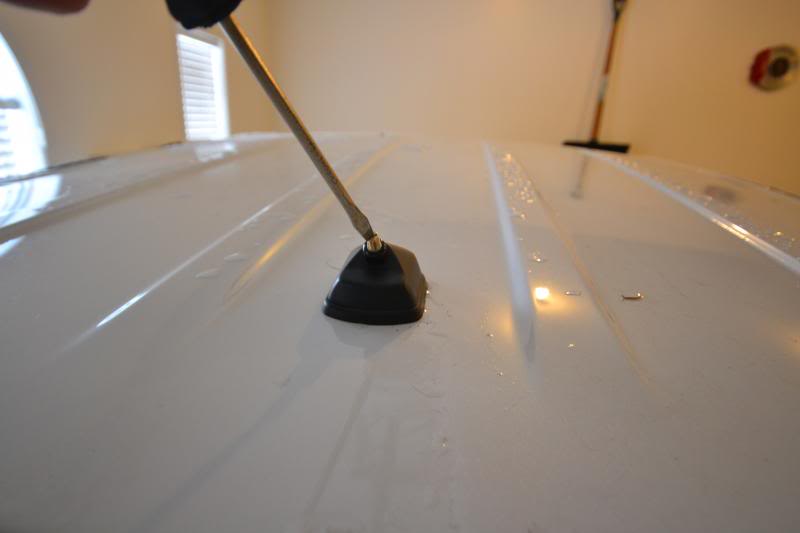
Finished product, a little more discrete.

The antenna simply twists off. Unlike this...

The new antenna I picked up was the shortest I could find. It also has a carbon fiber ring around the neck which is a nice touch.

Profile shot of the original versus the stubby.

The new antenna comes with a kit of different size inserts and spacers. Install the insert before twisting the new antenna on.

Finished product, a little more discrete.


Last edited by infected; Nov 16, 2013 at 03:06 PM. Reason: Pics

Newbie
Joined: Jul 2013
Posts: 28
Likes: 0
From: Vancouver, Canada


Joined: Feb 2012
Posts: 1,177
Likes: 16
From: Milwaukee, WI
Thread Starter
Evolving Member
Joined: Sep 2013
Posts: 265
Likes: 1
From: Calgary, AB
I'm not sure if it will fit the factory sub, is it more protruded than the regular setup?
Mat was crazy cheap but fitment isn't the best. If you look closely at the right side, the mat covers part of the hump near the rear strut. The left side is not so bad. Overall I'm ok with it than paying $100 for the WeatherTech; that's a little too steep for a trunk mat. I'm trying to see if there are other alternatives out there though so I'll keep everyone posted!
Mat was crazy cheap but fitment isn't the best. If you look closely at the right side, the mat covers part of the hump near the rear strut. The left side is not so bad. Overall I'm ok with it than paying $100 for the WeatherTech; that's a little too steep for a trunk mat. I'm trying to see if there are other alternatives out there though so I'll keep everyone posted!
Thread Starter
Evolving Member
Joined: Sep 2013
Posts: 265
Likes: 1
From: Calgary, AB
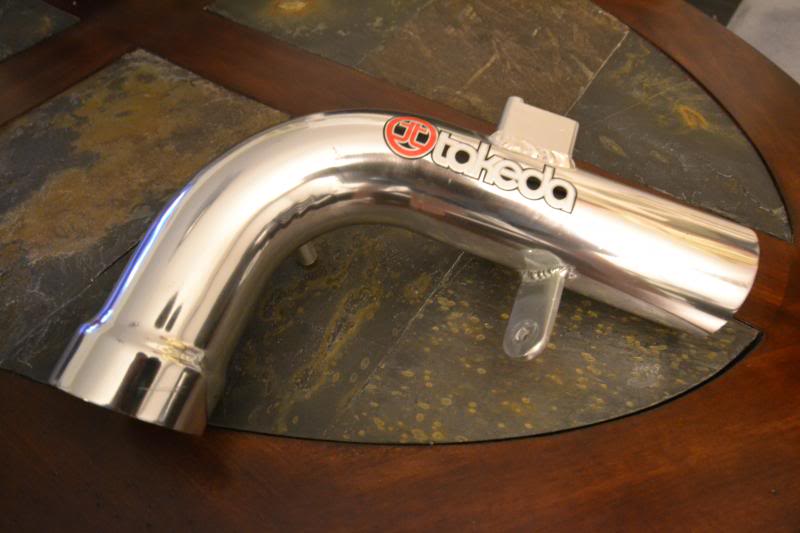
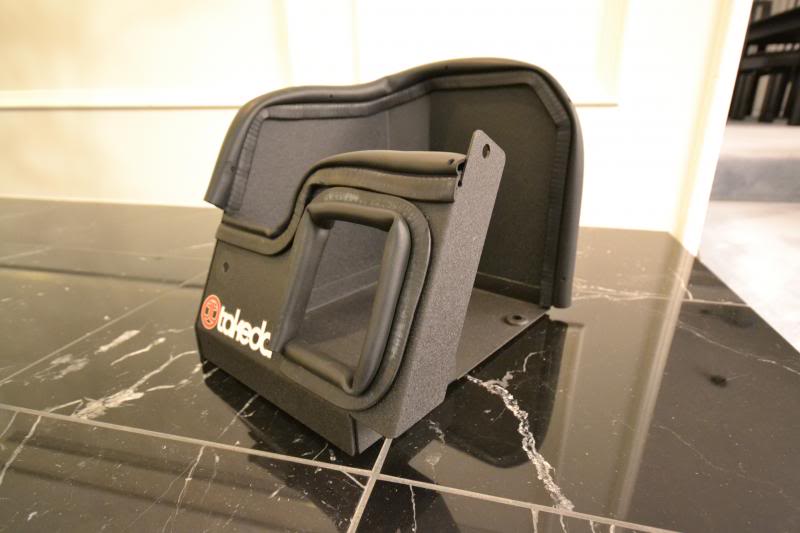
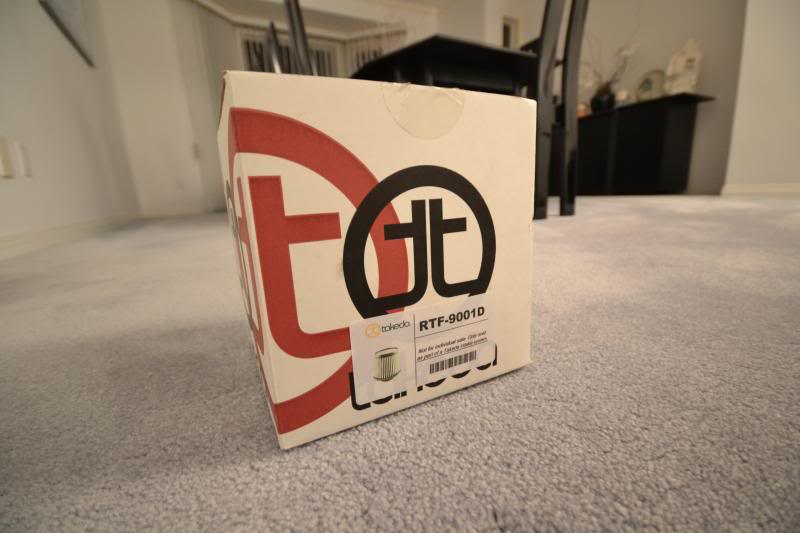
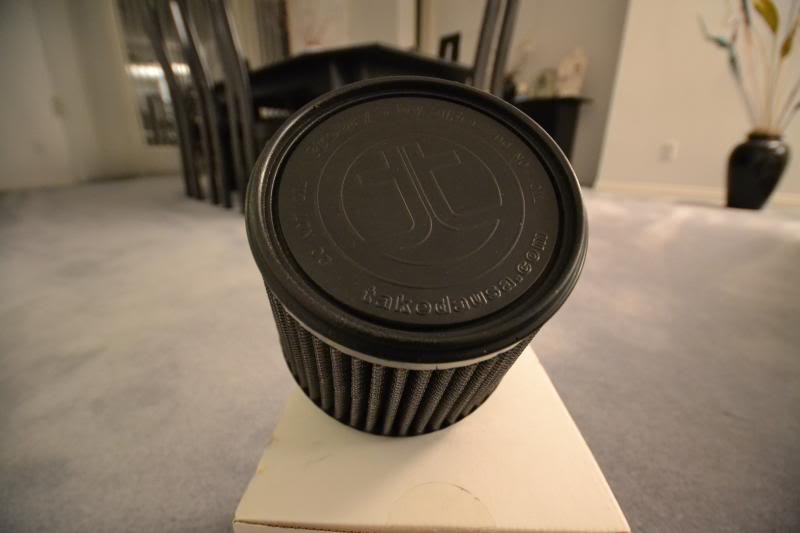
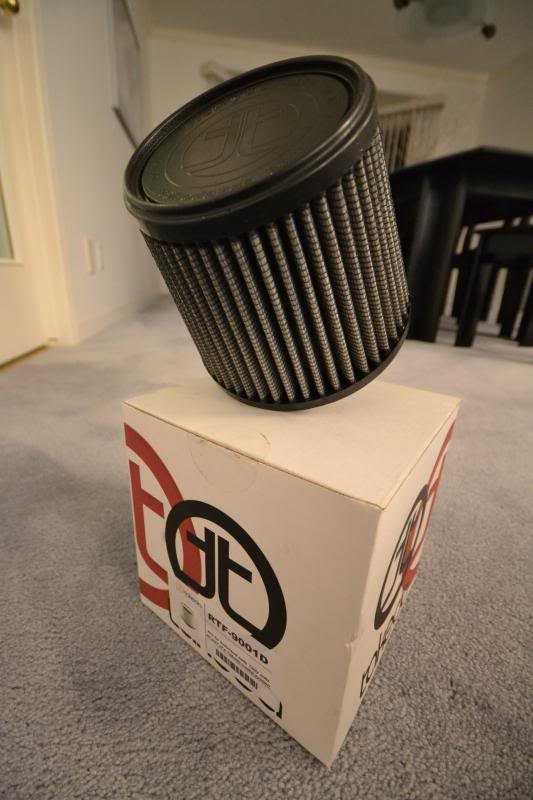
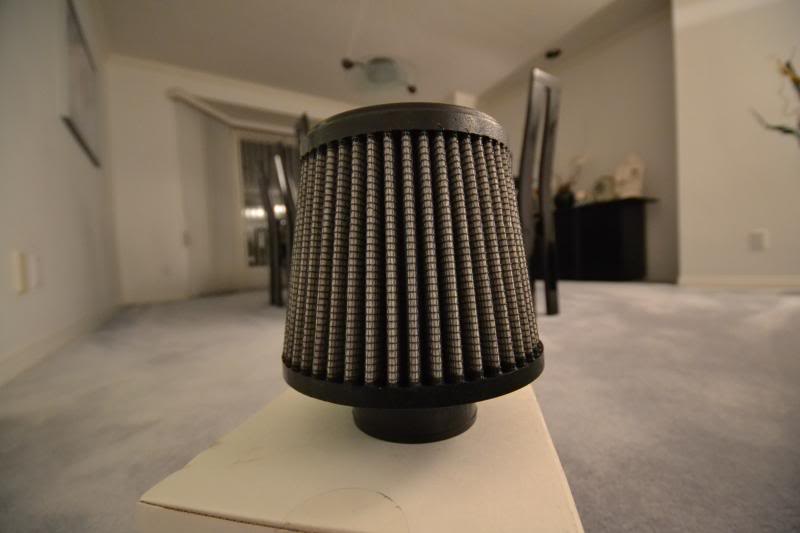
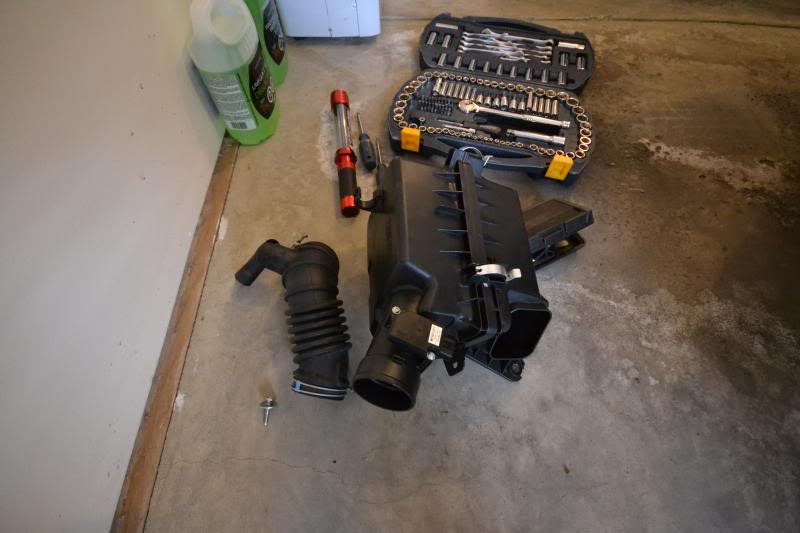
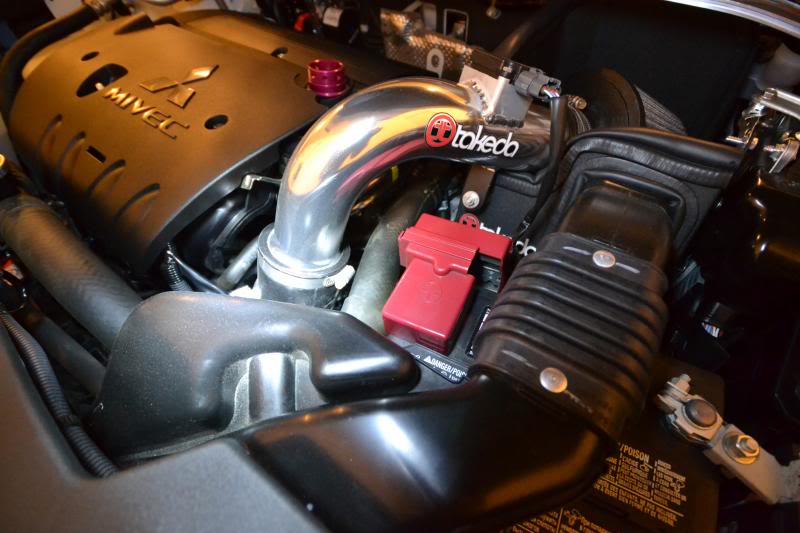
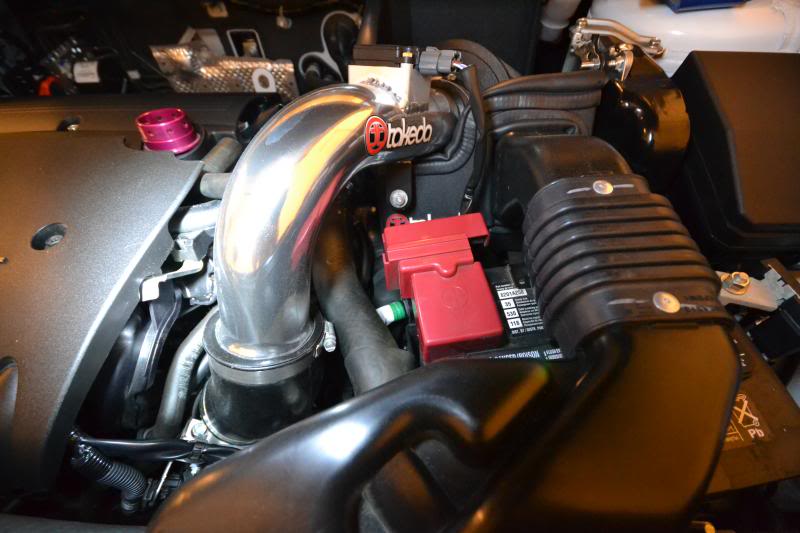
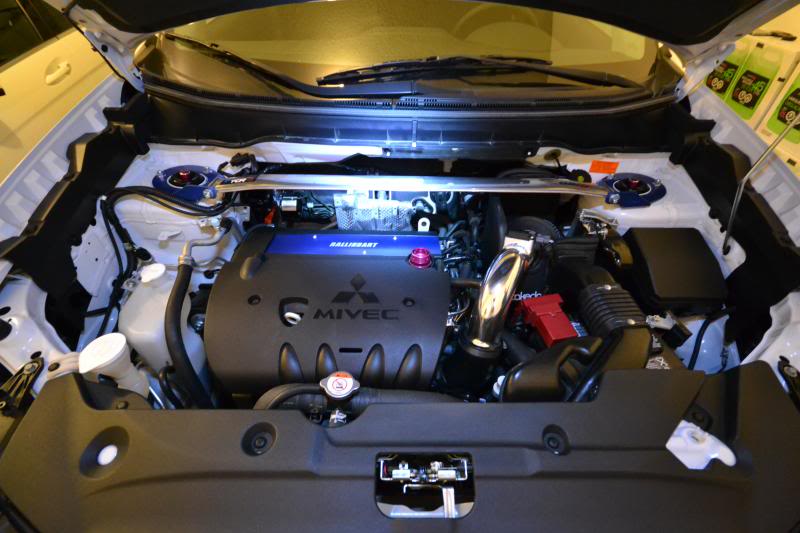
18. Takeda Stage-2 PRO DRY S Air Intake
It's been a while since I last updated the build on this. As I'm sitting halfway across the world in a hotel room trying to take a break from work, here is a follow up on some goodies I installed a while back but never got the chance to write about it until now.
I originally did not plan to purchase an intake system until early next year. The RVR just hit 2000kms and I felt it needed more time to break-in. However, upon randomly browsing EvoM one night, I came across a used Takeda setup for a Lancer which I could not pass up. Knowing me, I was too excited when the package finally arrived and ended up installing it right away!
Takeda Part Number: TR-4201P
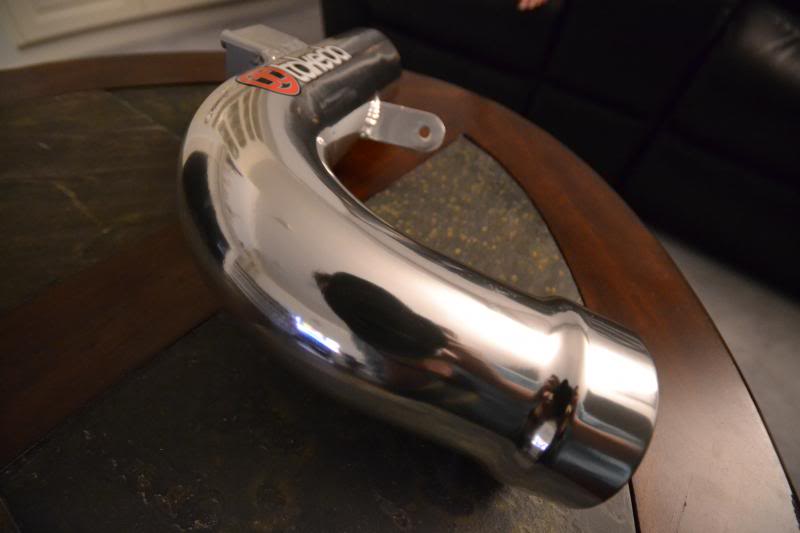
The pipe right out of the box had some imperfections. This was expected as I was buying a used intake and it was only installed for 2 months. I was actually quite surprised how clean all the parts were.
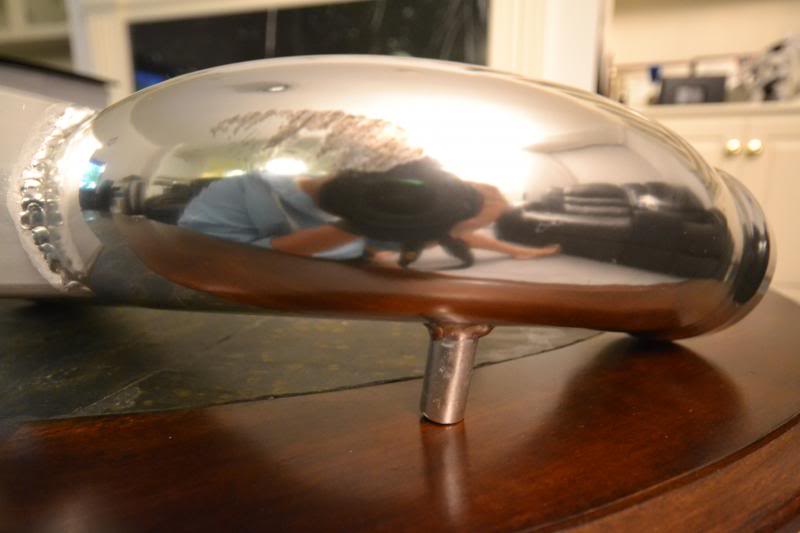
Of course there were blemishes here and there, but this one stood out the most on the main pipe. It looked like the hood or insulation from the previous owner was making contact with the intake. Hence, the friction rubbed away part of the coating on the polished pipe over time. I was hoping this area would not be visible after installation but it turns out to be dead right smack center of the show. Disappointment.
Good thing I had my trusty supplies handy...
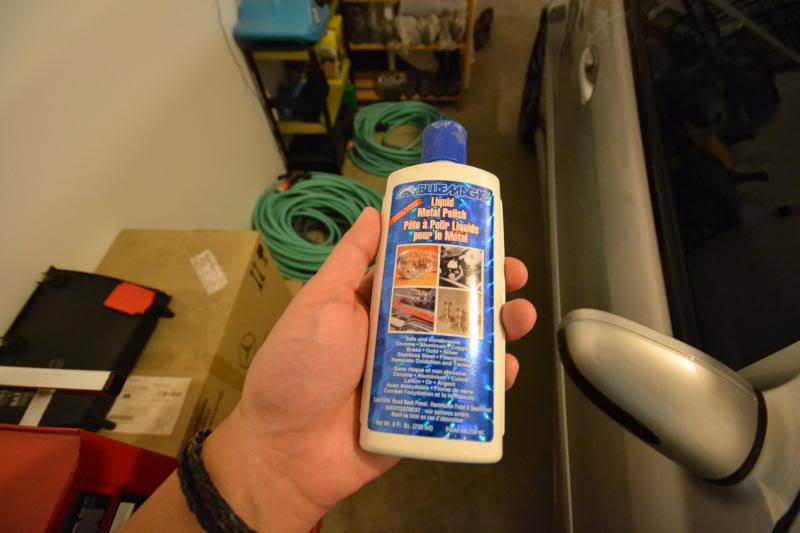
And after an evening of elbow grease while sitting in front of the TV polishing after dinner, she is starting to look much better.

More detail on the rest of the components out the box.

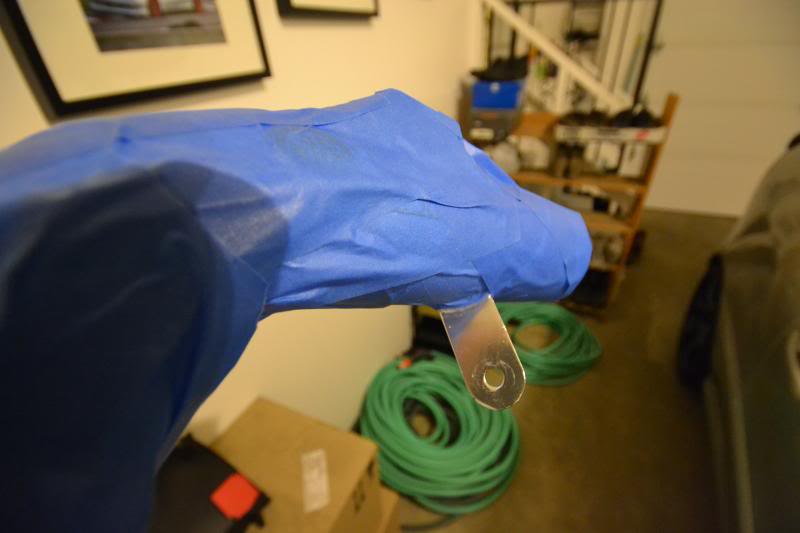
Upon seeing some of the other installs and reviews on the board, one thing that bothered me was the mounting peg attached to the bottom of the pipe. It just seemed to stick out too much when installed against the black heat shield. I wanted to do something about that.
Out with the old...
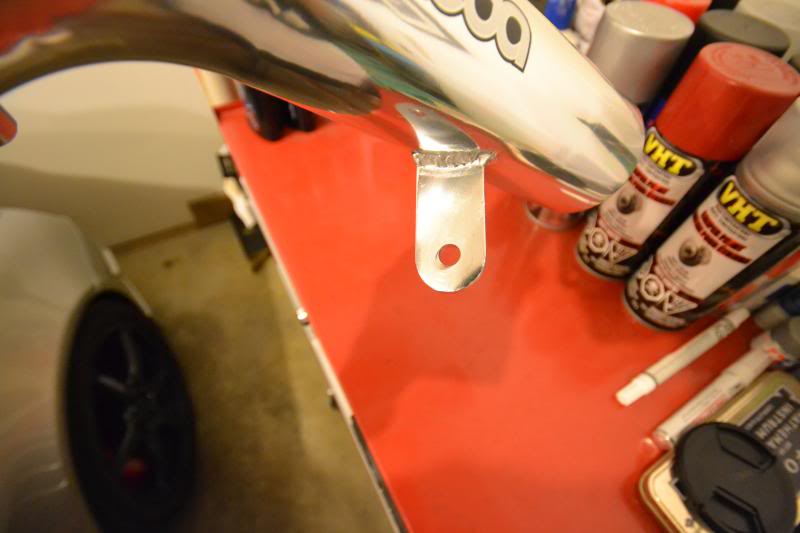
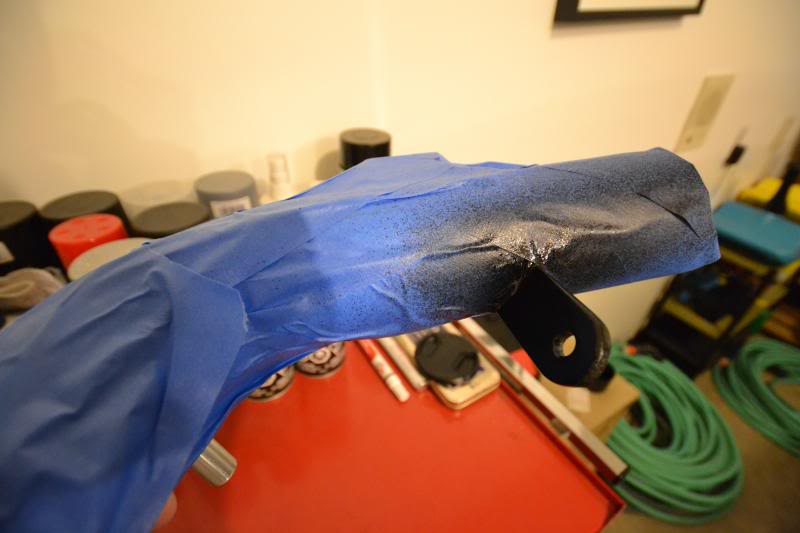
And the biggest problem of the day. I am unsure if 11-12 models did not have this issue, but on my 13, the bolts attaching the ECU are all security bolts. You'll see what I mean by the arrow in the picture pointing to how all of the heads are rounded off. There was no way I could replace the original bolts with a longer bolt to hold the heat shield in place. Without this support, there simply was not enough strength on the bottom two pegs to hold the heat shield securely. This was a major problem and it does not look like the Lancer or pre-facelift RVR's had this issue.
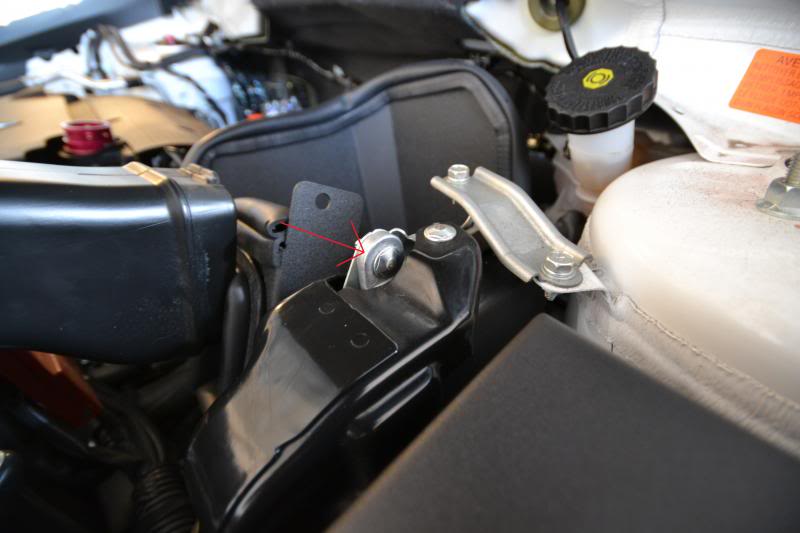
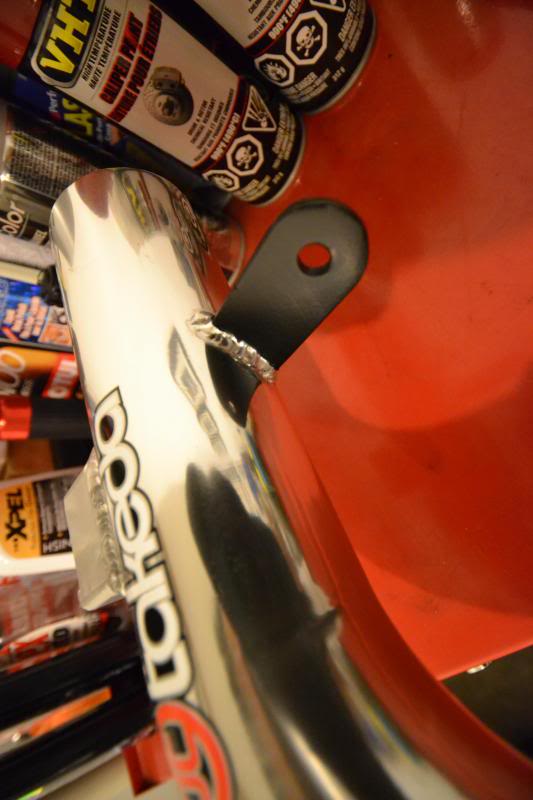
So my best solution was to make my own bracket. It's a metal strapping cut and formed to shape, attached to the heat shield and supported by the bolt further back. This bolt also has the security head, but I was fortunate the threads were long enough for me to thread on a nut to hold the new bracket in place. I was contemplating refinishing the new bracket in black as well, but for some reason silver seems to be sitting alright with me for the time being, so here is my solution for securely mounting the heat shield.
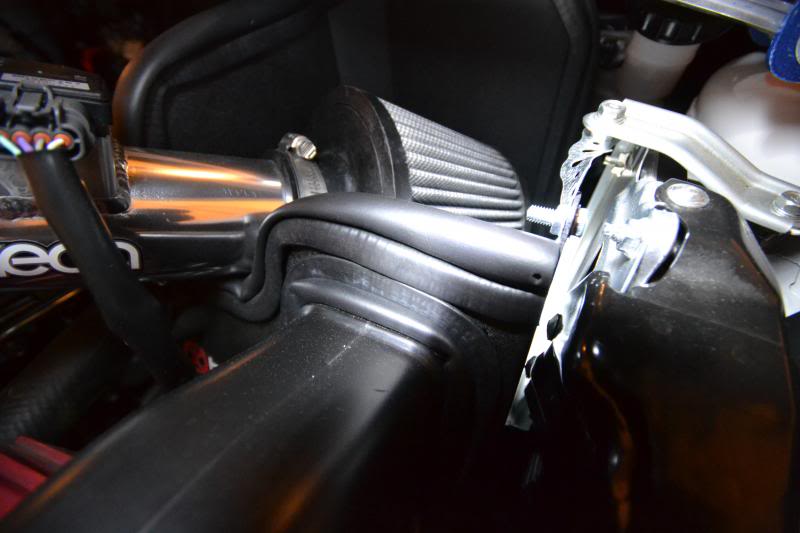
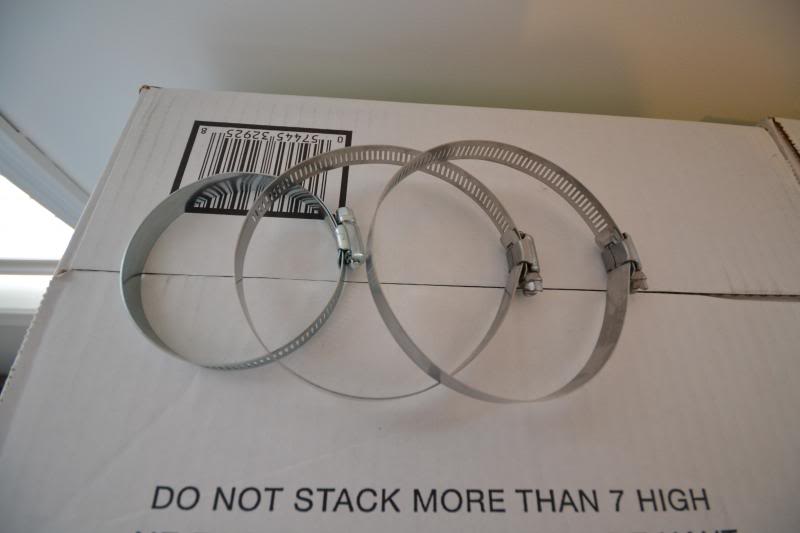
I was missing some hardware from the original owner, and the couplers were looking worn so I picked up some new pieces for the install. The picture shows 3" and 4" couplers but 3" is fine for all the connections. I also grabbed some M4 bolts for the MAF to the Takeda pipe as the original bolts are not the same pitch.
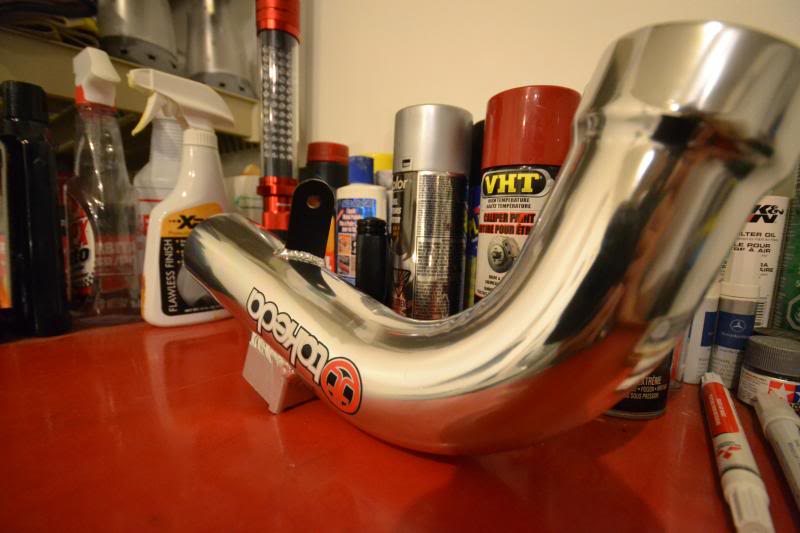
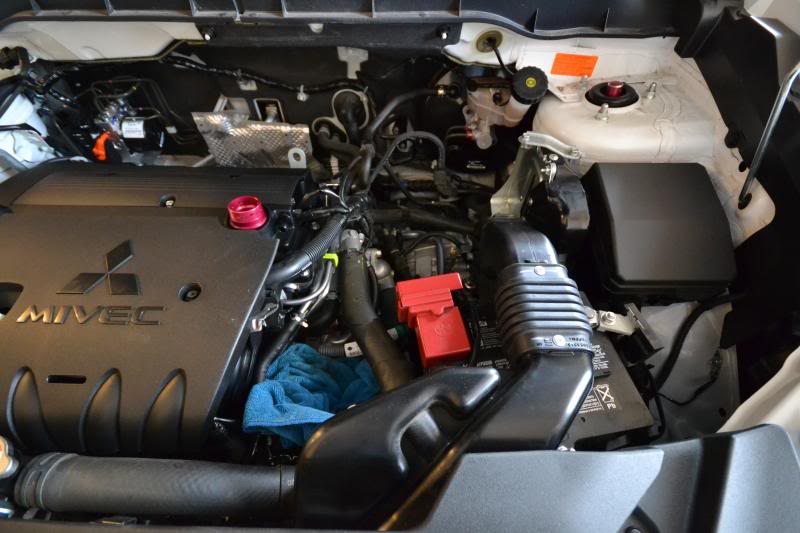
Here she is all buttoned up! Fired right up and everything has been working great. Takeda has a dyno chart for 6hp increase. I can't say for sure how much I can feel the difference, but for certain the stuttering when accelerating off the line while the original airbox was still installed has finally disappeared. For me, this alone is good enough for daily driving around the city with lots of stop and go traffic. A small price to pay for a great upgrade. Plus the looks are stellar!
I originally did not plan to purchase an intake system until early next year. The RVR just hit 2000kms and I felt it needed more time to break-in. However, upon randomly browsing EvoM one night, I came across a used Takeda setup for a Lancer which I could not pass up. Knowing me, I was too excited when the package finally arrived and ended up installing it right away!
Takeda Part Number: TR-4201P
The pipe right out of the box had some imperfections. This was expected as I was buying a used intake and it was only installed for 2 months. I was actually quite surprised how clean all the parts were.

Of course there were blemishes here and there, but this one stood out the most on the main pipe. It looked like the hood or insulation from the previous owner was making contact with the intake. Hence, the friction rubbed away part of the coating on the polished pipe over time. I was hoping this area would not be visible after installation but it turns out to be dead right smack center of the show. Disappointment.

Good thing I had my trusty supplies handy...

And after an evening of elbow grease while sitting in front of the TV polishing after dinner, she is starting to look much better.


More detail on the rest of the components out the box.


Upon seeing some of the other installs and reviews on the board, one thing that bothered me was the mounting peg attached to the bottom of the pipe. It just seemed to stick out too much when installed against the black heat shield. I wanted to do something about that.


Out with the old...


And the biggest problem of the day. I am unsure if 11-12 models did not have this issue, but on my 13, the bolts attaching the ECU are all security bolts. You'll see what I mean by the arrow in the picture pointing to how all of the heads are rounded off. There was no way I could replace the original bolts with a longer bolt to hold the heat shield in place. Without this support, there simply was not enough strength on the bottom two pegs to hold the heat shield securely. This was a major problem and it does not look like the Lancer or pre-facelift RVR's had this issue.

So my best solution was to make my own bracket. It's a metal strapping cut and formed to shape, attached to the heat shield and supported by the bolt further back. This bolt also has the security head, but I was fortunate the threads were long enough for me to thread on a nut to hold the new bracket in place. I was contemplating refinishing the new bracket in black as well, but for some reason silver seems to be sitting alright with me for the time being, so here is my solution for securely mounting the heat shield.

I was missing some hardware from the original owner, and the couplers were looking worn so I picked up some new pieces for the install. The picture shows 3" and 4" couplers but 3" is fine for all the connections. I also grabbed some M4 bolts for the MAF to the Takeda pipe as the original bolts are not the same pitch.

Here she is all buttoned up! Fired right up and everything has been working great. Takeda has a dyno chart for 6hp increase. I can't say for sure how much I can feel the difference, but for certain the stuttering when accelerating off the line while the original airbox was still installed has finally disappeared. For me, this alone is good enough for daily driving around the city with lots of stop and go traffic. A small price to pay for a great upgrade. Plus the looks are stellar!


Thread Starter
Evolving Member
Joined: Sep 2013
Posts: 265
Likes: 1
From: Calgary, AB
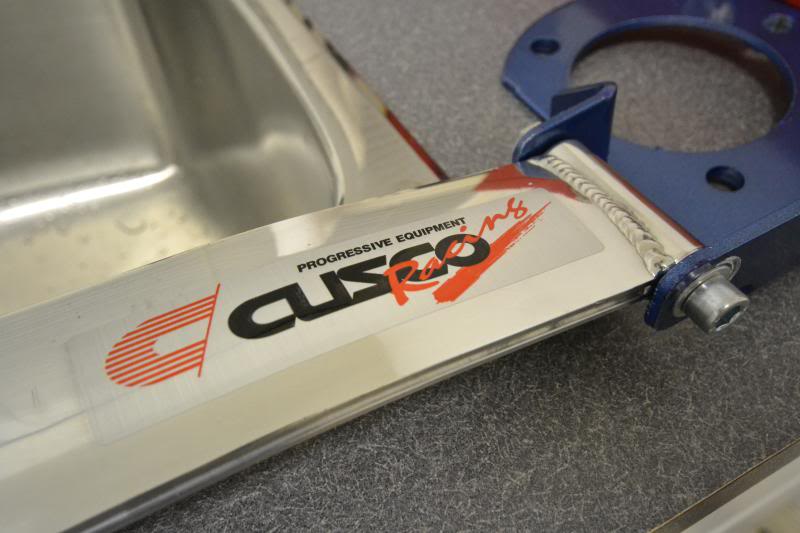
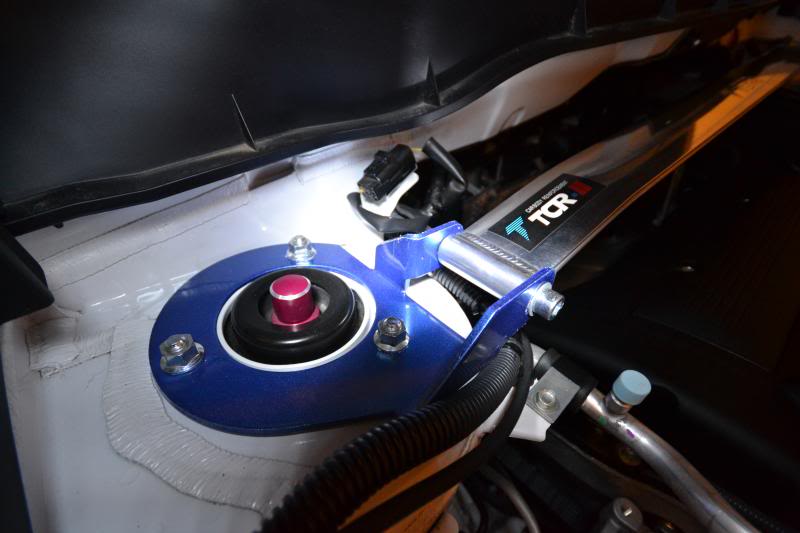
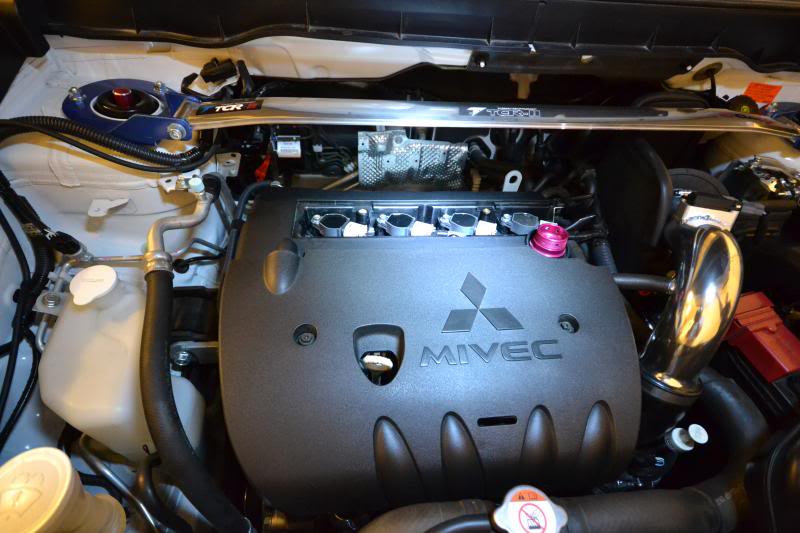
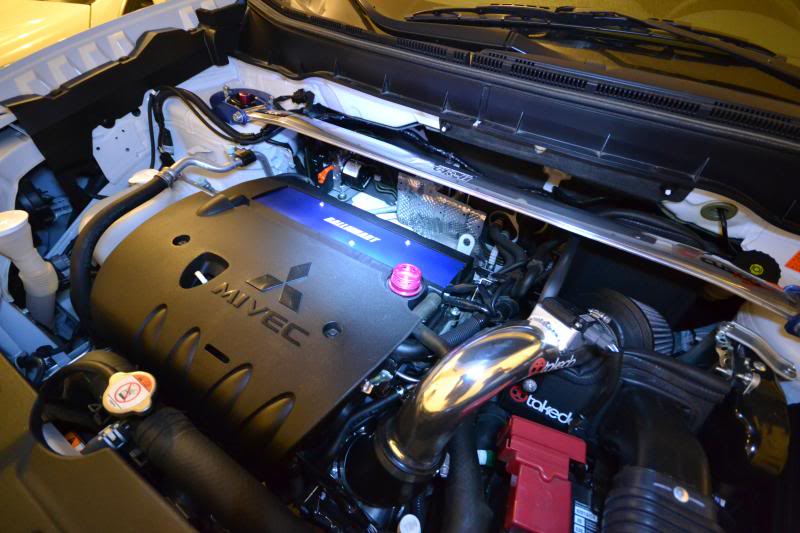
19. TCR Strut Tower Bar
While I was in Beijing during my previous trip, I came across this strut bar for a Lancer at a ridiculous bargain. I could not refuse to turn this sucker down! I was planning on picking up a strut bar relatively soon anyways and this one seemed to fit the books with the solid design. The blue end plates also compliment the Pearl White on my RVR nicely. From afar, it's obvious this bar was modeled after the Cusco Type OS bar.
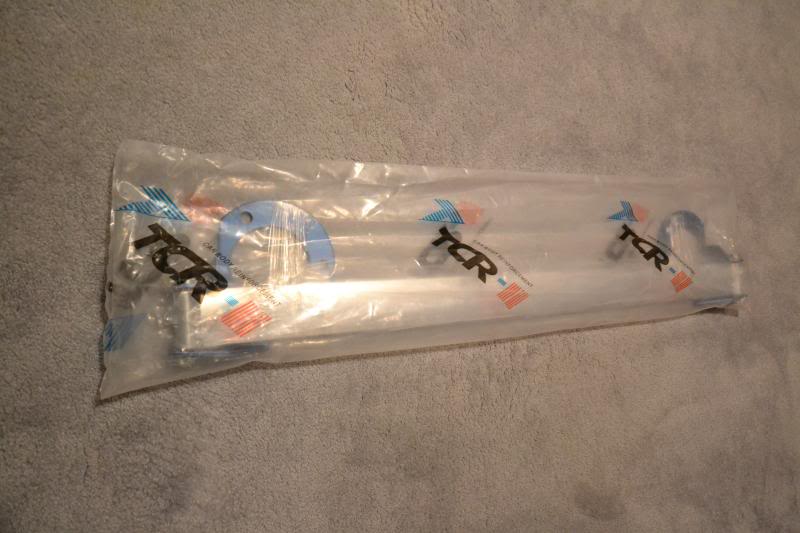
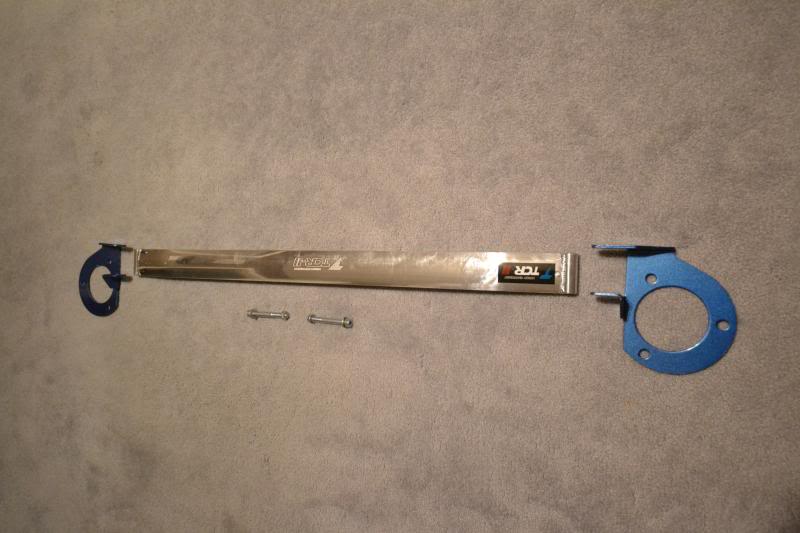
Of course, the packaging was not the best and there were some pretty bad blemishes all over the bar just like the Takeda intake.
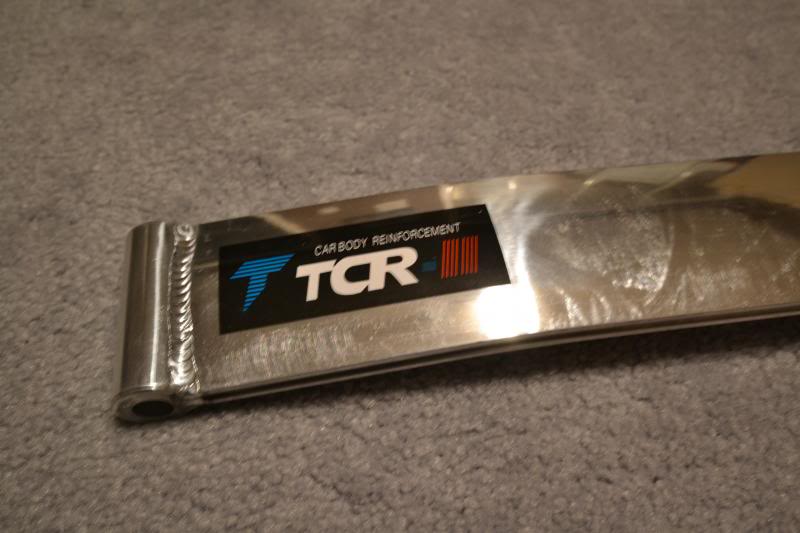
But again, nothing a little compound and elbow grease can't fix. I sealed all the polished areas with a coat of wax afterwards for extra measure, although I'm not certain how well that may hold up over time. I'll probably reapply occasionally to be safe and help keep the shine.
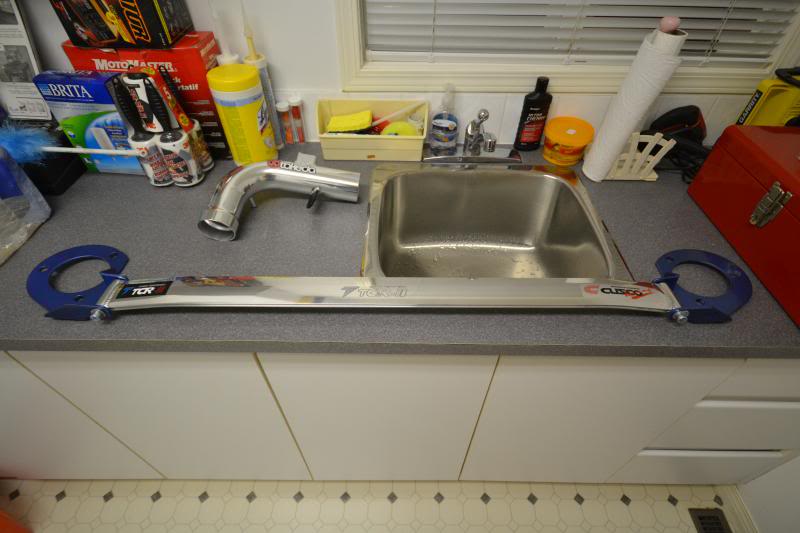
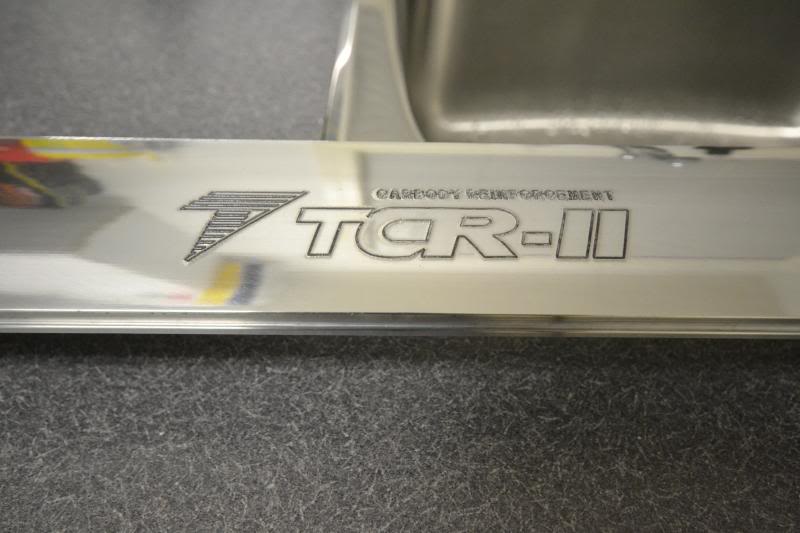
I had an extra Cusco decal kicking around which I decided to apply to the bar as well. It's obvious TCR made a pretty darn close model of the Cusco bar with the blue end plates and all. I thought it would be fun to keep the TCR logo on one end and have the Cusco on the other side.
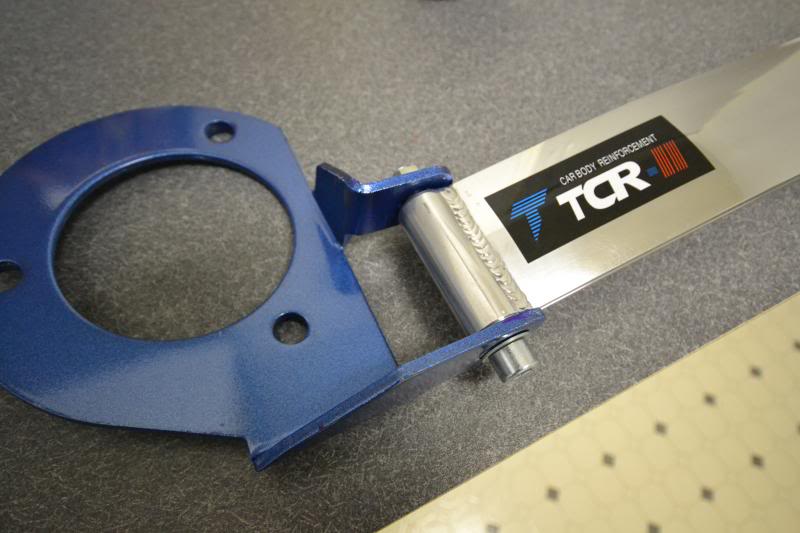
Thankfully the end plates all lined up with the shock towers. It was a little stubborn at first but once the angle is right, then it just all falls together nicely. I torqued all the nuts to 30ft/lbs for extra measure and consistency. Manufacturer spec calls for 28-35ft/lbs. Loving the polished look and how well it goes with the Takeda intake!
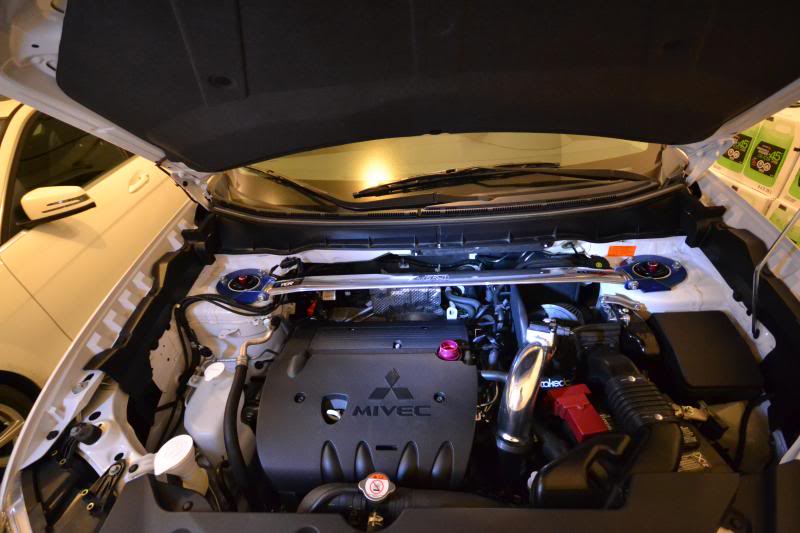
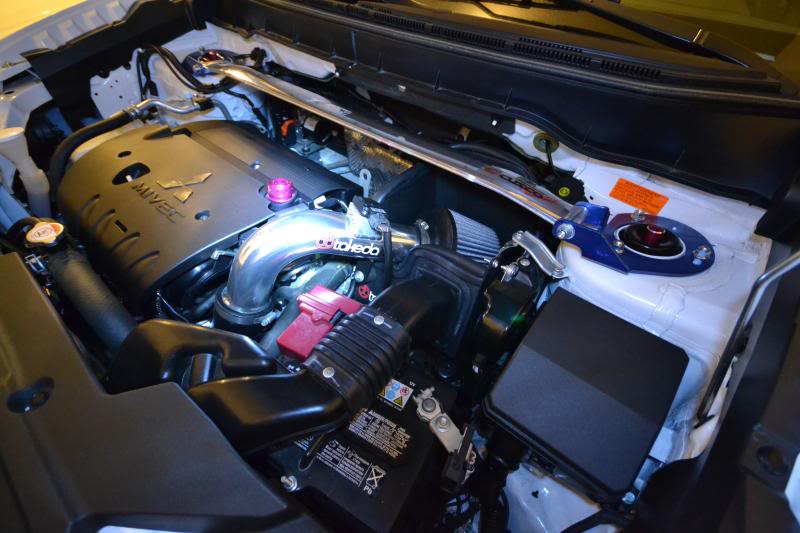
Handling has stiffened up the front for sure. I'm not feeling a lot of increase in understeer, but the steering is simply more firm and there feels to be less body roll. Aside from that, nothing spectacular but still plenty sufficient for a simple strut bar. Another +1 for doing the intake/strut bar combo for any new members out there!


Of course, the packaging was not the best and there were some pretty bad blemishes all over the bar just like the Takeda intake.

But again, nothing a little compound and elbow grease can't fix. I sealed all the polished areas with a coat of wax afterwards for extra measure, although I'm not certain how well that may hold up over time. I'll probably reapply occasionally to be safe and help keep the shine.


I had an extra Cusco decal kicking around which I decided to apply to the bar as well. It's obvious TCR made a pretty darn close model of the Cusco bar with the blue end plates and all. I thought it would be fun to keep the TCR logo on one end and have the Cusco on the other side.


Thankfully the end plates all lined up with the shock towers. It was a little stubborn at first but once the angle is right, then it just all falls together nicely. I torqued all the nuts to 30ft/lbs for extra measure and consistency. Manufacturer spec calls for 28-35ft/lbs. Loving the polished look and how well it goes with the Takeda intake!


Handling has stiffened up the front for sure. I'm not feeling a lot of increase in understeer, but the steering is simply more firm and there feels to be less body roll. Aside from that, nothing spectacular but still plenty sufficient for a simple strut bar. Another +1 for doing the intake/strut bar combo for any new members out there!
Thread Starter
Evolving Member
Joined: Sep 2013
Posts: 265
Likes: 1
From: Calgary, AB
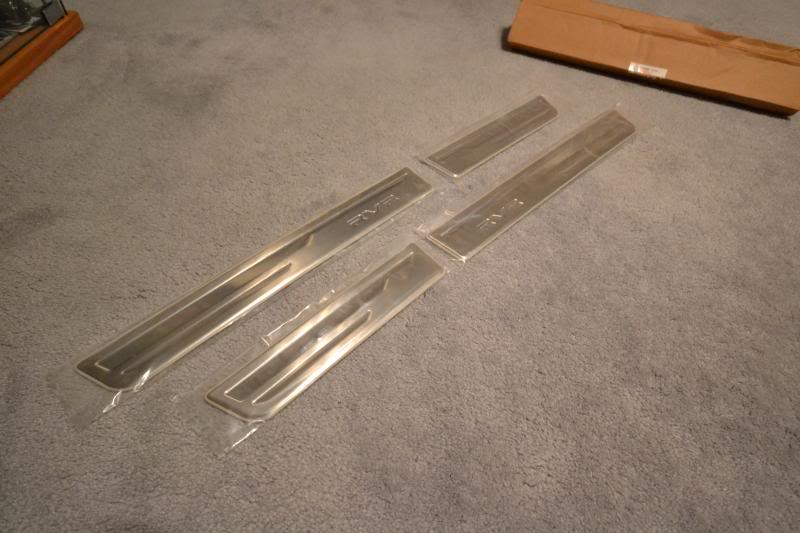
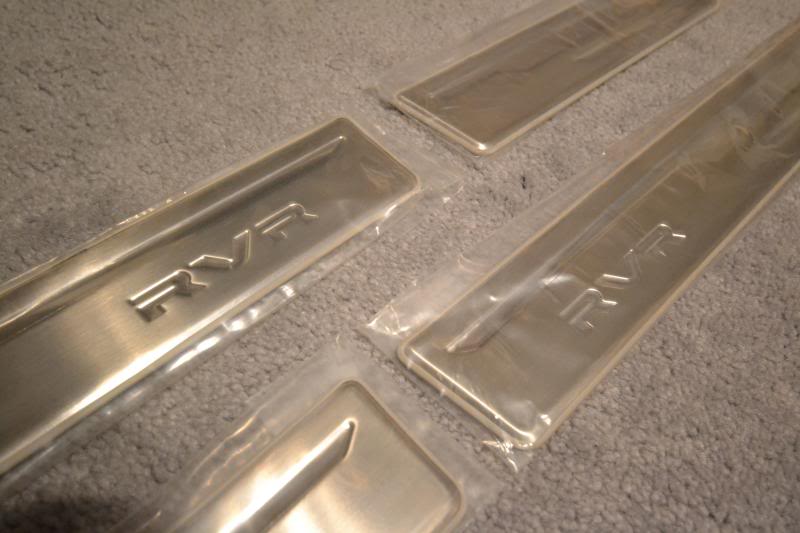
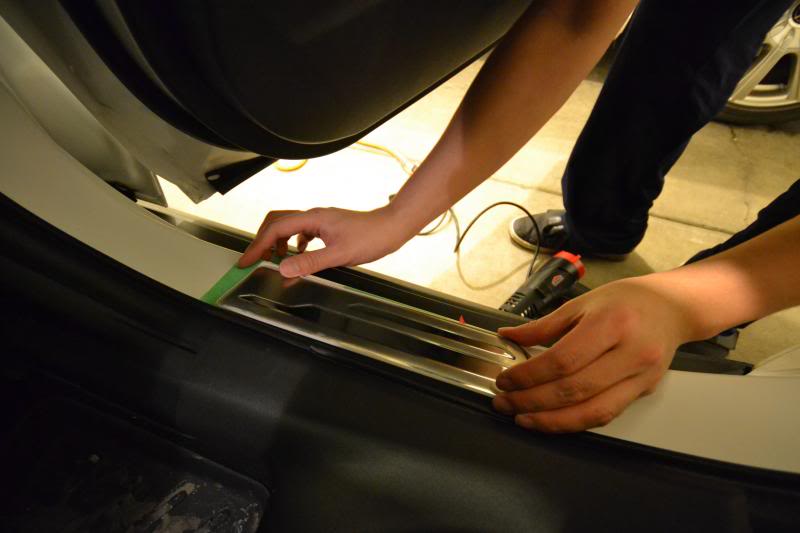
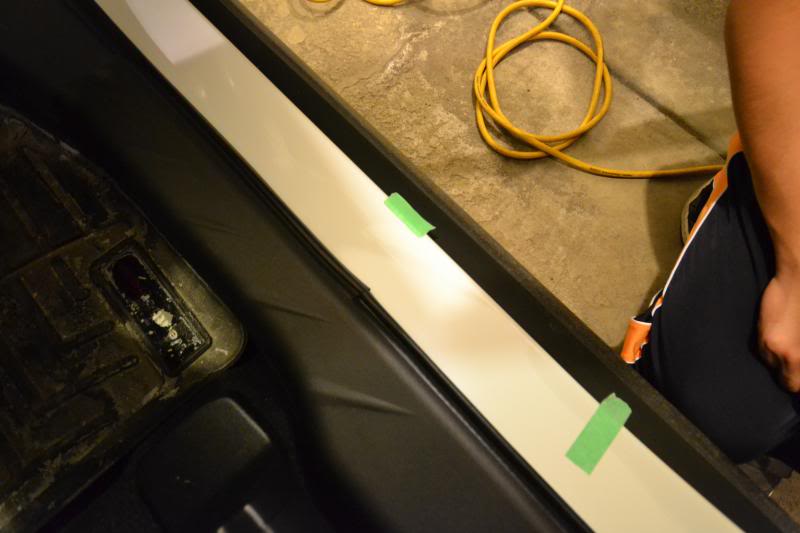
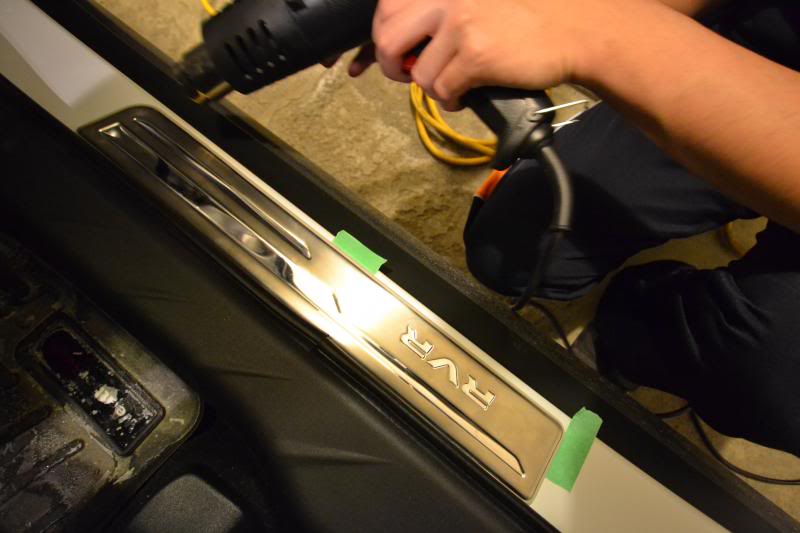
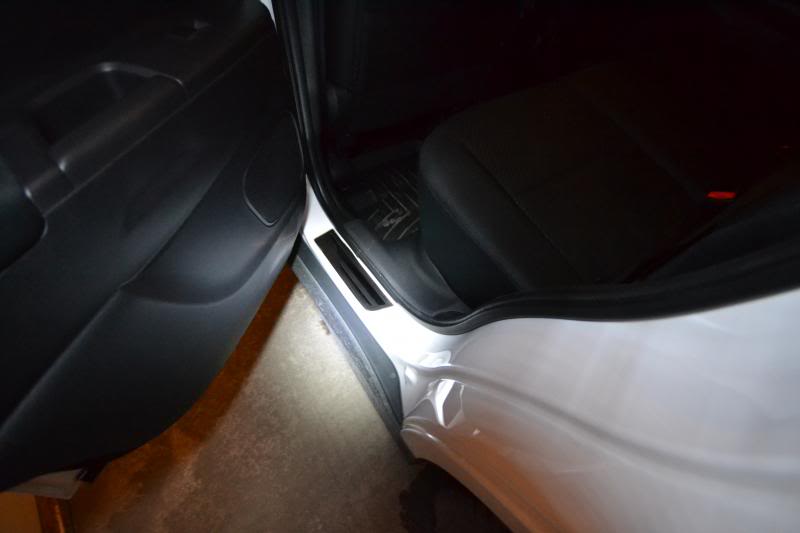
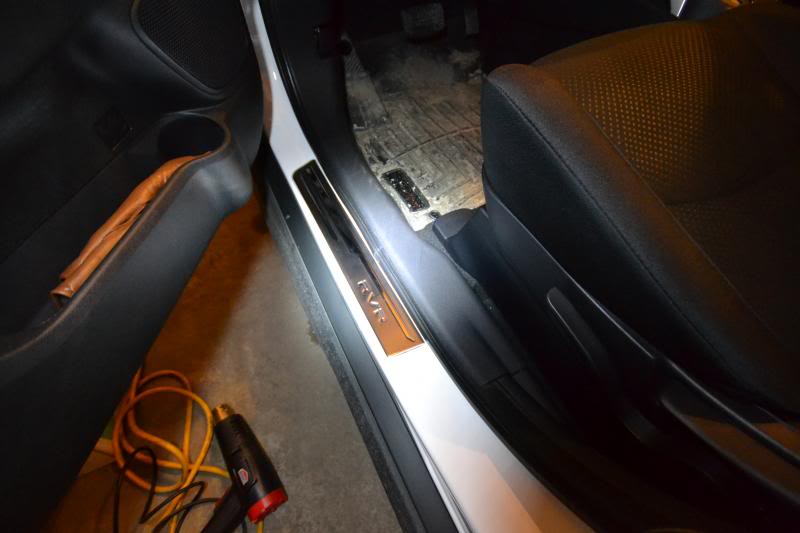
20. JDM Mitsubishi RVR Entry Kick Plates
Also from my last trip, I picked up a set of these door sills for the Japanese RVR. I was quite surprised how the RVR lacked any kind of entry plate from the factory. The finish in the door jambs is simply clear coat over paint, so it made non sense to me why they would not protect those areas with high foot traffic.
These puppies are super well built (+1 for OEM). I especially like the brushed and polished lettering, as well as the rubber grommet around the edge of each plate.
Always nice to have a friend with helping hands!
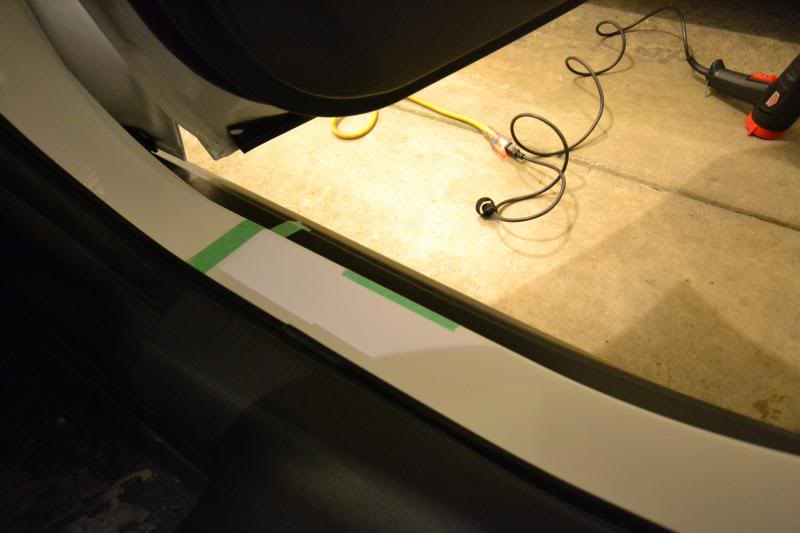
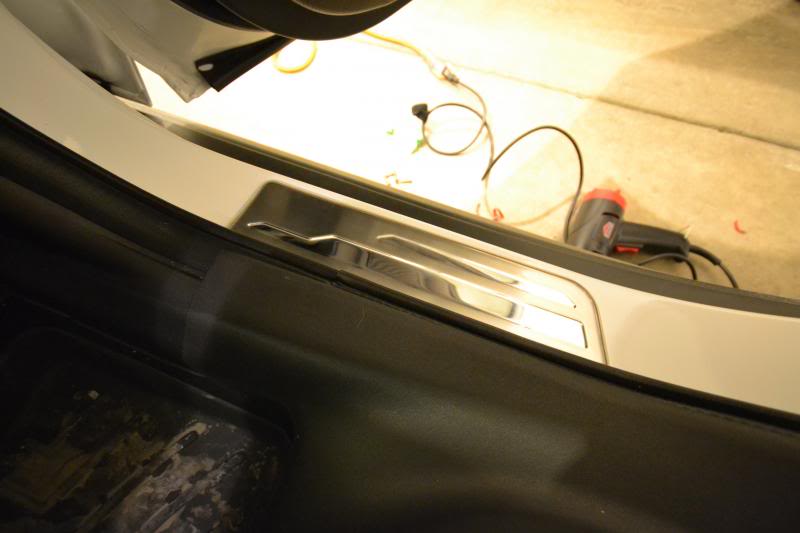
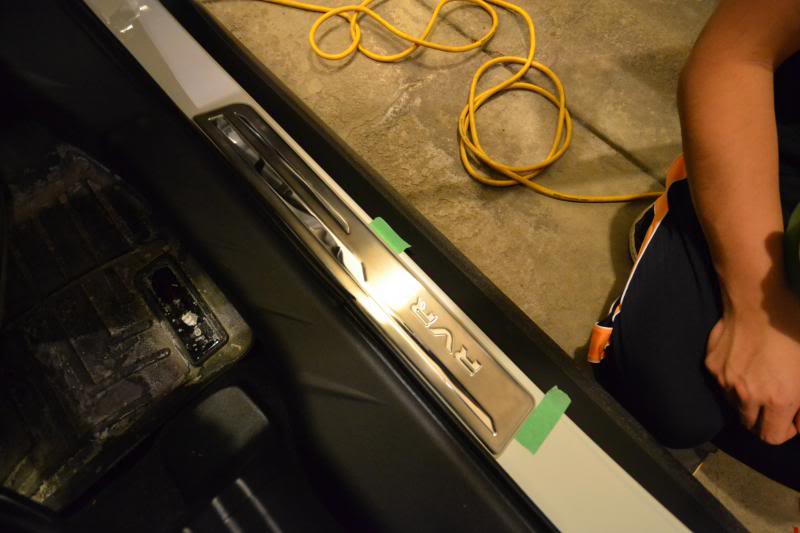
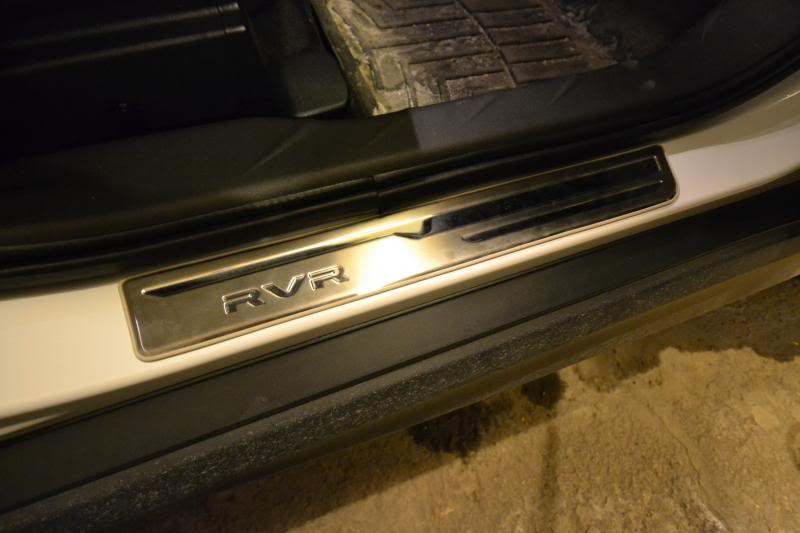
I can't get over how big of a difference these door sills make. It really kicks up the prestige level while entering and exiting the vehicle now. Another small ticket item with a tremendous result!
These puppies are super well built (+1 for OEM). I especially like the brushed and polished lettering, as well as the rubber grommet around the edge of each plate.


Always nice to have a friend with helping hands!


I can't get over how big of a difference these door sills make. It really kicks up the prestige level while entering and exiting the vehicle now. Another small ticket item with a tremendous result!


Thread Starter
Evolving Member
Joined: Sep 2013
Posts: 265
Likes: 1
From: Calgary, AB
21. Ralli Art Spark Plug Cover
Oh, what do we have here?
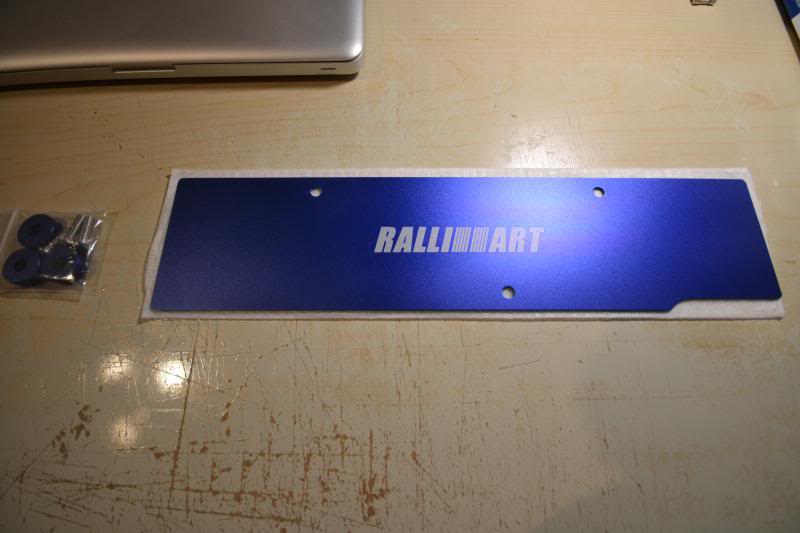
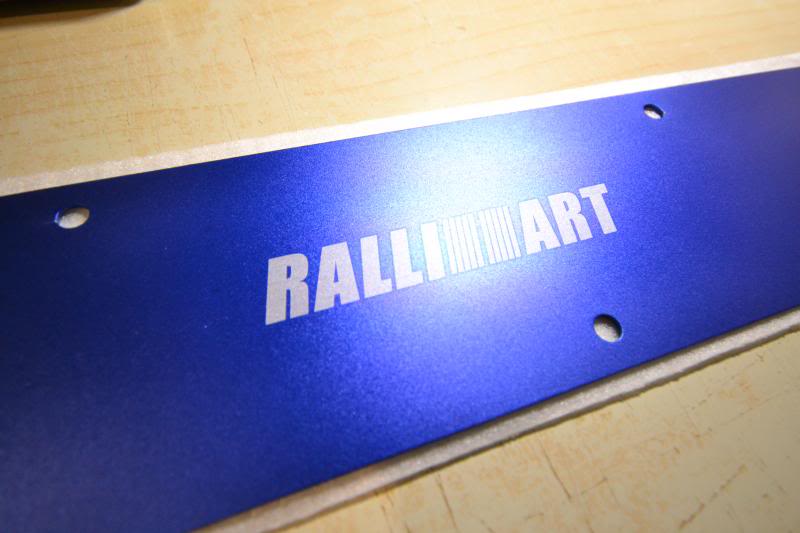
Perfect to match with the strut bar and continue the Ralli Art theme. The plastic coilpack cover just wasn't cutting it anymore!


Perfect to match with the strut bar and continue the Ralli Art theme. The plastic coilpack cover just wasn't cutting it anymore!


Joined: Feb 2012
Posts: 1,177
Likes: 16
From: Milwaukee, WI
I LOVE that strut bar. Looks fantastic! (Feel free to LMK next time you're heading to China....  )
)
I have almost the same door sill covers, I agree, they are quite nice looking. I also have a Takeda, please keep us informed on your opinions/observations of it.
Overall, some damn fine little tweaks, it looks great!
)I have almost the same door sill covers, I agree, they are quite nice looking. I also have a Takeda, please keep us informed on your opinions/observations of it.
Overall, some damn fine little tweaks, it looks great!
Thread Starter
Evolving Member
Joined: Sep 2013
Posts: 265
Likes: 1
From: Calgary, AB
I LOVE that strut bar. Looks fantastic! (Feel free to LMK next time you're heading to China.... )
I have almost the same door sill covers, I agree, they are quite nice looking. I also have a Takeda, please keep us informed on your opinions/observations of it.
Overall, some damn fine little tweaks, it looks great!
)I have almost the same door sill covers, I agree, they are quite nice looking. I also have a Takeda, please keep us informed on your opinions/observations of it.
Overall, some damn fine little tweaks, it looks great!