How to: Remove/Replace your engine
 Oct 2, 2014, 07:51 PM
#1
Evolving Member
Thread Starter
How to: Remove/Replace your engine
Because this is from our team forum that's more or less a project that was started, talk of other cars is present but the evo X is the car I used as the example.
Original thread can be found here.
This is a rather tedious job, but not difficult to do as long as you have a how-to such as this one to walk you through the process. I like to think of this as more of a walk-through than a how-to, since I'm no pro in this and have done this only once. The car used in this example is a Mitsubishi Lancer Evolution X, one of the more difficult cars to remove an engine from due to everything being cramped in there and the car being awd- adding a transfer case to have to deal with.
-Parts Required:
An engine, assuming you're replacing yours
Motor Oil
Transmission fluid
Water/Coolant
Transfer Case Fluid (Assuming you have AWD)
Oil Filter
Power Steering Fluid
Brake Fluid (if you're pulling the engine from the side)
-Tools Required (the basics):
Jacks, as many as possible if you're working alone. You also want one that could lift your car up at least 3.5 feet, to pull your engine from underneath in case you can't pull it from the top for one reason or another.
Engine crane/hoist/ cherry picker, whatever you call it. I used the Pittsburgh one, cost about 140 from ebay. Click http://www.ebay.com/itm/1-TON-Engine-Motor-Hoist-Cherry-Picker-Shop-Crane-Lift-Foldable-New-/141400445925?hash=item20ec1f93e5&item=141400445925&pt=Motors_Automotive_Tools&vxp=mtr to purchase
O2 sensor socket
Pry Bar
Oil Filter wrench
Pliars
Adjustable wrench
Sockets and Wrenches (as many sizes as possible)
Hammer
Torque Wrench
Socket extensions, 5/16, 3/4
Swivel Sockets
A Ryobi Impact or any other impact capable of doing the task (not required, but will help tremendously)
A dolly, in case you're pulling the engine from under.
-Recommended number of People:
You could do it alone, but having a friend is a very good idea with such a process.
-Difficulty:
6.5/10
-Time to complete:
Anywhere between 2-8 hours, depending on the car and the amount of people you're working with.
Set the car on stands, and get to work. Lift it up as long as you can work underneath the car and have just enough room, count on removing from the top- but if you know you won't be able to, then be ready to lift it up higher when the need arises. I left my rear wheels on, pulled the e-brake and set a wedge behind the rear wheels.
To start with, you'll have to drain your fluids. If you're the type of person who pays a service center to change your oil because you're scared to break something- maybe you shouldn't be doing this.
Start with oil:

After that, go to coolant:

Assuming you can't disconnect your engine from the transmission for one reason or another, you'll need to drain your trans fluid as well. I took the whole package out together.
Remove the bumper. Your bumper may be held by a number of bolts and you may need to remove your underbody as well. My car doesn't have an underbody anymore, and I only have 4 10 mm bolts and two rubber bands holding mine. Here's a vid to get you going:
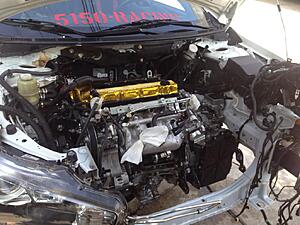
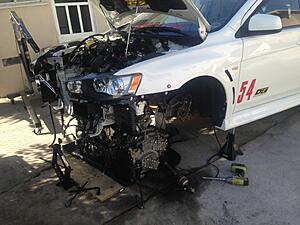
To start with, remove all the plumbing going to the engine, and coming out from the engine. This means intakes, intercooler pipes (if your car is turbocharged), downpipes/exhaust parts that come out directly from the engine, fuel lines, vacuum lines, coolant hoses, oil cooler lines, etc. Your engine bay should look sort of like this:

Radiator removal how to
Now for wiring. Before anything, disconnect your battery's negative terminal, and remove it completely if it's in the engine bay. If you have a positive battery terminal like myself in the engine bay, get that out of the way as well. In my case, it was held by 12 mm bolts and a single 12 mm nut. Disconnect all the wires from spark plugs, injectors, manifold sensors, mass air sensors, knock sensors, cam sensors, starter, alternator, ac lines and condenser, O2 sensors (need an O2 socket for this), etc. Mark all the wires to make your life easier when putting it all back together. Here's what your engine bay should look like after those wires are out of the way:
Attachment 330111
Minor details will be filled in as requests come in through comments. Further details will be added with time.
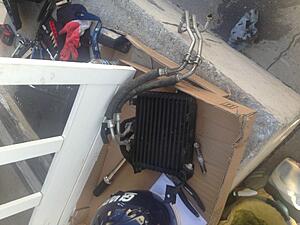
Next, there are the power steering lines and AC lines. I used this as an opportunity to remove my AC for good for a decent 20 lb weight reduction.
Attachment 330112
In your case you can just get the lines out of the way, but they can remain there along with the condenser.
NOTE: IT IS ILLEGAL TO DRAIN YOUR FREON UNLESS DONE BY AN AUTHORIZED DEALER
As far as power steering goes, removing the lines depends on whether or not you're pulling the engine, or dropping the engine. In either case, it's easier to remove the power steering pump from the engine as it will prevent a lot of mess from happening. I did not do this, made a mistake here, and am now trying to prevent you from making the same mistake. You don't have to do this, but I would do it if I removed the engine again. Then there are the lines going to the steering rack, and these WILL spill quite a bit of PS fluid. You could simply remove the PS pump and then remove these lines form the subframe, however this isn't necessary if you're pulling the engine from the top.
Bare engine bay with nothing in the way:
Don't forget to disconnect any shift links or cables from the transmission.
From the top:
Can you remove an engine from the top on an evo? Yes, you'll have to use something like this:

This will allow you to tilt your engine in order to pull it from the top, and works with any car that presents difficulties with this task. There are four motor mounts to deal with, two on the sub frame, two on the chassis. There is also the t case and the axles to deal with. Let's start with those.
If your car isn't AWD, you can skip quite a bit in this video. Simply pop your axles for FWD, or disconnect the driveshaft if you have RWD. You don't have to do any of this if you can disconnect your engine from the transmission, however they are far easier to reconnect when separated from the car. This video isn't by me.
Big thanks to Darren from Boosted Forum for helping me out with the removal of the axles remotely from the land of trees, beards, and backyard engine builds.
Once the t case is out of the way, you'll have easier access to the rear motor mount. Disconnect the rear mount and the front mount. It's highly suggested to have your hoist hooked on to your engine and creating tension in order to make the removal process easier and safer. I left my side mounts in tact for safety's sake.
Front mount:


Rear mount:

Big thanks to RallySportDirect.com
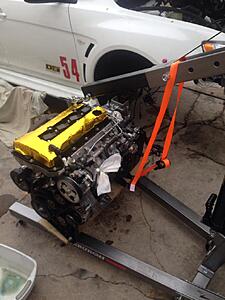
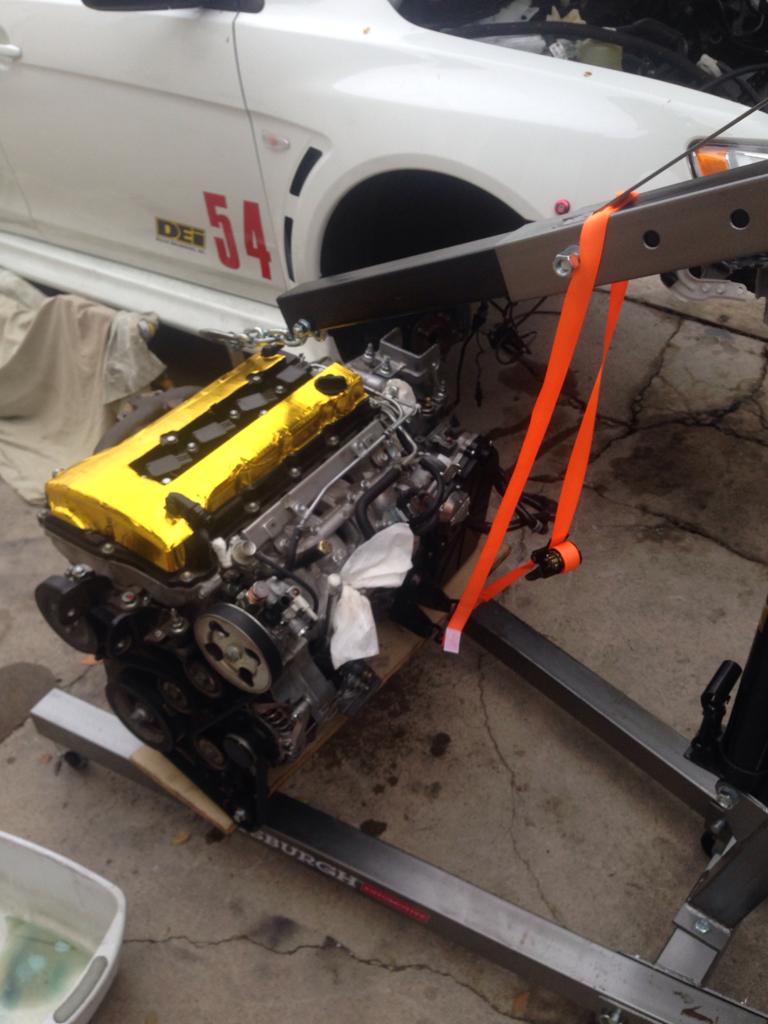
Here's how you can have your engine secured on the hoist.
NOTE: You will NEED an extra person or two to move the engine around to pull it from the top if you're not using the load leveler pictured in the previous photo. Big thanks to Edo Stepanyan for the heads up.
Few other examples:


From the bottom:
I didn't have the engine load leveler, so I couldn't pull the engine from the top. You may be in the same situation, but do not fret. You can drop the engine from the bottom. To do this, you don't even need a crane, but a use of one is highly recommended. I didn't, since my crane didn't arrive in time and I needed the engine out ASAP. The beauty of doing this from the bottom is that you don't have to remove the t-case or axles while they're on the car, giving you that much more room.
To remove the engine from the bottom, a few more things will have to be removed. Remember that PS line I mentioned? The one going to the steering rack? You may have a couple of those, one from the reservoir, and the other going to the pump. You can leave the pump on the engine, or disconnect it, either way there'll be a bit of a mess now.
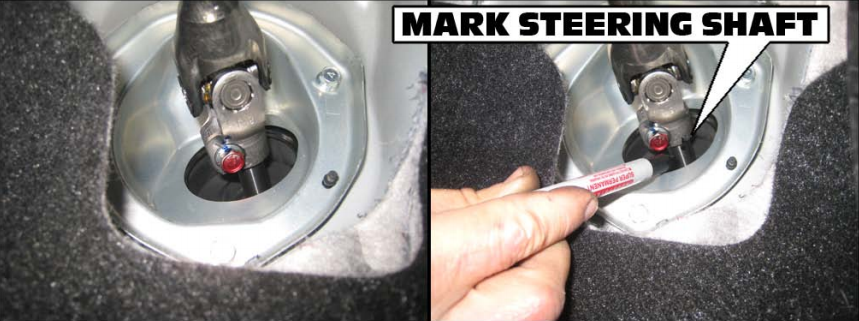
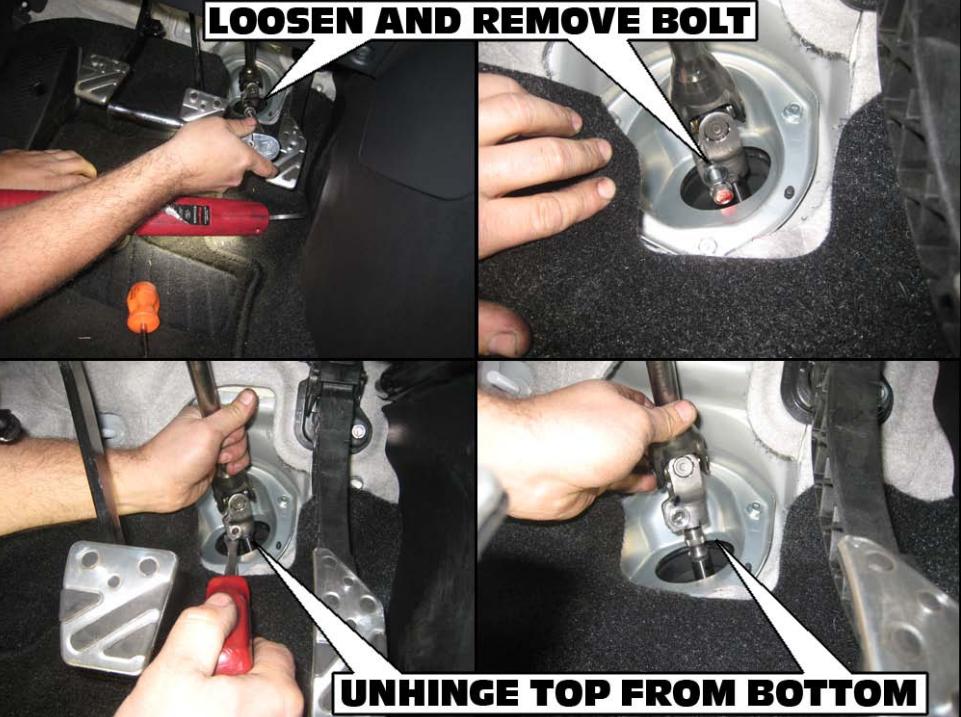
After you've removed the lines, disconnect the steering column. Make sure to mark exactly where the column was connected to the rack in order to properly re-install it. Pics by Hothckis:
Remove the lines going to the T-Case, and disconnect the drive shaft from the T-Case as seen in the video. You don't need to remove the axles or the drive shaft just yet, but it could make things less painful. I couldn't get the T-Case side axle out, that's why my t-case remained in the car. RWD and FWD folks don't have to deal with this headache.
Now you can lower the subframe. Use the jacks mentioned previously to make things easier and less painful. The way your subframe is hooked up may be different from car to car. Some pics related to the removal of the subframe on an evo, the basics should be the same across platforms:


You should have a jack or two holding the subframe. You could also bench it if you're Ara.
Attachment 330117
With the subframe out, clean it up because it's way easier to work with clean things rather than dirty things.
Now on to the shocks/struts and the hubs. If you're pulling the engine from the front, they shouldn't be an issue. If you're not, remove the shock, rotor, caliper and the hub on whatever side you're pulling the engine from. I had a line going into the hub so I moved it to the side and hooked it up to one of the holes where the subframe was mounted to:
To pull the engine from the side, my oil cooler was in the way. You may or may not face the same issue- still something to note.
Now you can lower the engine, and to do this you'll either need a hoist, or 3-4 jacks that can go very low. You also need a dolly in order to roll the engine out, or you can have your body builder friend pull it out by dragging it on the rubber mat you placed underneath. The front and rear mounts should be out of the way by this point, leaving the side mounts to work with. If you're using a hoist, this is very simple. Hook the engine up, create tension and disconnect the mounts, then slowly lower the engine onto the dolly. It's a similar idea with jacks, but way more dangerous and not preferable. I didn't have a dolly because I didn't think about it.
Attachment 330120
Attachment 330121
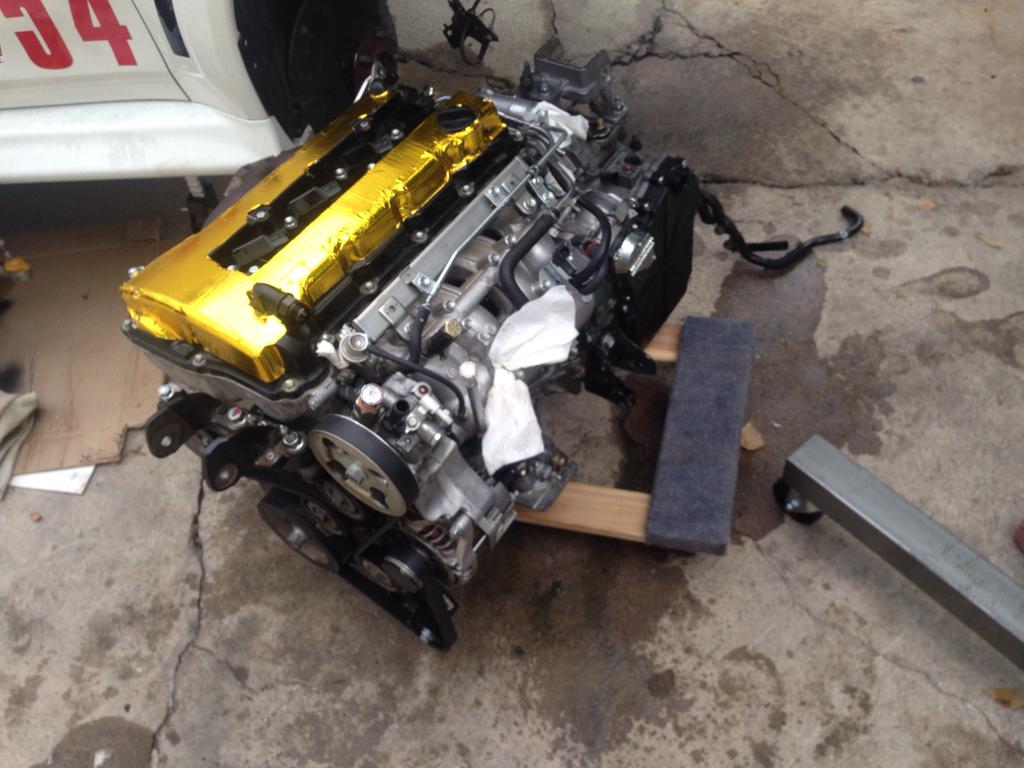
Now you can pull the engine out from under the car and do whatever you need with it, OR install your newly built engine back into your car.

The install process is reverse of the removal. Further details will be added as requested or as I remember them. This is a lot to write, so give me a break if I messed up somewhere and let me know.
Original thread can be found here.
This is a rather tedious job, but not difficult to do as long as you have a how-to such as this one to walk you through the process. I like to think of this as more of a walk-through than a how-to, since I'm no pro in this and have done this only once. The car used in this example is a Mitsubishi Lancer Evolution X, one of the more difficult cars to remove an engine from due to everything being cramped in there and the car being awd- adding a transfer case to have to deal with.
-Parts Required:
An engine, assuming you're replacing yours
Motor Oil
Transmission fluid
Water/Coolant
Transfer Case Fluid (Assuming you have AWD)
Oil Filter
Power Steering Fluid
Brake Fluid (if you're pulling the engine from the side)
-Tools Required (the basics):
Jacks, as many as possible if you're working alone. You also want one that could lift your car up at least 3.5 feet, to pull your engine from underneath in case you can't pull it from the top for one reason or another.
Engine crane/hoist/ cherry picker, whatever you call it. I used the Pittsburgh one, cost about 140 from ebay. Click http://www.ebay.com/itm/1-TON-Engine-Motor-Hoist-Cherry-Picker-Shop-Crane-Lift-Foldable-New-/141400445925?hash=item20ec1f93e5&item=141400445925&pt=Motors_Automotive_Tools&vxp=mtr to purchase
O2 sensor socket
Pry Bar
Oil Filter wrench
Pliars
Adjustable wrench
Sockets and Wrenches (as many sizes as possible)
Hammer
Torque Wrench
Socket extensions, 5/16, 3/4
Swivel Sockets
A Ryobi Impact or any other impact capable of doing the task (not required, but will help tremendously)
A dolly, in case you're pulling the engine from under.
-Recommended number of People:
You could do it alone, but having a friend is a very good idea with such a process.
-Difficulty:
6.5/10
-Time to complete:
Anywhere between 2-8 hours, depending on the car and the amount of people you're working with.
Set the car on stands, and get to work. Lift it up as long as you can work underneath the car and have just enough room, count on removing from the top- but if you know you won't be able to, then be ready to lift it up higher when the need arises. I left my rear wheels on, pulled the e-brake and set a wedge behind the rear wheels.
To start with, you'll have to drain your fluids. If you're the type of person who pays a service center to change your oil because you're scared to break something- maybe you shouldn't be doing this.
Start with oil:
After that, go to coolant:
Assuming you can't disconnect your engine from the transmission for one reason or another, you'll need to drain your trans fluid as well. I took the whole package out together.
Remove the bumper. Your bumper may be held by a number of bolts and you may need to remove your underbody as well. My car doesn't have an underbody anymore, and I only have 4 10 mm bolts and two rubber bands holding mine. Here's a vid to get you going:
To start with, remove all the plumbing going to the engine, and coming out from the engine. This means intakes, intercooler pipes (if your car is turbocharged), downpipes/exhaust parts that come out directly from the engine, fuel lines, vacuum lines, coolant hoses, oil cooler lines, etc. Your engine bay should look sort of like this:
Radiator removal how to
Now for wiring. Before anything, disconnect your battery's negative terminal, and remove it completely if it's in the engine bay. If you have a positive battery terminal like myself in the engine bay, get that out of the way as well. In my case, it was held by 12 mm bolts and a single 12 mm nut. Disconnect all the wires from spark plugs, injectors, manifold sensors, mass air sensors, knock sensors, cam sensors, starter, alternator, ac lines and condenser, O2 sensors (need an O2 socket for this), etc. Mark all the wires to make your life easier when putting it all back together. Here's what your engine bay should look like after those wires are out of the way:
Attachment 330111
Minor details will be filled in as requests come in through comments. Further details will be added with time.
Next, there are the power steering lines and AC lines. I used this as an opportunity to remove my AC for good for a decent 20 lb weight reduction.
Attachment 330112
In your case you can just get the lines out of the way, but they can remain there along with the condenser.
NOTE: IT IS ILLEGAL TO DRAIN YOUR FREON UNLESS DONE BY AN AUTHORIZED DEALER
As far as power steering goes, removing the lines depends on whether or not you're pulling the engine, or dropping the engine. In either case, it's easier to remove the power steering pump from the engine as it will prevent a lot of mess from happening. I did not do this, made a mistake here, and am now trying to prevent you from making the same mistake. You don't have to do this, but I would do it if I removed the engine again. Then there are the lines going to the steering rack, and these WILL spill quite a bit of PS fluid. You could simply remove the PS pump and then remove these lines form the subframe, however this isn't necessary if you're pulling the engine from the top.
Bare engine bay with nothing in the way:

Don't forget to disconnect any shift links or cables from the transmission.
From the top:
Can you remove an engine from the top on an evo? Yes, you'll have to use something like this:
This will allow you to tilt your engine in order to pull it from the top, and works with any car that presents difficulties with this task. There are four motor mounts to deal with, two on the sub frame, two on the chassis. There is also the t case and the axles to deal with. Let's start with those.
If your car isn't AWD, you can skip quite a bit in this video. Simply pop your axles for FWD, or disconnect the driveshaft if you have RWD. You don't have to do any of this if you can disconnect your engine from the transmission, however they are far easier to reconnect when separated from the car. This video isn't by me.
Big thanks to Darren from Boosted Forum for helping me out with the removal of the axles remotely from the land of trees, beards, and backyard engine builds.
Once the t case is out of the way, you'll have easier access to the rear motor mount. Disconnect the rear mount and the front mount. It's highly suggested to have your hoist hooked on to your engine and creating tension in order to make the removal process easier and safer. I left my side mounts in tact for safety's sake.
Front mount:
Rear mount:
Big thanks to RallySportDirect.com
Here's how you can have your engine secured on the hoist.
NOTE: You will NEED an extra person or two to move the engine around to pull it from the top if you're not using the load leveler pictured in the previous photo. Big thanks to Edo Stepanyan for the heads up.
Few other examples:
From the bottom:
I didn't have the engine load leveler, so I couldn't pull the engine from the top. You may be in the same situation, but do not fret. You can drop the engine from the bottom. To do this, you don't even need a crane, but a use of one is highly recommended. I didn't, since my crane didn't arrive in time and I needed the engine out ASAP. The beauty of doing this from the bottom is that you don't have to remove the t-case or axles while they're on the car, giving you that much more room.
To remove the engine from the bottom, a few more things will have to be removed. Remember that PS line I mentioned? The one going to the steering rack? You may have a couple of those, one from the reservoir, and the other going to the pump. You can leave the pump on the engine, or disconnect it, either way there'll be a bit of a mess now.
After you've removed the lines, disconnect the steering column. Make sure to mark exactly where the column was connected to the rack in order to properly re-install it. Pics by Hothckis:
Remove the lines going to the T-Case, and disconnect the drive shaft from the T-Case as seen in the video. You don't need to remove the axles or the drive shaft just yet, but it could make things less painful. I couldn't get the T-Case side axle out, that's why my t-case remained in the car. RWD and FWD folks don't have to deal with this headache.
Now you can lower the subframe. Use the jacks mentioned previously to make things easier and less painful. The way your subframe is hooked up may be different from car to car. Some pics related to the removal of the subframe on an evo, the basics should be the same across platforms:
Originally Posted by rallysportdirect
There is a hole in the lower control arm that you�ll have to grab either a long extension to get to the bolt, or stack shorter extensions like we did here. Pull all four of the bolts out making sure to have your tranny jack, or regular jack (depending if you�re on the ground or in the air) to support the sub frame before dropping it.
You should have a jack or two holding the subframe. You could also bench it if you're Ara.
Attachment 330117
With the subframe out, clean it up because it's way easier to work with clean things rather than dirty things.
Now on to the shocks/struts and the hubs. If you're pulling the engine from the front, they shouldn't be an issue. If you're not, remove the shock, rotor, caliper and the hub on whatever side you're pulling the engine from. I had a line going into the hub so I moved it to the side and hooked it up to one of the holes where the subframe was mounted to:

To pull the engine from the side, my oil cooler was in the way. You may or may not face the same issue- still something to note.

Now you can lower the engine, and to do this you'll either need a hoist, or 3-4 jacks that can go very low. You also need a dolly in order to roll the engine out, or you can have your body builder friend pull it out by dragging it on the rubber mat you placed underneath. The front and rear mounts should be out of the way by this point, leaving the side mounts to work with. If you're using a hoist, this is very simple. Hook the engine up, create tension and disconnect the mounts, then slowly lower the engine onto the dolly. It's a similar idea with jacks, but way more dangerous and not preferable. I didn't have a dolly because I didn't think about it.
Attachment 330120
Attachment 330121
Now you can pull the engine out from under the car and do whatever you need with it, OR install your newly built engine back into your car.
The install process is reverse of the removal. Further details will be added as requested or as I remember them. This is a lot to write, so give me a break if I messed up somewhere and let me know.


Thread
Thread Starter
Forum
Replies
Last Post
Jakeg97
Evo How To Requests / Questions / Tips
101
Aug 22, 2011 10:31 AM
Rob_GPT
Evo Engine / Turbo / Drivetrain
5
Nov 8, 2008 09:11 PM
Jakeg97
Evo How Tos / Installations
10
Jan 18, 2005 07:35 PM
AbusiveWombat
Evo Tires / Wheels / Brakes / Suspension
5
Feb 17, 2004 11:16 AM