2004 Lancer Sportback Ralliart AT Build
#1651
After playing with the AC all morning, and buttoning everything back up, I noticed the clutch was no longer engaged and I wasn't drawing any untoward power. I tried to recreate the parasitic draw but was unsuccessful so I left it as is and the car has been ok all day... it is now 10 p.m.
#1654
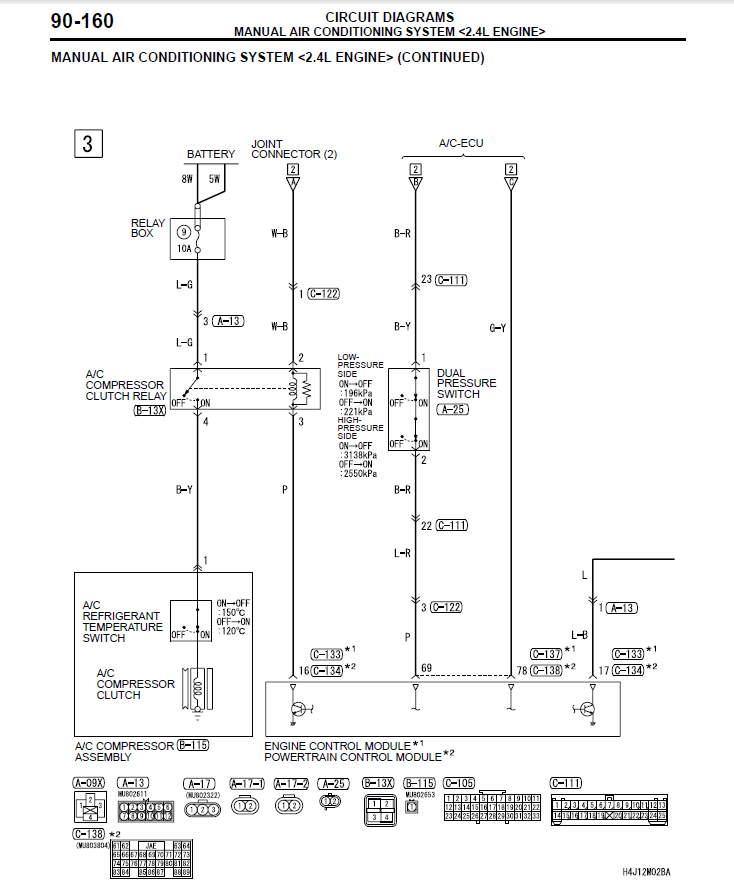
Garrett, can you find a wiring diagram that shows where the A/C Compressor/clutch is getting it power from, and any other systems that are supplied by the same? For, I've still a gremlin that's draining power from my battery even after disconnecting the AC compressor clutch. My headlights are continuing to flicker on and off after shutting down the engine and taking the keys out of the ignition! I'm suspecting there's a common power line for the headlights, AC, and possibly other systems. Any help would be invaluable.
#1655
There's hope:
Re: boost sensor Quote:
Originally Posted by truthdweller
I need the brass pressure sensor that accompanies the AEM (-35 /+35) boost gauge, or the entire gauge assy itself.
I might still have a sensor laying around, I will check and get back to you.
Thanks
Kris
#1656
Evolved Member
iTrader: (5)
Not so fast Gary!
Garrett, can you find a wiring diagram that shows where the A/C Compressor/clutch is getting it power from, and any other systems that are supplied by the same? For, I've still a gremlin that's draining power from my battery even after disconnecting the AC compressor clutch. My headlights are continuing to flicker on and off after shutting down the engine and taking the keys out of the ignition! I'm suspecting there's a common power line for the headlights, AC, and possibly other systems. Any help would be invaluable.
Garrett, can you find a wiring diagram that shows where the A/C Compressor/clutch is getting it power from, and any other systems that are supplied by the same? For, I've still a gremlin that's draining power from my battery even after disconnecting the AC compressor clutch. My headlights are continuing to flicker on and off after shutting down the engine and taking the keys out of the ignition! I'm suspecting there's a common power line for the headlights, AC, and possibly other systems. Any help would be invaluable.
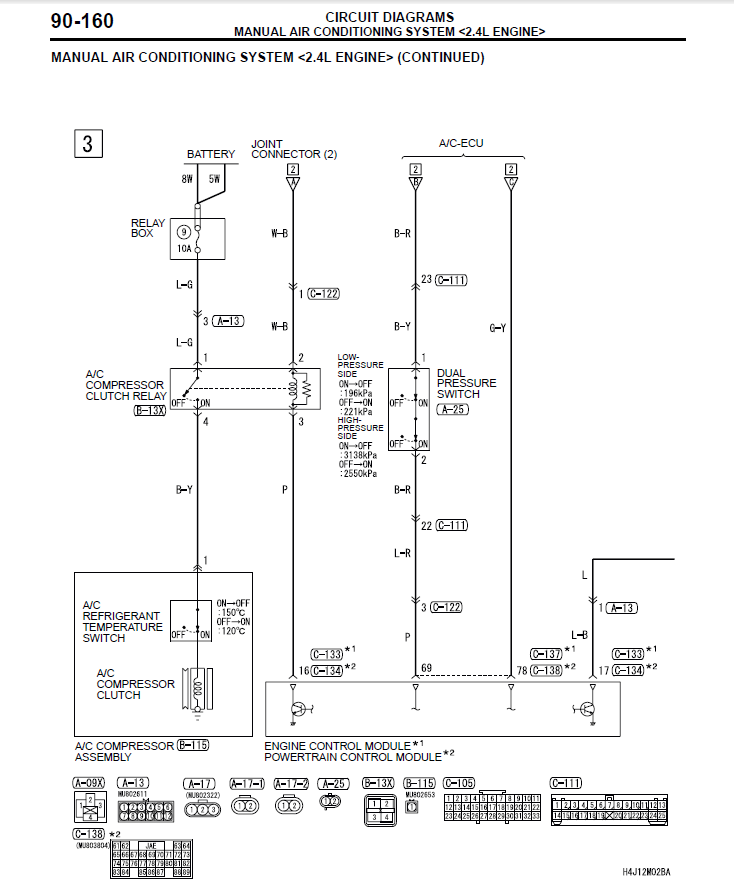
this is it...fuse #9, the relay, the temp switch and the clutch coil.

#1659
Okay now, don't laugh, but I can't yet figure out how to reassemble my parking brake assy smarter, and not harder! It disassembled so easily to replace the shoes, but now it's a p.i.t.a. to get back together. Particularly the two round springs that fit over the free floating pin on each side, capped by a small metal disc that twist-locks on!
After a small wild goose chase to locate the brake shoes at the new Advanced Auto, I came home and ran out of daylight and warmth out in front of the house where I chose to tackle this "simple" project. I had to put my pride in my back pocket and concede defeat by putting all the tools and pieces inside the car, and tires inside the garage with the car up on jacks for the evening....HELP, LOL!
After a small wild goose chase to locate the brake shoes at the new Advanced Auto, I came home and ran out of daylight and warmth out in front of the house where I chose to tackle this "simple" project. I had to put my pride in my back pocket and concede defeat by putting all the tools and pieces inside the car, and tires inside the garage with the car up on jacks for the evening....HELP, LOL!
#1660
Evolved Member
iTrader: (5)
stick the pin through the back dust shield, and through the hole in the shoe...place the spring over the pin on top of the shoe with the "metal disc", then with one hand holding the back side on the pin, use slightly opened needle nose pliers to push on the metal disc to compress the spring, while at the same time grabbing the flat part of the pin with the pliers and keep a good grip and tension on it...now the the pliers are holding the pin, so you can use your other hand that was pushing on the back of the pin to push on the metal disc, turn the pin 90 degrees till the flat part is sitting in the grooves and let go...
#1662
This morning I hopped on my son's mountain bike and headed to Autozone, about 3 miles down the road, to pick up a pair of 90 degree needle nose pliers. After about 45 minutes I arrived back home and assumed the position outside at my car. Although the dreaded frustration returned quickly. I even hopped on my sons bike again and went down the street to a young kids house at 0930 in hopes of recruiting him, for he works on UH-60 helos for the Army National Guard, and is frequently seen working diligently on his boosted Audi and other family vehicles. He reminds me of a young Cranswick. Unfortunately Muhammed was out of town on duty...*sigh*
"Why would Mitsubishi make it so easy to disassemble yet this difficult to put back together?!" I thought. I sat down on the ground in front of the right rear wheel and went over the diagram one more time. Those free floating pins were the crux and there had to be something I was missing, I kept insisting to myself. Sure enough, I finally realized that that pin can be pushed completely out of the back of the hub via a convenient access hole in the back of the hub. Now, all of you are probably saying, "Well, duh!" but this is exactly the type of problem that sets me back, sometimes days, when I'm not familiar with something. My eyes also get two-dimensional and forget there's a third. Anyhow, after discovering that, the processes picked up speed and I had it tidied up relatively quickly.
But there's more...
After a test drive, I got out to see if my wheels were still getting warm. The right rear was nice and cool, including the drum, but the left rear was warm again, "Darn it Jim!" After removing the wheel and rotor one more time and confirming my reassembly was good to go, I spun the rotor and noticed it was warped, causing the caliper to pulse in and out. I confirmed the other rotor is warped as well. Hopefully replacing these will solve the heating issue...

Last edited by truthdweller; Oct 27, 2015 at 07:03 PM.
#1665
Ok, my LR caliper was seized so, without going into detail, I got it unstuck...for now. While I was out taking it for a test drive to make sure the wheel wasn't getting hot, the engine all the sudden cut out and then regained power, but would hardly idle when I came to a stop without putting it into neutral and helping it with the accelerator. I threw a code as well which turned out to be a P0101, MAF Sensor. Here is a video of what it sounds like now. Unfortunately, my boost gauge is out of service:


