
How To: Install aftermarket amp/subs on non-fosgate system

Thread Starter
Evolved Member
iTrader: (7)
Joined: Jan 2005
Posts: 3,227
Likes: 6
From: Burbs, Chicago, IL
How To: Install aftermarket amp/subs on non-fosgate system
Ok, I've been putting this off long enough, but here goes. I'm going to be as painstakingly detailed as possible, so a lot of the steps are gonna be "duh" steps, but they'll all be there, just in case. Also, I am going to be using the Scosche LOC80 to do the signal conversion for the amp to retain the factory headunit, just so everybody knows. I know its not the best way to hook up a system, but its the easiest way to keep a stock appearance in the cabin but get a little extra sound from the stereo. Ok, ready??
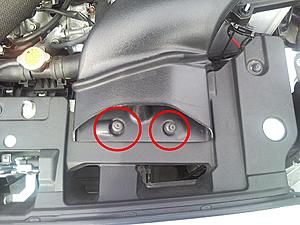
First off, running the power supply, you'll need to open up the hood and remove the air duct to gain access to the battery. You can do this by unscrewing the two plastic screw-type plugs that I circled and then once they are about a quarter inch out, pull up and the whole plug will come out. Then simply lift up on the front of the air intake duct and it should release from the airbox:
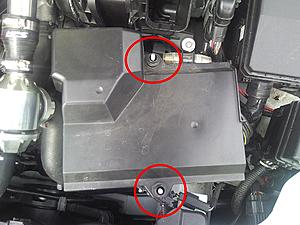
Next, there are two plastic nuts holding the battery cover in place. You can just unscrew them with your fingers until they are most of the way up, and then pull them off. Then you should be able to remove the black cover over the battery:
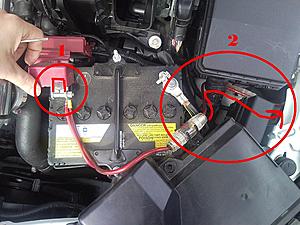
Circle 1: With the battery visible, you will now want to run your (hopefully) fused power wire off of the positive battery terminal using a ring terminal at the end of the short wire. The battery terminal nut is 10mm. In order to keep the positive terminal cover in place, I simply notched out a small section to allow the wire to travel under, which I over exaggerated with the paint illustration, just to give you the right idea.
Circle 2: You can mount the fuse however you like, I personally chose to drill a small 1/8" hole into the backside of the black plastic battery cover that I had removed and use an electrical zip-tie to hold it in place out of sight under the intake duct. Also, note the red arrow showing the routing I used for the power wire into the vehicle passenger compartment. I went under the main fuse harness just to keep it in place, and then out into the driver side fender-well. I then routed the wire along side the hood release cable to get it into the passenger compartment through a grommet. If needed, I can go into more detail with pictures for that later. After that, just put everything back on the way you got it off:
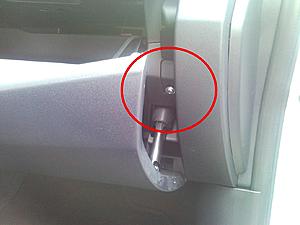
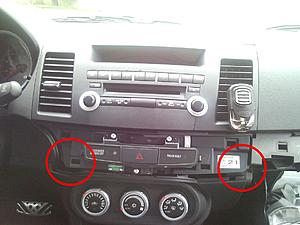
Once you've got the engine bay re-assembled, you can now move into the passenger compartment. Accessing the back of the audio unit is actually quite simple if you know what to do. First you'll need to open the glove-box door and look to the right side, just behind the edge of the door. There is 1 phillips head screw you will need to remove (circled) and then you can just pull that plastic piece to the right of the door directly towards you as its only being held on now by plastic tabs:
With the far right side plastic removed, you'll see another phillips screw (circled) holding on the fake carbon-fiber trim piece that runs across the dash. Unscrew that and then pull the fake cf piece towards you also, starting from the right side. again, its only held on by plastic tabs once that screw is removed:

First off, running the power supply, you'll need to open up the hood and remove the air duct to gain access to the battery. You can do this by unscrewing the two plastic screw-type plugs that I circled and then once they are about a quarter inch out, pull up and the whole plug will come out. Then simply lift up on the front of the air intake duct and it should release from the airbox:

Next, there are two plastic nuts holding the battery cover in place. You can just unscrew them with your fingers until they are most of the way up, and then pull them off. Then you should be able to remove the black cover over the battery:

Circle 1: With the battery visible, you will now want to run your (hopefully) fused power wire off of the positive battery terminal using a ring terminal at the end of the short wire. The battery terminal nut is 10mm. In order to keep the positive terminal cover in place, I simply notched out a small section to allow the wire to travel under, which I over exaggerated with the paint illustration, just to give you the right idea.
Circle 2: You can mount the fuse however you like, I personally chose to drill a small 1/8" hole into the backside of the black plastic battery cover that I had removed and use an electrical zip-tie to hold it in place out of sight under the intake duct. Also, note the red arrow showing the routing I used for the power wire into the vehicle passenger compartment. I went under the main fuse harness just to keep it in place, and then out into the driver side fender-well. I then routed the wire along side the hood release cable to get it into the passenger compartment through a grommet. If needed, I can go into more detail with pictures for that later. After that, just put everything back on the way you got it off:

Once you've got the engine bay re-assembled, you can now move into the passenger compartment. Accessing the back of the audio unit is actually quite simple if you know what to do. First you'll need to open the glove-box door and look to the right side, just behind the edge of the door. There is 1 phillips head screw you will need to remove (circled) and then you can just pull that plastic piece to the right of the door directly towards you as its only being held on now by plastic tabs:

With the far right side plastic removed, you'll see another phillips screw (circled) holding on the fake carbon-fiber trim piece that runs across the dash. Unscrew that and then pull the fake cf piece towards you also, starting from the right side. again, its only held on by plastic tabs once that screw is removed:

Last edited by 03chi-town0Z; Apr 5, 2010 at 09:33 PM.
Thread Starter
Evolved Member
iTrader: (7)
Joined: Jan 2005
Posts: 3,227
Likes: 6
From: Burbs, Chicago, IL
Now you should be looking at removing your radio face. It, like most things on this car (in case you havent noticed), is also held on by plastic clips. The easiest way to remove the radio face is to put your index fingers underneath the two areas which I've circled here, and gently pull upwards and towards yourself. It may take a bit of wiggling or effort, but it will come free:
Once it is free, flip the radio face out towards you and unclip the plastic wiring connector (circled) from the back of the face so you can set it out of your way to avoid any scratches or damage of any kind:
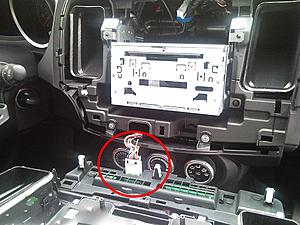
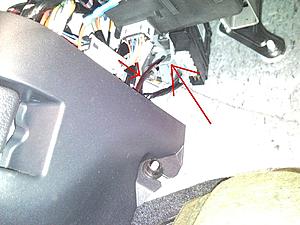
Ok, now to remove the actual radio unit. There are four phillips head screws, which I've circled, that you'll need to remove in order to release the head-unit. I highly recommend having some sort of magnet handy for the two lower ones as they have a tendency to fall into the dash and ruin your day if you're not careful. Once the screws are out, you can pull the head-unit towards yourself and access the wiring behind:
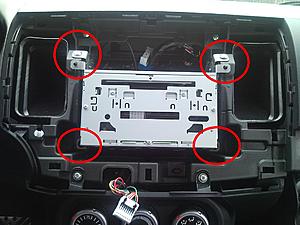
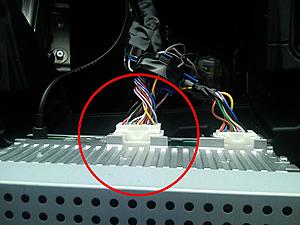
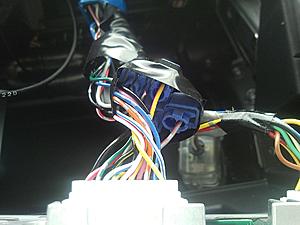
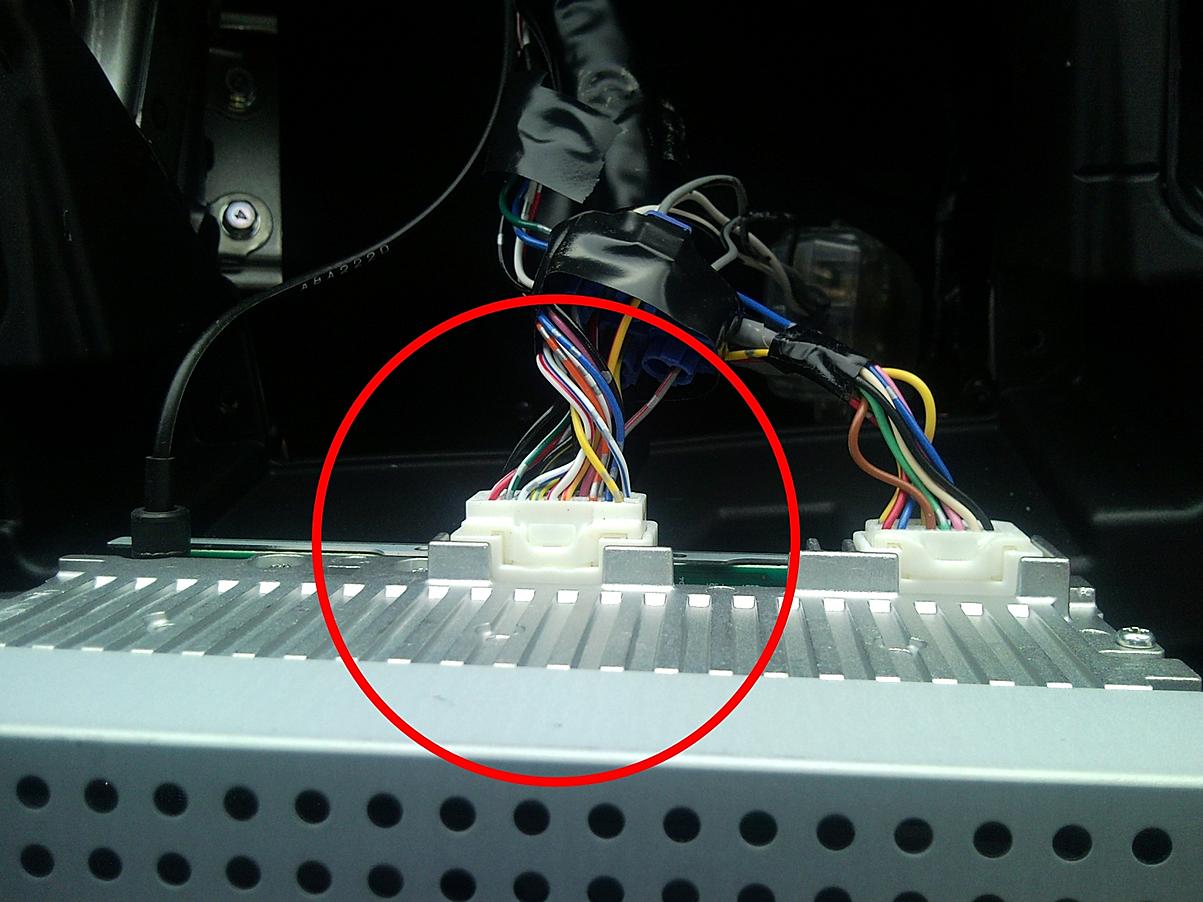
The connector you are going to use to tap into the speaker signal is the one circled on the left of the radio. You can tell which one, also, by counting the number of pin-slots, or "wire holes" available. The correct one is the 20-pin connector:
Now the part that really matters. This isnt the best way to get the greatest sound, but it is probably the most affordable, so in order to get as good of a sound quality as you can from this setup, you'll want to make sure you match the speakers properly. The way that the car's audio harness is set up, the color of the wire determines the polarity (yellow is positive, gray is negative) and the color of the stripe on the wire determines which speaker it relates to (blue is left/rear, red is right/rear). So if using the Scosche LOC80 like I did, you'll want to hook up the wires like so:
Scosche Wire Color Car Wire Color
White- Yellow (Blue Stripe)
White (Black Stripe)- Gray (Blue Stripe)
Gray- Yellow (Red Stripe)
Gray (Black Stripe)- Gray (Red Stripe)
I personally chose to use a very basic crimp-type clip-on connector to splice in the wiring, because I plan on upgrading my personal stereo head-unit in the future and didnt want to to any actual cutting of the wires. If this is a more permanent install, then I highly recommend soldering these connections, if possible, otherwise cutting and using a quality butt-connector with some heat shrink would be just fine too:

Once it is free, flip the radio face out towards you and unclip the plastic wiring connector (circled) from the back of the face so you can set it out of your way to avoid any scratches or damage of any kind:

Ok, now to remove the actual radio unit. There are four phillips head screws, which I've circled, that you'll need to remove in order to release the head-unit. I highly recommend having some sort of magnet handy for the two lower ones as they have a tendency to fall into the dash and ruin your day if you're not careful. Once the screws are out, you can pull the head-unit towards yourself and access the wiring behind:

The connector you are going to use to tap into the speaker signal is the one circled on the left of the radio. You can tell which one, also, by counting the number of pin-slots, or "wire holes" available. The correct one is the 20-pin connector:
Now the part that really matters. This isnt the best way to get the greatest sound, but it is probably the most affordable, so in order to get as good of a sound quality as you can from this setup, you'll want to make sure you match the speakers properly. The way that the car's audio harness is set up, the color of the wire determines the polarity (yellow is positive, gray is negative) and the color of the stripe on the wire determines which speaker it relates to (blue is left/rear, red is right/rear). So if using the Scosche LOC80 like I did, you'll want to hook up the wires like so:
Scosche Wire Color Car Wire Color
White- Yellow (Blue Stripe)
White (Black Stripe)- Gray (Blue Stripe)
Gray- Yellow (Red Stripe)
Gray (Black Stripe)- Gray (Red Stripe)
I personally chose to use a very basic crimp-type clip-on connector to splice in the wiring, because I plan on upgrading my personal stereo head-unit in the future and didnt want to to any actual cutting of the wires. If this is a more permanent install, then I highly recommend soldering these connections, if possible, otherwise cutting and using a quality butt-connector with some heat shrink would be just fine too:

Last edited by 03chi-town0Z; Dec 29, 2012 at 05:39 PM.
Thread Starter
Evolved Member
iTrader: (7)
Joined: Jan 2005
Posts: 3,227
Likes: 6
From: Burbs, Chicago, IL
Ok, finally, a month later, here goes the rest...
Before re-assembling the dash, I recommend routing the RCA wires back behind the glovebox and into the passenger side kick-panel while you have everything apart. Then put everything back together and this is where I continue my write-up...
Just to go over a bit to cover the whole process at once, once you've hooked up the inline fuse to the B+, I routed the wire as shown. Underneath the PCM harness and the relay box and into the fender well as shown:
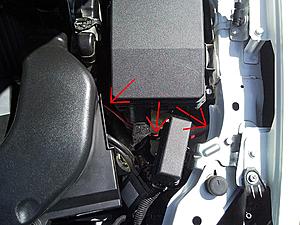
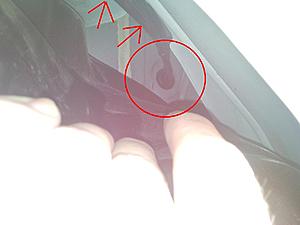
The next thing I did was to remove the plastic fender splash shield. It's held in place by an assortment of plastic clips and 10mm bolts. I didn't detail this process, as it should be fairly self explanatory: find all the clips/bolts and take them out. I will say, though, that the process is much easier if you have the wheel off of the car. Once you have the plastic shield out, you should see where you ran the wire into the fender and you should also see a black plastic covered wire which is the hood-release cable (red arrows). If you follow it back towards the rear of the fender, you'll see where it enters the passenger compartment through a rubber grommet (red circle). The grommet is held onto the release cable by a metal clamp, which I chose to leave in-tact and instead just cut a small slit in the rubber grommet to the side of the cable and pushed the wire through there. Here's the placement of the grommet and where I put it through, I only pulled the splash shield aside to get the pic but again, I highly recommend removing the whole thing for ease of access:
I zip-tied the power wire to the hood-release cable to prevent it from dangling and moving around which could lead to rubbing into the rubber wire casing and causing a major short. Then re-install the splash shield and the driver's front wheel/tire assembly. Now, onto the interior. Under the driver's side of the dashboard there is a lower cover that goes from the knee-panel to the firewall. Remove the three plastic clips (one is circled, one further out to each side) along the front of the panel and lower it down. There is a fourth clip to the rear of the panel, so dont try and pull the panel out unless you remove that, but it's not really necessary:

Now if you look up under the dash towards the left side of the car, behind the hood-releas handle, you can follow the cable up toward the firewall and find the wire you just inserted through the grommet (big arrow) pull it through and route it down behind the driver's side kick panel along with the hood-release cable (small arrow):
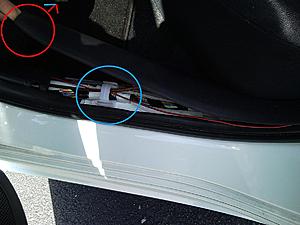
Now is a good time to connect your remote wire into the radio fuse, preferably with a fuse-tap. Again, this is nothing special, but I can go into greater detail if necessary, I think I've actually already explained it somewhere else on here. Anyway, the reason for that is so you can run both wires together which makes it a bit easier and saves some time. So once you've got the wires back behind the kick-panel, remove the driver's door scuff panel. The easiest way to do this is to pull upward and inward towards the seat at the rear edge of the panel (red circled). Then you can run the power and remote wire along with the body harness under the white clips (blue circles) to make sure they are out of the way and allow everything to re-install without any bulges:

Before re-assembling the dash, I recommend routing the RCA wires back behind the glovebox and into the passenger side kick-panel while you have everything apart. Then put everything back together and this is where I continue my write-up...
Just to go over a bit to cover the whole process at once, once you've hooked up the inline fuse to the B+, I routed the wire as shown. Underneath the PCM harness and the relay box and into the fender well as shown:

The next thing I did was to remove the plastic fender splash shield. It's held in place by an assortment of plastic clips and 10mm bolts. I didn't detail this process, as it should be fairly self explanatory: find all the clips/bolts and take them out. I will say, though, that the process is much easier if you have the wheel off of the car. Once you have the plastic shield out, you should see where you ran the wire into the fender and you should also see a black plastic covered wire which is the hood-release cable (red arrows). If you follow it back towards the rear of the fender, you'll see where it enters the passenger compartment through a rubber grommet (red circle). The grommet is held onto the release cable by a metal clamp, which I chose to leave in-tact and instead just cut a small slit in the rubber grommet to the side of the cable and pushed the wire through there. Here's the placement of the grommet and where I put it through, I only pulled the splash shield aside to get the pic but again, I highly recommend removing the whole thing for ease of access:

I zip-tied the power wire to the hood-release cable to prevent it from dangling and moving around which could lead to rubbing into the rubber wire casing and causing a major short. Then re-install the splash shield and the driver's front wheel/tire assembly. Now, onto the interior. Under the driver's side of the dashboard there is a lower cover that goes from the knee-panel to the firewall. Remove the three plastic clips (one is circled, one further out to each side) along the front of the panel and lower it down. There is a fourth clip to the rear of the panel, so dont try and pull the panel out unless you remove that, but it's not really necessary:

Now if you look up under the dash towards the left side of the car, behind the hood-releas handle, you can follow the cable up toward the firewall and find the wire you just inserted through the grommet (big arrow) pull it through and route it down behind the driver's side kick panel along with the hood-release cable (small arrow):

Now is a good time to connect your remote wire into the radio fuse, preferably with a fuse-tap. Again, this is nothing special, but I can go into greater detail if necessary, I think I've actually already explained it somewhere else on here. Anyway, the reason for that is so you can run both wires together which makes it a bit easier and saves some time. So once you've got the wires back behind the kick-panel, remove the driver's door scuff panel. The easiest way to do this is to pull upward and inward towards the seat at the rear edge of the panel (red circled). Then you can run the power and remote wire along with the body harness under the white clips (blue circles) to make sure they are out of the way and allow everything to re-install without any bulges:

Last edited by 03chi-town0Z; Jun 7, 2010 at 07:37 PM.
Thread Starter
Evolved Member
iTrader: (7)
Joined: Jan 2005
Posts: 3,227
Likes: 6
From: Burbs, Chicago, IL
You'll want to then run the wires behind the lower b-pillar and behind the seatbelt to the rear passenger area, just pull on the outer/upper edges of the lower b-pillar section away from the pillar towards the front or rear of the car depending on which side of the pillar you're on, and you should be able to release the clips enough to sneak the wire through and then just push it back into place until the clips pop back in. Inside the rear door, remove the lower scuff-panel in the same manor, by pulling up and in on the front edge of the panel (red circle) and run them under the white clips again (blue circle):
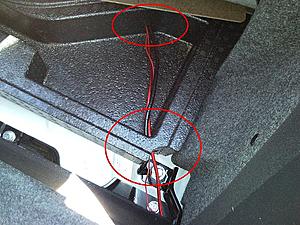
Run the wires upward and rearward between the rear seat bottom and the side support cushion with the seat belt to keep them hidden:

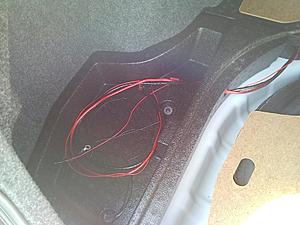
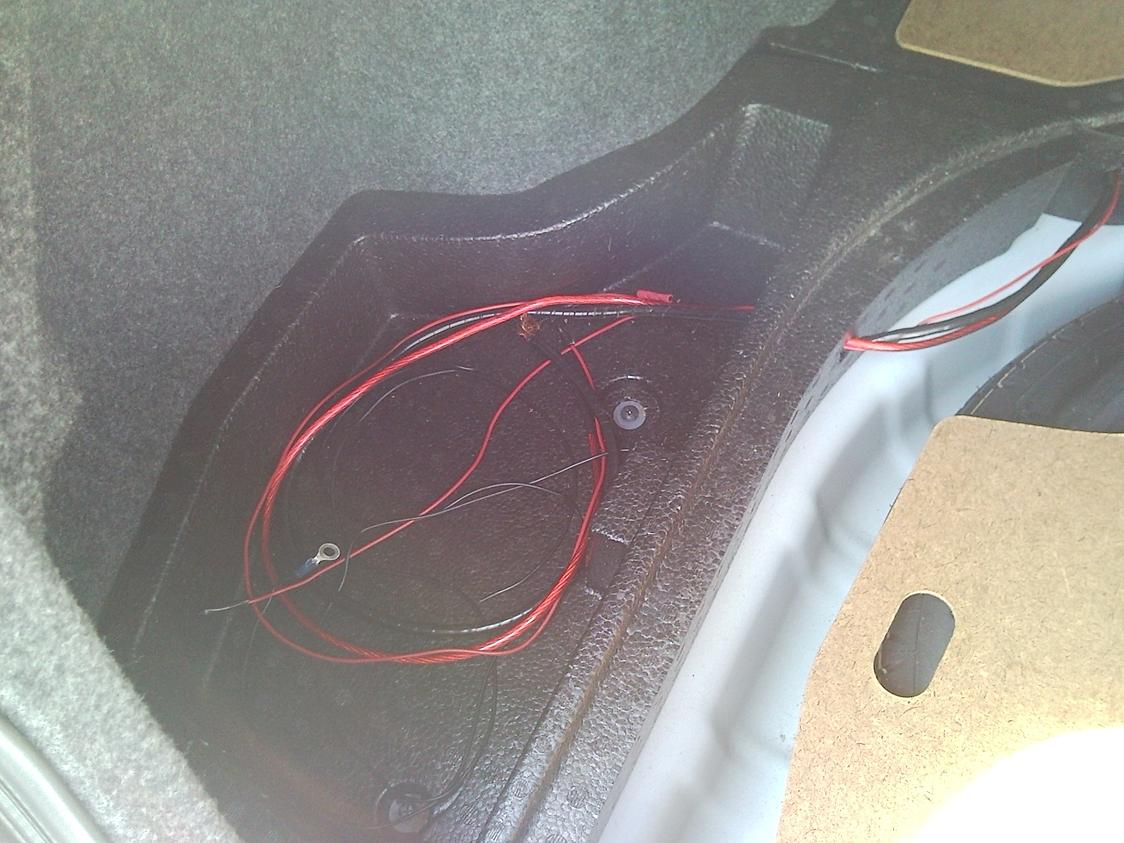
If you look here, with the driver's side rear seat folded down and the carpet lifted out, you can see the wires coming from the floor (bottom of pic) back towards the trunk area (top of pic), with the way that the foam storage compartments are set up, I didn't want to lay the wires on top of the edges and have lumps in the carpet and the weight of the subs/amp/etc resting on them, so I drilled holes into the foam (red circles) to be able to route everything cleanly into the trunk:
With the trunk carpet and tire cover board removed, you can see where the wires come into the trunk area (blue circles) and then the two more holes I opened into the side compartments (red circles):
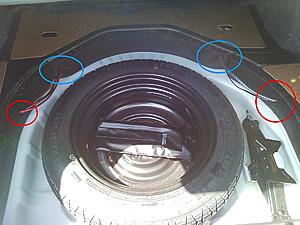
This way, with my setup, I was able to cut small slits into the trunk carpet and slip the wires through when the system is installed and when I take everything out for the track, the wires will store neatly in the side compartments and you can't even see the slits in the carpet so everything stays clean looking:
Now that you've got the power and remote wire run, getting back to the RCA wires, route them along the passenger side of the car in basically the same manner. Lifting the panels away and running the wiring under the white hold-down type clips. Between the seat cushion and side support in the rear. Drilling again into the foam storage to keep it clean to get it back there.

Run the wires upward and rearward between the rear seat bottom and the side support cushion with the seat belt to keep them hidden:

If you look here, with the driver's side rear seat folded down and the carpet lifted out, you can see the wires coming from the floor (bottom of pic) back towards the trunk area (top of pic), with the way that the foam storage compartments are set up, I didn't want to lay the wires on top of the edges and have lumps in the carpet and the weight of the subs/amp/etc resting on them, so I drilled holes into the foam (red circles) to be able to route everything cleanly into the trunk:

With the trunk carpet and tire cover board removed, you can see where the wires come into the trunk area (blue circles) and then the two more holes I opened into the side compartments (red circles):

This way, with my setup, I was able to cut small slits into the trunk carpet and slip the wires through when the system is installed and when I take everything out for the track, the wires will store neatly in the side compartments and you can't even see the slits in the carpet so everything stays clean looking:
Now that you've got the power and remote wire run, getting back to the RCA wires, route them along the passenger side of the car in basically the same manner. Lifting the panels away and running the wiring under the white hold-down type clips. Between the seat cushion and side support in the rear. Drilling again into the foam storage to keep it clean to get it back there.
Last edited by 03chi-town0Z; Jun 7, 2010 at 08:03 PM.

Thread Starter
Evolved Member
iTrader: (7)
Joined: Jan 2005
Posts: 3,227
Likes: 6
From: Burbs, Chicago, IL
sorry, i've been so busy trying to get ready for the track season, havent had a lot of time to get this finished. everything kinda crept up on me at once. finally got everything installed and the car's in the shop for a tune as we speak and then i should be able to get the rest of the pics and finish this up.
Trending Topics


Thread Starter
Evolved Member
iTrader: (7)
Joined: Jan 2005
Posts: 3,227
Likes: 6
From: Burbs, Chicago, IL
Ok, there you have it. See post 3 & 4 for the conclusion. The only thing I didnt document was the ground wire, which I just found a bolt in the trunk and used a ring-terminal on the end of the ground wire and put it around the bolt and put it back into place, should be pretty basic.
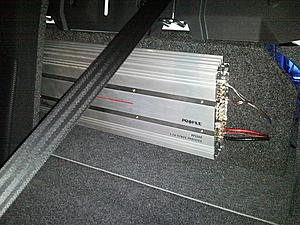
Also, to clarify, there were two reasons why I separated the wires the way I did. First, power and remote being run on opposite sides of the car from the RCA wires is a common practice that takes a bit more time, but helps to reduce interference in the RCA signal to the amp from the high current running through the power wire. Second, it was only coincidence that my amp was setup that one side plugged into power, ground, and remote, and the other side plugged into the RCA connection and the speaker wires to the subs. The convenience of running the setup this way is that if the amp hooks up differently, then you can use the forward storage area to cross the wiring to whichever side it needs to be on to hook up neatly and reduce as much interference as possible. So here's my end result, let me know what you think.
Amp view from inside the passenger compartment with the seats folded down, please excuse the fact that it's shifted and you can see through the side into the trunk, lol:
And the view into the trunk from outside, with two fans drawing air back to the amp wired to run whenever the ignition switch is on:
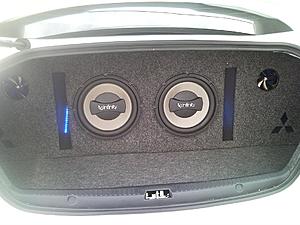
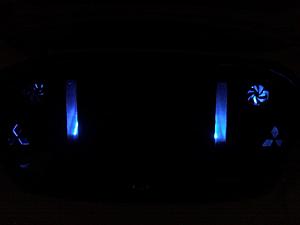
And finally, what it looks like at night, with the trunk open, led's wired into the trunk area light so they are only on when the trunk is open so they don't burn out prematurely and such...:
Again, sorry all that it took so long, but here it is, finally. Hope it helps some of you at least. Lemme know what you think, if there's something that needs changing or something else I may be able to help with. Thanks for looking
Also, to clarify, there were two reasons why I separated the wires the way I did. First, power and remote being run on opposite sides of the car from the RCA wires is a common practice that takes a bit more time, but helps to reduce interference in the RCA signal to the amp from the high current running through the power wire. Second, it was only coincidence that my amp was setup that one side plugged into power, ground, and remote, and the other side plugged into the RCA connection and the speaker wires to the subs. The convenience of running the setup this way is that if the amp hooks up differently, then you can use the forward storage area to cross the wiring to whichever side it needs to be on to hook up neatly and reduce as much interference as possible. So here's my end result, let me know what you think.
Amp view from inside the passenger compartment with the seats folded down, please excuse the fact that it's shifted and you can see through the side into the trunk, lol:

And the view into the trunk from outside, with two fans drawing air back to the amp wired to run whenever the ignition switch is on:

And finally, what it looks like at night, with the trunk open, led's wired into the trunk area light so they are only on when the trunk is open so they don't burn out prematurely and such...:

Again, sorry all that it took so long, but here it is, finally. Hope it helps some of you at least. Lemme know what you think, if there's something that needs changing or something else I may be able to help with. Thanks for looking
NICE WORK MAN!
I had a question. I didn't want to run a sub, but want to upgrade front and rear speakers and run a channel to both of them with a 75WATT RMS x4 AMP.
Would I need to use a Scosche SLC-4 4channel LOC instead of your two?
I had a question. I didn't want to run a sub, but want to upgrade front and rear speakers and run a channel to both of them with a 75WATT RMS x4 AMP.
Would I need to use a Scosche SLC-4 4channel LOC instead of your two?
Thread Starter
Evolved Member
iTrader: (7)
Joined: Jan 2005
Posts: 3,227
Likes: 6
From: Burbs, Chicago, IL
depends on which amp you're using. some amps come with the ability to run speaker-level inputs while others dont. if the only inputs on the amp are RCA style connections, then yes, you'll need some sort of 4-way loc like the scosche
 No more trunk though, eh?