
How to set up datalog lab?

How to set up datalog lab?
So I downloaded a copy but I'm getting some pretty funky results.
1. I set the universal datalog definition file to the one MalibuJack posted.
2. I chose the EVO VIII car definition
3. I edited the coefficient of drag and front area according to njxxxx's recommendation.
Questions:
How do I get my AF ratio displayed? I log it in evoscan. It doesn't show up here.
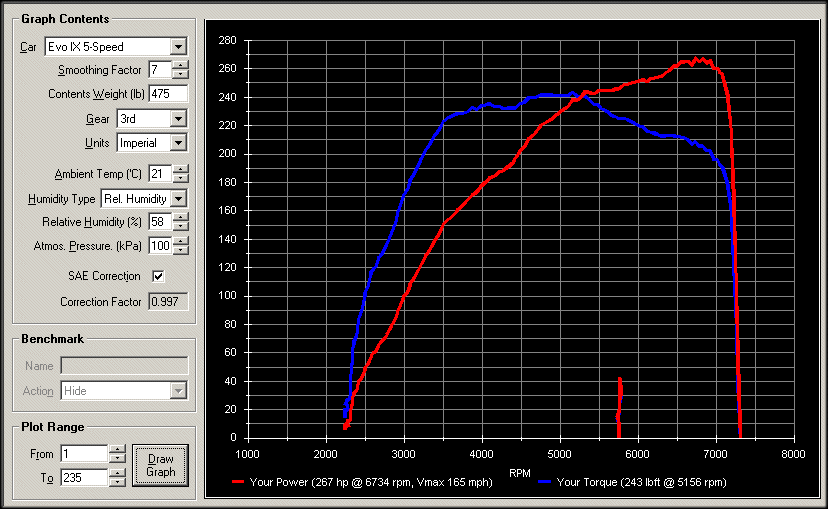
Here are some of my setup screens.
If I do a power graph and change from 3rd gear and 4th gear I get some HUGE differences in horsepower that I know aren't right.
My car is a IX GSR...so aren't the gear ratio's off?
What is the wheel power for in the car definition?


1. I set the universal datalog definition file to the one MalibuJack posted.
2. I chose the EVO VIII car definition
3. I edited the coefficient of drag and front area according to njxxxx's recommendation.
Questions:
How do I get my AF ratio displayed? I log it in evoscan. It doesn't show up here.
Here are some of my setup screens.
If I do a power graph and change from 3rd gear and 4th gear I get some HUGE differences in horsepower that I know aren't right.
My car is a IX GSR...so aren't the gear ratio's off?
What is the wheel power for in the car definition?

You will need to edit the mitsulogger.txt definition file for dataloglab to include AFR and anything else you wish to display. I attached mine. It has the AFR and IDC columns and some others that I do not remember.
You will also need to create new car definitions for the Evo 9. I already did that with the gear ratios. You will have to edit the file some more to reflect the actual test weight of the car.
You will also need to create new car definitions for the Evo 9. I already did that with the gear ratios. You will have to edit the file some more to reflect the actual test weight of the car.
Originally Posted by nj1266
You will need to edit the mitsulogger.txt definition file for dataloglab to include AFR and anything else you wish to display. I attached mine. It has the AFR and IDC columns and some others that I do not remember.
You will also need to create new car definitions for the Evo 9. I already did that with the gear ratios. You will have to edit the file some more to reflect the actual test weight of the car.
You will also need to create new car definitions for the Evo 9. I already did that with the gear ratios. You will have to edit the file some more to reflect the actual test weight of the car.
Thanks a lot man.
I used your mitsulogger definition file (for evoscan) so hopefully it likes it. It seems like things are ok. I also used your car file.
It appears I need to work on my timing map as my AF ratio is pretty rock solid but my torque curve drops like panties after 4k rpm.
I'm a little confused as to why the SAE corrected would be so much higher than uncorrected.
You're using uncorrected I'm assuming?
Is this supposed to give you an estimate of awhp or crank power?
I can't imagine making 360 hp with just a test pipe and intake + tuning at stock boost (with as much taper removed as possible)
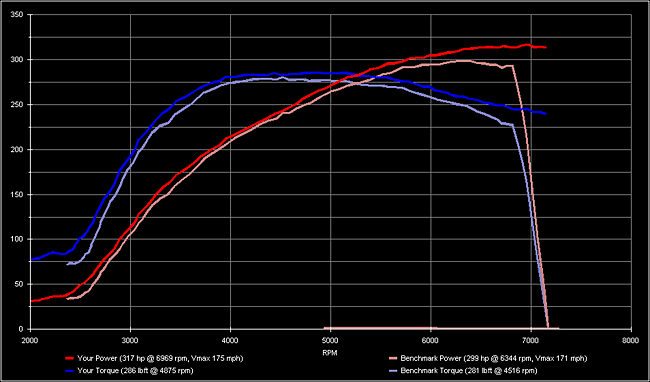
SAE corrected shows 360hp and 356lbft peak.

Uncorrected shows 302hp and 299ft lbft peak.


Originally Posted by SophieSleeps
I'm a little confused as to why the SAE corrected would be so much higher than uncorrected.
Eric
Originally Posted by SophieSleeps
Thanks a lot man.
I used your mitsulogger definition file (for evoscan) so hopefully it likes it. It seems like things are ok. I also used your car file.
It appears I need to work on my timing map as my AF ratio is pretty rock solid but my torque curve drops like panties after 4k rpm.
I'm a little confused as to why the SAE corrected would be so much higher than uncorrected.
You're using uncorrected I'm assuming?
Is this supposed to give you an estimate of awhp or crank power?
I can't imagine making 360 hp with just a test pipe and intake + tuning at stock boost (with as much taper removed as possible)
To figue out the correct temp and humidity and baro numbers in your area go here
http://www.wunderground.com/
Enter your zip code and then find the weather station closest to where you test and use the numbers from that weather station. This is a great site. The weather conditions are updated live and you will get all the numbers that you will need to get accurate power numbers from DLL.
Weeeeeeeeeeeeeeeeeeee
Thanks guys.
Yeah, I don't think 60 degrees celcius is right.

I know this is really to be used for tuning purposes and really can't be looked at as a "dyno" by any means, but are the results from this supposed to correspond more with crank hp or wheel hp?

Thanks guys.
Yeah, I don't think 60 degrees celcius is right.
I know this is really to be used for tuning purposes and really can't be looked at as a "dyno" by any means, but are the results from this supposed to correspond more with crank hp or wheel hp?

this software corresponds to wheel horsepower.. Generally my experience is it reads higher than on most dynos.. But it doesnt matter for tuning your own car.
The tricks are to always log in the same gear, and try to do each log in the same location, as slight grade in the road, or a head/tailwind might affect your data.
The tricks are to always log in the same gear, and try to do each log in the same location, as slight grade in the road, or a head/tailwind might affect your data.
Trending Topics
Originally Posted by SophieSleeps
Weeeeeeeeeeeeeeeeeeee
Thanks guys.
Yeah, I don't think 60 degrees celcius is right.
I know this is really to be used for tuning purposes and really can't be looked at as a "dyno" by any means, but are the results from this supposed to correspond more with crank hp or wheel hp?
Thanks guys.
Yeah, I don't think 60 degrees celcius is right.
I know this is really to be used for tuning purposes and really can't be looked at as a "dyno" by any means, but are the results from this supposed to correspond more with crank hp or wheel hp?
This is from a stock Evo 9 with a test pipe only. This is very close to the number that a stock Evo 9 puts on a dynojet. If you use the DLL correctly with all the proper data inputs and you test on a flat surface, then it can be surprisingly accurate.


The real power of DLL is using the powercurve overlays so you can see before/after changes to your tunes.
In the power curve window, plot your baseline curve. "save as", this will save it as a .pow file.
Open up your next log after tuning changes, plot the powercurve, click "open", open the .pow file from before, this will populate the benchmark area on the left, click draw graph, presto!

You can also ctrl-c in that window and it copies the graph to the clipboard, no screenshot needed.
I use the evoscan def file for DLL that chmodlf made, it seems to show everything from evoscan logs. (attached)
In the power curve window, plot your baseline curve. "save as", this will save it as a .pow file.
Open up your next log after tuning changes, plot the powercurve, click "open", open the .pow file from before, this will populate the benchmark area on the left, click draw graph, presto!
You can also ctrl-c in that window and it copies the graph to the clipboard, no screenshot needed.
I use the evoscan def file for DLL that chmodlf made, it seems to show everything from evoscan logs. (attached)
Originally Posted by nj1266
Another tip is to make your log that DLL reads longer than the WOT that you just posted. Include some data before and some data after the WOT run in the power graph.
It looks like you shouldn't add more data to the end of the run, because it appears that DLL will be using a certain RPM or speed twice and average the results.
For example, what I mean is that if you did a pull up to 7500 RPM and had DLL plot the dyno curves, if you plotted the data just up to the point of 7500 RPM, the HP would be greater at that point than if you used DLL to plot the curves with the data a few points after the 7500 RPM was initially reached.
In the example above, DLL would see 7000RPM twice (or the corresponding speed) and it looks like it averages out the power. So, adding more data in the beginning seems fine, but I wouldn't do it afterwards, to make sure that you have more precision in your future comparisons. For example, it you just coasted after your pull instead of braking hard and included that data, DLL would give different numbers. You don't want that data.
Eric
l2r99gst,
I had the same findings, in fact, you can test it out right in the powercurve window with the "plot range" feature, move the "to" numbers back and forth and keep clicking the draw graph button everytime and you can actually see the peak curves change. I can make a car that was making 280 whp peak magically be making 300whp by just moving the "To" numbers back.
I have found you really need to keep the data of getting off the power, putting in the clutch or hitting the brakes so you can plot that downward curve. If you don't the software will make the HP line keep going up where it really wasn't.
Here is an example:
Right, that's what I'm talking about.
I'm not sure about it's accuracy, but I would rather do it without the extra data....not because of the higher numbers, but because it shows the curves going all the way to the correct RPM.
For example, in your log below, what was the highest RPM that your took 100% throttle to? If you use the extra data, it brings the curve down prematurely because of using the same RPM or speed value twice.
Do you see what I am saying?
Eric
Eric,
yea totally I am agreeing with you. I believe the "your power" plot above was actually taken to the same as the benchmark. By me moving the plot range numbers back I cut off that cut off of 100% throttle and the plot magically kept going on in RPM and power.
DLL is a powerful tuning tool but you need to use it correctly to get accurate results.
Originally Posted by razorlab
the plot magically kept going on in RPM and power.
Without the extra data, the curves go up to the correct RPM. With the extra data, the curves will fall, to finish at the correct RPM at or near 0.
Like if you went to 7500 at 100% throttle and plotted the curves with extra past the 100% throttle point, the curves would go down to o at 7500, because it is using all of those RPM or speed points the second time (when you are decelerating) to fit the curves.
Eric

