
Stiff heater temperature control dial/knob

I've a bit of a problem with my temp control (The dial that you turn to adjust the temperature) on my 03 Evo VIII - it's super stiff/ can't be adjusted if you try to turn it by hand the regular way. The only way I can control it is by crawling under the dash (in drivers footwell) and physically turning a white pulley. 
Is this a common problem?
What's the easiest/cheapest way to fix this?
Thanks
Karl
Is this a common problem?
What's the easiest/cheapest way to fix this?
Thanks
Karl
with the 03's this is a common problem. under the dash on the driver side directly above the accelerator pedal, there are some plastic parts that the heater control cable is connected to. you can replace these parts with parts from an 04 or newer evo or lancer. once you replace them you shouldn't have any binding problems anymore.
i don't know the part numbers off hand though.... sorry.
edit: there are two plastic parts you need. they are the sliding white plastic ones when you look under there.
i don't know the part numbers off hand though.... sorry.
edit: there are two plastic parts you need. they are the sliding white plastic ones when you look under there.
No: TSB-055-003
DATE: December, 2005
MODEL: See below
SUBJECT:
HEATER TEMPERATURE DIAL
HARD TO TURN
This TSB supercedes TSB-04-55-003, issued March, 2004, to add new heater blend door replacement procedures and information, and to update the affected vehicles.
PURPOSE
The heater temperature dial on some affected vehicles may be difficult to turn. This is caused by the heater air blend door link and lever binding, or a dirty and/or damaged blend door gear track preventing the door from moving freely.
To prevent this condition, install a new, improved heater blend door as described in this bulletin.
If a customer complains that the heater temperature dial is difficult to turn:
^ Install the new, improved heater blend door (listed in the PARTS INFORMATION section of this bulletin).
^ For 2002-2003 models only, if the vehicle has NOT already had the heater air blend link and lever replaced as described in TSB-04-55-003, replace the heater air blend link and lever.
On vehicles that do not have a blower motor housing filter already installed as original equipment, install a filter to the top of the blower motor housing, to prevent entry of dirt and debris.
AFFECTED VEHICLES
2002-on Lancer and Lancer Evolution
2003-on Outlander
PROCEDURE
1. Remove the heater case from the vehicle as follows. Refer to Group 55 in the service manual.
a. Discharge and recover the refrigerant.
b. Clamp the heater inlet and outlet hoses near the bulkhead and remove the hoses from the heater core pipes.
c. Disconnect the A/C pipes and remove the expansion valve block.
d. Remove the instrument panel. Refer to Group 52A in the service manual.
e. Remove the heater case assembly.

2. Remove the seal from the case and discard it.
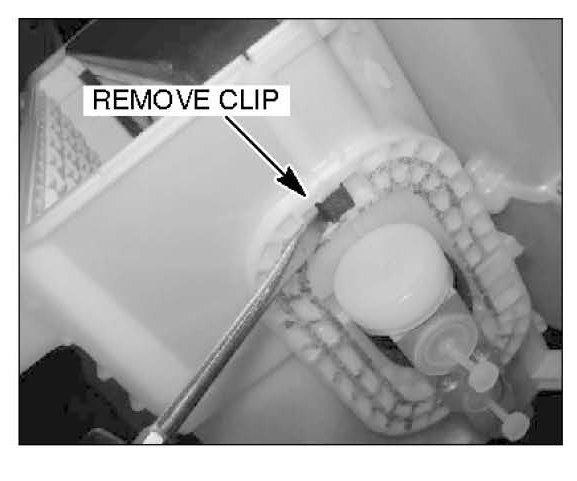
3. Use a flat-blade screwdriver to pry off the clip.

4. Remove the connector.
Do not remove the fin temperature sensors from the evaporator. If a sensor location is changed, compressor failure may result.

Do not remove the fin temperature sensors from the evaporator. If a sensor location is changed, compressor failure may result.
5. Remove the temperature control linkages and gear.
6. Position the heater case on the bench with the control linkage gear side facing down.
7. Open the case. Remove and discard the blend door assembly. Do not remove the mode doors.

DATE: December, 2005
MODEL: See below
SUBJECT:
HEATER TEMPERATURE DIAL
HARD TO TURN
This TSB supercedes TSB-04-55-003, issued March, 2004, to add new heater blend door replacement procedures and information, and to update the affected vehicles.
PURPOSE
The heater temperature dial on some affected vehicles may be difficult to turn. This is caused by the heater air blend door link and lever binding, or a dirty and/or damaged blend door gear track preventing the door from moving freely.
To prevent this condition, install a new, improved heater blend door as described in this bulletin.
If a customer complains that the heater temperature dial is difficult to turn:
^ Install the new, improved heater blend door (listed in the PARTS INFORMATION section of this bulletin).
^ For 2002-2003 models only, if the vehicle has NOT already had the heater air blend link and lever replaced as described in TSB-04-55-003, replace the heater air blend link and lever.
On vehicles that do not have a blower motor housing filter already installed as original equipment, install a filter to the top of the blower motor housing, to prevent entry of dirt and debris.
AFFECTED VEHICLES
2002-on Lancer and Lancer Evolution
2003-on Outlander
PROCEDURE
1. Remove the heater case from the vehicle as follows. Refer to Group 55 in the service manual.
a. Discharge and recover the refrigerant.
b. Clamp the heater inlet and outlet hoses near the bulkhead and remove the hoses from the heater core pipes.
c. Disconnect the A/C pipes and remove the expansion valve block.
d. Remove the instrument panel. Refer to Group 52A in the service manual.
e. Remove the heater case assembly.
2. Remove the seal from the case and discard it.
3. Use a flat-blade screwdriver to pry off the clip.
4. Remove the connector.
Do not remove the fin temperature sensors from the evaporator. If a sensor location is changed, compressor failure may result.
Do not remove the fin temperature sensors from the evaporator. If a sensor location is changed, compressor failure may result.
5. Remove the temperature control linkages and gear.
6. Position the heater case on the bench with the control linkage gear side facing down.
7. Open the case. Remove and discard the blend door assembly. Do not remove the mode doors.
8. Install the new blend door (provided in the heater blend door kit listed in the PARTS INFORMATION section of this bulletin). Use the location pins on the door to align it properly.

9. Move the blend door all the way to the left. Then install the gear.

10. 2002-2003 MODELS ONLY
If the vehicle has NOT already had the heater blend link and lever replaced as described in TSB-04-55-003:
Use the heater air blend link and lever kit listed in the PARTS INFORMATION section of this bulletin.
Apply a small amount of grease to the slot in the new door link, and to the gearteeth on the new lever.
Install the new link and lever to the heater box.

11. Adjust the gear so that the raised dot on the gear is aligned with the notch in the blend door as shown.
IMPORTANT :The raised dot on the gear for the door track must be aligned with the notch in the door lever to achieve proper timing. If the link and lever are not installed properly, binding will result.
12. Install the new seal provided in the heater blend door kit.
13. Reassemble the case. Use all of the screws provided in the kit, as there may be one or more broken case tabs. Be sure that there are no gaps after reassembly.
14. Reinstall the heater case and expansion valve block. Reconnect the hoses and pipes. Reinstall the instrument panel.
15. On vehicles that do not have a blower motor housing filter already installed as original equipment, install a blower motor housing filter as follows:
a. Remove the glove box lid.

b. Use a knife to cut a section from the top of the blower motor housing, along the perforated lines as shown.

c. Install the filter with the air flow directional arrow pointing down.
d. Secure the filter with two 5X14 self-tapping screws listed in the PARTS INFORMATION section of this bulletin.
9. Move the blend door all the way to the left. Then install the gear.
10. 2002-2003 MODELS ONLY
If the vehicle has NOT already had the heater blend link and lever replaced as described in TSB-04-55-003:
Use the heater air blend link and lever kit listed in the PARTS INFORMATION section of this bulletin.
Apply a small amount of grease to the slot in the new door link, and to the gearteeth on the new lever.
Install the new link and lever to the heater box.
11. Adjust the gear so that the raised dot on the gear is aligned with the notch in the blend door as shown.
IMPORTANT :The raised dot on the gear for the door track must be aligned with the notch in the door lever to achieve proper timing. If the link and lever are not installed properly, binding will result.
12. Install the new seal provided in the heater blend door kit.
13. Reassemble the case. Use all of the screws provided in the kit, as there may be one or more broken case tabs. Be sure that there are no gaps after reassembly.
14. Reinstall the heater case and expansion valve block. Reconnect the hoses and pipes. Reinstall the instrument panel.
15. On vehicles that do not have a blower motor housing filter already installed as original equipment, install a blower motor housing filter as follows:
a. Remove the glove box lid.
b. Use a knife to cut a section from the top of the blower motor housing, along the perforated lines as shown.
c. Install the filter with the air flow directional arrow pointing down.
d. Secure the filter with two 5X14 self-tapping screws listed in the PARTS INFORMATION section of this bulletin.
Trending Topics


I love this site more and more with ever post.
Simply awesome information! Thank you so much!!
If I call my local Mitsubishi dealer will they fix this for me as a recall or is this something I will have to fix myself? Sorry I'm not sure how recalls work.
Simply awesome information! Thank you so much!!
If I call my local Mitsubishi dealer will they fix this for me as a recall or is this something I will have to fix myself? Sorry I'm not sure how recalls work.


