
BR Underhood metal bushing install

BR Underhood metal bushing install
This is a how to for installing the BR underhood metal shifter bushings.

They're cheap yet very high quality. The improvements in shifting make them all the worthwhile.
To install these you need:
10mm deep socket
Needle nose pliers (large and small)
Some patience and a little muscle.
Drop light
Little bit of grease or antisieze (optional)
For starters, put the ebrake on and leave the shifter in the neutral position. Pop your hood and walk over to the drivers side of the car.
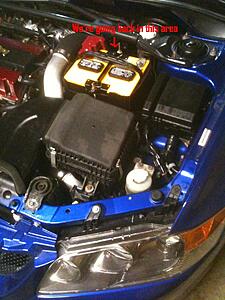
The transmission linkages are located behind the battery.
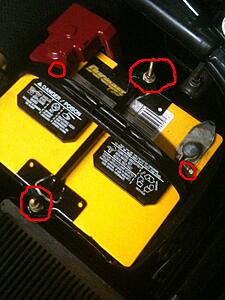
Loosen the 2 10mm nuts that hold the battery clamp on and remove it. They just hook into the tray.
Then pop off the red battery terminal cover (it just clips in place) and loosen the 10mm nuts which old the terminals tight. Remove the battery and set somewhere out of the way and NOT on concrete!
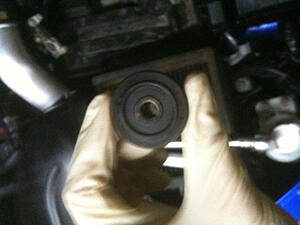
Here's what you're going to see with the battery out.
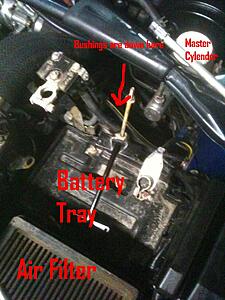
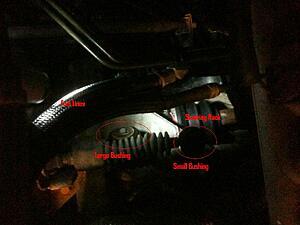
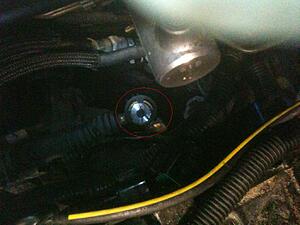
If you take a peek down behind the battery tray this is what you'll see.
I circled the small linkage bushing.
The large one is right next to it.
They're cheap yet very high quality. The improvements in shifting make them all the worthwhile.
To install these you need:
10mm deep socket
Needle nose pliers (large and small)
Some patience and a little muscle.
Drop light
Little bit of grease or antisieze (optional)
For starters, put the ebrake on and leave the shifter in the neutral position. Pop your hood and walk over to the drivers side of the car.

The transmission linkages are located behind the battery.

Loosen the 2 10mm nuts that hold the battery clamp on and remove it. They just hook into the tray.
Then pop off the red battery terminal cover (it just clips in place) and loosen the 10mm nuts which old the terminals tight. Remove the battery and set somewhere out of the way and NOT on concrete!
Here's what you're going to see with the battery out.

If you take a peek down behind the battery tray this is what you'll see.

I circled the small linkage bushing.
The large one is right next to it.

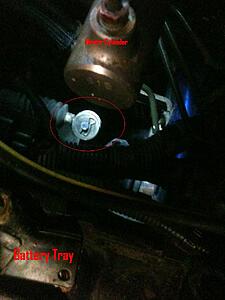
Grab your large and small needle nose pliers and remove the cotter pins which hold the bushing to the linkage. After your get the cotter pin off, there is also a washer that can be removed and discarded.
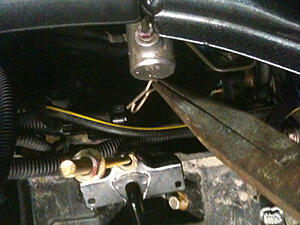
Don't fret if you loose these cotter pins and Bushur gives you spares (thanks guys!)
After the pins and washers are removed, you can pull them off the linkage like so.
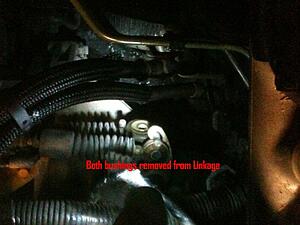
Now for the fun part. The bushings will just push right out of the cable with a little bit of thumb muscle, but you can try pressing them out with the pliers or a screwdriver.
Here's the small one removed.
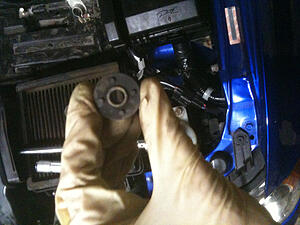
Here's the large one removed.

So here's what we got.
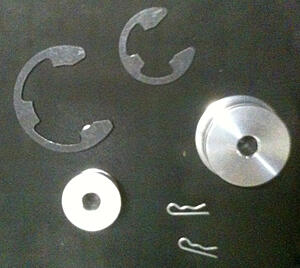
The C clips fit into the groove on one side of the bushing.
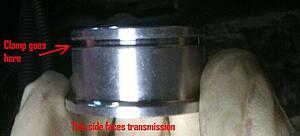
(optional) Put a little bit of grease or antisize into the clamp groove of the bushing to make the clips slide easier and a little bit on the linkage to they'll be easier to remove should you need to pull the tranny at a later date.
Order of installation:
Start with the large bushing first!
Set the bushing into the linkage shaft
Slide the cable over the bushing
Insert the C clap
Insert the new cotter pin
Here's what it'll look like installed.
Here's the small one installed.
Now, before you reinstall the battery, go have a seat in the car and try shifting the gears for a bit. If you installed everything correctly, shifting should be smooth and they won't pop out.
If you're happy with the improvements, check out the shifter base bushings BR sells too!
https://www.evolutionm.net/forums/ev...g-install.html

The C clips fit into the groove on one side of the bushing.

(optional) Put a little bit of grease or antisize into the clamp groove of the bushing to make the clips slide easier and a little bit on the linkage to they'll be easier to remove should you need to pull the tranny at a later date.
Order of installation:
Start with the large bushing first!
Set the bushing into the linkage shaft
Slide the cable over the bushing
Insert the C clap
Insert the new cotter pin
Here's what it'll look like installed.

Here's the small one installed.

Now, before you reinstall the battery, go have a seat in the car and try shifting the gears for a bit. If you installed everything correctly, shifting should be smooth and they won't pop out.
If you're happy with the improvements, check out the shifter base bushings BR sells too!
https://www.evolutionm.net/forums/ev...g-install.html

Thread
Thread Starter
Forum
Replies
Last Post
mrwickd123
Evo X How Tos / Installations
30
Feb 20, 2019 09:29 PM
MitsuJoe
Evo How To Requests / Questions / Tips
468
Feb 20, 2016 11:17 AM
aggieEVO
Evo Tires / Wheels / Brakes / Suspension
4
Sep 21, 2015 07:03 AM
otbEVO
For Sale - Cars For Sale
1
Jul 14, 2015 06:08 PM