Notices
Evo How Tos / Installations Post or link to your detailed how to / installation articles in here. If you have any questions regarding the how tos, feel free to post them in the Request sub-forum.

DIY plywood front splitter for Evo 8/9

Thread Tools
 
Search this Thread
 
Old Oct 6, 2011 | 02:19 PM
  #16  
1UpMoto's Avatar
Evolving Member
iTrader: (14)
 
Joined: May 2011
Posts: 398
Likes: 4
From: 305
Im sooo disappointed you didn't Stain it and make it have that antique look lol.
Reply
Old Dec 20, 2011 | 08:54 PM
  #17  
RJones's Avatar
Evolved Member
iTrader: (5)
 
Joined: Jan 2009
Posts: 1,322
Likes: 14
From: CA
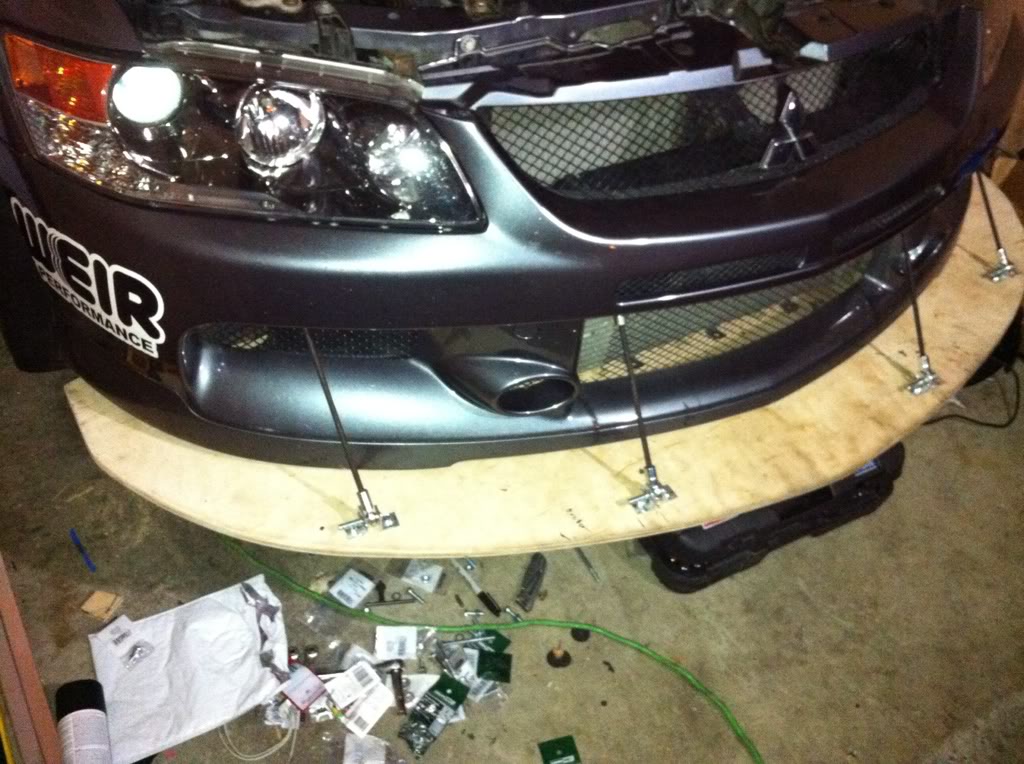
So I ended up going your route... I used 1/2" birch and instead of the speaker strapping, I used threaded rod and quick release ball joint rod ends. I think that change added about $60-70 to the total cost of the splitter, but I can get it on and off in just a couple minutes.

Name:  849bf2f7.jpg
Views: 0
Size:  137.7 KB
Name:  cf567de1.jpg
Views: 0
Size:  131.3 KB

Last edited by RJones; Jan 30, 2012 at 09:57 PM.
Reply
Old Dec 20, 2011 | 09:16 PM
  #18  
ssg_petty_210's Avatar
Evolved Member
iTrader: (13)
 
Joined: Feb 2009
Posts: 1,187
Likes: 1
From: Texas
Thats pretty impressive. I love reading DIY articles. You know what you should to, is get some of that 3m carbon fiber vinyl, and wrap it.
Reply
Old Dec 21, 2011 | 11:35 AM
  #19  
EGbeater's Avatar
Thread Starter
Evolved Member
15 Year Member
Liked
Loved
Community Favorite
iTrader: (35)
 
Joined: Jan 2008
Posts: 519
Likes: 15
From: Colorado
Originally Posted by ssg_petty_210
Thats pretty impressive. I love reading DIY articles. You know what you should to, is get some of that 3m carbon fiber vinyl, and wrap it.
Thanks; glad you enjoyed checking out the thread.

I've actually since repainted my plywood splitter with a satin/matte black spraypaint that looks much better and matches my bumper cover.
Reply
Old Dec 21, 2011 | 07:08 PM
  #20  
ssg_petty_210's Avatar
Evolved Member
iTrader: (13)
 
Joined: Feb 2009
Posts: 1,187
Likes: 1
From: Texas
Ah okay. Good stuff. Well done man.
Reply
Old Jan 4, 2012 | 09:48 AM
  #21  
sabrinaEvo's Avatar
Evolving Member
iTrader: (2)
 
Joined: Jun 2011
Posts: 138
Likes: 1
From: San Jose
Good DIY... You know what you can do is use that splitter to make a mold and just lay some fiberglass
Reply
Old May 12, 2012 | 09:41 AM
  #22  
meltdown's Avatar
Evolving Member
iTrader: (16)
 
Joined: Nov 2006
Posts: 355
Likes: 0
From: KC
Originally Posted by sabrinaEvo
Good DIY... You know what you can do is use that splitter to make a mold and just lay some fiberglass
+1million!

Please get rid of the wood. It reminds me of DSM's
Reply
Old May 12, 2012 | 01:24 PM
  #23  
evol evo's Avatar
Newbie
iTrader: (1)
 
Joined: Sep 2011
Posts: 52
Likes: 0
From: ky
and people say im a redneck only because im from ky.this reminds me of a kid that built a body kit out of plywood. wait till it gets wet and starts to seperate and split.
Reply
Old May 12, 2012 | 02:12 PM
  #24  
xXANCHORMONXx's Avatar
Evolved Member
iTrader: (15)
 
Joined: Jan 2012
Posts: 703
Likes: 3
From: San Bruno
Alumilite might be something you could have looked at. very nice job tho
Reply
Old May 13, 2012 | 03:02 PM
  #25  
RJones's Avatar
Evolved Member
iTrader: (5)
 
Joined: Jan 2009
Posts: 1,322
Likes: 14
From: CA
Originally Posted by evol evo
and people say im a redneck only because im from ky.this reminds me of a kid that built a body kit out of plywood. wait till it gets wet and starts to seperate and split.
Mine has been autocrossed and tracked in the wet many times. That's why I spent time and effort making sure it was waterproofed. No swelling or splitting here.
Reply
Old May 13, 2012 | 03:03 PM
  #26  
RJones's Avatar
Evolved Member
iTrader: (5)
 
Joined: Jan 2009
Posts: 1,322
Likes: 14
From: CA
Here's what the finished product ended up looking like.

Reply
Old May 13, 2012 | 06:21 PM
  #27  
Evo_Someday's Avatar
Evolved Member
 
Joined: Jan 2007
Posts: 671
Likes: 0
From: Dallas / Fort Worth
I also did a DIY plywood splitter. I did mine before I saw this so I did it differently but similar. I used threaded rod from HomeDepot to brace mine in the front. I then used a digital level and turned the front rods to exact -3 degrees downslope in the front - as it should be and is allowed by SM rules. It left a big gap in the front between the splitter and the bumper so I used a thin piece of plastic strip about 4 inches wide and screwed it to the bumper.


The result = I think the car gripped better.

http://www.youtube.com/watch?v=JDTTgmSalwI
Attached Thumbnails DIY plywood front splitter for Evo 8/9-2012-05-12-08.56.35.jpg  
Reply
Old May 14, 2012 | 08:15 AM
  #28  
EGbeater's Avatar
Thread Starter
Evolved Member
15 Year Member
Liked
Loved
Community Favorite
iTrader: (35)
 
Joined: Jan 2008
Posts: 519
Likes: 15
From: Colorado
Originally Posted by Evo_Someday
I then used a digital level and turned the front rods to exact -3 degrees downslope in the front - as it should be and is allowed by SM rules.
I only have the most rudimentary grasp of fluid dynamics, and am only parroting what more educated and intelligent people have told me, but I've heard that having the splitter level/parallel to the ground will actually have a greater effect than having it tilted downward at the leading edge. The theory as it's been explained to me is that the air under the splitter is accelerated, thus creating a lower pressure zone and "sucking" the splitter down. If you tilt the splitter down at the front, the air will slow down as it expands in the larger area under the car as it moves rearward.

Originally Posted by Evo_Someday
It left a big gap in the front between the splitter and the bumper so I used a thin piece of plastic strip about 4 inches wide and screwed it to the bumper.
I do know that having the splitter closer to the ground (and parallel to it) WILL increase the downforce, though, so I'm currently working on new mounting hardware to move it down to about 2.5" above the ground, rather than about 4.7". So, like you, I'll be using thin ABS plastic to bridge the resulting gap between the splitter's top surface and the front edge of my front bumper cover. I'll post pics when I'm done.
Reply
Old May 14, 2012 | 04:58 PM
  #29  
Evo_Someday's Avatar
Evolved Member
 
Joined: Jan 2007
Posts: 671
Likes: 0
From: Dallas / Fort Worth
Originally Posted by EGbeater
I only have the most rudimentary grasp of fluid dynamics, and am only parroting what more educated and intelligent people have told me, but I've heard that having the splitter level/parallel to the ground will actually have a greater effect than having it tilted downward at the leading edge.
So I've been doing some research and I've learned...

Bernoullis’ principal says faster moving air has a lower pressure and that lower pressure is what causes front down force.... For a splitter to work it has to be flat, parallel to the ground, and be able to hold together at high speeds. The benefit of the splitter gets better the further back under the car it goes.

So yeah, I guess I have a few design changes to make.
Reply
Old May 15, 2012 | 09:48 AM
  #30  
meltdown's Avatar
Evolving Member
iTrader: (16)
 
Joined: Nov 2006
Posts: 355
Likes: 0
From: KC
Just a thought. Attach the plastic trim, that fills the gap between the body and the splitter, to the splitter and then you could just use 3m tape to attach/stick it to the bumper. This way you dont have to drill into the front bumper/lip.
Reply


All times are GMT -7. The time now is 05:25 PM.