
DIY plywood front splitter for Evo 8/9


Pretty close to what I was planning; I was going to attach the plastic trim only to the splitter itself with small L-brackets. I figure the air is going to push the plastic firmly against the bottom edge of the front bumper at speed anyway, plus my splitter mounting brackets will allow for height adjustment (so I can adjust the amount of front downforce, or raise it up slightly if necessary for ground clearance at certain tracks) so I wouldn't want the top of the plastic "airdam" attached to the bumper cover for that reason.

Pretty close to what I was planning; I was going to attach the plastic trim only to the splitter itself with small L-brackets. I figure the air is going to push the plastic firmly against the bottom edge of the front bumper at speed anyway, plus my splitter mounting brackets will allow for height adjustment (so I can adjust the amount of front downforce, or raise it up slightly if necessary for ground clearance at certain tracks) so I wouldn't want the top of the plastic "airdam" attached to the bumper cover for that reason.
Evolved Member
Joined: Jan 2007
Posts: 671
Likes: 0
From: Dallas / Fort Worth
More info....
"The airstream is brought to stagnation above the splitter by an air dam, causing an area of high pressure. Below the splitter, the air is redirected away from the stagnation zone and is accelerated, causing the pressure to drop. This, combined with the high pressure over the splitter creates downforce. The larger the area of the splitter, the more downforce is generated."
The key from what I read is the "air dam" part. Meaning the splitter must feed directly in to a verticle wall to create the stagnation (as shown below).
So I'm thinking that tilting the splitter down just a hair will cause an even larger amount of air to collect on top against the bumper resulting in more pressure. The tilt underneath will further accelerate the air causing even lower pressure below.

Tilting the splitter upwards could have the opposite result and actually cause a low pressure vacuum above the splitter and result in lift on the front end.
"The airstream is brought to stagnation above the splitter by an air dam, causing an area of high pressure. Below the splitter, the air is redirected away from the stagnation zone and is accelerated, causing the pressure to drop. This, combined with the high pressure over the splitter creates downforce. The larger the area of the splitter, the more downforce is generated."
The key from what I read is the "air dam" part. Meaning the splitter must feed directly in to a verticle wall to create the stagnation (as shown below).
So I'm thinking that tilting the splitter down just a hair will cause an even larger amount of air to collect on top against the bumper resulting in more pressure. The tilt underneath will further accelerate the air causing even lower pressure below.
Tilting the splitter upwards could have the opposite result and actually cause a low pressure vacuum above the splitter and result in lift on the front end.
Last edited by Evo_Someday; May 18, 2012 at 12:24 PM.
Alumalite isnt bi directional so it actually works best when oriented in 4ft wide at the bumper and 8 ft traveling the lengths of the car. I laminated two together for increases strength .. you could do two sheets running seamed down the center of the car and secure them together. Mine was a 100$ experience .. ill design on wood next and move to better stuff once it works. I too am in SM.

I do know that having the splitter closer to the ground (and parallel to it) WILL increase the downforce, though, so I'm currently working on new mounting hardware to move it down to about 2.5" above the ground, rather than about 4.7". So, like you, I'll be using thin ABS plastic to bridge the resulting gap between the splitter's top surface and the front edge of my front bumper cover. I'll post pics when I'm done.
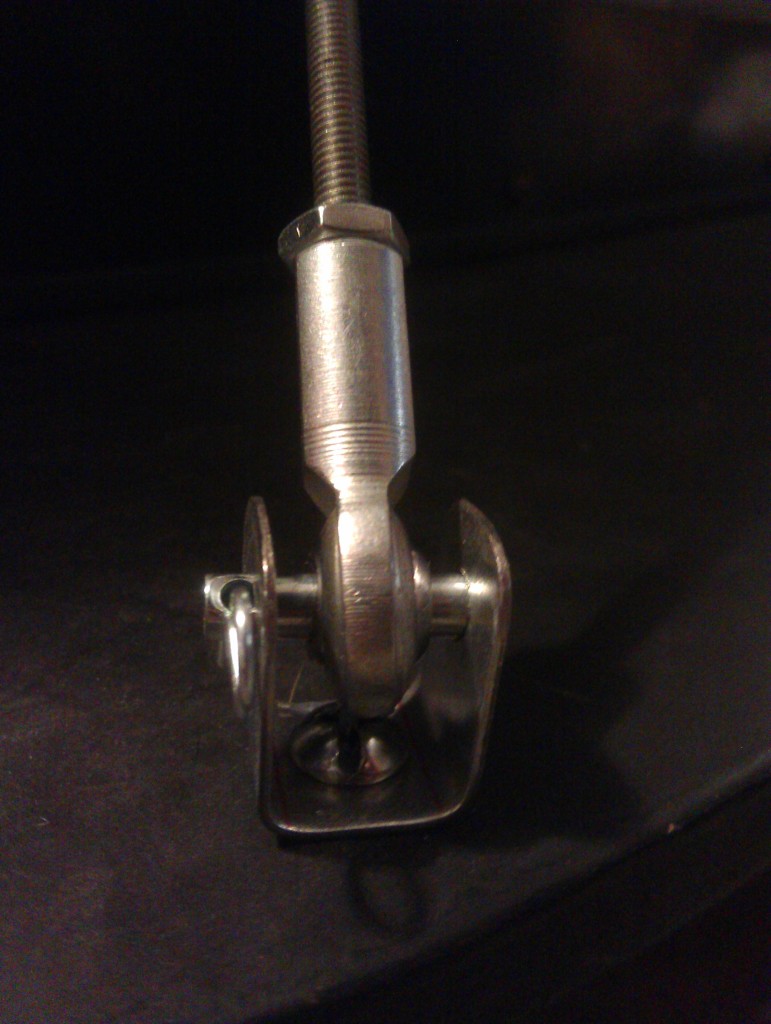
I've now revised my mounting hardware design to make the height of the splitter adjustable (four settings, in increments of 3/4", except for the lowest setting, which is 3/8" lower than the 2nd lowest); and I've given in and built threaded rod/"turnbuckle" style supports for the splitter, since that allows for easy finetuning of the splitter angle, plus it looks more professional. It does add significantly to the overall cost though, as RJones already mentioned on post #17/page 2 of this thread, and as you'll see in a bit.
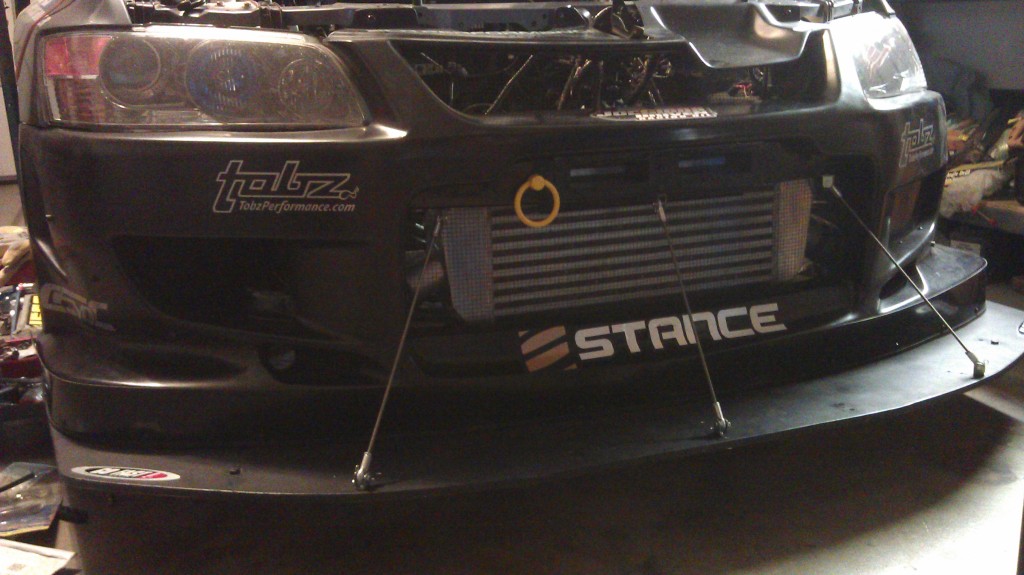
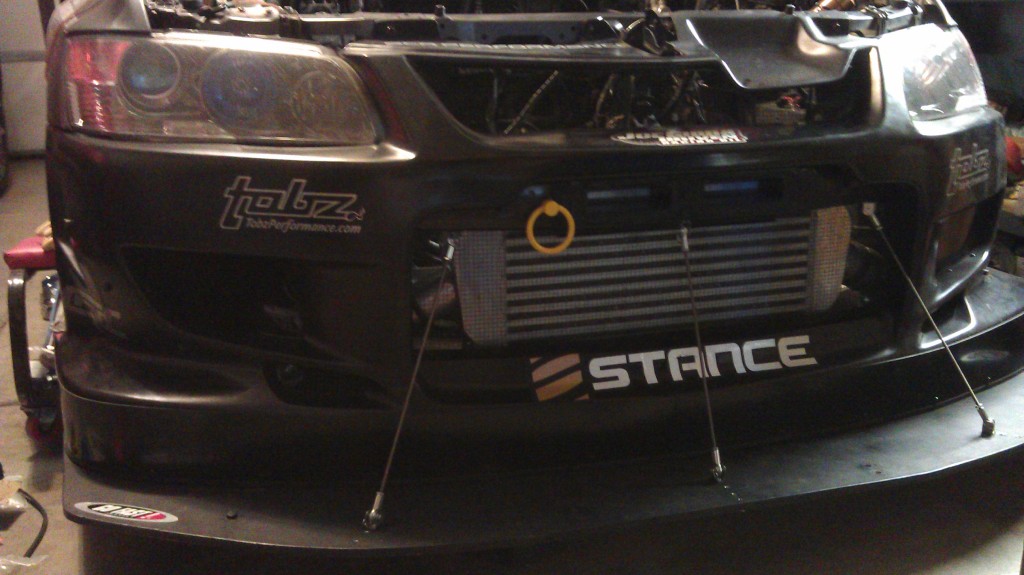
Lowering the splitter required adding an air dam between the leading edge of the bumper cover and the top surface of the splitter. And because of the multiple height settings, I needed to make more than one air dam... if I made just one dam that was tall enough to accommodate the lowest splitter height, at the higher settings, the air dam would partially block the air inlets for my front brakes... and just look uglier than absolutely necessary.
So, below is the parts required for my V2.0, adjustable height splitter with threaded rod/rod end supports. My cost was slightly less than the total of the parts total below, because I already had some of the stuff, and because I fabricated my 90-degree brackets for attaching the air dam to the splitter; but I supplied all the items/costs so anyone who wanted to replicate this design would be able to do so easily. Also keep in mind that none of the prices below include tax or shipping costs.
You could save a little money by using zinc-plated hardware and threaded rod instead of the stainless steel stuff I opted for, but it'd only save you 10 bucks or so at the most. The majority of the cost comes from the 4' x 8' sheet of ABS plastic (if you don't buy the full sheet, you'll end up having to piece together smaller sections of airdam, which would have bothered me aesthetically), the rod ends, and the 90-degree mounting brackets for the air dam (free for me b/c I made them out of OEM hood bracing material).
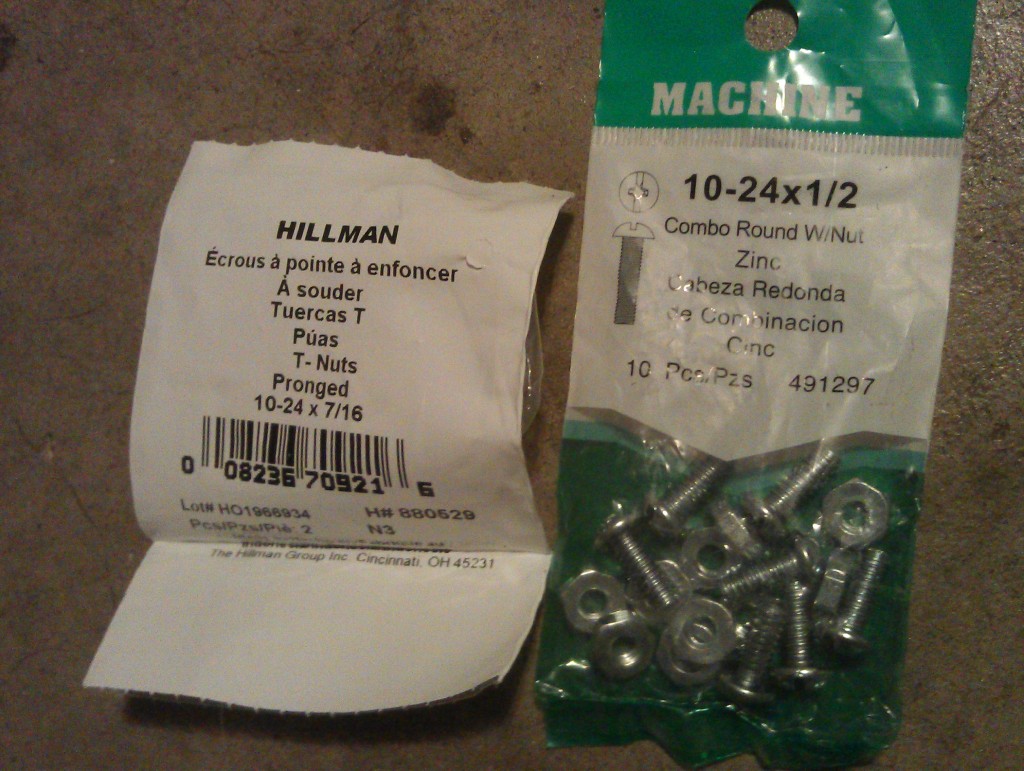
EGbeater's DIY Splitter V2.0 parts list
* 4' x 8' x .060" (1/16") sheet black ABS plastic: $25 (Port Plastics, Denver, CO; Port Plastics is in a few select major cities in the U.S.)
Stuff purchased at Home Depot
* Simpson Strong-Tie 9 in. 20-gauge strap: $0.94
* Crown Bolt #10-24 x 1/2" coarse stainless-steel round-head combination machine screws, 4-Pack: $1.18
Stuff purchased at Lowe's
* SteelWorks/The Hillman Group plated (galvanized) 12-gauge flat steel bar 1" x 3': $4.92
* The Hillman Group 2-Count #10-24 Zinc-Plated Standard (SAE) 3-Prong Tee Nuts, 2-pack: $1.09 x 5 = $5.45
Parts sourced on eBay
* 3/16" eye x 10-32 Female righthand rod end: $2.45 x 6 = $14.70 (eBay vendor name "qsc8," www.racingrodends.com; these rod ends are also available from McMaster-Carr, but they were marginally cheaper from racingrodends.com via eBay)
* Furniture hardware 1"x1" 90-degree right angle brackets, pack of 5: $4.16 x 3 = $12.48 (eBay vendor name "jetsoshop" NOTE: I didn't actually buy or use these brackets, but they're very similar to what I made)
Parts from McMaster-Carr
* Neoprene rubber edge trim, 1/16" opening, 1/4" inside depth: $0.83/ft x 8 = $6.64
* Zinc-plated steel clevis pin, with cotter pin, 3/16" diameter, 3/4" long, pack of 10: $3.62
* 18-8 stainless steel threaded rod, 10-32 thread, 3' length: $3.10 x 2 = $6.20
* Zinc-plated steel machine screw hex nut, 10-32 thread size, 3/8" width, 1/8" height, pack of 100: $1.71
* Metric 18-8 stainless steel hex head cap screw, M6 x 1.0, 12 mm length, fully threaded, pack of 50: $6.30
* Metric type 316 stainless steel nylon-insert hex locknut M6 x 1.0, 10mm width, 6mm height, pack of 50: $6.52
* Wide panel clip-on nut No. 8, .025"–.125" panel, .375" hole ctr to edge, pack of 25: $5.91
TOTAL COST OF MATERIALS FOR V2.0 SPLITTER (not including plywood, polyurethane, and paint): $101.57
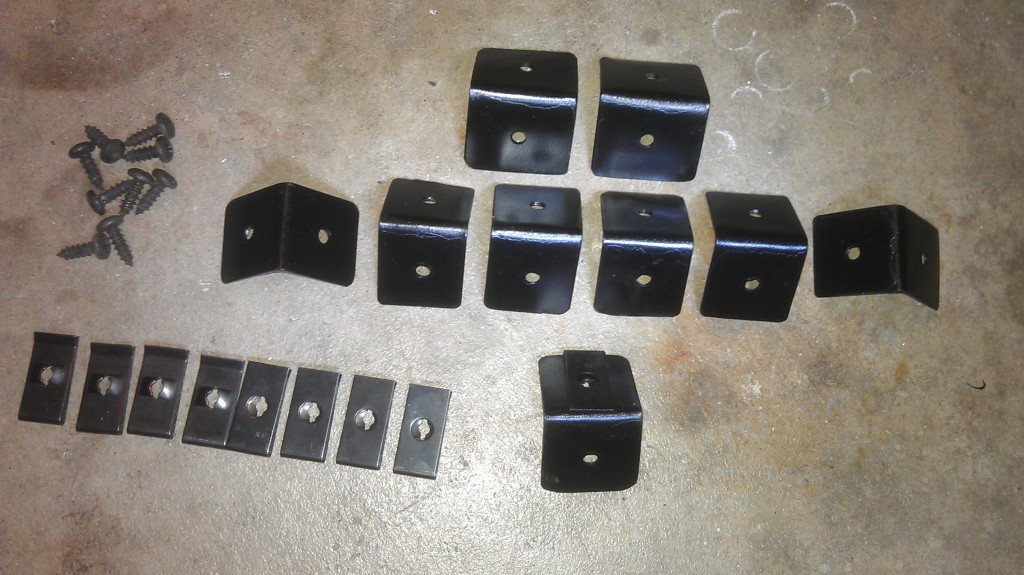
If you look at the pictures I've supplied, it's pretty clear what parts are used for what. I couldn't find an appropriately sized 90-degree bracket for attaching the 1/16"-thick ABS plastic air dam to the splitter, so I decided to make them out of aluminum sheet metal that I had gutted a long time ago out of the bottom of an OEM Evo hood. It was a PITA but it was nice to recycle the material that way.
I also could not find an appropriate, U-shaped bracket in the McMaster-Carr online catalog for the quick-release pins to attach the support rods to the splitter and the bottom of the OEM bumper beam, so I made those out of a Simpson Strong-Tie 9" 20-gauge strap, available at either Home Depot or Lowe's. The thickness of the steel is just right for being stiff and strong, and fairly easy to bend/shape. These were also a PITA to make by hand... at least I only needed six of them as opposed to the 17 90-degree L brackets I ended up making for the air dam.
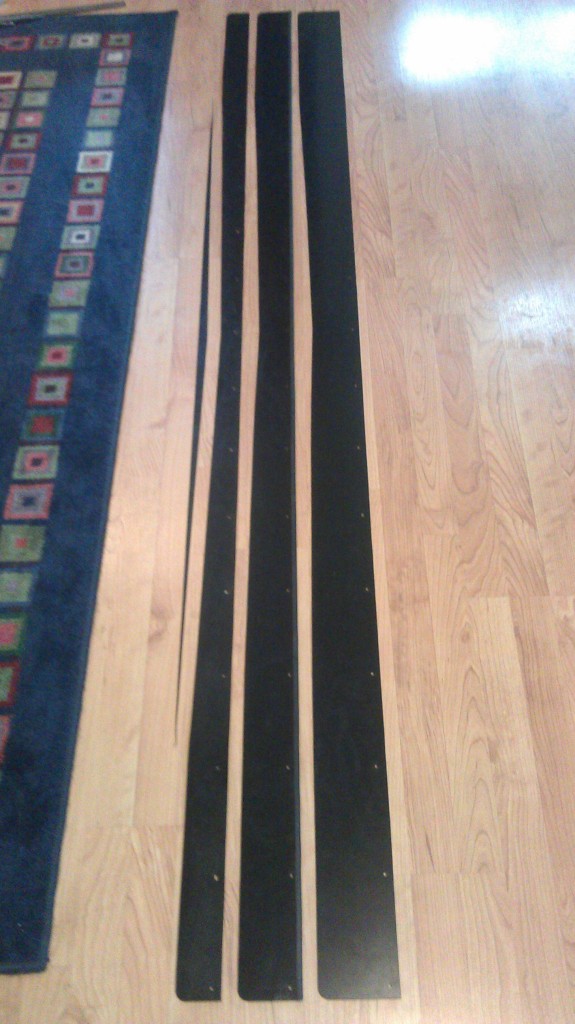
Speaking of the air dam, it would have been a little cheaper to buy smaller pieces of 1/16" thick ABS plastic and butt them together to create a 8-foot-long strip, instead of buying the 4' x 8' sheet, but I preferred the simplicity of the air dam being one piece, especially as I ended up making three of them. Garden edging might have been an option as well, but I'm thinking it would have been significantly heavier.
I could have gotten threaded rod from Home Depot, but they don't sell it in the thinner/lighter 10-32 size, or in stainless steel. Plus the rod ends for 1/4"-20 are fairly monstrous and total overkill.
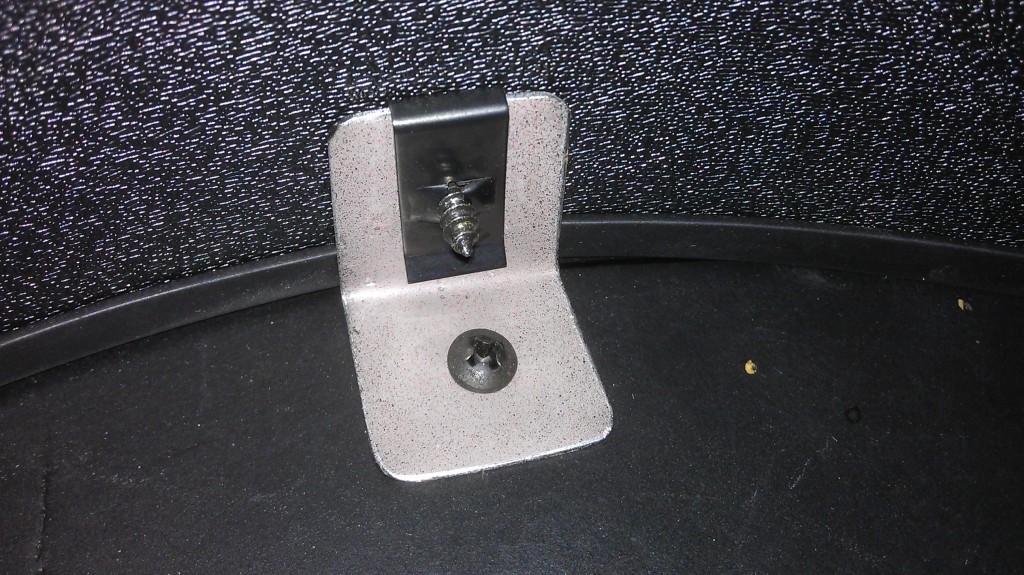
Here's the revised mounting hardware. Basically, two layers of the 12-gauge, 1" wide galvanized steel, with holes drilled to accommodate the 6mm x 1.0mm pitch x 12mm long bolts and matching lock nuts:
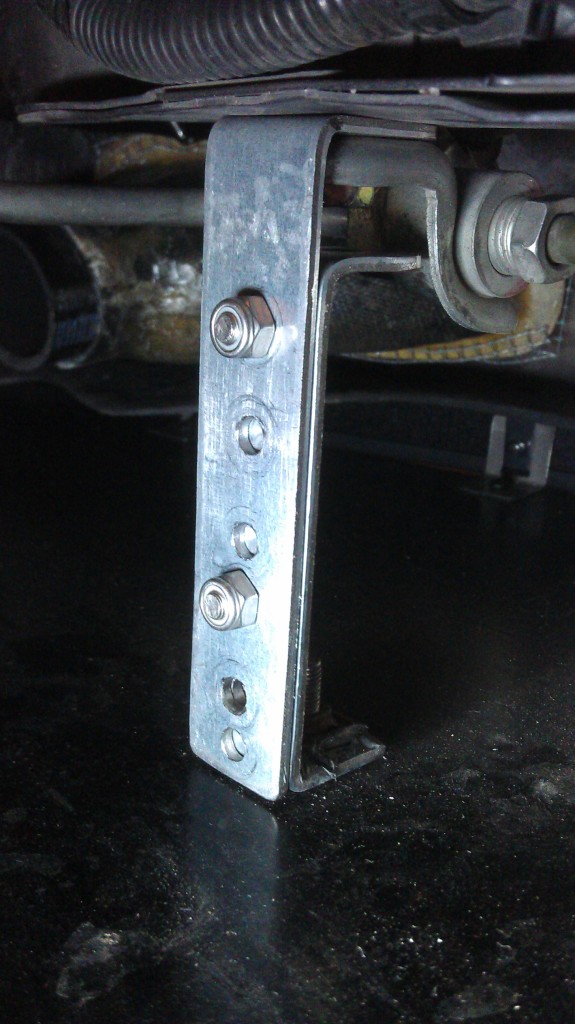
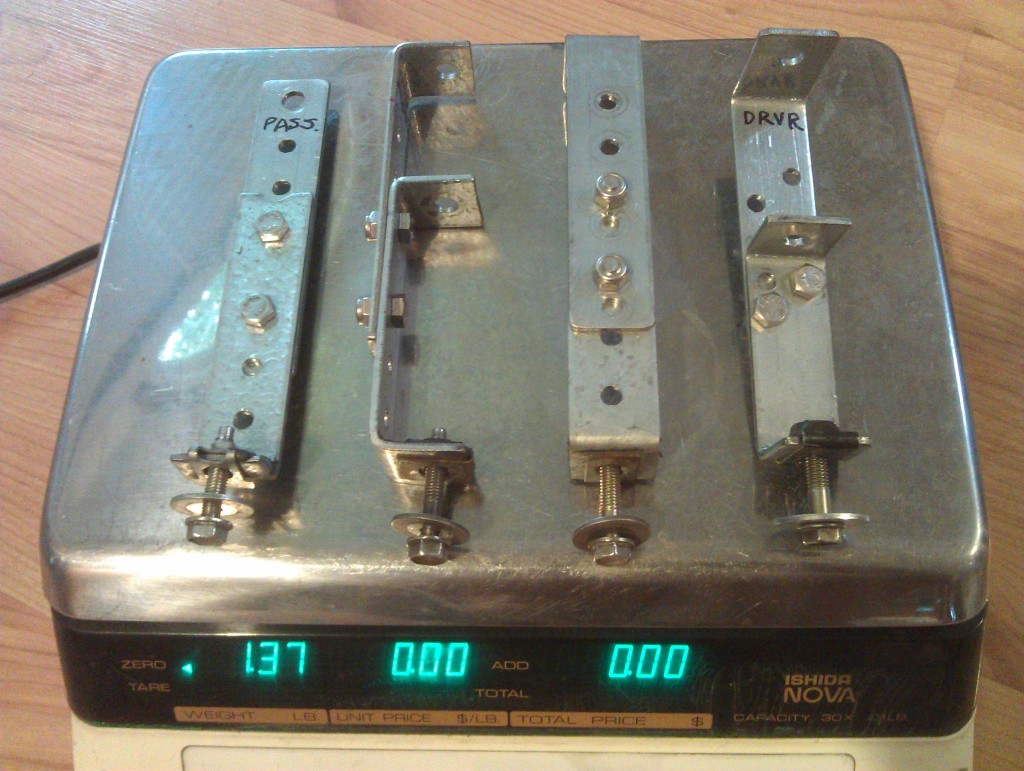
This is the one on the driver's side:
Here's the section of OEM Evo hood bracing I cut up to make my air dam mounting brackets:
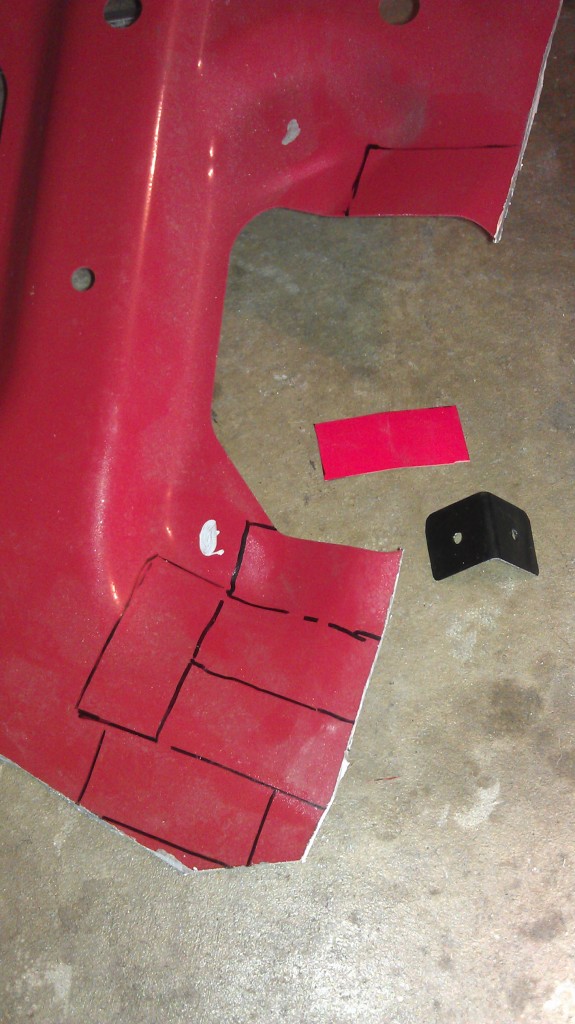
They are pretty light... about 6 ounces for all 17:
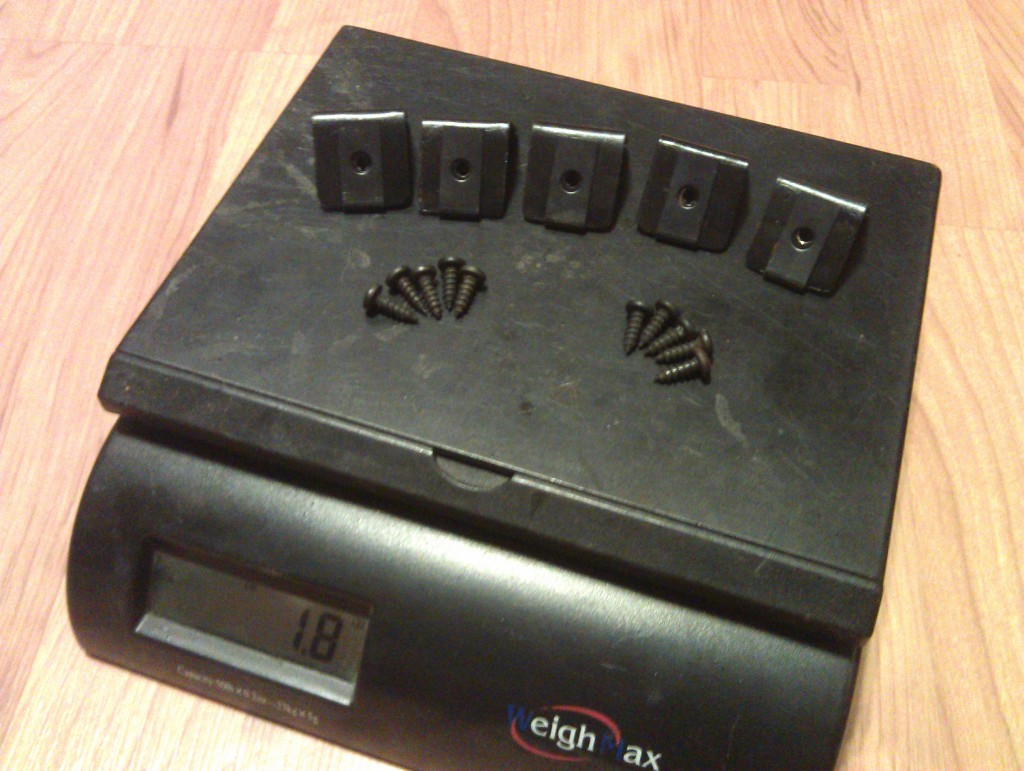
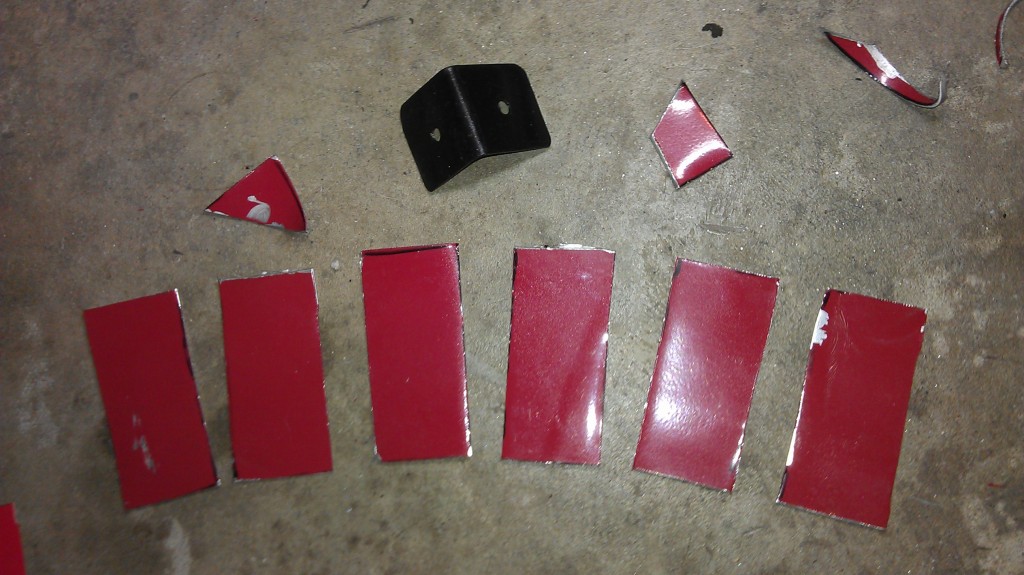
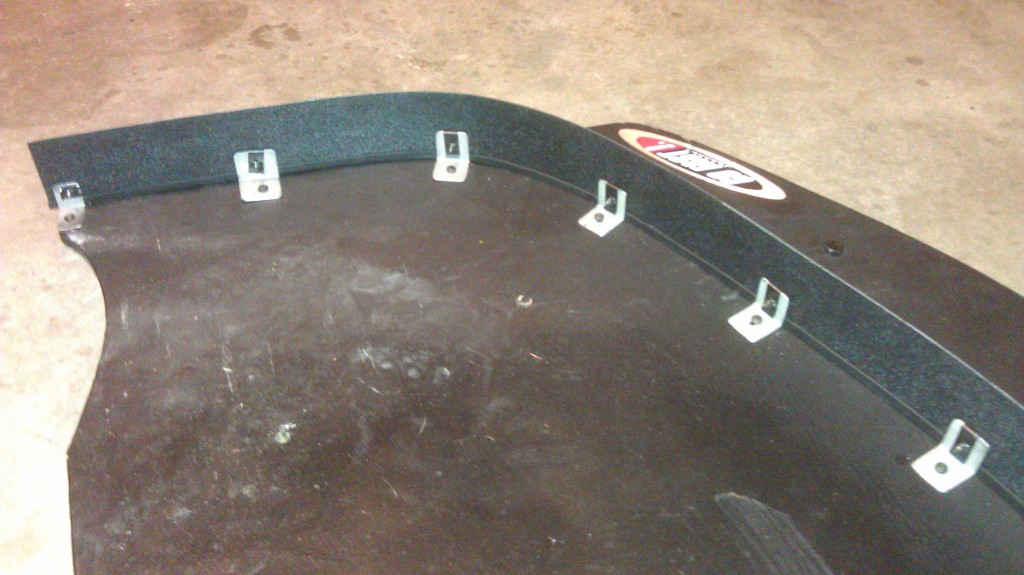
I ended up needing more of these than I anticipated so that the air dam would be held tight against the bottom of the bumper cover:
In the process of chopping up the Strong-Tie steel strap to make the six rod end U-shaped mounting brackets:
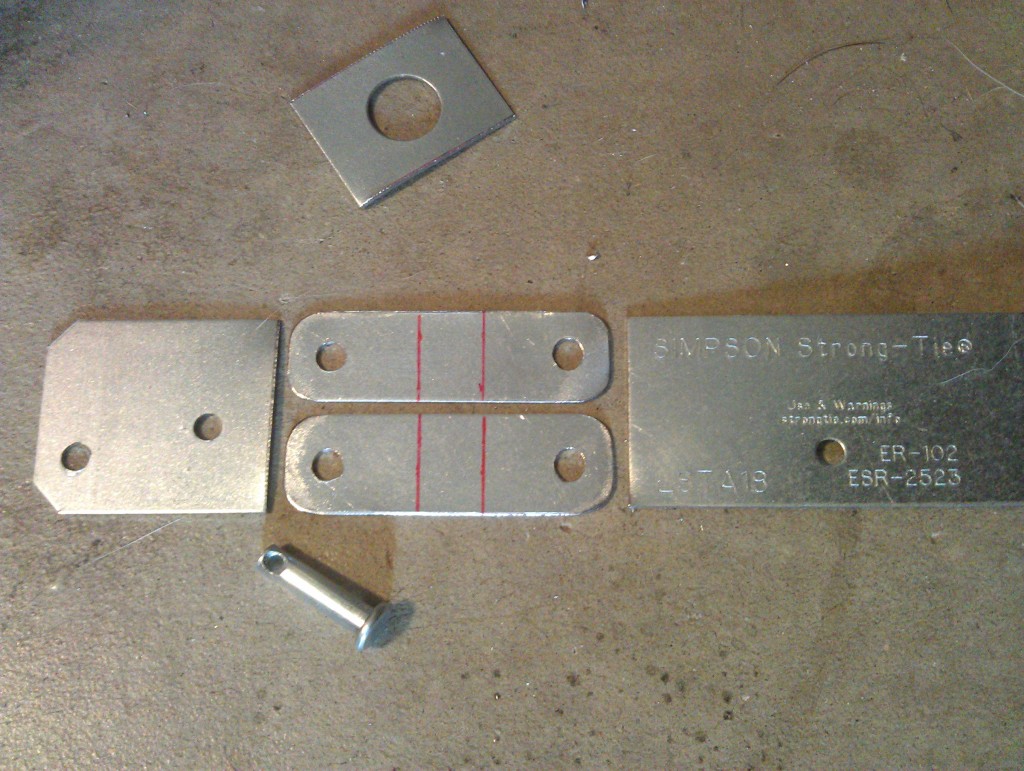
Here's four of 'em... and yes, they're all a little uneven/imperfect. Simple design; hard to accurately create with hand tools:
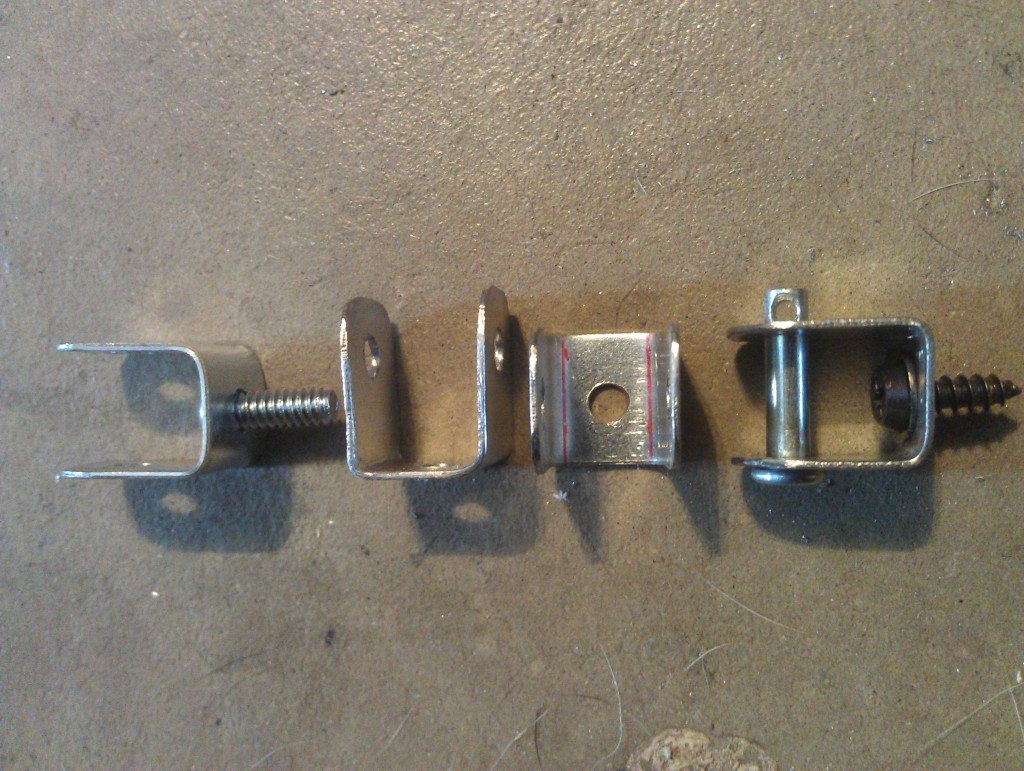
Here's the hardware for attaching the U-brackets to the splitter:
From above, before I installed the additional T-nuts in the plywood to accommodate the different splitter heights:
This is how I cut the strips of ABS plastic for the air dam... long straight edge; el cheapo carpet knife; stainless steel ruler to measure twice, slice once; and duct tape to keep the straight edge from slipping as I cut:
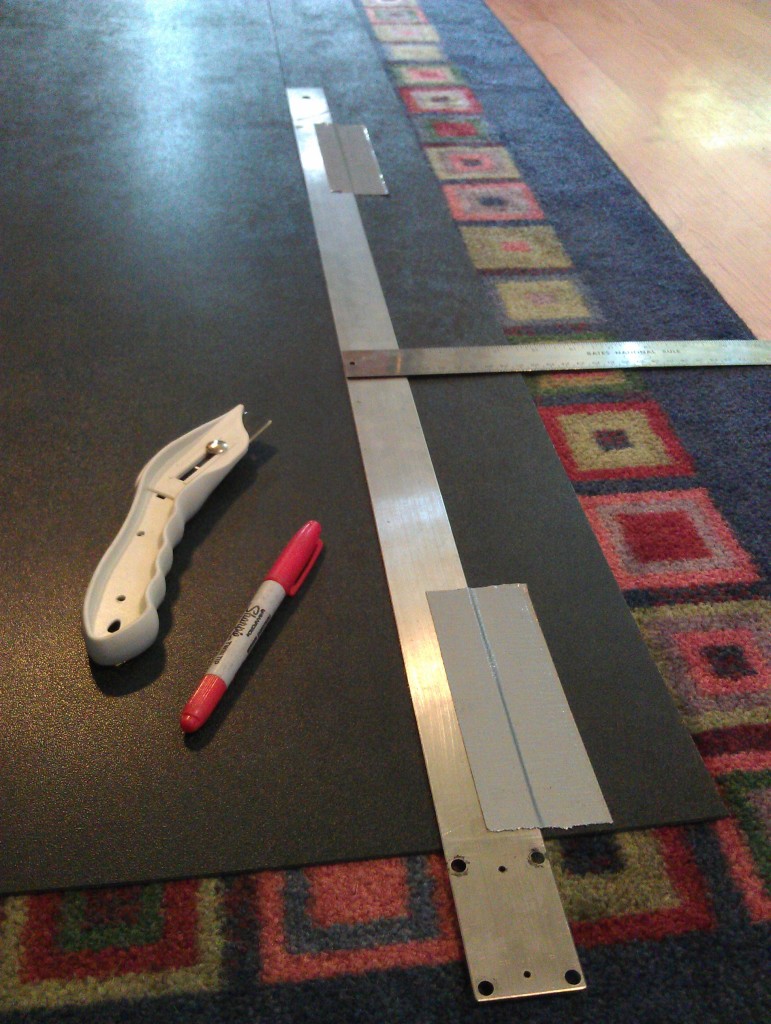
Once you've sliced the ABS plastic about 3/4 of a millimeter deep, you can just flex and bend the ABS to get it to snap/break along the line:

Highest setting:
2nd to highest setting:
2nd to lowest height:
From above:
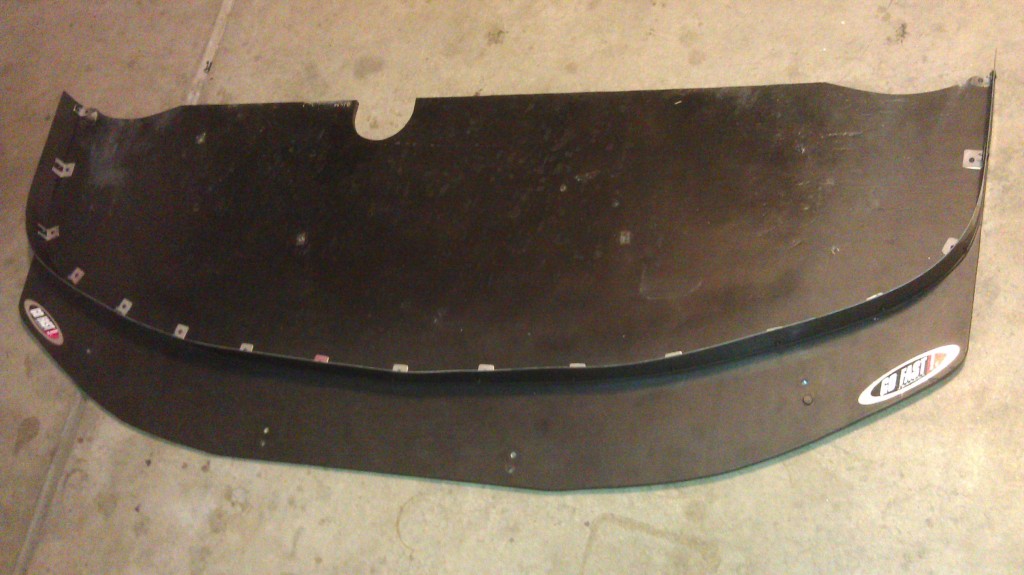
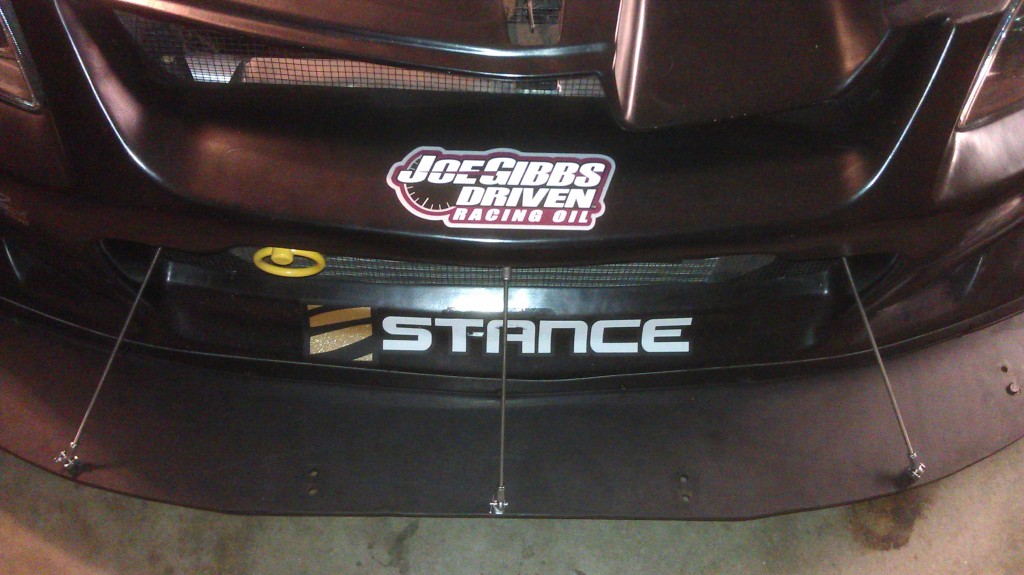
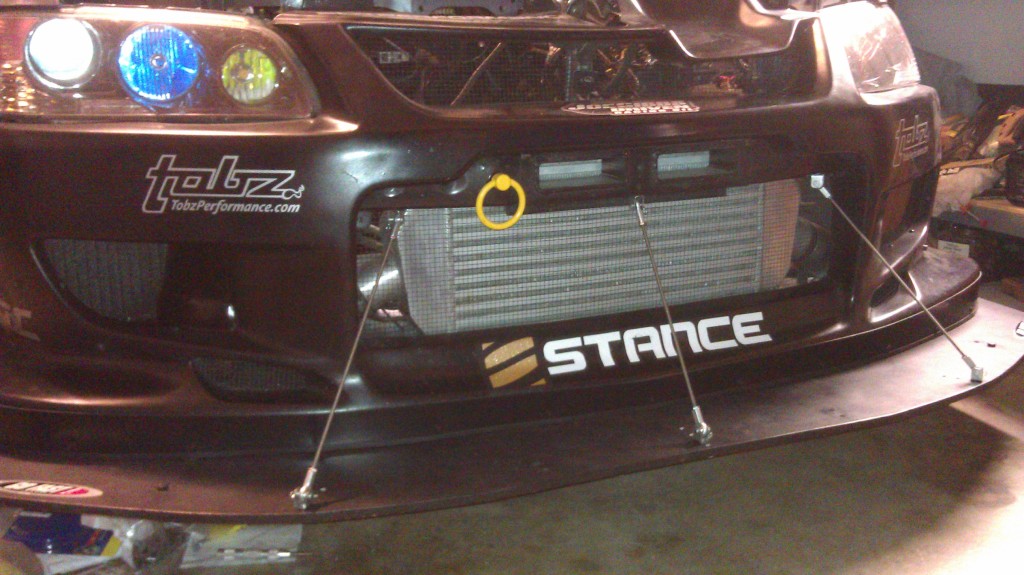
The shape of the bottom edge of the CWest replica bumper cover dictated a custom "V" cut of the top edge so that it'd look good:
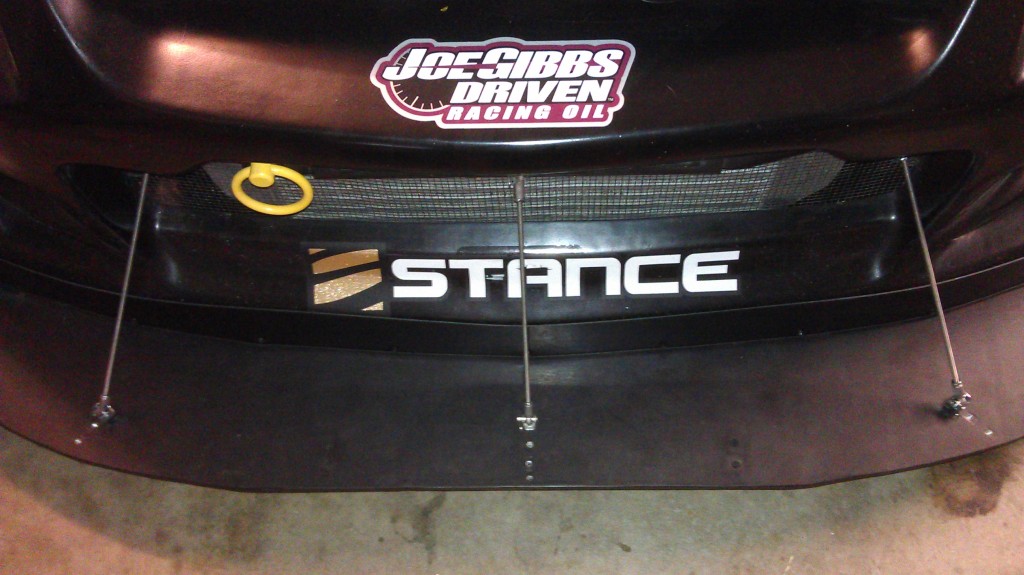
The three air dams are 2 3/8", 3 1/4", and 4 1/4" tall. I used the neoprene edging along the bottom to help minimize any air slipping between the air dam and the top of the splitter:
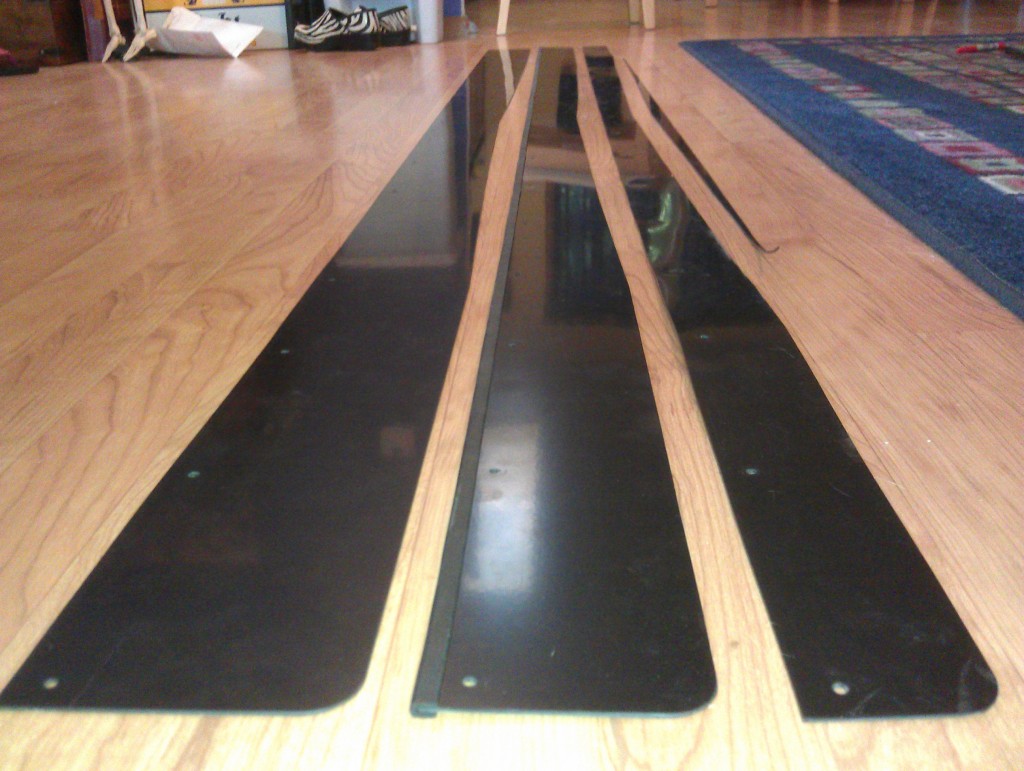
This shot shows how the V-shape matches the bumper cover:
Surprisingly, the four backstrap supports are nearly the same weight as the three threaded rod/rod end supports:

No denying the air dams add weight though (these are the shortest @ 2 3/8" and the tallest @ 4 1/4"):

And of course the double-layered adjustable splitter mounts are heavier than the previous non-adjustable ones too:
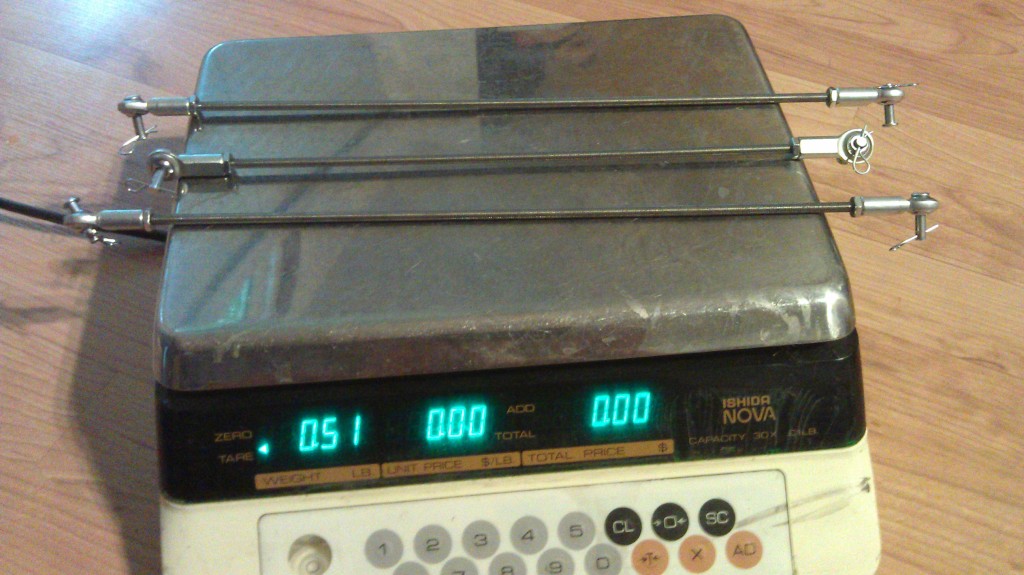
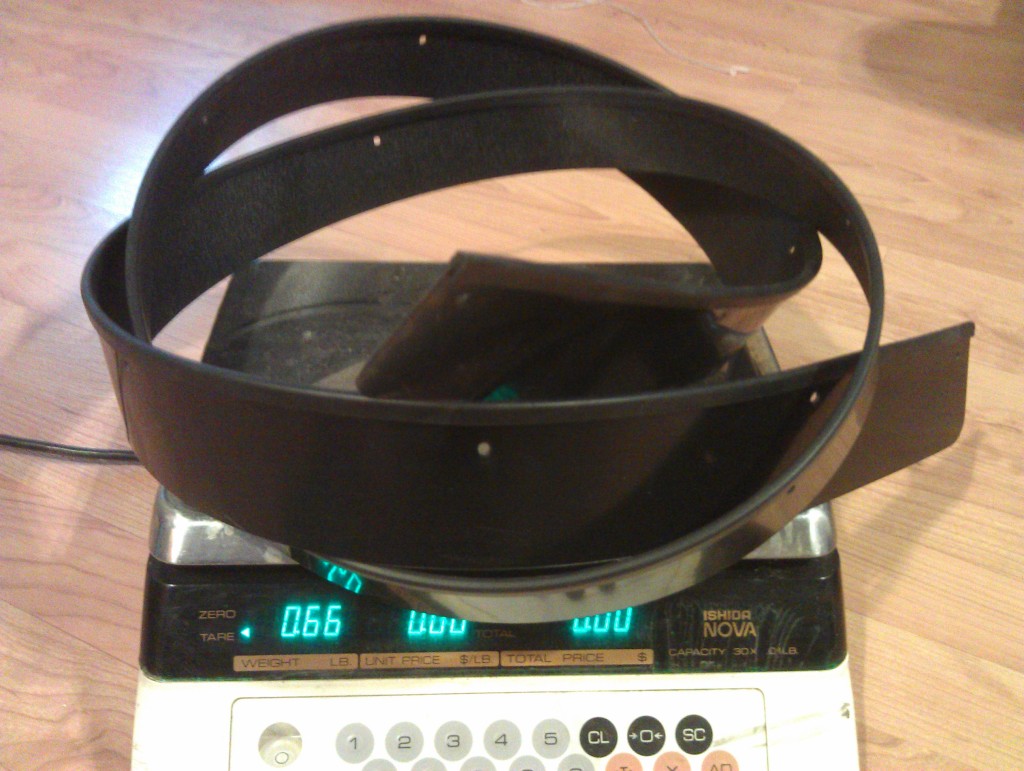
For the weight weenies:
Plywood splitter weight: 16.1 lb.
Adjustable mounting brackets (4): 1.37 lb.
17 aluminum 90-degree mounting brackets/screws/speed clips for air dam: .38 lb.
1/16"-thick ABS plastic airdam, 2 1/2" to 4 1/2" tall: .66 to 1.06 lb.
10-32 S/S threaded rod/rod ends/QR clevis/cotter pins: .51 lb.
10-24 T-nuts (9), matching 10-24 1/2" machine screws (3), and custom U-brackets for rod ends (6): .15 lb.
TOTAL V2.0 SPLITTER WEIGHT: 19.17–19.57 lb.
I can't accurately quantify how much additional downforce moving the splitter lower will add, but I'm confident it's substantial, especially as speeds go up of course.
Overall, I think it was worth the (substantial) effort to lower the splitter. It's unfortunate that the total cost of the adjustable V2.0 splitter approaches $200, but unless you're a noob to building race cars, you know that any mod that costs less than $500 is a drop in the bucket, relatively speaking.
Last edited by EGbeater; Aug 18, 2012 at 04:44 PM.
Great Wright up and love the DIY splitters  It can be hard to buy something really $$$$ when it is one of the first things to get damaged on the race track when you hit anything. These are simple and work. They may not work as well as something that has a bit more testing behind it, but they can get the job done
Thanks,
Dallin
It can be hard to buy something really $$$$ when it is one of the first things to get damaged on the race track when you hit anything. These are simple and work. They may not work as well as something that has a bit more testing behind it, but they can get the job done Thanks,
Dallin
Anyone have opinions on whether the extra 20lb on the front would be worth the benefit on an A/X course? Here I am pulling everything imaginable out of my car to shed weight, Id hate to add 20lb for no real benefit at <40-50mph.
Good job, thanks for sharing!
Got a new guy in our local group that has made his own CF body panels for his lotus....says he's up for helping with any interesting CF projects....hmmmmm May have to chat a little more with him.
Good job, thanks for sharing!
Got a new guy in our local group that has made his own CF body panels for his lotus....says he's up for helping with any interesting CF projects....hmmmmm May have to chat a little more with him.
I don't have any empirical data to share, but many successful autocrossers who have run "serious aero"�large (and low enough) splitters, giant rear wings that are high enough to be in clean air�in classes like SM, SSM, and XP have stated to me that it works and has noticeable benefit at 45 to 65 mph�speeds achievable on most larger, Nationals-style courses. Whether or not that handling benefit "outweighs" the weight penalty, who knows.
You might also consider that Chris Mayfield was able to win SM at Nationals in 2010 in my Evo with no aero at all. Obviously, the most important variable in the "building a winning racecar" equation is the driver.
At this point, I'm developing my car for track use as well as autocross, and I think it's been established without a shadow of a doubt that aero works to increase grip and cornering speeds at 60 to 140 mph.
Keep in mind that you could make a splitter exactly like mine but use 1/4"-thick plywood or alumalite (available through most sign shops) instead and probably take that 16-pound weight of the splitter itself down to 6 pounds (alumalite) or 8.5 pounds (1/4" plywood). The mounting hardware and airdam of my design is only about 3.6 pounds, so lightening the splitter itself will result in a significant overall weight reduction.
Our normal lots are fairly small. The little rwd cars kick butt. But there is a big airfield event every year at an old air force base (~1.5-2min runs, >70mph) and talks of securing another old base as a regular venue. But I'll probably hold off until I know we have regular venues that are bigger. Or just make one and toss it on for special occasions. Definitely will look into diy carbon fiber with the help of a local.
thanks for the input and write up.
thanks for the input and write up.
For the weight weenies:
Plywood splitter weight: 16.1 lb.
Adjustable mounting brackets (4): 1.37 lb.
17 aluminum 90-degree mounting brackets/screws/speed clips for air dam: .38 lb.
1/16"-thick ABS plastic airdam, 2 1/2" to 4 1/2" tall: .66 to 1.06 lb.
10-32 S/S threaded rod/rod ends/QR clevis/cotter pins: .51 lb.
10-24 T-nuts (9), matching 10-24 1/2" machine screws (3), and custom U-brackets for rod ends (6): .15 lb.
TOTAL V2.0 SPLITTER WEIGHT: 19.17–19.57 lb.
That would be a definite drawback to using plywood for a splitter that doesn't exist with alumalite... material that isn't perfectly flat, although it will mostly be straightened out by the support rods. I should note that after cutting the 11/32" plywood down from a full 4' x 8' sheet to the 70.25" x 27.75" dimensions of my splitter, the warpiness of the material was pretty much eliminated.
The weight savings compared to the 15/32"-thick splitter is disappointing—after two coating of spar urethane to make it waterproof, and then spraypainting it black, it's 11.18 pounds... only 4.92 pounds lighter than the original plywood splitter. So, the total weight of splitter V2.1 is between 14.25 to 14.65 pounds, depending on which ABS air dam I use.
So, the next splitter (and hopefully final one) will be made of Alumalite, Econolite, or Dibond. Not sure what thickness to use yet but I'll probably just go with other people have used for splitters on their race cars, like 6mm.
Last edited by EGbeater; Aug 18, 2012 at 05:33 PM.
this is a nice read especially since i plan on getting a kognition wing. For mine i plan on making a stencil out of cardboard and then using alumalite for the final product. Professional awesomes evo front splitter is pretty cool b/c they incorporated the brake cooling air guides into it, me likey lol