
How-To: Disassembly of ACD Transfer Case

How-To: Disassembly of ACD Transfer Case
How-To: Disassembly of ACD Transfer Case

Disclaimer: I hereby release myself from any damage to your T-Case you may incur during disassembly. Please do all of this at your OWN risk.
This How-To is for those who have already removed the T-Case from the Evo. And by the way all of these images are crappy PhotoBooth App Pictures from my Macbook and are intended to be flipped 180 degrees horizontally.
Tools Need:
Slide Hammer
10mm Socket
12mm Socket
14mm Socket
2-3 Flathead Screwdrivers
Impact Gun (Preferred)
Gloves
Cleaning Cloths
Well Lighted Area
Area to place all the crap you take of without loosing it
Step 1
Use a Slide hammer to release the Stubby Shaft that would have been on the Passenger Side.


Step 2
Take the Seal and Round Spring Ring out and set aside.


Step 3
Place Stubby Shaft on Cleaning Cloth so you don't get dirt and dust all over it and set aside.

Step 4
Red Arrows- Qty 7 12mm Socket Bolts
Yellow Arrows- Qty 2 10mm Socket Bolts

Step 5
Remove 10mm Bolts and 12mm Bolts


Step 6
Using a thin Flathead...GENTLY pry at the seems shown with the Orange Arrows. Then Pull Top Portion of the Case off


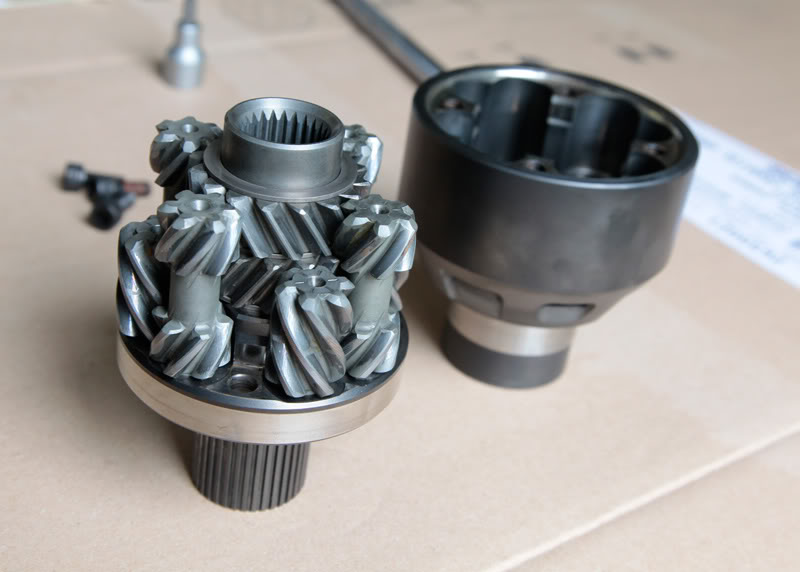
Step 7
GENTLY pull up on the Central section without whacking it against the sides.


Set Aside the Larger portion with Pinion Gear

Step 8
With my left hand I pull up from the inside of the top section and use my right hand to guide it from the teeth.


Step 9
Use the Flathead again to Gently pry up on the Collar that surround the discs with the teeth. Keep them organized. From the top that we just pulled off the disc go in the a Staggered order of Outer Teeth, then Inner Teeth, then Outer teeth, etc, with the last one being and Outer Toothed Disc. At the bottom of the Collar the is a lip that holds them in place.


Step 10
Use the Flathead to pry up on the Red Arrowed Ring, this goes on the bottom of the Collar with all the discs. When removing Remember to yourself the orientation of the ring.


Step 11
Use the Flathead again to pry up on the Yellow Arrowed Ring. Remember the orientation of this ring also...(The lip/divot thing is UP as I am disassembling this)


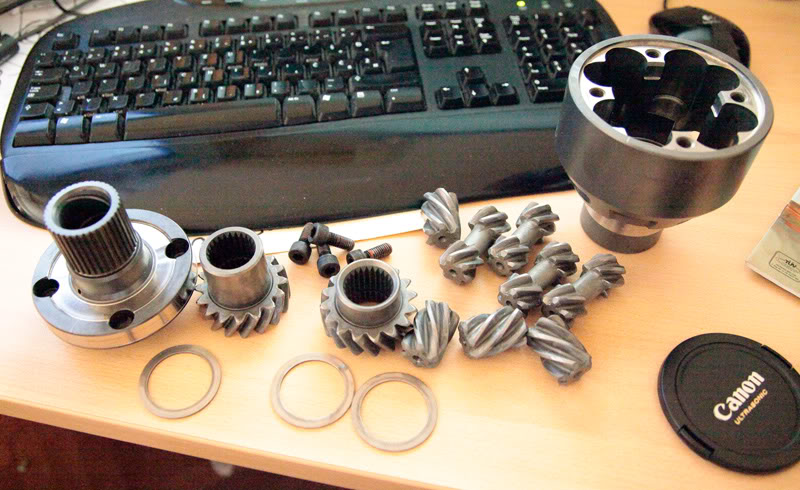
Step 12
First Photo Shows 3 locations the you need to once again use a 2-3 Flatheads to simultaneously pry up under the 3 notched marked with Red Arrows. Second Photo shows the locations are under tucked under a bit. Third Shows the notches with the gear thing off the rest of the assembly. Again remember the orientation of this gear thing.


Step 13
Take off the Yellow Arrowed Ring that was under what you were prying against. Then Lift the Central Sections of the T-Case away from the rest of the assembly.


Step 14
Remove all the Orange Arrowed 14mm Bolts holding the Red Arrowed Ring Gear in place using a Impact Gun if available...as it will make this step much easier. The Red Arrowed Ring Gear will release after all the bolts are out. (I placed all the bolts in the same whole so everything will go back together exactly the way they came out.)


Step 15
Use the Flathead again to pry at the Yellow Arrow Marks to separate the two halves.


Step 16
Remove the Red Arrowed Ring and remember the orientation of it for re-installation.


Step 17
Pull up on the Green Arrowed Shaft to Remove it from the Orange Arrowed assembly.


Step 18
I didn't go any further than this since I was unable to Remove the 4 Green Arrowed 6mm Allen Head Bolts. I need to get some different tools to remove them and fully access the remainder of the internals.

Also to remove the Tail Section if Needed to access the Pinion Gear:
Step 1
Remove the Qty 7 Red Arrowed 12mm Bolts. Then using a Flathead pry at the Green Arrowed Seem.


Step 2
VERY GENTLY separate the two halves in the direction of the Blue Arrows. Be aware of the Gasket in here marked with Yellow. Also be aware of the Large O-Ring marked with Green.

That is is for now. Hopefully this was helpful to you as I know I wished there was something on this already, so I wanted to make a DIY for others. Sorry for this being so long and picture whored to no end...This was my first How-To. Please leave feedback. Please feel free to ask questions or if you would like an specific picture as my t-Case will be out of the car for another week or two. Thanks For Ready

Disclaimer: I hereby release myself from any damage to your T-Case you may incur during disassembly. Please do all of this at your OWN risk.
This How-To is for those who have already removed the T-Case from the Evo. And by the way all of these images are crappy PhotoBooth App Pictures from my Macbook and are intended to be flipped 180 degrees horizontally.
Tools Need:
Slide Hammer
10mm Socket
12mm Socket
14mm Socket
2-3 Flathead Screwdrivers
Impact Gun (Preferred)
Gloves
Cleaning Cloths
Well Lighted Area
Area to place all the crap you take of without loosing it
Step 1
Use a Slide hammer to release the Stubby Shaft that would have been on the Passenger Side.


Step 2
Take the Seal and Round Spring Ring out and set aside.


Step 3
Place Stubby Shaft on Cleaning Cloth so you don't get dirt and dust all over it and set aside.

Step 4
Red Arrows- Qty 7 12mm Socket Bolts
Yellow Arrows- Qty 2 10mm Socket Bolts

Step 5
Remove 10mm Bolts and 12mm Bolts


Step 6
Using a thin Flathead...GENTLY pry at the seems shown with the Orange Arrows. Then Pull Top Portion of the Case off


Step 7
GENTLY pull up on the Central section without whacking it against the sides.


Set Aside the Larger portion with Pinion Gear

Step 8
With my left hand I pull up from the inside of the top section and use my right hand to guide it from the teeth.


Step 9
Use the Flathead again to Gently pry up on the Collar that surround the discs with the teeth. Keep them organized. From the top that we just pulled off the disc go in the a Staggered order of Outer Teeth, then Inner Teeth, then Outer teeth, etc, with the last one being and Outer Toothed Disc. At the bottom of the Collar the is a lip that holds them in place.


Step 10
Use the Flathead to pry up on the Red Arrowed Ring, this goes on the bottom of the Collar with all the discs. When removing Remember to yourself the orientation of the ring.


Step 11
Use the Flathead again to pry up on the Yellow Arrowed Ring. Remember the orientation of this ring also...(The lip/divot thing is UP as I am disassembling this)


Step 12
First Photo Shows 3 locations the you need to once again use a 2-3 Flatheads to simultaneously pry up under the 3 notched marked with Red Arrows. Second Photo shows the locations are under tucked under a bit. Third Shows the notches with the gear thing off the rest of the assembly. Again remember the orientation of this gear thing.


Step 13
Take off the Yellow Arrowed Ring that was under what you were prying against. Then Lift the Central Sections of the T-Case away from the rest of the assembly.


Step 14
Remove all the Orange Arrowed 14mm Bolts holding the Red Arrowed Ring Gear in place using a Impact Gun if available...as it will make this step much easier. The Red Arrowed Ring Gear will release after all the bolts are out. (I placed all the bolts in the same whole so everything will go back together exactly the way they came out.)


Step 15
Use the Flathead again to pry at the Yellow Arrow Marks to separate the two halves.


Step 16
Remove the Red Arrowed Ring and remember the orientation of it for re-installation.


Step 17
Pull up on the Green Arrowed Shaft to Remove it from the Orange Arrowed assembly.


Step 18
I didn't go any further than this since I was unable to Remove the 4 Green Arrowed 6mm Allen Head Bolts. I need to get some different tools to remove them and fully access the remainder of the internals.

Also to remove the Tail Section if Needed to access the Pinion Gear:
Step 1
Remove the Qty 7 Red Arrowed 12mm Bolts. Then using a Flathead pry at the Green Arrowed Seem.


Step 2
VERY GENTLY separate the two halves in the direction of the Blue Arrows. Be aware of the Gasket in here marked with Yellow. Also be aware of the Large O-Ring marked with Green.

That is is for now. Hopefully this was helpful to you as I know I wished there was something on this already, so I wanted to make a DIY for others. Sorry for this being so long and picture whored to no end...This was my first How-To. Please leave feedback. Please feel free to ask questions or if you would like an specific picture as my t-Case will be out of the car for another week or two. Thanks For Ready
Last edited by mclaren; Mar 16, 2012 at 09:17 PM.
Reserved for Even More Teardown...
And Yes I know this is the wrong section...I have already messaged the Mod to move it, Sorry Guys!
And Yes I know this is the wrong section...I have already messaged the Mod to move it, Sorry Guys!
Last edited by mclaren; Mar 16, 2012 at 08:52 PM.

Yes I knew eventually Id see this **** on here excellent keep up the good work. I remember seeing a teardown on youtube but im not sur if its the same lsd that the japanese guy tore down. he used a machine press and used some king of tool to open up the lsd and inspect it see here at 8:31 on the videohttp://www.youtube.com/watch?v=s_7wwP6mgd0&list=PL8E7DDB58575A1F43&index= 21&feature=plpp_video

Evolved Member


Joined: Mar 2008
Posts: 2,110
Likes: 320
From: Croatia
just clamp the front diff in a vice and unbolt it...

the 4 bolts are usually glued with loctite, because on previous evo's they would loosen and start eating on the casing..
inside you will find the torsen diff, or a normal open diff, depending on the model you have..
the 4 bolts are usually glued with loctite, because on previous evo's they would loosen and start eating on the casing..
inside you will find the torsen diff, or a normal open diff, depending on the model you have..
Trending Topics

nice tear down, cant wait to see the rest. my biggest question on this is does the pinon go in with a crush washer/shim and like a rear end do you have to mark it and check the Toe and heel?


great write up! got any more stuff to add? im doing mine in march and im glad i found this just to see what im getting myself into...doesnt look to difficult.....time to call jack trans for parts 
