


opinion on color scheme...


I think first painting your headlights black would make a whole lot more sense and look way better than painting the doorhandles/mirrors.
IMO, leave the mirrors the way they are unless you order aftermarket CF ones like the Ralliart Aero model, for example.
And in the case of the handles, as people said above I think it would just make your car look like the RS.
However, not many people out on the road know the differences between an Evo RS and GSR - so if you think it will look good, then go for it. It is your car after all. But I definately think you should get the headlights done first. It's very basic work and will greatly add to the color scheme you are going for.
IMO, leave the mirrors the way they are unless you order aftermarket CF ones like the Ralliart Aero model, for example.
And in the case of the handles, as people said above I think it would just make your car look like the RS.
However, not many people out on the road know the differences between an Evo RS and GSR - so if you think it will look good, then go for it. It is your car after all. But I definately think you should get the headlights done first. It's very basic work and will greatly add to the color scheme you are going for.

** UPDATE **
I had mentioned earlier I was going to get a couple of quotes to reclear my CF hood....oxidizing beyond my waxing skills....so I went to one body shop behind my office. Instead of re-clearing coating the whole hood, they recommended I color sand the hood and then buff to a shiny finish. So I decided to go that route and drop my car off at the shop this morning.
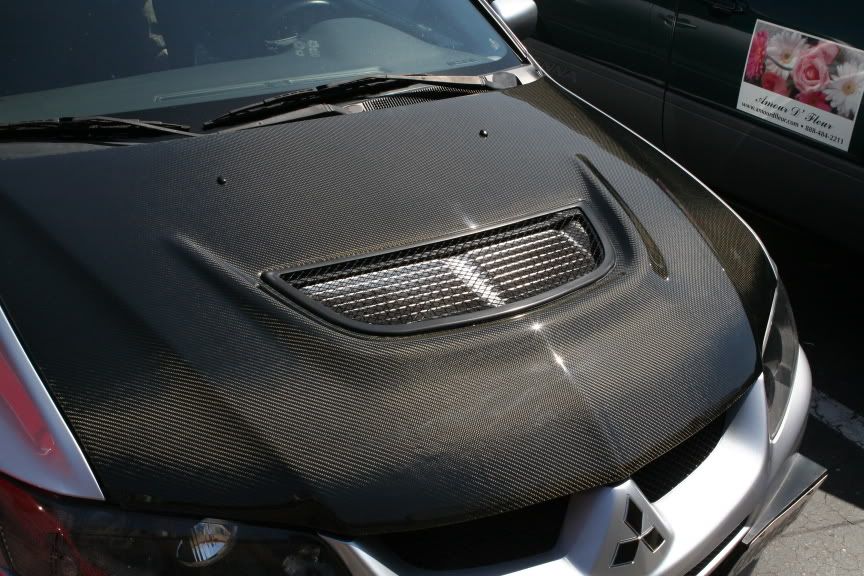
Total cost $100 ($75/hr plus $25 for a car wash). That's it. I just got back from the shop. It looks like I just had a NEW CF Hood installed!!
AMAZING results!! I highly recommend everyone to consider this option vs. reclear coating tho hood. I am SOOOOOO STOKED! I would happily recommend this shop to help out any other evo owner who are experiencing oxidizing CF hoods.....
I did not have my wing touched since it is still looking like new with the factory clear.
I hope this helps you guys out! Let me know if you have any other questions!!
I'll post some AFTER pics once I get home and grab my camera. Sorry, no before pictures....just imagine a dull white haze covering around half or less of total hood area....ugly.
I had mentioned earlier I was going to get a couple of quotes to reclear my CF hood....oxidizing beyond my waxing skills....so I went to one body shop behind my office. Instead of re-clearing coating the whole hood, they recommended I color sand the hood and then buff to a shiny finish. So I decided to go that route and drop my car off at the shop this morning.
Total cost $100 ($75/hr plus $25 for a car wash). That's it. I just got back from the shop. It looks like I just had a NEW CF Hood installed!!
AMAZING results!! I highly recommend everyone to consider this option vs. reclear coating tho hood. I am SOOOOOO STOKED! I would happily recommend this shop to help out any other evo owner who are experiencing oxidizing CF hoods.....
I did not have my wing touched since it is still looking like new with the factory clear.
I hope this helps you guys out! Let me know if you have any other questions!!
I'll post some AFTER pics once I get home and grab my camera. Sorry, no before pictures....just imagine a dull white haze covering around half or less of total hood area....ugly.


Originally Posted by Marvel32x2
And in the case of the handles, as people said above I think it would just make your car look like the RS.
However, not many people out on the road know the differences between an Evo RS and GSR - so if you think it will look good, then go for it.
However, not many people out on the road know the differences between an Evo RS and GSR - so if you think it will look good, then go for it.

Opinion on painting mirrors and door handles: No
Other ideas: Headlights (Look at Sleets car, his lights are nice), side blinker lights blacked out, and maybe something with the tail lights(not a cover, but look around for a painting options, but the red under it might, well probably will, make it look funny, would have been eaiser on the stock tails).
Your headlights and tail lights stand out the most in terms of contradicting colors. Everything else looks fine, don't mess with it, and I can't see changing something else for the better.
But I say if you really want to paint something, do the markers, they are small and in theory have a high "will look good" success rate.
Good luck
Other ideas: Headlights (Look at Sleets car, his lights are nice), side blinker lights blacked out, and maybe something with the tail lights(not a cover, but look around for a painting options, but the red under it might, well probably will, make it look funny, would have been eaiser on the stock tails).
Your headlights and tail lights stand out the most in terms of contradicting colors. Everything else looks fine, don't mess with it, and I can't see changing something else for the better.
But I say if you really want to paint something, do the markers, they are small and in theory have a high "will look good" success rate.
Good luck

Evolving Member
Joined: Apr 2006
Posts: 155
Likes: 0
From: Tulsa, Ok
Originally Posted by blink2824
color sand? can you explain further? thanks for the info
Step 1: Get a fine grit sandpaper, 1500 to 2500, then sand any imperfections out of your job while using water(IE a squirt bottle) and sand it down flat. You can start with 1500 and end with 2500 or just use either one start to finish but 2500 is easier to buff out. There will be no imperfections what so ever and your finish will be DULL and SANDED. BE VERY CAREFUL when doing this to not put finger grooves in your finish, because when you buff it back you will see them.
Step 2: Using a buffer and WHITE foam pad(3M pad and 3M compound) and compound, buff out the sand scratches until you can no longer see them. If you are a beginner use a slow speed. It takes longer but you run a lower risk of "burning" your paint. Burning occurs when you leave the buffer in one spot to long and it heats up your paint and scars it.
Step 3: Using a buffer and a BLACK foam pad(once again 3m pads and 3m polish) and polish, polish comes in 2 types Light and Dark, so depending on the color of your car get the right one. Polish the car back to a nice shine, if you have a dark car use a slower speed and a fine touch to remove any swirls and get that nice deep gloss. You should use a slower speed when you polish anyhoo.
Step 4: To remove any swirls use the same polish and a very fine CLEAN towel, and hand polish. Then reapply your favorite wax and call it a day.
this concludes your intro to buffing, if you are new to this take your time so you do not ruin your finish and have to call me to repaint it
 and good luck all hope this helps.
 Later Josh


Originally Posted by ziggy_juju
This answer should be in my "painting questions answered here" thread but since you asked here ya go
Step 1: Get a fine grit sandpaper, 1500 to 2500, then sand any imperfections out of your job while using water(IE a squirt bottle) and sand it down flat. You can start with 1500 and end with 2500 or just use either one start to finish but 2500 is easier to buff out. There will be no imperfections what so ever and your finish will be DULL and SANDED. BE VERY CAREFUL when doing this to not put finger grooves in your finish, because when you buff it back you will see them.
Step 2: Using a buffer and WHITE foam pad(3M pad and 3M compound) and compound, buff out the sand scratches until you can no longer see them. If you are a beginner use a slow speed. It takes longer but you run a lower risk of "burning" your paint. Burning occurs when you leave the buffer in one spot to long and it heats up your paint and scars it.
Step 3: Using a buffer and a BLACK foam pad(once again 3m pads and 3m polish) and polish, polish comes in 2 types Light and Dark, so depending on the color of your car get the right one. Polish the car back to a nice shine, if you have a dark car use a slower speed and a fine touch to remove any swirls and get that nice deep gloss. You should use a slower speed when you polish anyhoo.
Step 4: To remove any swirls use the same polish and a very fine CLEAN towel, and hand polish. Then reapply your favorite wax and call it a day.
this concludes your intro to buffing, if you are new to this take your time so you do not ruin your finish and have to call me to repaint it and good luck all hope this helps.
Later Josh
Step 1: Get a fine grit sandpaper, 1500 to 2500, then sand any imperfections out of your job while using water(IE a squirt bottle) and sand it down flat. You can start with 1500 and end with 2500 or just use either one start to finish but 2500 is easier to buff out. There will be no imperfections what so ever and your finish will be DULL and SANDED. BE VERY CAREFUL when doing this to not put finger grooves in your finish, because when you buff it back you will see them.
Step 2: Using a buffer and WHITE foam pad(3M pad and 3M compound) and compound, buff out the sand scratches until you can no longer see them. If you are a beginner use a slow speed. It takes longer but you run a lower risk of "burning" your paint. Burning occurs when you leave the buffer in one spot to long and it heats up your paint and scars it.
Step 3: Using a buffer and a BLACK foam pad(once again 3m pads and 3m polish) and polish, polish comes in 2 types Light and Dark, so depending on the color of your car get the right one. Polish the car back to a nice shine, if you have a dark car use a slower speed and a fine touch to remove any swirls and get that nice deep gloss. You should use a slower speed when you polish anyhoo.
Step 4: To remove any swirls use the same polish and a very fine CLEAN towel, and hand polish. Then reapply your favorite wax and call it a day.
this concludes your intro to buffing, if you are new to this take your time so you do not ruin your finish and have to call me to repaint it
and good luck all hope this helps. Later Josh
I wanted to provide an alternative since we had discussed reclearing the hood earlier in this thread
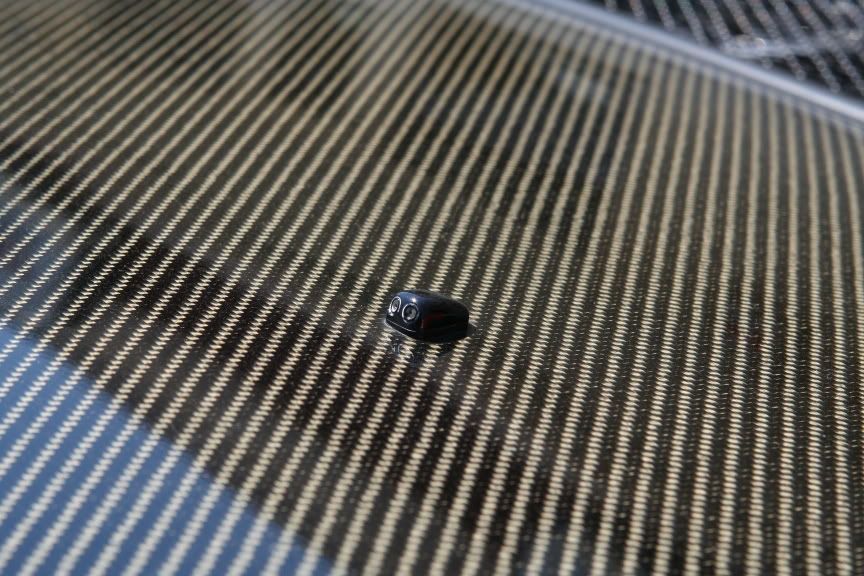
Here are the after shots when I picked it up yesterday.


Evolving Member
Joined: Apr 2006
Posts: 155
Likes: 0
From: Tulsa, Ok
Yea silvershadow, your buffing route was a good idea, people do not know that buffing (ie COLORSANDING and buffing) will remove oxidation, so I think you helped out a bunch of people. And your hood does indeed look good. I have been painting cars for a long time so I have logged my time behind a buffer IMO, ANYTHING that is less then five years old should never be oxidated, but CF is something that many shops really are afraid to paint. Its not any different to me than any other body part. And at the shop I work at, we offer a 5 yr warranty on anything we touch paint related, and it can be upgraded to a lifetime for as long as you own the car too. Anyhoo your hood looks great, now keep it out of the sun so that oxidation does not come back and wax the crap out of it.
Later Josh
IMO, ANYTHING that is less then five years old should never be oxidated, but CF is something that many shops really are afraid to paint. Its not any different to me than any other body part. And at the shop I work at, we offer a 5 yr warranty on anything we touch paint related, and it can be upgraded to a lifetime for as long as you own the car too. Anyhoo your hood looks great, now keep it out of the sun so that oxidation does not come back and wax the crap out of it. Later Josh
Originally Posted by ziggy_juju
Yea silvershadow, your buffing route was a good idea, people do not know that buffing (ie COLORSANDING and buffing) will remove oxidation, so I think you helped out a bunch of people. And your hood does indeed look good. I have been painting cars for a long time so I have logged my time behind a buffer IMO, ANYTHING that is less then five years old should never be oxidated, but CF is something that many shops really are afraid to paint. Its not any different to me than any other body part. And at the shop I work at, we offer a 5 yr warranty on anything we touch paint related, and it can be upgraded to a lifetime for as long as you own the car too. Anyhoo your hood looks great, now keep it out of the sun so that oxidation does not come back and wax the crap out of it.
Later Josh
IMO, ANYTHING that is less then five years old should never be oxidated, but CF is something that many shops really are afraid to paint. Its not any different to me than any other body part. And at the shop I work at, we offer a 5 yr warranty on anything we touch paint related, and it can be upgraded to a lifetime for as long as you own the car too. Anyhoo your hood looks great, now keep it out of the sun so that oxidation does not come back and wax the crap out of it. Later Josh
If you would like to start a thread or at least present this option in your "Painting" thread, I would be happy to contribute my photos or you can link to this thread. I agree with you, hardly anyone has considered this route! I didn't even know I could do this until the paint guy came out and noticed the amount of clear my hood has on it, and all other CF hoods for that matter. He said he could repeat the process at least a couple more times.......he also said to wax it often to maintain the mirror shine!
Mike
Evolving Member
Joined: Apr 2006
Posts: 155
Likes: 0
From: Tulsa, Ok
The reason he can only do it a couple of times, and I should have said this before, is that with everytime you colorsand (OBLIVIOUSLY) you are taking mils off your existing clear. Usually 3 to 4 mils (measuring with a micro fiche) is about standard on anything as far as paint goes. You can put more coats of clear on it,but if do it all at the same time and do not allow the original 2-3 coats to fully cure, you run the risk of what is called Solvent Popping. Actually you do not run the risk, you for SURE are going to end up with solvent popping, which requires a complete redo if you get them. As far as the thread goes, I think this thread will get the info to the people that need/want it. Thanks for the support though.
Later Josh
Later Josh


Evolved Member
Joined: Nov 2003
Posts: 1,496
Likes: 0
From: Bangkok
Originally Posted by sho 'um
Opinion on painting mirrors and door handles: No
Your headlights and tail lights stand out the most in terms of contradicting colors. Everything else looks fine, don't mess with it, and I can't see changing something else for the better.
Your headlights and tail lights stand out the most in terms of contradicting colors. Everything else looks fine, don't mess with it, and I can't see changing something else for the better.
The red gives the whole thing a purple tint and the side markers don't help either.
Don't suppose you'd consider anodizing (or otherwise making) the trunk key hole black?
Also +1 on the Ralliart mirrors. Look awesome but be warned, the view is restrictive, parallel parking becomes a bit random.
What hood is that (in the OP) btw? Look real good, but why does it need to be re-finished?
p.s. the mitsu emblem seems to sit a little low on in the grille. is it just me?
Last edited by x838nwy; Sep 8, 2006 at 09:02 AM.

Thread
Thread Starter
Forum
Replies
Last Post
SlowCar
Water / Methanol Injection / Nitrous Oxide
150
Jul 5, 2008 10:38 AM
4TUN8
Vendor Service / Parts / Tuning Review
46
Mar 30, 2007 05:02 PM
