
jdm rear install/ carbon fiber backing plate created

jdm rear install/ carbon fiber backing plate created
I posted this in the evo general but i wanted to post this in here so all can see Enjoy
Ok first of all there was a thread like a month or so ago about a carbon fiber plate for the jdm rear well i made one to cover up the holes that are created when the bumper is installed. I just finished installing my jdm rear and my carbon plate enjoy. now this is gonna sort of be a guide to installing it as well. hope this helps somebody and answers some questions about bending the plate etc etc.
I made a carbon fiber backing plate for my jdm rear. You dont have to but i did. usually when these things are mounted they have holes on each side of the plate and the top. I did not want the inside of the wall showing. besides carbon fiber is trick


as you can see i made a board then i fiberglassed it all together to seal and make it strong. then i took that carbon fiber sheet i have and cut it as you can see above. now i superglued and utra superglued the carbon fiber to the boad i made.


carbon fiber plate is done


uninstall the rear bumper. there are many guides in how to do this . The foam plate and rear bumper support bar will not fit with this bumper unless you get it modified. Im gonna send mine out to get rewielded and ill put it back on later. You will need a riviet gun the jdm rear comes with rivets already. you will also need a strong drill so you can drill out the rivites and new holes for the license plate
*****WARNING*****
This install took me 6 hours to do. it was my first time and as you know i do all my installs. so make sure you allow plenty of time for doing this and daylight.
now you have to take out the retainer clip off the old bumper so you can use it on the new one.


Now you have to drill out these riviets. there are 18 or so total i did not have that many in my bumper. if you ever took off your rear or bought it used there is a chance that it was removed before. there is no advice i can offer you for this just start with a small drill bit and work your way up it you drill it out. dont forget there are two screw in the center that need to be removed and two 10mm screws below those
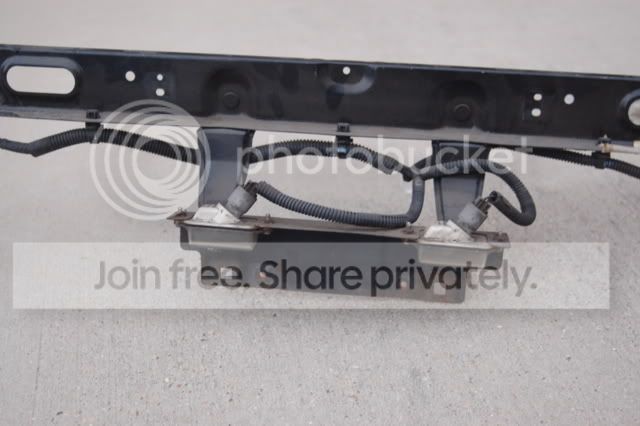


now if you look at the pictures above if you were to put the clip in now you will see it will stick out way pass the bumper. look at the second picture the license plate bracket is sticking so far out its bad. you will have to bent it back alot so it sits flush with the new bumper. now you cant bend the bracket with the license plate hold on. So drill out those riviets holding it to the retainer clip like above.


Now after thats done bend the clips back and keep bending then till it sits flush with the rear bumper. now put the retainter clip back in with the 2 screws so it holds still like i have done above. Now this is all guesstimation on your part. put the license plate bracket back on top of the clip till its high enough to not be seen by the naked eye. now rememeber the license plate hole will only line up on one side. the other hole will be touching one of the brackets. you will have to bend that tab back. now you have to make new holes for the license plate holder. drill a hole though the bracket to the tab as you see above. make sure the hole is in the postion where you want the bracket to hang.
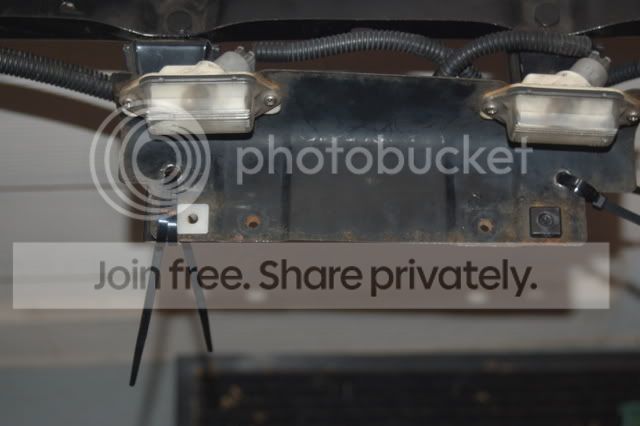


now your probaly wondering how to get the bracket to hang. i used black zip ties two on each side nice and tight. Of course i cut the access off. You can use screws with nuts if you like for the holes you drilled. now if thats all your doing then go ahead and put the riviets back in the top of the bumper i just used two on each side. Now your done reinstall it backwards etc. i made that carbon plate remember now put the carbon plate in the front of the license plate bracket. Now take a small drill bit and drill though the license plate holder on the backside of the bumper to mark where to drill the carbon plate. Pull the plate back out and drill two holes big enough so the license plate screws will fit now put it all together and bam you have the trick carbon fiber plate and install the actual license plate to make sure it all lines up and it all should be stuck together nice and tight.
check it out above if i did not install that plate there would be holes in all the places you see carbon fiber. now go in reverse order and install the rear bumper remember no foam no support beam no 3 retainer clips on the bottom no sidemakers. now for the side marks just zip tie them up on the inside. its started raining or it was raining while i was doing this i have to go to work tomorrow so i was determined to get this done glad i started early. dont forget to plug everythig back up


ok now to exhaust pics most want to know how far it sticks out remember usdm exhaust are longer then japanese in most cases. so most that do this mod have to modify the exhaust. i have a Nvidia N1 High Preformace Exhaust System. I think its fine if anything i might trim the tip some have not decieded yet. The important thing is the bumper does not touch the exhaust pipe on any sides .


now the 350 and evo are kitted out and suited and booted


Ok first of all there was a thread like a month or so ago about a carbon fiber plate for the jdm rear well i made one to cover up the holes that are created when the bumper is installed. I just finished installing my jdm rear and my carbon plate enjoy. now this is gonna sort of be a guide to installing it as well. hope this helps somebody and answers some questions about bending the plate etc etc
. JDM REAR BUMPER INSTALLED
Carbon Fiber backing plateI made a carbon fiber backing plate for my jdm rear. You dont have to but i did. usually when these things are mounted they have holes on each side of the plate and the top. I did not want the inside of the wall showing. besides carbon fiber is trick
as you can see i made a board then i fiberglassed it all together to seal and make it strong. then i took that carbon fiber sheet i have and cut it as you can see above. now i superglued and utra superglued the carbon fiber to the boad i made.
carbon fiber plate is done
uninstall the rear bumper. there are many guides in how to do this . The foam plate and rear bumper support bar will not fit with this bumper unless you get it modified. Im gonna send mine out to get rewielded and ill put it back on later. You will need a riviet gun the jdm rear comes with rivets already. you will also need a strong drill so you can drill out the rivites and new holes for the license plate
*****WARNING*****
This install took me 6 hours to do. it was my first time and as you know i do all my installs. so make sure you allow plenty of time for doing this and daylight.
now you have to take out the retainer clip off the old bumper so you can use it on the new one.
Now you have to drill out these riviets. there are 18 or so total i did not have that many in my bumper. if you ever took off your rear or bought it used there is a chance that it was removed before. there is no advice i can offer you for this just start with a small drill bit and work your way up it you drill it out. dont forget there are two screw in the center that need to be removed and two 10mm screws below those
now if you look at the pictures above if you were to put the clip in now you will see it will stick out way pass the bumper. look at the second picture the license plate bracket is sticking so far out its bad. you will have to bent it back alot so it sits flush with the new bumper. now you cant bend the bracket with the license plate hold on. So drill out those riviets holding it to the retainer clip like above.
Now after thats done bend the clips back and keep bending then till it sits flush with the rear bumper. now put the retainter clip back in with the 2 screws so it holds still like i have done above. Now this is all guesstimation on your part. put the license plate bracket back on top of the clip till its high enough to not be seen by the naked eye. now rememeber the license plate hole will only line up on one side. the other hole will be touching one of the brackets. you will have to bend that tab back. now you have to make new holes for the license plate holder. drill a hole though the bracket to the tab as you see above. make sure the hole is in the postion where you want the bracket to hang.
now your probaly wondering how to get the bracket to hang. i used black zip ties two on each side nice and tight. Of course i cut the access off. You can use screws with nuts if you like for the holes you drilled. now if thats all your doing then go ahead and put the riviets back in the top of the bumper i just used two on each side. Now your done reinstall it backwards etc. i made that carbon plate remember now put the carbon plate in the front of the license plate bracket. Now take a small drill bit and drill though the license plate holder on the backside of the bumper to mark where to drill the carbon plate. Pull the plate back out and drill two holes big enough so the license plate screws will fit now put it all together and bam you have the trick carbon fiber plate and install the actual license plate to make sure it all lines up and it all should be stuck together nice and tight.
check it out above if i did not install that plate there would be holes in all the places you see carbon fiber. now go in reverse order and install the rear bumper remember no foam no support beam no 3 retainer clips on the bottom no sidemakers. now for the side marks just zip tie them up on the inside. its started raining or it was raining while i was doing this i have to go to work tomorrow so i was determined to get this done glad i started early. dont forget to plug everythig back up
INSTALL DONE!!!!!
ok now to exhaust pics most want to know how far it sticks out remember usdm exhaust are longer then japanese in most cases. so most that do this mod have to modify the exhaust. i have a Nvidia N1 High Preformace Exhaust System. I think its fine if anything i might trim the tip some have not decieded yet. The important thing is the bumper does not touch the exhaust pipe on any sides .
now the 350 and evo are kitted out and suited and booted


Trending Topics
DRAGHICI to answer your question i could make one to cover the whole middle if i really really wanted to but why?? that would look very tacky and ugly. the whole point in the middle section is to let you and others know its two toned. body color up top and Met. Grey on bottom covering that up to me would make the bumper not only look plain but you would then have to remodify the whole license plate bracket again to get the lights infront of the new longer plate. Now comes the question how are you gonna get the ends of it to stick with no pressure?? What the middle will be fine because the license plate will hold that but what about the ends. use superglue hmm that might eventually come off just from regular weather conditions Contact solution same thing. Double sided tape would work for awhile till water got behind it. You would either have to put small longer screws in it or longer i mean long riviets. now your have little chrome spots everwhere. let me guess you will paint them black to try and blend in?!?!?  one could put the back board in plate first with screws or riviets then sand them down as much as you could so they are at least almost flush then place the carbon fiber over it. that would work for sure and insure a smooth look . Way to much work as far as im concern just to make it look horrible. But you welcome to rig one up good luck
one could put the back board in plate first with screws or riviets then sand them down as much as you could so they are at least almost flush then place the carbon fiber over it. that would work for sure and insure a smooth look . Way to much work as far as im concern just to make it look horrible. But you welcome to rig one up good luck

