Notices
Evo Show / Shine Post your pictures, photoshops, and videos!

"Darkn3s" EVO 8 --Nose Chop mod

Thread Tools
 
Search this Thread
 
Old Mar 30, 2011, 12:47 PM
  #16  
Evolved Member
iTrader: (28)
 
05blue8's Avatar
 
Join Date: Mar 2007
Location: Austin, TX
Posts: 843
Received 3 Likes on 3 Posts
Did you reinforce the top strip? When I swapped my FMIC I realized just how thin and flimsy that piece would be without the nose although I'll be doing the chop soon myself. Does the 9 grill piece fit in that insert? I didn't realize until my bumper was off mitsu left that nose area open, would have been so much easier if it was solid back there damn them.
Old Mar 30, 2011, 12:49 PM
  #17  
Evolved Member
iTrader: (28)
 
05blue8's Avatar
 
Join Date: Mar 2007
Location: Austin, TX
Posts: 843
Received 3 Likes on 3 Posts
Also did you heat up the bumper so the rivets recessed down into the plastic a bit or do you just have a small raised section there? It looks like you sanded down the tops of the rivets to smooth it all out?
Old Mar 30, 2011, 01:50 PM
  #18  
Evolved Member
Thread Starter
iTrader: (47)
 
Darkn3s's Avatar
 
Join Date: Feb 2009
Location: Woodbridge, VA
Posts: 592
Likes: 0
Received 1 Like on 1 Post
Originally Posted by Dube
How much was it for the paint? I want it!
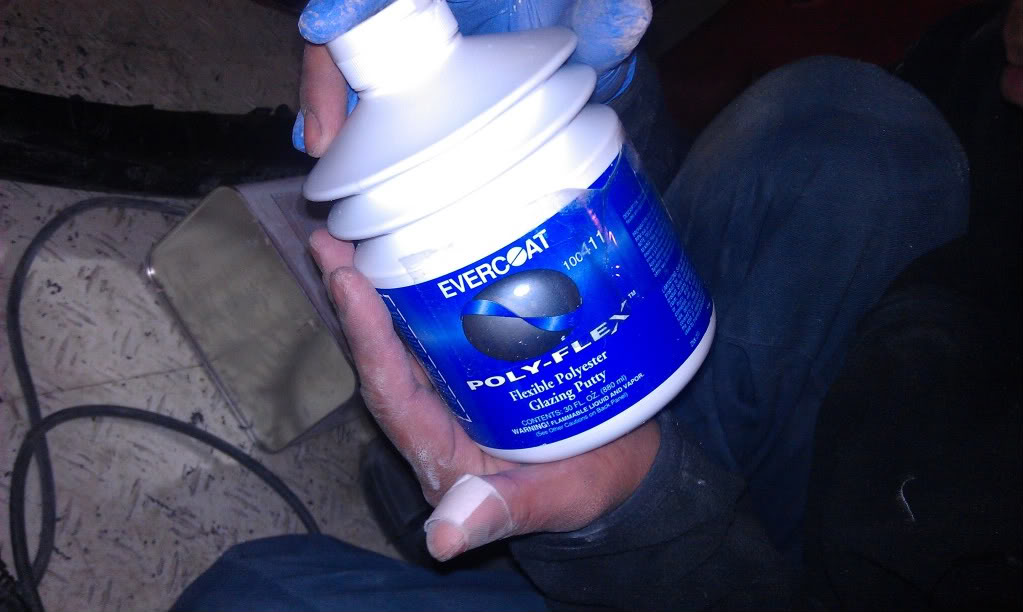
not sure a buddy supplied the paint, primer and clear coat but id say around $40ish.. but the poly flex stuff was about $36 at local "total auto parts" store

Originally Posted by -Evo Aaron-
looks great
thanks man

Originally Posted by xBLK21LEVO9x
damn that looks pretty damn good, lets see it installed

BTW thanks for the cutout!! Still waiting for it!
no prob man and yea i cant wait to install everything back on


Originally Posted by ta ace
nose chop ftw!!
hell yea best of both worlds (ix and viii bumpers)

Originally Posted by limp_noodle
are you worried about the bondo cracking?

I like how you rivitted the sheet metal to the bottom.

I think I'm going to attempt this it doesn't look hard at all.

I'd like to combine the techniques of yours and others though. I think I'm going to rivet a piece of sheet metal like you did, but instead of using bondo, I want to plastic weld on a filler piece.
no bondo was used bro ill upload the pic of the actual filler that we used

Originally Posted by Arkitek
nice work! great job
thanks man

Originally Posted by whoflungpoo
what specifically did you use to smooth it out? I've been contemplating this, but am afraid to use something inflexible, as I don't want it to crack.
pic posted.. VERY vERY very flexible.. i wouldnt worry about this cracking with the aluminum plate that was riveted for support should hold up fine

Originally Posted by tsidrift1
if you get the good "bondo" which is a term bdoy shops will not use! lol If you get the good stuff, it is pretty flexible. You will want to be careful with that part of the bumper, just for safe measure though. I am prolly gonna do this to my 8 bumper soon. It looks amazing!
this is TRUE they hate "bondo" and thanks

Originally Posted by Speed_Freak
Very nice. I am absolutely going to do that. Where did you get the paint?
from a buddy that works at a shop
Old Mar 30, 2011, 01:54 PM
  #19  
Evolved Member
Thread Starter
iTrader: (47)
 
Darkn3s's Avatar
 
Join Date: Feb 2009
Location: Woodbridge, VA
Posts: 592
Likes: 0
Received 1 Like on 1 Post
Originally Posted by 05blue8
Did you reinforce the top strip? When I swapped my FMIC I realized just how thin and flimsy that piece would be without the nose although I'll be doing the chop soon myself. Does the 9 grill piece fit in that insert? I didn't realize until my bumper was off mitsu left that nose area open, would have been so much easier if it was solid back there damn them.
no i didnt reinforce the top strip just yet.. but YES its real flimsy but it should be fine once bolted back up

i didnt use the 9 grill since it cost $107 F that! will probably go with a black mesh grill that they sell at auto zone

Originally Posted by 05blue8
Also did you heat up the bumper so the rivets recessed down into the plastic a bit or do you just have a small raised section there? It looks like you sanded down the tops of the rivets to smooth it all out?
yes you are right about the heating the rivets.. after that we sanded the top of the rovets down smooth like you said
Old Mar 30, 2011, 01:55 PM
  #20  
Evolved Member
Thread Starter
iTrader: (47)
 
Darkn3s's Avatar
 
Join Date: Feb 2009
Location: Woodbridge, VA
Posts: 592
Likes: 0
Received 1 Like on 1 Post
this is what was used.. pretty pricey $36 but works real good

Name:  IMAG0022.jpg
Views: 0
Size:  85.2 KB
Old Mar 30, 2011, 02:24 PM
  #21  
Newbie
 
SpongebobEvo's Avatar
 
Join Date: Mar 2011
Location: Wilkes-Barre Pa
Posts: 19
Likes: 0
Received 0 Likes on 0 Posts
Looks really really sharp man.

So in materials you probably got less then $100 bucks and how much time did it take?
Old Mar 30, 2011, 02:45 PM
  #22  
Evolving Member
iTrader: (7)
 
siceclipse's Avatar
 
Join Date: May 2007
Location: Fairfield County, CT
Posts: 118
Likes: 0
Received 0 Likes on 0 Posts
cant see pics at work
Ill check this out later
Old Mar 30, 2011, 06:03 PM
  #23  
EvoM Staff Alumni
iTrader: (149)
 
chaotichoax's Avatar
 
Join Date: Apr 2005
Location: New Jersey
Posts: 6,108
Likes: 0
Received 17 Likes on 5 Posts
once you have a grill mounted the top strip will be fine...the grill supports the upper portion of the bumper

even without a grill, once you bolt on the bumper the mounting points will hold it sturdy
Old Mar 30, 2011, 06:13 PM
  #24  
EvoM Staff Alumni
iTrader: (149)
 
chaotichoax's Avatar
 
Join Date: Apr 2005
Location: New Jersey
Posts: 6,108
Likes: 0
Received 17 Likes on 5 Posts
if I was the OP...I'd be most concerned with the filler material separating from the riveted plate.

especially if the OP experiences a lot of temperature changes
Old Mar 30, 2011, 06:13 PM
  #25  
Evolved Member
iTrader: (4)
 
CJ2X's Avatar
 
Join Date: Sep 2007
Location: SoCal
Posts: 1,809
Likes: 0
Received 1 Like on 1 Post
Looks great.

Off topic: What radiator pipe is that?
Old Mar 30, 2011, 06:20 PM
  #26  
Newbie
iTrader: (1)
 
02sleeper-g's Avatar
 
Join Date: Sep 2010
Location: chicopee,ma
Posts: 14
Likes: 0
Received 0 Likes on 0 Posts
looks really good would like to see some installed pics though.
Old Mar 30, 2011, 06:33 PM
  #27  
Evolved Member
iTrader: (17)
 
Astro_Train's Avatar
 
Join Date: Feb 2008
Location: east coast
Posts: 542
Received 53 Likes on 51 Posts
Originally Posted by chaotichoax
if I was the OP...I'd be most concerned with the filler material separating from the riveted plate.

especially if the OP experiences a lot of temperature changes
good point... being that is in VA... it can be 105 in the summer and 5 below in the winter... .

Looks good tho. This is one of the reasons I would do an 8 swap on a 9

I am not as talented as the OP. I will have a buddy of mine who owns a shop do it for me.

But its funny how after owning a 9, I now have a craving for another one but with a nosechopped 8 front bumper in WW.
ChaoticHoax's WW IX is what I am looking to model after but I will add my own twist to it. Now the hard part... find a WW 8 or 9 that wont cost me an arm or leg and is somewhat stock.

Last edited by Astro_Train; Mar 30, 2011 at 06:46 PM. Reason: added comment
Old Mar 30, 2011, 06:45 PM
  #28  
Evolved Member
 
FLOW1's Avatar
 
Join Date: Oct 2007
Location: Florida
Posts: 3,640
Likes: 0
Received 1 Like on 1 Post
Yeah buddy!
Old Mar 30, 2011, 06:57 PM
  #29  
Evolved Member
iTrader: (17)
 
shuttlegoose's Avatar
 
Join Date: Feb 2007
Location: philadelphia
Posts: 722
Likes: 0
Received 0 Likes on 0 Posts
I used that same filler for mine. Worked great!
Old Mar 30, 2011, 07:58 PM
  #30  
Newbie
 
ryanjoachim's Avatar
 
Join Date: Nov 2009
Location: parkersburg
Posts: 19
Likes: 0
Received 0 Likes on 0 Posts
car looks awesome man


Quick Reply: "Darkn3s" EVO 8 --Nose Chop mod


All times are GMT -7. The time now is 03:56 AM.