
Automatic headlight conversion


Thread Starter
Newbie
Joined: Aug 2013
Posts: 10
Likes: 1
From: west palm beach, FL
Automatic headlight conversion
SO, I have been researching this topic and found a couple of threads on it, all unresolved, usually with a bunch of people saying "not worth it." I'm not really interested in that response, I'm trying to figure out how to add this feature to my 2009. So far I have bought and added the light stalk and taken it to the dealer to have it activated in ETACS. He found the option in there, but every time he sent the activation command, my car rejected it. Upon further digging, it looks like there are 2 ways the car gets the signal to trigger the auto lights, neither of which is the sun load sensor on the dash like I thought it would be. It uses either the sensor on the windshield glass, or the light sensors in the auto dimming mirror. I have added in an auto dimming mirror out of a Prius, and I have auto climate control, so theoretically I could use the output of either one of those to trigger it. I have a couple of diagrams my buddy at the dealer printed out for me showing which connector the signal wires need to go to, but he wasn't able to find the pinouts of those connectors. Has anyone successfully added auto headlights in, and if so, would you mind sharing your process? So far all I have found are abandoned forum threads, and a forum in Russian that looks promising, but google really makes a hash of the translation (it says something about needing to run wires through the torpedo.)
Newbie

Joined: Feb 2012
Posts: 56
Likes: 1
From: Houston
I would say your on the right track with the Russian forums. Also try ETACS decoder forums too. Seems like the ETACS decoder forum had a link to wiring diagrams etc too. I found both really helpful when I added JDM power fold mirrors to my car. I also came across great information on youtube for my project. Good Luck!


So, the non-us market but it might help.
Credit to:
https://lynspira.blogspot.com/
Since there are query for the Auto Light thing, and Im kind of in mood to update my long stucked blog. Here it comes.
well the parts...

The part number is 7825A019 (This one comes with both Auto Climate light sensor and the Auto light functionality. 7825A003 only comes with the light sensor for Auto Climate function.
I am not going into how to install it as I have already install it lolz. I guess you would have know where this thing should be placed at.
Okay, both lancer and Inspira Does Not Have wiring for this kind of light sensor. However older batch of lancer have the wire for ONLY the auto climate functions. So either way some custom wiring have to be done, do not worry only 5 wirings.
So we open up the sensor cover....
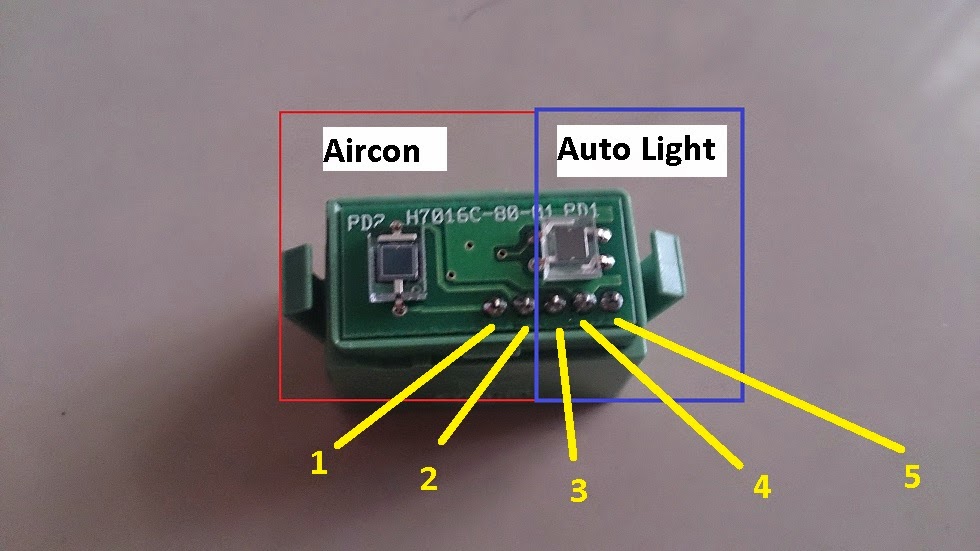
Okay, I have label the sensor into 2 different part, Left is for the Climate Control Light sensor (This helps a lot on the auto climate function where you will feel the air conditioner fan will blast stronger during hot sun and during night time it will be more mild.) At the right side is for the analog version of the auto light sensor.
I hope you guys know where the ETACS and the A/C ECU is. Both is actually behind the glove box.
Now lets move on to the wiring. Base on the picture above. Pin 1 & 2 are use for the Aircon sensor and Pin 3 to 5 is use for the autolight sensor.
The aircon Ecu should be on your right side behind the glove box (RHD cars). There are two sets of socket connected to the Aircon ECU. Remove the lower socket (20 pin count).

Pin 19 should be connected by a Light Green wire. Tap that wire and connect to the sensor PIN 2.
Pin 18 should be empty, connect it to PIN 1 of the sensor.
PIN 19 is actually the common ground for the sensor of the aircon (common ground for internal temperature sensor and the light sensor)
PIN 18 is the sensor input / power supply to the light sensor.
Now lets move on to the 2nd part which is the Auto light portion. This portion have to be connected to the ETACS.

I hope you all know where is the ETACS. The connector need to be connected is the lowest connector (For the new design etacs. The older design ETACS is on TOP). For inspira or any lancer 2011 above the connector is as show above. The pin need to connect is PIN 3, 18, 20.
PIN 3 : Photo Sensor Power Supply
PIN 18 : Photo Sensor Ground
PIN 20 : Photo Sensor Input signal
PIN 3 is to be connected to the LIGHT SENSOR PIN 5
PIN 18 is to be connected to the LIGHT SENSOR PIN 4
PIN 20 is to be connected to the LIGHT SENSOR PIN3
Almost there.. then you have to of cause change your stalk to the auto light stalk.
http://4.bp.blogspot.com/-Sfep_xa4HP...0/DSC_0420.jpg
This works without programming the ETACS. Not sure any difference after program though, because I programmed it when i Installed.
Credit to:
https://lynspira.blogspot.com/
Auto Light Alternative for Inspira / Lancer
Since there are query for the Auto Light thing, and Im kind of in mood to update my long stucked blog. Here it comes.
well the parts...
The part number is 7825A019 (This one comes with both Auto Climate light sensor and the Auto light functionality. 7825A003 only comes with the light sensor for Auto Climate function.
I am not going into how to install it as I have already install it lolz. I guess you would have know where this thing should be placed at.
Okay, both lancer and Inspira Does Not Have wiring for this kind of light sensor. However older batch of lancer have the wire for ONLY the auto climate functions. So either way some custom wiring have to be done, do not worry only 5 wirings.
So we open up the sensor cover....
Okay, I have label the sensor into 2 different part, Left is for the Climate Control Light sensor (This helps a lot on the auto climate function where you will feel the air conditioner fan will blast stronger during hot sun and during night time it will be more mild.) At the right side is for the analog version of the auto light sensor.
I hope you guys know where the ETACS and the A/C ECU is. Both is actually behind the glove box.
Now lets move on to the wiring. Base on the picture above. Pin 1 & 2 are use for the Aircon sensor and Pin 3 to 5 is use for the autolight sensor.
The aircon Ecu should be on your right side behind the glove box (RHD cars). There are two sets of socket connected to the Aircon ECU. Remove the lower socket (20 pin count).
Pin 19 should be connected by a Light Green wire. Tap that wire and connect to the sensor PIN 2.
Pin 18 should be empty, connect it to PIN 1 of the sensor.
PIN 19 is actually the common ground for the sensor of the aircon (common ground for internal temperature sensor and the light sensor)
PIN 18 is the sensor input / power supply to the light sensor.
Now lets move on to the 2nd part which is the Auto light portion. This portion have to be connected to the ETACS.
I hope you all know where is the ETACS. The connector need to be connected is the lowest connector (For the new design etacs. The older design ETACS is on TOP). For inspira or any lancer 2011 above the connector is as show above. The pin need to connect is PIN 3, 18, 20.
PIN 3 : Photo Sensor Power Supply
PIN 18 : Photo Sensor Ground
PIN 20 : Photo Sensor Input signal
PIN 3 is to be connected to the LIGHT SENSOR PIN 5
PIN 18 is to be connected to the LIGHT SENSOR PIN 4
PIN 20 is to be connected to the LIGHT SENSOR PIN3
Almost there.. then you have to of cause change your stalk to the auto light stalk.
http://4.bp.blogspot.com/-Sfep_xa4HP...0/DSC_0420.jpg
This works without programming the ETACS. Not sure any difference after program though, because I programmed it when i Installed.
Thread Starter
Newbie
Joined: Aug 2013
Posts: 10
Likes: 1
From: west palm beach, FL
Holy cow, I wasn't expecting a complete walk thruthr. You're a legend! Now I just need to find that 7825A019, probably going to have to order it from overseas. My local Mitsubishi dealer says it's an invalid number.
Glad to help out.
The US market cars use the Rain Light Sensor array on the windshield for the light sensor. It might be the easier route but it does require activation in ETACS:
Set:
Auto light control - either High threshold RLS or Low threshold RLS. The latter will give you "twilight mode" - two stage autolight, where parking lights kick in first, and as it gets darker headlights follow.
If it does not work try Analog mode - that was meant for older setup where rain and light sensors were two separate units. (Which is probably what the Lynspira setup is referencing.

Newbie
Joined: Mar 2022
Posts: 6
Likes: 0
From: Australia
Sorry to revive a old post, but when i gave the part number a google (7825A019) it only shows the sensor with connectors and no circuit board. Does it still wire the same or do I need to get the circuit board for it to work?
Sorry if its a dumb question, im new to the electrical and wiring stuff
Sorry if its a dumb question, im new to the electrical and wiring stuff

Thread
Thread Starter
Forum
Replies
Last Post
LanEvoNine
Evo General
4
Dec 6, 2007 05:47 PM