

CNT RS Exhaust Modification


Thread Starter
Newbie
Joined: Dec 2016
Posts: 17
Likes: 1
From: san diego
CNT RS Exhaust Modification
I got a great deal on a used CNT RS Dual Catback Exhaust. After doing some research I discovered that this exhaust is known to be very restrictive. I went ahead and cleaned it up, and opened her up to see what could be causing the restriction. Here are some pics...
How I got it.. $250.
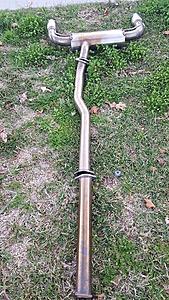
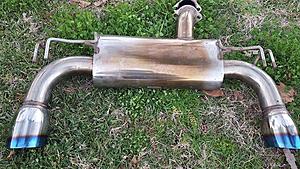
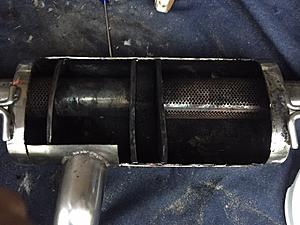
All cleaned up...

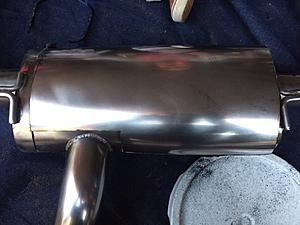
Now, we cut the top portion of the muffler off to inspect..
Upon opening the muffler, this is what we saw. Lots of sound dampening material..
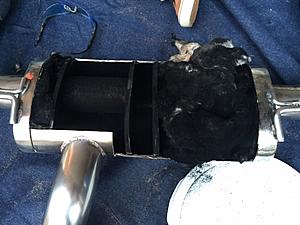
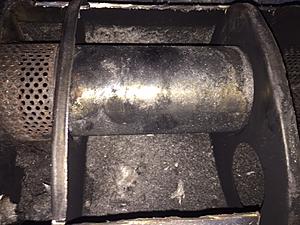
We removed the material, seems to be a pretty simple design...
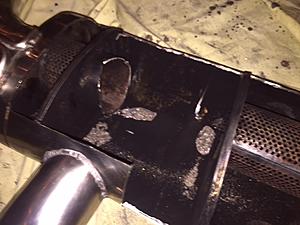
Close up of the chamber that receives the initial exhaust gases. As you can see the only place for gases to escape this area, is through the small hole leading to the center of the muffler. This appears to be the main source of restriction..
We decided to cut the pipe directly in front of the inlet area and eliminate the center wall.

By doing this we have eliminated the main restriction in the exhaust, and have made it much more free flowing. I know some people would have done something different, but this is just what we decided to try. The next step is to weld the top piece of the muffler back on and mount the cat back on my car.
I plan to have the exhaust on my car in a couple days, and I will post a video of the results.
How I got it.. $250.


All cleaned up...

Now, we cut the top portion of the muffler off to inspect..

Upon opening the muffler, this is what we saw. Lots of sound dampening material..

We removed the material, seems to be a pretty simple design...

Close up of the chamber that receives the initial exhaust gases. As you can see the only place for gases to escape this area, is through the small hole leading to the center of the muffler. This appears to be the main source of restriction..

We decided to cut the pipe directly in front of the inlet area and eliminate the center wall.


By doing this we have eliminated the main restriction in the exhaust, and have made it much more free flowing. I know some people would have done something different, but this is just what we decided to try. The next step is to weld the top piece of the muffler back on and mount the cat back on my car.
I plan to have the exhaust on my car in a couple days, and I will post a video of the results.

Thread Starter
Newbie
Joined: Dec 2016
Posts: 17
Likes: 1
From: san diego
For cleanup I used dish soap and hot water with the srubby part of a sponge. That got it looking amazing. Then my friend gave me some turtle wax metal shine stuff to protect it and make it nice and shiny.
I did two complete coats of soap and hot water. Probably 3 hours total work.
I did two complete coats of soap and hot water. Probably 3 hours total work.

Thread Starter
Newbie
Joined: Dec 2016
Posts: 17
Likes: 1
From: san diego
UPDATE:
I welded up the top of the exhuast. Installed it. Here are the results.
https://www.youtube.com/watch?v=h3t31bOxAU8
It has a very nice sound i think. Nice rumble and no highway drone. Feels stock at idle.
I welded up the top of the exhuast. Installed it. Here are the results.
https://www.youtube.com/watch?v=h3t31bOxAU8
It has a very nice sound i think. Nice rumble and no highway drone. Feels stock at idle.
Trending Topics

Newbie

Joined: Oct 2005
Posts: 19
Likes: 0
From: Fort Lewis, Washington
Never seen anyone go into that much detail when it comes to exhaust restriction. It's interesting to see what was inside as well. The sound clip sounds great too. Close to what you get when removing the muffler completely.

Thread
Thread Starter
Forum
Replies
Last Post
EvoGeneration
Evo X Engine / Turbo / Drivetrain
12
May 16, 2011 08:52 PM
LancerShop.com
Vendor Announcements
22
Jan 13, 2011 02:01 PM