
DIY Wiki: What do you know and how can you help?

Thread Starter
Evolved Member
iTrader: (18)
Joined: Oct 2009
Posts: 1,574
Likes: 11
From: the internet
wiki= "what i know is"
Here's what I know is:
A whole lot of things that we take our cars to shops to fix, or think are unfixable, are really fixable at home if you have someone to show you how.
I've got ~10 years experience in bodywork, plastic repair, fiberglass and plastic/composite fabbing. I know non-structural interior and exterior car refinishing. I can also do 12 volt electrical.
If we can consolidate related questions into this one thread, it will help act as a DIY guide. If you read something and know how to help, post up too!
Example: elecan's amazing bumper removal video. Perfect. I'll work on consolidating into one mass EvoX wiki thread for the DIY subforum. Go team!
Last edited by ikt; May 29, 2014 at 11:49 AM.
Thread Starter
Evolved Member
iTrader: (18)
Joined: Oct 2009
Posts: 1,574
Likes: 11
From: the internet
kelvar13's headlight blackout
https://www.evolutionm.net/forums/ev...it-chrome.html
https://www.evolutionm.net/forums/ev...it-chrome.html
Originally Posted by kelvar13
So about two weeks ago I decided to finally take care of all the crappy chrome in the headlight housing and while i was at it do away with the chrome rings around the fog lights and paint the silver bar (ac condenser?) These changes along with my already blacked out emblems turned out great! I'd totally recomend doing this if you want to change the front appearance to a more aggressive darker look.
For those looking to do this I know there are some write-ups on how to but I'll spell out how I went about doing it just to get another point of view.
1 First of all I removed the front bumper to get acess to the headlights (they are held on by three screws, two up top and one under the fender)
2 secondly i removed all cables from the headlight housing
3 Next I pre-heated my oven to 200 degrees (which happened to be it's lowest setting).
4 I then tentively set my first headlight housing onto a cookie sheet with a moist garage throwaway towel (could have been a regular towel since it only got warm and didn't get messed up in any way).
5 I baked the headlight for 23-25 minutes (i tried opening them at 20 like another person had suggested but the sealant was still very sticky). To be honest this was the most nerve racking moment cause the housing is very hot and the glue is still pretty strong so you kinda have to muscle through it unless you pop them in for another 5 or so minutes.
6 After that I was able to take the headlight apart into its sections (there is a reflector section, the bottom tray of the headlight which also has the cover for the turn signal, and the hid/drl section which is tricky since the wiring for the hid light is still going to be attached (there are two little connectors if i remember right).
7 After that it was paint time. I used plastidip and the finish is pretty close to the bottom tray piece which is already black. I also masked off the indents on the hid housing to leave a bit of chrome on that side of the light to pull it all together and to do something a bit different.
8 After the paint was done I just pieced the light back together and squished the plastic cover back on and started to screw the four screws back together (you can't totally get them all the way tight initially without risking breaking the cover. Screw them down until they are somewhat tight and putting pressure on the lens so that when it heats up the two pieces will be drawn together)
9 Pop back in the oven at 200 degrees for 10 minutes. After the first ten minutes tighten the screws again and use a clamp or pliers to squeeze the lens on as best as you can. Put the light back in the oven for another 10 minutes and then again tighten the screws and squish. If it is sealed to your liking your done. If not do another 10 minute session.
10 I went over the seams of the headlight with some silicone sealant just to ensure there was no condensation in the future. It was 5 bucks from autozone and i think thats well worth the peace of mind of a good seal.
Now on to PICS!!
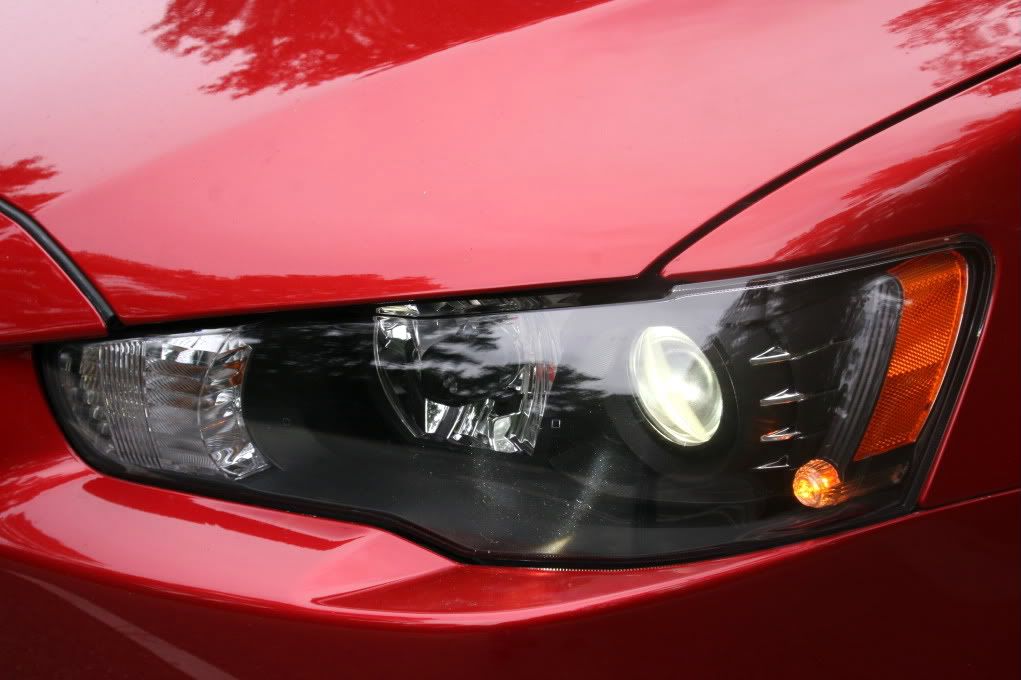
Sidemarker in sexy plasti-dip black (i wanted to make sure the small orange light was visible from the side in case it was an inspection issue so i left that area clear, same reason for leaving the reflector orange)

HID housing in black (here you can see the part i left chrome to do something different and to tie the chrome pieces from the drl and blinker)

whole headlight put back together without cover

Close up shot of the pieces that wound up painted (this was before i cleaned it up a bit so there may be some rough edges still)

And finally on the car with the blacked out fog rings and the ac line (plus the mitsu emblem which was previously done)

And here is a link to my photobucket album for more pics (http://s1018.photobucket.com/albums/af301/kelvar13/)
So yeh thats about it. Feel free to voice your opinions or ask questions. Its a farily easy task just time consuming (I took about 6-7 hours total to do this including baking and paint drying time but if you have a free weekend why not).
For those looking to do this I know there are some write-ups on how to but I'll spell out how I went about doing it just to get another point of view.
1 First of all I removed the front bumper to get acess to the headlights (they are held on by three screws, two up top and one under the fender)
2 secondly i removed all cables from the headlight housing
3 Next I pre-heated my oven to 200 degrees (which happened to be it's lowest setting).
4 I then tentively set my first headlight housing onto a cookie sheet with a moist garage throwaway towel (could have been a regular towel since it only got warm and didn't get messed up in any way).
5 I baked the headlight for 23-25 minutes (i tried opening them at 20 like another person had suggested but the sealant was still very sticky). To be honest this was the most nerve racking moment cause the housing is very hot and the glue is still pretty strong so you kinda have to muscle through it unless you pop them in for another 5 or so minutes.
6 After that I was able to take the headlight apart into its sections (there is a reflector section, the bottom tray of the headlight which also has the cover for the turn signal, and the hid/drl section which is tricky since the wiring for the hid light is still going to be attached (there are two little connectors if i remember right).
7 After that it was paint time. I used plastidip and the finish is pretty close to the bottom tray piece which is already black. I also masked off the indents on the hid housing to leave a bit of chrome on that side of the light to pull it all together and to do something a bit different.
8 After the paint was done I just pieced the light back together and squished the plastic cover back on and started to screw the four screws back together (you can't totally get them all the way tight initially without risking breaking the cover. Screw them down until they are somewhat tight and putting pressure on the lens so that when it heats up the two pieces will be drawn together)
9 Pop back in the oven at 200 degrees for 10 minutes. After the first ten minutes tighten the screws again and use a clamp or pliers to squeeze the lens on as best as you can. Put the light back in the oven for another 10 minutes and then again tighten the screws and squish. If it is sealed to your liking your done. If not do another 10 minute session.
10 I went over the seams of the headlight with some silicone sealant just to ensure there was no condensation in the future. It was 5 bucks from autozone and i think thats well worth the peace of mind of a good seal.
Now on to PICS!!
Sidemarker in sexy plasti-dip black (i wanted to make sure the small orange light was visible from the side in case it was an inspection issue so i left that area clear, same reason for leaving the reflector orange)
HID housing in black (here you can see the part i left chrome to do something different and to tie the chrome pieces from the drl and blinker)
whole headlight put back together without cover
Close up shot of the pieces that wound up painted (this was before i cleaned it up a bit so there may be some rough edges still)
And finally on the car with the blacked out fog rings and the ac line (plus the mitsu emblem which was previously done)
And here is a link to my photobucket album for more pics (http://s1018.photobucket.com/albums/af301/kelvar13/)
So yeh thats about it. Feel free to voice your opinions or ask questions. Its a farily easy task just time consuming (I took about 6-7 hours total to do this including baking and paint drying time but if you have a free weekend why not).
Thread Starter
Evolved Member
iTrader: (18)
Joined: Oct 2009
Posts: 1,574
Likes: 11
From: the internet
elecan's front bumper removal video:
https://www.evolutionm.net/forums/ev...r-removal.html
Hi guys,
After some trackdays my wheelhouse panels are wrecked, my clips have started to migrate from the car and my front lip/spoiler is busted.
So I decided to remove the front bumper to make some repairs, and why not share it? Maybe someone will find this useful!
Now, there might be some difference between my engine cooling plate and the stock one, nothing you can't figure out, other then that all should be the same.
I will add subtitels and correct my rusty English as well
Cheers

Thread
Thread Starter
Forum
Replies
Last Post
Mad_SB
09+ Ralliart Engine/Turbo/Drivetrain
16
Nov 6, 2015 07:51 PM
EVO8LTW
Evo Engine / Turbo / Drivetrain
17
Feb 8, 2005 07:57 AM