
My seats from LeatherSeats.com arrived today!!!

Thread Starter
Evolving Member
Joined: Sep 2004
Posts: 413
Likes: 3
From: Alexandria VA
My seats from LeatherSeats.com arrived today!!!
It was a long search, an even longer decision process, and just to top it off a long shipping process thanks to UPS sitting on its hands in Roanoke VA ... but I finally bit the bullet, and dug into the wallet and ordered some leather seats for my cloth X SE. And if you look really closely in the window you can see the glowing eyes of my dog wondering WTF his dad is doing taking a picture of him from outside rather than coming inside and giving him some long overdue attention 

So here is what I got:
- Premium Leather Kit in single-Tone
- Ecstasy Leather upgrade (Graphite)
- Perforated "Combo"
- Double Stitched with Silver thread
- #139 embroidered in Black
- Center Console lid with Ecstasy Leather top
So what is Ecstasy leather you ask? It is pure Butta baby. I swear the swatches they sent me (for free) of the Ecstasy and their normal leather simply don't do it justice. Make no mistake, I have no doubt their normal leather feels sweet too. The swatches of those really felt sweet. But this stuff is aptly named Ecstasy. I haven't even installed it yet and all I want to do is lay down on these things.
The perforation "combo" describes what is perforated. In this case it means the entire length of where your sit, excluding side bolsters from your knees to your shoulder blades.
"Premium" describes how much of the seat is leather vs vinyl. This picture shows it best compared to their "Deluxe" kit:


What isn't clear from the picture is that the top of the front arm rest is leather. Also the rear arm rest is leather where your arm rests, but not the part that faces you when the arm rest is stowed away.
The graphite looks to match the interior perfectly. A small part of me is still wondering if I shouldn't have done some sort of two-tone but really I'm sort of low-key with my cars so I think this suites me well. Ironically this is pretty much exactly what the leather looks like [shrug] I like what I like.
The #139 logo is for my Special Edition Number; #139 of 340 made.
Here is a picture of the front seat out of the box.
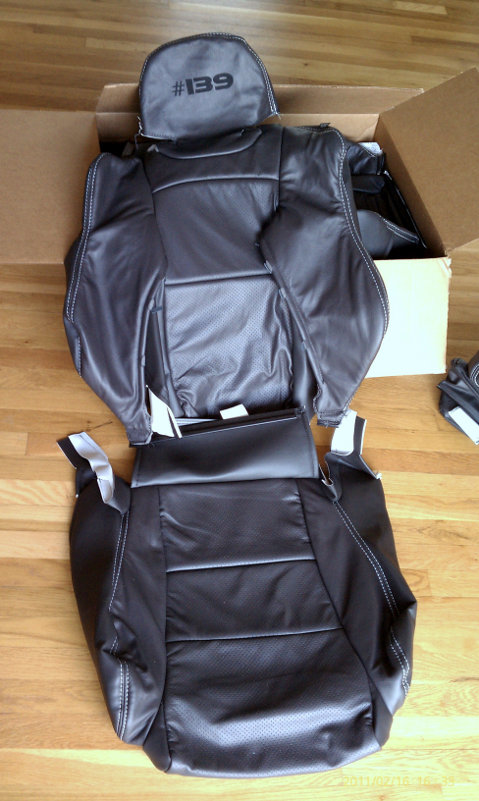
After a lot of color manipulating this is a fairly close representation though I think it looks a little bluer and lighter than it really represents. YMMV (your monitor may vary). Also the logo is WAY more obvious than it is in real life and I imagine once it is in the shadow of the car interior it will be even more subtle.
The next step is installation. [takes a deep breath] I'm going to start with the back seats first since they actually look easier, then the passenger front and finally once I have a ton of practice I'll do the drivers seat.
Also included in the kit are the vinyl inserts for the door. They are installed by trimming to size, gluing and stuffing around the edges. I might just pay someone to do that since it seems easy for me to mess up and difficult to recover from. Then again if I start with the rear doors I won't care much if they don't look perfect and I'll either learn the tricks there or decide to pay someone to do the front ;-)
The final price to my door, $1280. The Ecstasy leather on a Premium Kit was a $200 upgrade from their normal leather and from Deluxe to Premium was $200. I think the Deluxe/Premium bump is a bit less for non-Ecstasy leather. Maybe like $150. You can see the prices of the other options at their webage.
For those who might ask about Katzkin leather ... I called all around the DC/MD/VA area and the best quote I got for get their version of the Deluxe with Standard leather and no embroidery was about $1299 installed. I figured for the effort of a self-install I get a free upgrade plus the pride that comes with doing-it-yourself ... we are EVO-men are we not?
So wish me luck. I'll update with progress and pictures that can hopefully serve as a How-To for anyone who wants to try.
So here is what I got:
- Premium Leather Kit in single-Tone
- Ecstasy Leather upgrade (Graphite)
- Perforated "Combo"
- Double Stitched with Silver thread
- #139 embroidered in Black
- Center Console lid with Ecstasy Leather top
So what is Ecstasy leather you ask? It is pure Butta baby. I swear the swatches they sent me (for free) of the Ecstasy and their normal leather simply don't do it justice. Make no mistake, I have no doubt their normal leather feels sweet too. The swatches of those really felt sweet. But this stuff is aptly named Ecstasy. I haven't even installed it yet and all I want to do is lay down on these things.
The perforation "combo" describes what is perforated. In this case it means the entire length of where your sit, excluding side bolsters from your knees to your shoulder blades.
"Premium" describes how much of the seat is leather vs vinyl. This picture shows it best compared to their "Deluxe" kit:
What isn't clear from the picture is that the top of the front arm rest is leather. Also the rear arm rest is leather where your arm rests, but not the part that faces you when the arm rest is stowed away.
The graphite looks to match the interior perfectly. A small part of me is still wondering if I shouldn't have done some sort of two-tone but really I'm sort of low-key with my cars so I think this suites me well. Ironically this is pretty much exactly what the
The #139 logo is for my Special Edition Number; #139 of 340 made.
Here is a picture of the front seat out of the box.
After a lot of color manipulating this is a fairly close representation though I think it looks a little bluer and lighter than it really represents. YMMV (your monitor may vary). Also the logo is WAY more obvious than it is in real life and I imagine once it is in the shadow of the car interior it will be even more subtle.
The next step is installation. [takes a deep breath] I'm going to start with the back seats first since they actually look easier, then the passenger front and finally once I have a ton of practice I'll do the drivers seat.
Also included in the kit are the vinyl inserts for the door. They are installed by trimming to size, gluing and stuffing around the edges. I might just pay someone to do that since it seems easy for me to mess up and difficult to recover from. Then again if I start with the rear doors I won't care much if they don't look perfect and I'll either learn the tricks there or decide to pay someone to do the front ;-)
The final price to my door, $1280. The Ecstasy leather on a Premium Kit was a $200 upgrade from their normal leather and from Deluxe to Premium was $200. I think the Deluxe/Premium bump is a bit less for non-Ecstasy leather. Maybe like $150. You can see the prices of the other options at their webage.
For those who might ask about Katzkin leather ... I called all around the DC/MD/VA area and the best quote I got for get their version of the Deluxe with Standard leather and no embroidery was about $1299 installed. I figured for the effort of a self-install I get a free upgrade plus the pride that comes with doing-it-yourself ... we are EVO-men are we not?
So wish me luck. I'll update with progress and pictures that can hopefully serve as a How-To for anyone who wants to try.
Last edited by Jumperalex; Feb 17, 2011 at 05:56 AM.
Thread Starter
Evolving Member
Joined: Sep 2004
Posts: 413
Likes: 3
From: Alexandria VA
Tools Required
- Philips screw driver
- Hog pliers (available from Leatherseats.com)
- Wire cutters (see pic below)
- Needle nose pliers
- Hog rings (available from Leatherseats.com)
- Spray glue (available from Leatherseats.com)
- work gloves (a must if you don't want to slice your fingers off)
- 14mm and 17mm wrench/socket
- breaker bar and torque wrench
- thin flat head screwdriver
The wire cutters ... flat out these are the ones to get, they cut like BUTTAH. Nothing else I tried or found at Home Depot could cut the rings even with two hands. Those regular cutters in the picture, not even a dent. You don't HAVE to have the fancy needle nose pliers but they did make it easier since they are also a compound design like the cutters. And yes the Wine is required as well as some good single malt scotch like Macallan 12

Both were $14 at Home Depot
Rear Head Rest Install
Time: DVRed episodes of The Daily Show and Colbert Report
Ok well obviously remove the head rests from the car. Take note of the fact that the center head rest is different than the two sides. I didn't but got lucky and grabbed the correct cover. Unlike the seats you don't have to remove the cloth. I'm not even sure you'd want to since they really do seem to be sewn in place.
First off be ready for your fingers to get tired. Trying to squeeze the covers on to the head rest is like trying to wrestle Rosanne Bar into a super model's jeans. The pics tell the story. Truth be told, it took me less than one episode of V to do the job and take pictures. Its taking me longer to fight with the attachments in vB


Front Arm Rest Install
Time: About 2 hours while watching Supernatural, Royal Pains and Colbert Report
Arm Rest removal: You can just remove the armrest top without having to remove the hing. Flip up the armrest. There are two flush screws on the underside of the armrest near the hinge. Remove those. Then remove the two screws holding armrest latch. With those removed the plastic bottom comes out. Under there you will see how the top of the armrest is attached to the metal hinge. Remove those two screws and the armrest top comes out.


Next I removed the OEM felt by yanking the staples which is fairly self-explanatory. I test fitted the new leather cover and noticed two things: 1) I'd have to cut the leather to get it to form around the curves of the arm rest and 2) Since the leather, vinyl and padding is much thicker than the OEM felt, the plastic frame really didn't fit right. I needed to remove the foam backing where the cover wraps under the armrest. So I used a marker to trace around the inside of the cover along the edge of the frame, remove the cover, and used a razor blade to CAREFULLY cut away the padding. Its really important that you are careful not to cut too deep as you'll cut right into the leather and vinyl. If you happen to do that some crazy glue on the inside can fix it. Ask me how I know ;-)

You can better judge the slits I cut in the pictures below but the key point is I used the OEM felt as a reference. Cut slowly and keep testing.
With that done I put the cover back on, pulled it tight and used heavy duty clamps to hold it in place. Using a staple gun and 1/4" staples I stapled around the clamps before removing them and stapling the rest. There wasn't a lot of room so in some places I didn't really get the staples in too well but that is where the pliers come in. I squeezed any staples down that weren't fully seated. Careful though or you might push them right through the other side of the cover. If you do you can just pry them out a tad and all is well.


Once that was done I test fit the bottom plastic again and all was well.

It is still a little tight but nothing that caused any problems once I installed it back in the car. Installation is of course opposite of removal. In the end I'm very happy with the arm rest. It looks great and at least as good as anything I would have expect to get from a pro-shop.

Rear Seat
Time: 3 hours for the seat back / One episode of Top Gear for seat bottom
Just a little taste until I get a chance to finish the write up:


Ok the rear seats is done, but not installed. Looking at the picture I noticed some minor looking wrinkles in the leather that I didn't even notice in person. A little bit of massaging of the leather to get to slide into place and the wrinkles are gone. Also note that on the seat bottom back near your butt where you can see the double stitching that is where the holes are for the child seat attachments so there is a little extra slop that really I couldn't see how it could be improved.
- Philips screw driver
- Hog pliers (available from Leatherseats.com)
- Wire cutters (see pic below)
- Needle nose pliers
- Hog rings (available from Leatherseats.com)
- Spray glue (available from Leatherseats.com)
- work gloves (a must if you don't want to slice your fingers off)
- 14mm and 17mm wrench/socket
- breaker bar and torque wrench
- thin flat head screwdriver
The wire cutters ... flat out these are the ones to get, they cut like BUTTAH. Nothing else I tried or found at Home Depot could cut the rings even with two hands. Those regular cutters in the picture, not even a dent. You don't HAVE to have the fancy needle nose pliers but they did make it easier since they are also a compound design like the cutters. And yes the Wine is required as well as some good single malt scotch like Macallan 12
Both were $14 at Home Depot
Rear Head Rest Install
Time: DVRed episodes of The Daily Show and Colbert Report
Ok well obviously remove the head rests from the car. Take note of the fact that the center head rest is different than the two sides. I didn't but got lucky and grabbed the correct cover. Unlike the seats you don't have to remove the cloth. I'm not even sure you'd want to since they really do seem to be sewn in place.
First off be ready for your fingers to get tired. Trying to squeeze the covers on to the head rest is like trying to wrestle Rosanne Bar into a super model's jeans. The pics tell the story. Truth be told, it took me less than one episode of V to do the job and take pictures. Its taking me longer to fight with the attachments in vB
Front Arm Rest Install
Time: About 2 hours while watching Supernatural, Royal Pains and Colbert Report
Arm Rest removal: You can just remove the armrest top without having to remove the hing. Flip up the armrest. There are two flush screws on the underside of the armrest near the hinge. Remove those. Then remove the two screws holding armrest latch. With those removed the plastic bottom comes out. Under there you will see how the top of the armrest is attached to the metal hinge. Remove those two screws and the armrest top comes out.
Next I removed the OEM felt by yanking the staples which is fairly self-explanatory. I test fitted the new leather cover and noticed two things: 1) I'd have to cut the leather to get it to form around the curves of the arm rest and 2) Since the leather, vinyl and padding is much thicker than the OEM felt, the plastic frame really didn't fit right. I needed to remove the foam backing where the cover wraps under the armrest. So I used a marker to trace around the inside of the cover along the edge of the frame, remove the cover, and used a razor blade to CAREFULLY cut away the padding. Its really important that you are careful not to cut too deep as you'll cut right into the leather and vinyl. If you happen to do that some crazy glue on the inside can fix it. Ask me how I know ;-)
You can better judge the slits I cut in the pictures below but the key point is I used the OEM felt as a reference. Cut slowly and keep testing.
With that done I put the cover back on, pulled it tight and used heavy duty clamps to hold it in place. Using a staple gun and 1/4" staples I stapled around the clamps before removing them and stapling the rest. There wasn't a lot of room so in some places I didn't really get the staples in too well but that is where the pliers come in. I squeezed any staples down that weren't fully seated. Careful though or you might push them right through the other side of the cover. If you do you can just pry them out a tad and all is well.
Once that was done I test fit the bottom plastic again and all was well.
It is still a little tight but nothing that caused any problems once I installed it back in the car. Installation is of course opposite of removal. In the end I'm very happy with the arm rest. It looks great and at least as good as anything I would have expect to get from a pro-shop.
Rear Seat
Time: 3 hours for the seat back / One episode of Top Gear for seat bottom
Just a little taste until I get a chance to finish the write up:
Ok the rear seats is done, but not installed. Looking at the picture I noticed some minor looking wrinkles in the leather that I didn't even notice in person. A little bit of massaging of the leather to get to slide into place and the wrinkles are gone. Also note that on the seat bottom back near your butt where you can see the double stitching that is where the holes are for the child seat attachments so there is a little extra slop that really I couldn't see how it could be improved.
Last edited by Jumperalex; Feb 22, 2011 at 08:18 PM.
Thread Starter
Evolving Member
Joined: Sep 2004
Posts: 413
Likes: 3
From: Alexandria VA
Front Seat
Time: 1 episode of The Graham Norton Show, 4 episodes of BBC Top Gear, 1 episode of V. This was spread over a Saturday and Sunday ... so about 8 hours or so
Here are the finished pix, install steps will come later:


Last edited by Jumperalex; Feb 22, 2011 at 08:15 PM.


Thread Starter
Evolving Member
Joined: Sep 2004
Posts: 413
Likes: 3
From: Alexandria VA
haha don't feel too sorry for him. I got right into the house and took care of him first before I even brought the box into the house. I know which side my bread is buttered on and he will no doubt want to help me with the install as I plan on doing it in front of my TV. I suspect I might feel the same way after my install but at least I'll be able to say I did it myself.
Trending Topics

so you're sucker #139...nice.
i hate to break it to you, but at that price you can get it all custom upholstered here at CA, and 100% leather too, not that 70/30 thing. good luck with the install, though.
i hate to break it to you, but at that price you can get it all custom upholstered here at CA, and 100% leather too, not that 70/30 thing. good luck with the install, though.
Thread Starter
Evolving Member
Joined: Sep 2004
Posts: 413
Likes: 3
From: Alexandria VA
@EvoX-11 it is in the post $1280
@endGameXIII: You're not breaking anything to me. I live where I live and those are the prices. There is no one around here that will do custom 100% leather installed for that price. I could have bought 100% leather but really didn't see the point regardless of the cost since nothing that touches my body touches vinyl. But thanks for your encouragement
@endGameXIII: You're not breaking anything to me. I live where I live and those are the prices. There is no one around here that will do custom 100% leather installed for that price. I could have bought 100% leather but really didn't see the point regardless of the cost since nothing that touches my body touches vinyl. But thanks for your encouragement


Thread Starter
Evolving Member
Joined: Sep 2004
Posts: 413
Likes: 3
From: Alexandria VA
Wow IE really does NOT display this post well at all. Strings all the photos instead of wrapping them. FF FTMFW ... I'll edit my post to clean that up.
@Neo, no they do not eliminate the holes.
@popdakebin and Evod350z, thanks. The stitching lines up pretty well and in the end it is up to you to man handle it into place. When I first pulled the covers over they weren't perfectly aligned but it isn't too hard to squeeze, push, slide and pull the cover to twist it into place. In fact you really have no choice but to do that to get the closures into place. If you notice in the pics, once I have the cover completely over the headrest the closures still are not aligned with the headrest posts. So I had to keep massaging the cover to slide it around and into place. Come to think of it my pics could use some captions I guess.
As for calling off work, don't tempt me. I have a LOT of leave built up still and the weather is getting nice finally. But with a three day weekend ahead of me (ignoring the friend who has asked me to help her move) And tonight I don't have soccer so I'll pull the rear seats out and start work on those.
I did some more work on the front armrest. Made the neccesary cuts to help wrap and fold the cover around. I also pealed off the back padding where the vinyl wraps under the armrest to remove some bulk. As it is, even all stapled into place, it will be a tight fit reinstalling the plastic tray. There is nothing I can do about the bulk of the double stiched seams, but for the rest it really made a difference and I only did one side. I'm still considering removing the stock felt too but it is a commitment I am not ready for ;-)
Last edited by Jumperalex; Feb 17, 2011 at 11:29 AM.