


Blue guage cluster


Thread Starter


Joined: Sep 2003
Posts: 1,679
Likes: 0
From: Vancouver, WA
Blue gauge cluster
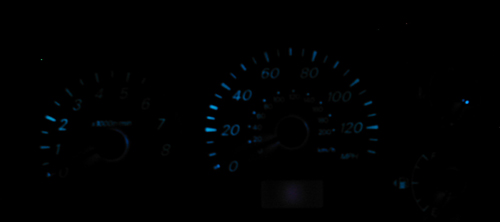
Changed my gauge cluster over to blue with LED's from http://www.superbrightleds.com/cgi-b...gi?product=CAR . To get the light to spread evenly I glued small pieces of paper onto the ends of the LEDs. Sounds horrible, but works pretty decently. I'll get some pics posted soon.


yo
yeah, what type LED's are they? Did you do the work yourself? How long and difficult was it? And ya gotta get some pics. i wanna have my gauges a diff color. i hate the stock color.
<chris>
<chris>
Thread Starter
Joined: Sep 2003
Posts: 1,679
Likes: 0
From: Vancouver, WA
I used the t1.5 LEDs. As for the install, the part that takes the most time is waiting for the glue to dry, if you go that route. If you can come up with a better way to disperse the light, let me know.
If you want actual steps of how to get the gauge cluster out:
1. Remove the two screws holding the black plastic frame aroung the cluster.
2. Remove frame, this takes a little force, or just the right angle. The plastic is fairly flexible though, so don't worry about bending it a little.
3. Remove the two screws holding the cluster in. These are located at the upper right and left edges. To get at the left side a little easier, I pulled out the plastic piece with the mirror control on it.
4. Pull cluster out. Just mess around until you find the right angle to slip it out. Works good fi you rotate the top away from your self. Also, having the mirror control piece popped out helps a lot there too.
5. Dis-connect wiring. This will reset your trip meters, but not the odometer. Press down on the clip and pull out at the same time.
6. Take back cover off of cluster. 4 screws, you'll see them.
7. remove old bulbs, put new in. With the LEDs from suprebrightleds.com they come with a little red sticker on one side. For the backlights of the gauges, put the LEDs in so that this sticker will end up facing the lower side of the cluster, for other LEDs, like the fasten-seatbelt lamp, have the sticker face upwards.
8. Installation - reverse of removal.
If this is a little confusing, let me know and i'll try to set some time aside to take pictures. Also, I'll get the pics of the blue setup, my camera has been acting weird lately, but I'll see if I can get at least one good shot.
If you want actual steps of how to get the gauge cluster out:
1. Remove the two screws holding the black plastic frame aroung the cluster.
2. Remove frame, this takes a little force, or just the right angle. The plastic is fairly flexible though, so don't worry about bending it a little.
3. Remove the two screws holding the cluster in. These are located at the upper right and left edges. To get at the left side a little easier, I pulled out the plastic piece with the mirror control on it.
4. Pull cluster out. Just mess around until you find the right angle to slip it out. Works good fi you rotate the top away from your self. Also, having the mirror control piece popped out helps a lot there too.
5. Dis-connect wiring. This will reset your trip meters, but not the odometer. Press down on the clip and pull out at the same time.
6. Take back cover off of cluster. 4 screws, you'll see them.
7. remove old bulbs, put new in. With the LEDs from suprebrightleds.com they come with a little red sticker on one side. For the backlights of the gauges, put the LEDs in so that this sticker will end up facing the lower side of the cluster, for other LEDs, like the fasten-seatbelt lamp, have the sticker face upwards.
8. Installation - reverse of removal.
If this is a little confusing, let me know and i'll try to set some time aside to take pictures. Also, I'll get the pics of the blue setup, my camera has been acting weird lately, but I'll see if I can get at least one good shot.


Doesn't seem like all that much work...although I really like the red cluster the car comes with, I am certainly interested in detailed instructions and images of the work and finished product.
I look forward to hearing more.
I look forward to hearing more.

Trending Topics


Thread Starter
Joined: Sep 2003
Posts: 1,679
Likes: 0
From: Vancouver, WA
OK, gonna have a few posts now. Correction to above, there are three screws holding the cluster in. Sorry for the mistake. Here's the first picture, camera still wasn't taking good pics, but you can get the general idea. I'll try using my camcorder to get a good pic when I put it back together tonite.
Last edited by twardOZRally; Nov 17, 2004 at 08:32 AM.


Thread Starter
Joined: Sep 2003
Posts: 1,679
Likes: 0
From: Vancouver, WA
Remove the cluster. It helps to pull out the plastice piece holding the mirror controls, and rotate the top of the cluster away from your body. Then wiggle it around till you get the right angle and it slips out.

Last edited by twardOZRally; Nov 17, 2004 at 08:33 AM.
Thread Starter
Joined: Sep 2003
Posts: 1,679
Likes: 0
From: Vancouver, WA
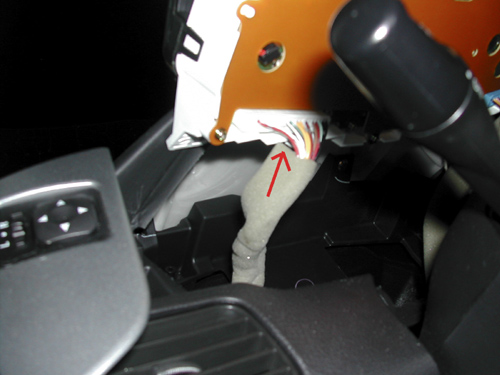
Now disconnect the wiring harnesses, two clips, one white, one blue. On the front (when rotated otherwise top, is a detent in the middle of the harness, press in on that and pull out on the harness at the same time to release.
Last edited by twardOZRally; Nov 17, 2004 at 08:33 AM.