
There is and will never be another Subaru like this...


There is and will never be another Subaru like this...
Hey all. For those that know me (Also known as Bad Wagon) I have been known to do an try things that aren�t �mainstream� to the Nasioc ways but it�s finally time to share my crowning jewel. Many of you have seen my Wagon and love it or hate it, it was one of a kind and it was taken from me by Mother Nature in the form of a strategically placed deer. It has been a while since that fateful night and its now time to show you what I have been working on for the pass year or so. This, its not the same car I had before reincarnated, but a totally new monster so love it or hate I can 100% guarantee that there is and never will be another Subaru like this again.
Let�s start with the Chassis.
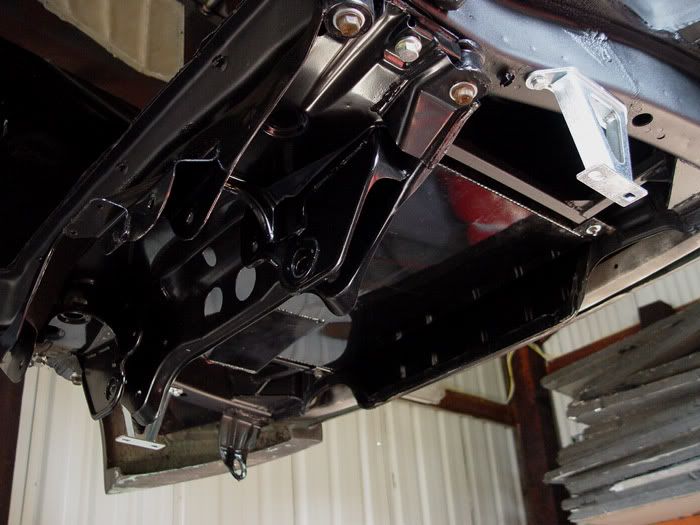
I started by stripping all the stock undercoating off and stitch welded the entire chassis. I know many members feel that this is un-necessary but I did it for added rigidity and it made it to I could shave some weight off the chasses by getting rid of most of the un-needed supports and mounting points so in the end I shaved a good 100lbs off the car. Coated the underside in POR15 and then applied 2 coats of hard rubberized undercoating to keep it light but not defining. Here are a few pics of the end result. The Front frame rails are still cut short so I can make a custom core support for the Intercooler and radiator so we will get to that later. I also took all the crossmembers and seam welded and boxed in all the weak points to help with the all the HP this thing is going to make and then POR15ed those as well.
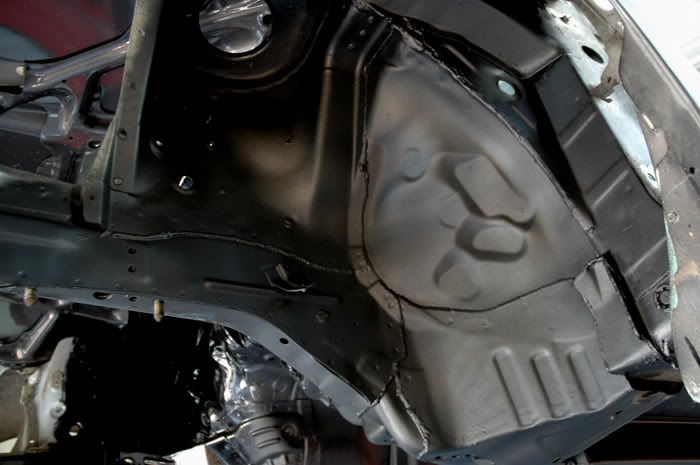
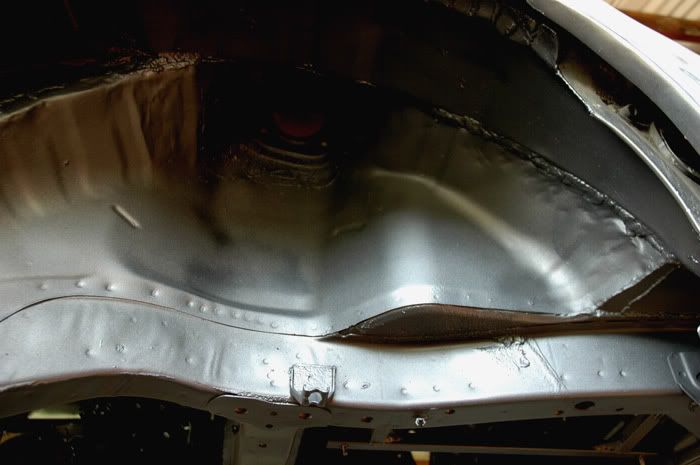
Now that the Chassis is mostly finished we can start assemble of the mountain of parts that�s going to be going into it.
For those that know me, all my cars may be �flashy� or �ricey� or whatever but they were all fast. My old wagon was packing 545whp daily driven and this car is no exception. From a gracious sponsorship from Brian Crower we attained the entire top level product line for this motor.
2.7L Stroker Kit 8:4:1 Compression
Darton Sleaves
1mm Oversized Intake/ Exhaust Valves
Ti Springs/ Retainers
Stage 3 Race Cams
To compliment these parts we added all the best supporting mods�
ARP Crankcase Bolt Kit
ARP Headstud Kit
Cosworth Oil Baffle Plate
Cosworth High Volume Oil Pan
Cosworth Blueprinted High Volume Oil Pump
Cosworth Timing Belt Guide
Cosworth Head Gaskets
Greddy Timing Belt
Machine work was done by Dan Benson who�s very well known for his sleaving. He bored, and balanced the entire rotating assy for 9000 rpm rev limit which is great for a 2.7L. Also fully Ported the heads with a like 20 angle Valve Job.
After the Block came it was given to the pros at PIA for assembly. They did a great job putting the long block together for us and it will be returning for Tim @ Surgeline Tuning to dial it in on the dyno.
So now on to the supporting mods. Currently we only have enough fuel and a turbo to make 650ish whp so when I get more funds will put the big boy turbo (or twin!?!) in and punch out the target goal of 850whp. We are going to run Direct port Meth injection using the AUX Injector ports in some APS tumbler deletes and a direct port nitrous kit in the intake manifold for extra fuel so we might be able to squeeze more out.
So far this is what we have (many of these parts are from the old Wagon):
Engine:
Agency Power Crank Pulley
Unorthodox P/S Pulley
Unorthodox Alternator Pulley
NGK Iridium Plugs
Cusco Motor Mounts
P&L SS AVCS Lines
P&L SS P/S Line
Fuel:
Aeromotive 20gal Fuel Cell
Aeromotive A1000 Fuel Pump
Aeromotive High Volumn Fuel Rails
Aeromotive Fuel Regulator
X2 Walbro Inline Helper Pumps
Custom 5lt Surge Tank
Full Russell Fittings/ Hardlines
RC1400cc Injectors
Turbo/ Intake/ Exhaust:
Turbonetics GTK650 Turbo
Tial 44mm Wastegate
Turbo XS Externally Gated Up-pipe
Turbo XS TMIC Core
GTspec V2 Header
Custom Rotated Turbo Pipe
Custom Down-Pipe
Custom Exhaust
X2 Magnaflow Race Mufflers
Custom Intercooler Piping
PnT High Flow Intake Manifold
Custom Billet 75mm Throttle Body
APS Tumbler Deletes
Agency Power Phenelic Spacers
Electronics/ Meth/ Nitrous:
AEM Stand Alone EMS
Custom AEM Direct Port Methanol Injection Kit
NX Express Direct Port Nitrous Kit
NX Express Intercooler Sprayer
AEM Uego Wideband Gauge
AEM Tru-Boost Boost Controller
AEM Digital Volts Gauge
AEM Digital Oil Pressure Gauge
AEM Digital Oil Temp Gauge
AEM Digital Water Temp Gauge
AEM Digital Fuel Pressure Gauge
Okay on with the Assembly!!!!!
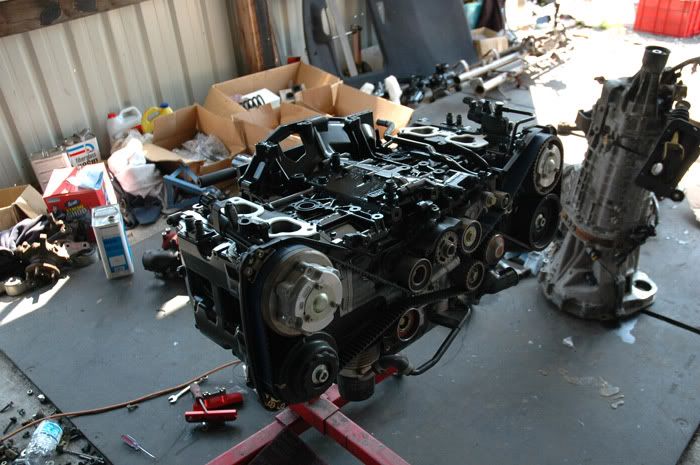
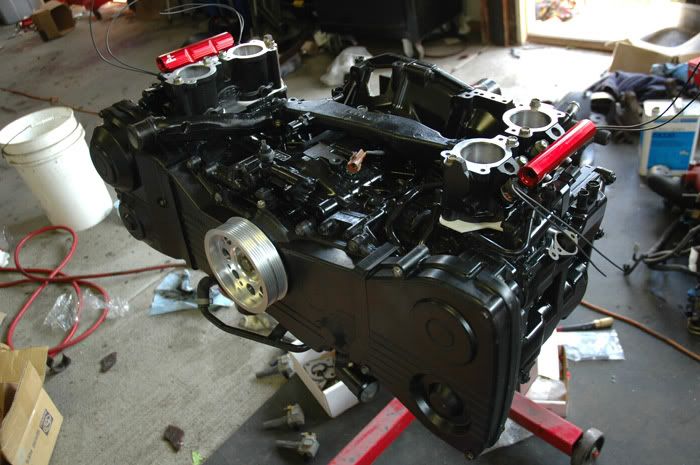
For starters I coated the engine in a nice flat black engine coating to give it a different look. I want to showcase the performance parts installed on top it. I am starting with wiring and fuel.
Installed the tumblers, injectors and taped the aux ports for the water/meth nozzles. Now its time to hard-line fun! I decided to go hardlines because I can keep things much tight and better secured. Got all the Russell fittings and hose at TH Motorsports and the prices were great. A+ to TH for Hooking me up! Pics of the finished fuel system on Friday! I am on a very tight schedule so I will have progress pics every Friday and Monday.
Johann @ Girodisc
Let�s start with the Chassis.
I started by stripping all the stock undercoating off and stitch welded the entire chassis. I know many members feel that this is un-necessary but I did it for added rigidity and it made it to I could shave some weight off the chasses by getting rid of most of the un-needed supports and mounting points so in the end I shaved a good 100lbs off the car. Coated the underside in POR15 and then applied 2 coats of hard rubberized undercoating to keep it light but not defining. Here are a few pics of the end result. The Front frame rails are still cut short so I can make a custom core support for the Intercooler and radiator so we will get to that later. I also took all the crossmembers and seam welded and boxed in all the weak points to help with the all the HP this thing is going to make and then POR15ed those as well.
Now that the Chassis is mostly finished we can start assemble of the mountain of parts that�s going to be going into it.
For those that know me, all my cars may be �flashy� or �ricey� or whatever but they were all fast. My old wagon was packing 545whp daily driven and this car is no exception. From a gracious sponsorship from Brian Crower we attained the entire top level product line for this motor.
2.7L Stroker Kit 8:4:1 Compression
Darton Sleaves
1mm Oversized Intake/ Exhaust Valves
Ti Springs/ Retainers
Stage 3 Race Cams
To compliment these parts we added all the best supporting mods�
ARP Crankcase Bolt Kit
ARP Headstud Kit
Cosworth Oil Baffle Plate
Cosworth High Volume Oil Pan
Cosworth Blueprinted High Volume Oil Pump
Cosworth Timing Belt Guide
Cosworth Head Gaskets
Greddy Timing Belt
Machine work was done by Dan Benson who�s very well known for his sleaving. He bored, and balanced the entire rotating assy for 9000 rpm rev limit which is great for a 2.7L. Also fully Ported the heads with a like 20 angle Valve Job.
After the Block came it was given to the pros at PIA for assembly. They did a great job putting the long block together for us and it will be returning for Tim @ Surgeline Tuning to dial it in on the dyno.
So now on to the supporting mods. Currently we only have enough fuel and a turbo to make 650ish whp so when I get more funds will put the big boy turbo (or twin!?!) in and punch out the target goal of 850whp. We are going to run Direct port Meth injection using the AUX Injector ports in some APS tumbler deletes and a direct port nitrous kit in the intake manifold for extra fuel so we might be able to squeeze more out.
So far this is what we have (many of these parts are from the old Wagon):
Engine:
Agency Power Crank Pulley
Unorthodox P/S Pulley
Unorthodox Alternator Pulley
NGK Iridium Plugs
Cusco Motor Mounts
P&L SS AVCS Lines
P&L SS P/S Line
Fuel:
Aeromotive 20gal Fuel Cell
Aeromotive A1000 Fuel Pump
Aeromotive High Volumn Fuel Rails
Aeromotive Fuel Regulator
X2 Walbro Inline Helper Pumps
Custom 5lt Surge Tank
Full Russell Fittings/ Hardlines
RC1400cc Injectors
Turbo/ Intake/ Exhaust:
Turbonetics GTK650 Turbo
Tial 44mm Wastegate
Turbo XS Externally Gated Up-pipe
Turbo XS TMIC Core
GTspec V2 Header
Custom Rotated Turbo Pipe
Custom Down-Pipe
Custom Exhaust
X2 Magnaflow Race Mufflers
Custom Intercooler Piping
PnT High Flow Intake Manifold
Custom Billet 75mm Throttle Body
APS Tumbler Deletes
Agency Power Phenelic Spacers
Electronics/ Meth/ Nitrous:
AEM Stand Alone EMS
Custom AEM Direct Port Methanol Injection Kit
NX Express Direct Port Nitrous Kit
NX Express Intercooler Sprayer
AEM Uego Wideband Gauge
AEM Tru-Boost Boost Controller
AEM Digital Volts Gauge
AEM Digital Oil Pressure Gauge
AEM Digital Oil Temp Gauge
AEM Digital Water Temp Gauge
AEM Digital Fuel Pressure Gauge
Okay on with the Assembly!!!!!
For starters I coated the engine in a nice flat black engine coating to give it a different look. I want to showcase the performance parts installed on top it. I am starting with wiring and fuel.
Installed the tumblers, injectors and taped the aux ports for the water/meth nozzles. Now its time to hard-line fun! I decided to go hardlines because I can keep things much tight and better secured. Got all the Russell fittings and hose at TH Motorsports and the prices were great. A+ to TH for Hooking me up! Pics of the finished fuel system on Friday! I am on a very tight schedule so I will have progress pics every Friday and Monday.
Johann @ Girodisc
Well I worked late into the night and got the hardlines done a day early. Used a 10an to 2 8an Y block mounted to the engine and ran 8an or 1/2" hardline through the Aeromotive rails to the Aeromotive Regulator where I am running a 6an return. I had to grind down the APS Tumbers to fit the giant RC injectors but I mad it work and when the rails needed spacers to fit them so its pretty cramped.
Here are the Hardlines, everything came out really nice and its going to make for a nice sturdy point to attach my wiring too. The rearward line looks goofy in the pics but it drops down and then s curves though the blocks breather lines. I have made sure to clear all the ports I need and if you look where the lines enter and exit its all over the tranny. Everything that comes off the engine will come off over the tranny and there will be nothing in the engine bay but engine, intercooler pipes and a monster turbo.
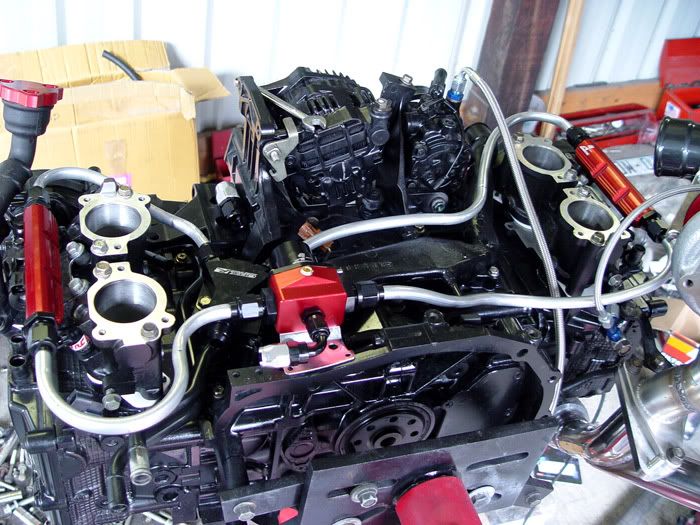
I had an old Stock A/C Pump to check clearence on the forward drivers side line but I have one of the new smaller 09 WRX A/C pumps coming so it should fit nicely. Got the stock wiring harness de-loomed so I can set it in and move everything around so it goes where it should always have gone. I'll have pics of those Monday. The Turbo was pre-installed to check clearance but I took it back off to do the wiring and I still need gaskets so I'll have pics of the turbo back on soon.
Johann @ Girodsic
Here are the Hardlines, everything came out really nice and its going to make for a nice sturdy point to attach my wiring too. The rearward line looks goofy in the pics but it drops down and then s curves though the blocks breather lines. I have made sure to clear all the ports I need and if you look where the lines enter and exit its all over the tranny. Everything that comes off the engine will come off over the tranny and there will be nothing in the engine bay but engine, intercooler pipes and a monster turbo.
I had an old Stock A/C Pump to check clearence on the forward drivers side line but I have one of the new smaller 09 WRX A/C pumps coming so it should fit nicely. Got the stock wiring harness de-loomed so I can set it in and move everything around so it goes where it should always have gone. I'll have pics of those Monday. The Turbo was pre-installed to check clearance but I took it back off to do the wiring and I still need gaskets so I'll have pics of the turbo back on soon.
Johann @ Girodsic
On on with the wiring. De-loomed the harness and re-routed it a little. Cut out all the emotions bull**** and now we have a much leaner better setup. I am running all the connections over the tranny to keep the engine bay as clean as possible and it will help with servicing.
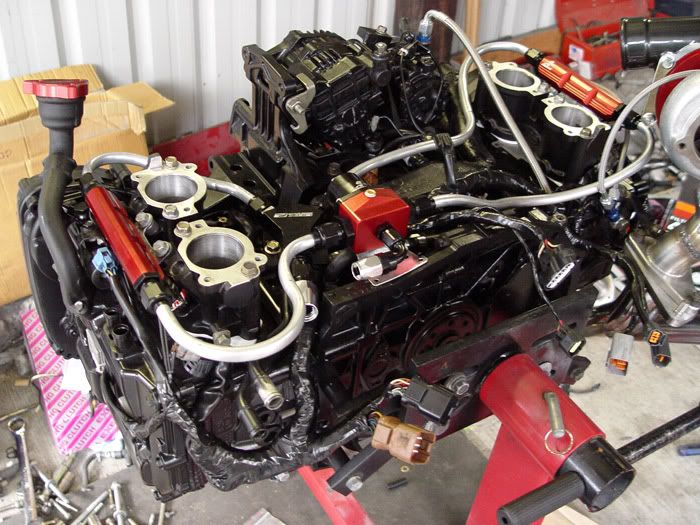
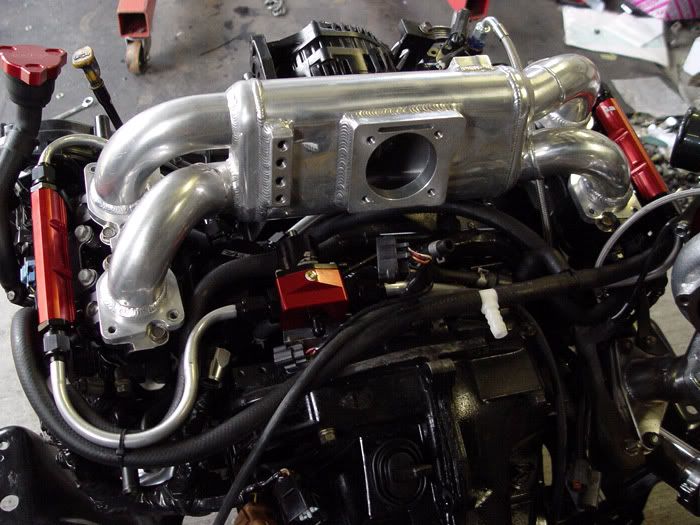
Now we�ll start slapping on the header and the TURBO!!!!!! I added some more welds to the Header to hopefully hold the boost and the heat better. Put the up-pipe on and modified the stock bracket to be sturdier so it can hold that monster turbo up. Lightly installed the Tial gate and dump tube and now turbo time. Turbo XS up-pipe is nice because it�s built to house the 44mm Tial gate and as I said before I modified the upper piece to better suit the build. If it shows as a weak point I�ll redo it to be all one piece but the weld on it are nice and the wall thickness is good. The DP had a weird 3 bolt flange on it and since I moved the up-pipe it�s worthless so I am going to make a new one. I won�t weld it ill I get the tranny attached to the block and mount the car so I can get proper fitment. Also I wanted to start from scratch because my whole exhaust will be V-Bands!!!
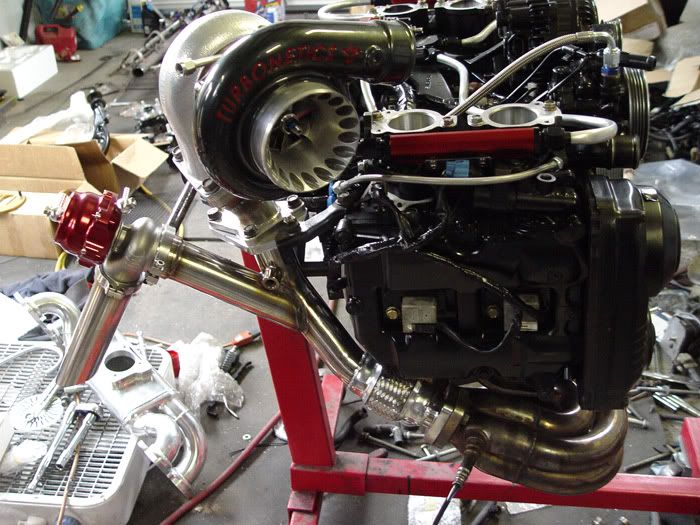
Oh and here is one more with the intake manifold set on there. Look at the size of the throttle body port. mmmmm 70mm aaaghaagaha....
Now we�ll start slapping on the header and the TURBO!!!!!! I added some more welds to the Header to hopefully hold the boost and the heat better. Put the up-pipe on and modified the stock bracket to be sturdier so it can hold that monster turbo up. Lightly installed the Tial gate and dump tube and now turbo time. Turbo XS up-pipe is nice because it�s built to house the 44mm Tial gate and as I said before I modified the upper piece to better suit the build. If it shows as a weak point I�ll redo it to be all one piece but the weld on it are nice and the wall thickness is good. The DP had a weird 3 bolt flange on it and since I moved the up-pipe it�s worthless so I am going to make a new one. I won�t weld it ill I get the tranny attached to the block and mount the car so I can get proper fitment. Also I wanted to start from scratch because my whole exhaust will be V-Bands!!!
Oh and here is one more with the intake manifold set on there. Look at the size of the throttle body port. mmmmm 70mm aaaghaagaha....
Now we�re going to take a brake from engine and move on to the Suspension and Drivetrain. Got the new 05 STi Hubs assembled and pressed so all we need to do it slap everything in. Here�s the menu:
Transmission/ Drivetrain:
JDM Ver 7 RA Spec C Close Ratio 6mt
Exedy Tripple Plate Clutch
Custom Carbon Driveshaft
Agency Power SS Clutch Line
Agency Power Billet Pitch Stop
Cusco Tranny Mount
Kartboy Tranny X-Member Bushings
Whiteline Crosmember Lock Down Kit
Stance Hard Diff Bushings
Stance Forward Hard Crossmember Bushings
Agency Power Short Kift Kit
Kartboy Front Shifter Bushings
Kartboy Rear Shifter Bushings
Suspension:
Stance GR+Pro Coilovers
Agency Power Front Sway Bar
Agency Power Rear Sway Bar
Agency Power Front Endlinks
Agency Power Rear Endlinks
Agency Power Adjustable Control Arms
Painted Cusco Adjustable Lateral Links
Perrin PSRS
GT Spec 3pc Crossmember Brace
GT Spec Front Latter Brace
GT Spec Rear 4pc Latter Brake
GT Spec Fender Brake
GT Spec Rear Crossmember Brace
GT Spec Front Strut Bar
GT Spec Rear Strut Bar
GT Spec Rear Trunk Brace
update time WOOOOOO!
*
I have decided it would be easier if I assembled the engine and tranny to their crossmembers on the floor and then lower the car onto them so everything gets put in, in one fowl swoop. So now its time to take the engine off its stand and bolt it to the tranny but before the Exedy triple disc much go on.
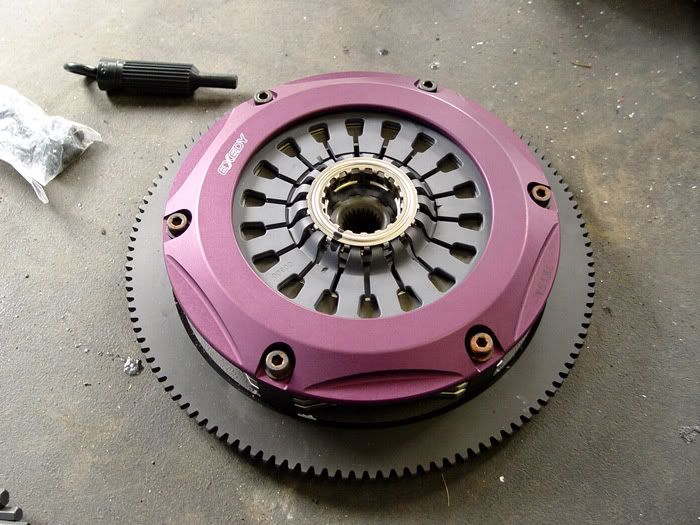
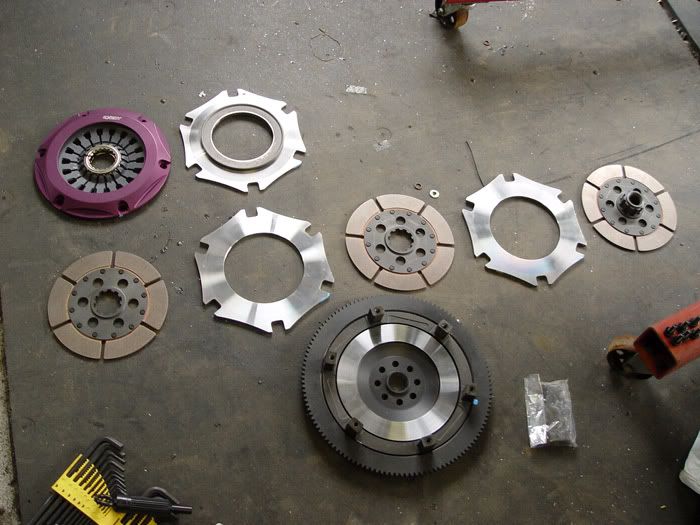
Now putting on this ridiculous Exedy Triple Plate clutch�. (MONTAGE!!!!!)
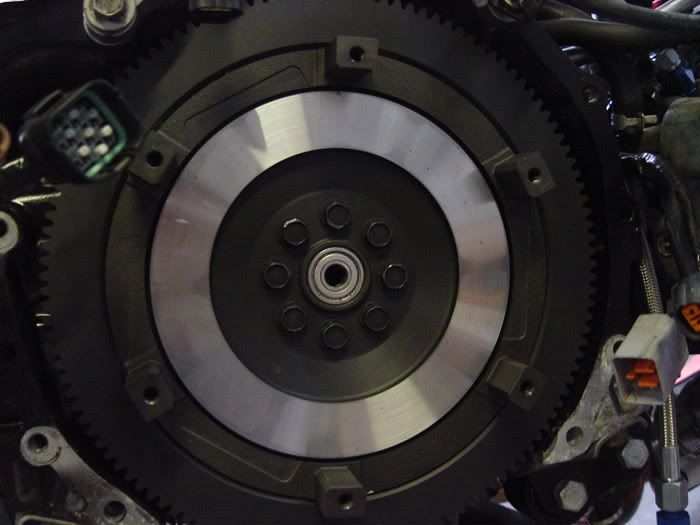
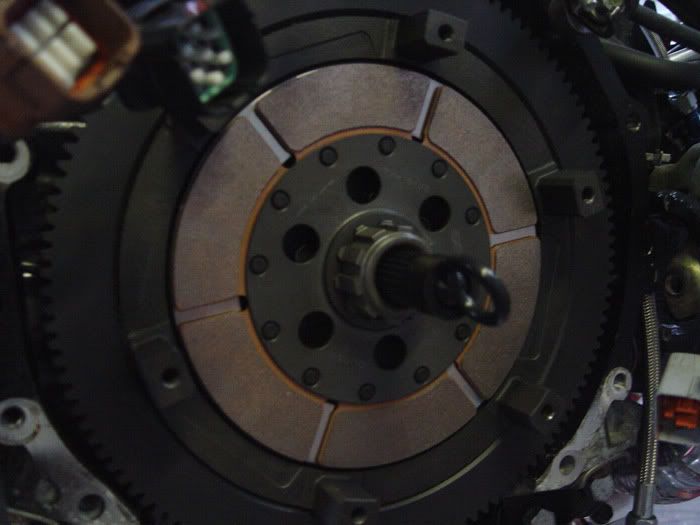
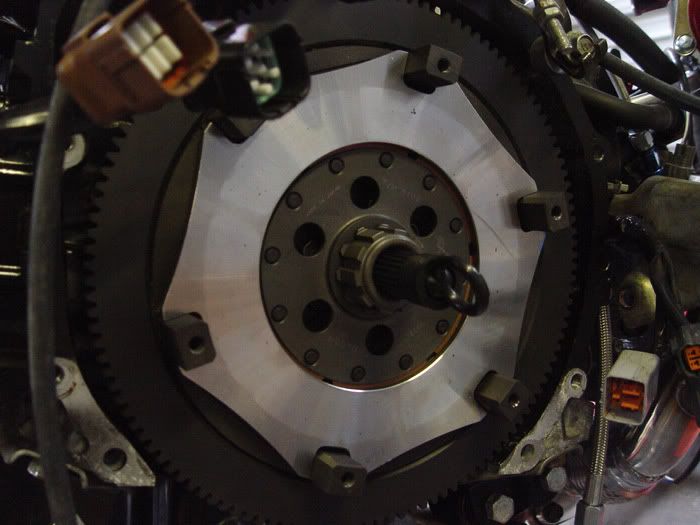

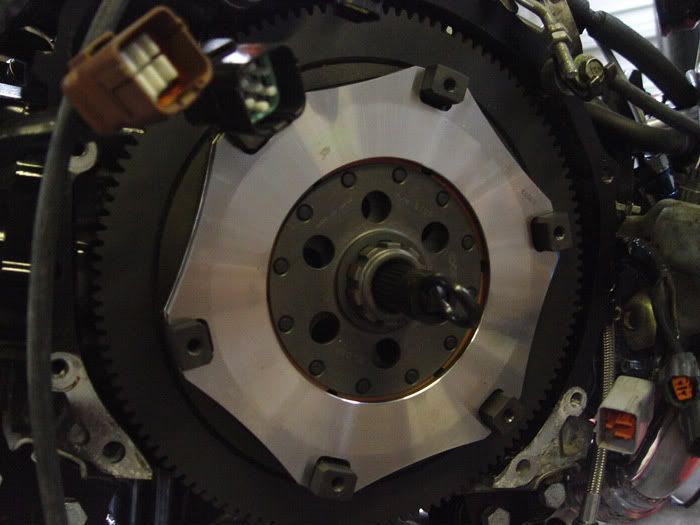
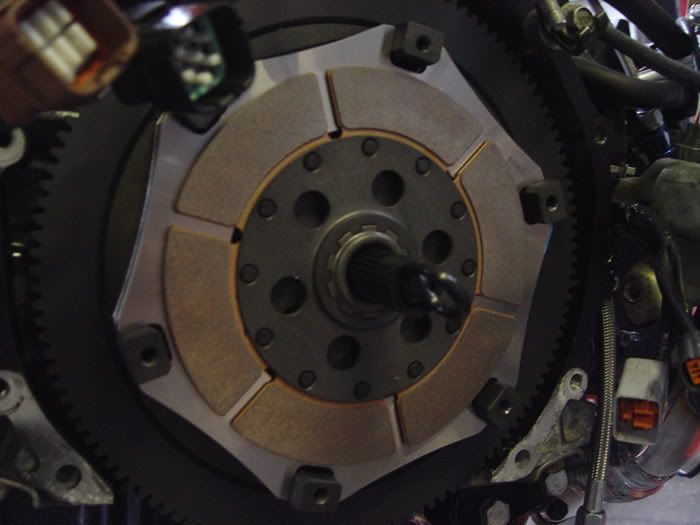
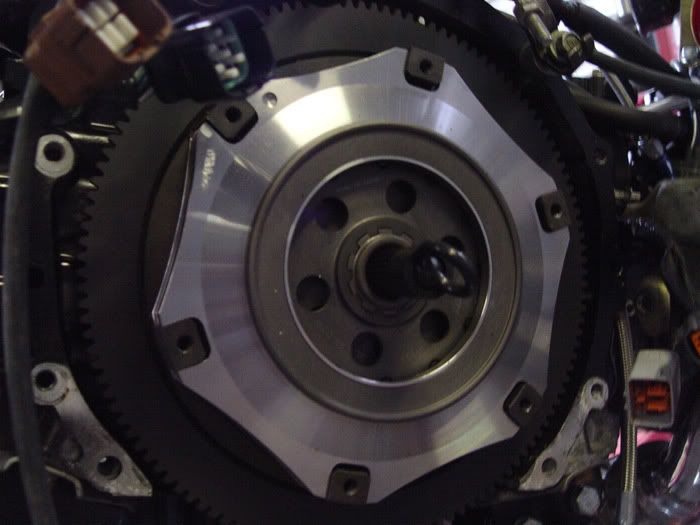
Johann
*
I have decided it would be easier if I assembled the engine and tranny to their crossmembers on the floor and then lower the car onto them so everything gets put in, in one fowl swoop. So now its time to take the engine off its stand and bolt it to the tranny but before the Exedy triple disc much go on.
Now putting on this ridiculous Exedy Triple Plate clutch�. (MONTAGE!!!!!)
Johann
And finally the tranny (also painted black w/ engine coating)
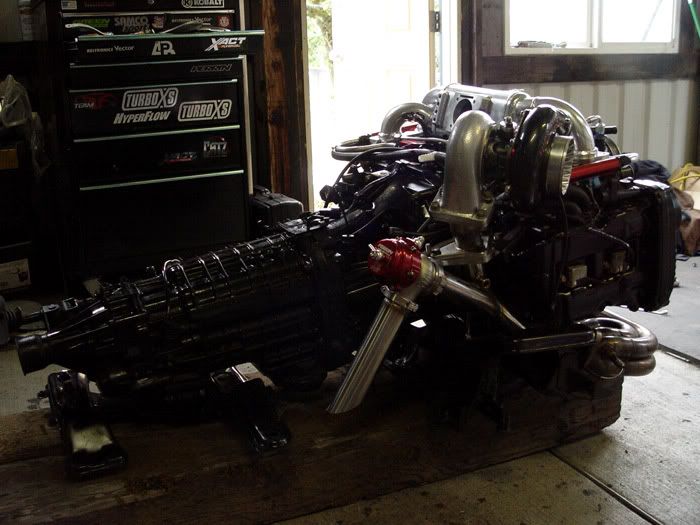
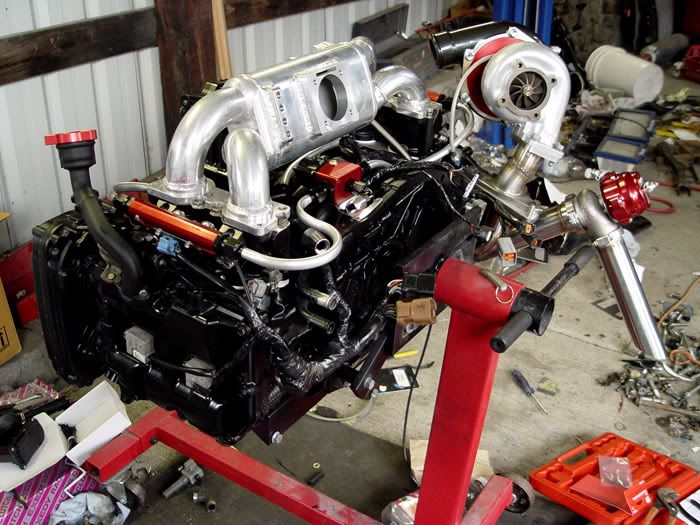
Now comes the fun part lowering the body on the drive train. I pre-set the crossmembers before bolting the engine to them. All we have to do is slowly lower the car on the crossmembers start all the bolts lift it up a smidge and gun them home. Everything is ready to install the engine but before I bolt it up I did a few more things now that I could like up the engine with the holes in the firewall so I did the breather lines and installed the rails and wiring harness for good.
So the next step is to get it in and start on the exhaust and fab up my new core support. Very huge milestone to finally have the einge back in the car since test fitting a year ago. I really had some doubts that I would get to this point but here we are. Everybody have a beer tonight and celebrate with me!
Johann
Trending Topics
Evolving Member
Joined: Feb 2005
Posts: 150
Likes: 0
From: south colton
Good job using Dan Benson for the machine work. He did a lot of motors for me when I was in the evo and dsm scene. His work is unparalleled. Do you have contact info for him? When I deployed to Iraq I lost his number. I plan on building another evo one of these days and I would like to have him do the machine work for me. PM me if you want I know he is semi reitred now and has left southern california.


 haha
haha
