
DIY: AMS Intercooler and UICP

DIY: AMS Intercooler and UICP
Here's a quick how-to for installing the AMS FMIC and UICP.
The method is very similar to that used for installing an Evo X FMIC and UICP, as posted in another How-To thread, so I'll keep it quick.
Since I was asked to make this after the job was done, I have limited pics. Just follow the directions
1. Remove front bumper.
a) Remove snorkel - remove 2 screw clips, pull the snorkel up.
b) Remove radiator cover - 3 snaps
c) Remove bumper - 5 bolts on top, 5 on bottom, 2 screws from each wheel well side, 4 clips from under bumper, 2 screw clips from each wheel well, 2 bolts in front grille. Disconnect the fog light connector, located below the hood latch.
To release the bumper from each wheel well corner, pull the bumper down to release it from the clip that holds it there.
2. Remove stock UICP and FMIC. Unscrew the UICP's worm clamps and remove the two bolts holding it to the rad support. Pull the pipe off the FMIC and turbo up pipe.
Unbolt the FMIC from it's support bracket, 2 bolts. Pull the hangers off. Unscrew the worm clamp connecting it to the LICP. Pull out the FMIC. Unbolt the FMIC support bracket and remove it.
3. a) Attach FMIC and UICP. For the FMIC, attach the hangers, and bolt the FMIC to the bolt points for the stock FMIC support bracket. These bolts are somewhat annoying to put in if you have big hands. Girly man hands will have no issues. If you have man hands, a ratcheting wrench makes your life easy.
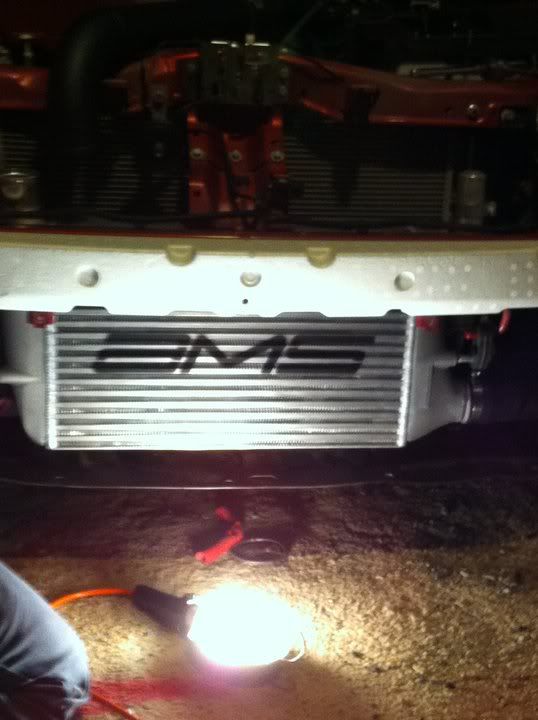
Connect the FMIC to the LICP with the supplied coupler, it's the short tapering one. Connect the tapered side to the LICP. Tighten worm clamps.
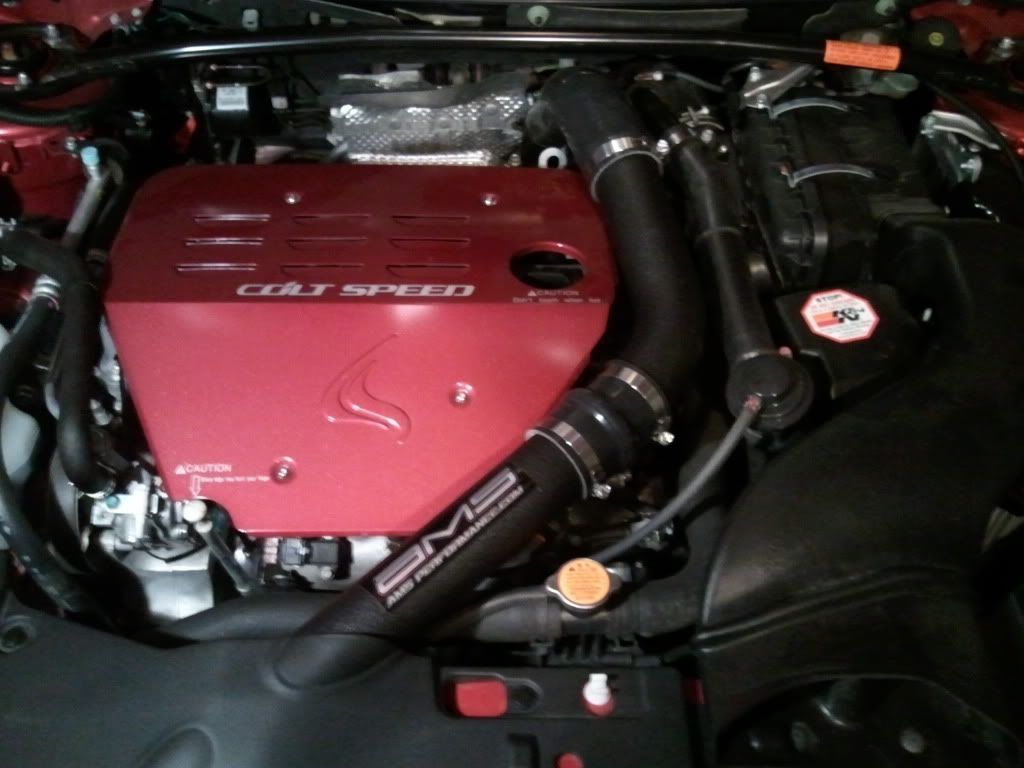
b) For the UICP, mock up the pipes and couplers before tightening, to check clearance and fitment.
The long tapered hose connects the short pipe to the turbo outlet.
The short coupler with the bulge in it connects the bent side of the short pipe to the long pipe.
The last coupler, a longer straight coupler, connects the long pipe to the FMIC.
Bolt the long pipe to the rad support in the factory position, then tighten the worm clamps on all the couplers.
4. Re-install bumper, rad cover, snorkel. Installation is the reverse of removal.
The method is very similar to that used for installing an Evo X FMIC and UICP, as posted in another How-To thread, so I'll keep it quick.
Since I was asked to make this after the job was done, I have limited pics. Just follow the directions
1. Remove front bumper.
a) Remove snorkel - remove 2 screw clips, pull the snorkel up.
b) Remove radiator cover - 3 snaps
c) Remove bumper - 5 bolts on top, 5 on bottom, 2 screws from each wheel well side, 4 clips from under bumper, 2 screw clips from each wheel well, 2 bolts in front grille. Disconnect the fog light connector, located below the hood latch.
To release the bumper from each wheel well corner, pull the bumper down to release it from the clip that holds it there.
2. Remove stock UICP and FMIC. Unscrew the UICP's worm clamps and remove the two bolts holding it to the rad support. Pull the pipe off the FMIC and turbo up pipe.
Unbolt the FMIC from it's support bracket, 2 bolts. Pull the hangers off. Unscrew the worm clamp connecting it to the LICP. Pull out the FMIC. Unbolt the FMIC support bracket and remove it.
3. a) Attach FMIC and UICP. For the FMIC, attach the hangers, and bolt the FMIC to the bolt points for the stock FMIC support bracket. These bolts are somewhat annoying to put in if you have big hands. Girly man hands will have no issues. If you have man hands, a ratcheting wrench makes your life easy.
Connect the FMIC to the LICP with the supplied coupler, it's the short tapering one. Connect the tapered side to the LICP. Tighten worm clamps.
b) For the UICP, mock up the pipes and couplers before tightening, to check clearance and fitment.
The long tapered hose connects the short pipe to the turbo outlet.
The short coupler with the bulge in it connects the bent side of the short pipe to the long pipe.
The last coupler, a longer straight coupler, connects the long pipe to the FMIC.
Bolt the long pipe to the rad support in the factory position, then tighten the worm clamps on all the couplers.
4. Re-install bumper, rad cover, snorkel. Installation is the reverse of removal.
Last edited by SudzRA; May 18, 2011 at 09:47 AM.

I used the OEM LICP at this point. The AMS LICP does not fit properly, since it's an Evo X LICP. The LICP for the Evo X and RA are a bit different due to the fact that the diverter valves are not at the same place, so swapping one for the other will take some doing. Look into the Ultimate Racing RA LICP. Works great
I also know it's easy to do the install the EVO intercooler so if I go with the EVO AMS intercooler would I have to go with the AMS LICP? Just wondering since both the Ralliart AMS IC and they EXO X AMS IC are the same price.

https://www.evolutionm.net/forums/09...g-your-ra.html
And here:
https://www.evolutionm.net/forums/09...rbo-swaps.html

Thread
Thread Starter
Forum
Replies
Last Post
velocityhead
09+ Ralliart How-To/Installations
246
Jun 1, 2018 02:22 PM