
apr rear diffuser for usdm evo help


Thread Starter
Evolving Member
iTrader: (2)
Joined: Jul 2005
Posts: 147
Likes: 0
From: SoCal, CHEEENOH
apr rear diffuser for usdm evo help
ok i have everything set, including drill bit and everything but the directions apr gave me are sorta vague. i think my rear bumper may be warped but its not sitting flush. ill post pics up soon so maybe someone can chime in whoever has it installed already. thanks!
mods please move to proper topic. im in a rush
mods please move to proper topic. im in a rush
Thread Starter
Evolving Member
iTrader: (2)
Joined: Jul 2005
Posts: 147
Likes: 0
From: SoCal, CHEEENOH
well i took off the 2 bolts off the rear subframe and when i tried to align the diffuser, the diffuser would hang to the left side of the exhaust cut out on the rear bumper. i tried moving it around but i got the same result. i decided just go to apr themselves to get it done since they live 10 minutes away from me. hopefully all goes well. other than that, this piece is very nice. if the holes came predrilled on the diffuser, the install wouldve been so much easier.
Trending Topics
Originally Posted by silver 1
i just did mine in the garage... not to bad, about 3 hours taking my time:
Anyway, I LOVE it!
Check out some ****ty, 12am shots of it:

Anyway, I LOVE it!
Check out some ****ty, 12am shots of it:

What lip spoiler is that on your decklid? It would look nice on my rs.


Subscribed! What tools are required to do the installation? Are jackstands sufficient or is a lift required? I vote we use this as the main install FAQ thread and let's see your Evo's sexy black a$$!!!
Last edited by Turd Squirter; Oct 7, 2006 at 12:58 PM.

Newbie
Joined: Jul 2006
Posts: 6
Likes: 0
From: So Cali - Mission Viejo
Here is a pretty quick and dirty How-To:
Jack
Jack stands
17mm socket, and 1/2 ratchet
Allen (cant remember size)
Wrench (cant remember size)
Blue Painters Tape
1) Jack the rear of car up and set down level on jack stands. It does NOT have to be very high off the ground, just enough to remove the rear wheels.
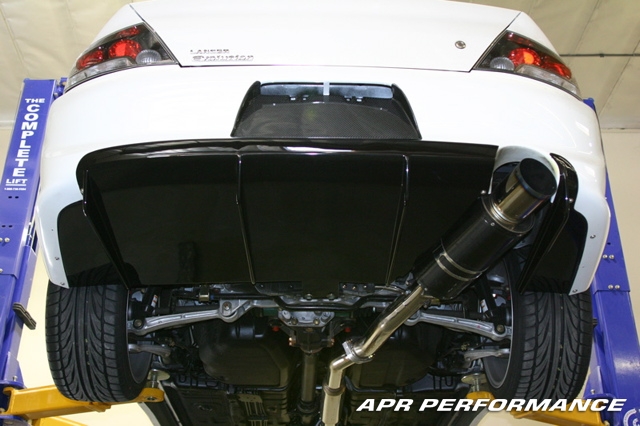
2) Unbolt the two 17mm Rear Subframe bolts, and place the rear diffuser on the car and reinstall the Rear Subframe bolts. Use tape (blue), to help hold the large diffuser up until the other steps are complete.
3) Make sure the underside of the Rear Diffuser is tucked over the inside of rear bumper, this sounds confusing until you are looking at it...
4) Tape the underside of rear bumper and measure according to APR's directions
5) Drill the 6 holes (3 per side), using a bit about the same size as the provided bolts (NOT much bigger).
5) Start installing the bolts and nuts (driver�s side), using washers on both sides (this is why I removed the rear wheels, as it is much easier to reach with the inner fender apart.
5) Test fit the passenger side portion (attached using blue tape to get it in the correct location)
6) Do the same tapping and measuring on the passenger side.
7) Drill and attached same as driver side.
8) Drill one hole on the small passenger side diffuser by the exhaust (see APRs picture)
9) Drill one hole on the very left of the diffuser at bumpers corner on drivers side (see APRs picture)
10) Drill one hole on the large diffuser by the exhaust (see APRs picture)
11) Attached the provided adj rods to the METAL inner fender, you can drill a small hole for this.
12) Go back and check ALL bolts, nuts, and TRIPPLE CHECK the Subframe bolts, make sure they are TIGHT.
13) Lower car, recheck Subframe bolts, and enjoy.
*This is just what I did, I don�t work for a shop, don�t work for APR, and really have no idea what I am doing. You can use this help if you want, but I am not responsible for anything you do to your own car- good luck*
Took me a little over 3 hours, taking my time and making certain everything was perfect. I had come buddies over so it was pretty fun. I LOVE it. Daytime full car shots to come....
Ask away!
Jack
Jack stands
17mm socket, and 1/2 ratchet
Allen (cant remember size)
Wrench (cant remember size)
Blue Painters Tape
1) Jack the rear of car up and set down level on jack stands. It does NOT have to be very high off the ground, just enough to remove the rear wheels.
2) Unbolt the two 17mm Rear Subframe bolts, and place the rear diffuser on the car and reinstall the Rear Subframe bolts. Use tape (blue), to help hold the large diffuser up until the other steps are complete.
3) Make sure the underside of the Rear Diffuser is tucked over the inside of rear bumper, this sounds confusing until you are looking at it...
4) Tape the underside of rear bumper and measure according to APR's directions
5) Drill the 6 holes (3 per side), using a bit about the same size as the provided bolts (NOT much bigger).
5) Start installing the bolts and nuts (driver�s side), using washers on both sides (this is why I removed the rear wheels, as it is much easier to reach with the inner fender apart.
5) Test fit the passenger side portion (attached using blue tape to get it in the correct location)
6) Do the same tapping and measuring on the passenger side.
7) Drill and attached same as driver side.
8) Drill one hole on the small passenger side diffuser by the exhaust (see APRs picture)
9) Drill one hole on the very left of the diffuser at bumpers corner on drivers side (see APRs picture)
10) Drill one hole on the large diffuser by the exhaust (see APRs picture)
11) Attached the provided adj rods to the METAL inner fender, you can drill a small hole for this.
12) Go back and check ALL bolts, nuts, and TRIPPLE CHECK the Subframe bolts, make sure they are TIGHT.
13) Lower car, recheck Subframe bolts, and enjoy.
*This is just what I did, I don�t work for a shop, don�t work for APR, and really have no idea what I am doing. You can use this help if you want, but I am not responsible for anything you do to your own car- good luck*
Took me a little over 3 hours, taking my time and making certain everything was perfect. I had come buddies over so it was pretty fun. I LOVE it. Daytime full car shots to come....
Ask away!
Last edited by silver 1; Oct 7, 2006 at 01:34 PM.