
02 Housing Install w/pics

02 Housing Install w/pics
There are a few ways to do this. If you are set on NOT removing the manifold you can split the turbo in half on the car by removing the hotside with the 02 housing attached and then do the 02 housing on a bench. I was going to do this but I decided to take the manifold off instead.
Tools needed:
12mm socket & open wrench
14mm socket & open wrench (It�s nice if you have a ratcheting 14mm wrench also)
17mm socket & open wrench
22mm open wrench (02 Sensor)
Different size extensions
Swivel sockets or a universal
Philips head screw driver
Breaker Bar
Drop light
Telescopic Magnet really helps to not lose the washers during the manifold removal
WD40, PB Blaster, Liquid Wrench�Pick one
Remove the plastic undertray first. These little screw clips can be a real pain in the a**. A philips head screw driver with a dexterity works, but a screw gun works better.
Downpipe Removal:
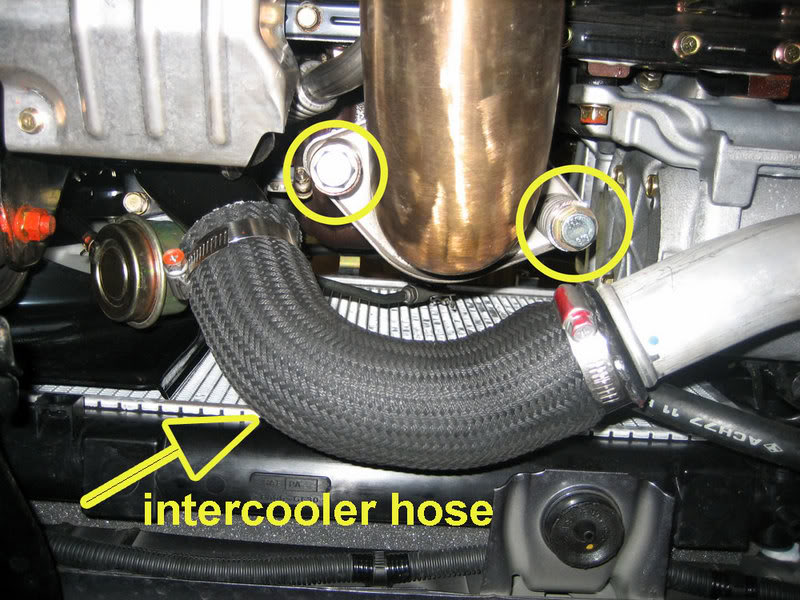
If you have an extra jack stand, set it up under the catback section so its not just hanging after you remove the downpipe. Disconnect the DP from your cat/testpipe and remove the two 12mm screws from the exhaust hangers holding it up. Now disconnect the two 17mm spring bolts connecting the downpipe to the 02 housing. The down pipe will be free now being held up by the two lower arm bars. Tale off the lower arm bars and remove the downpipe. Before you proceed, make sure you remove the bracket holding the factory 02 Housing to the motor.
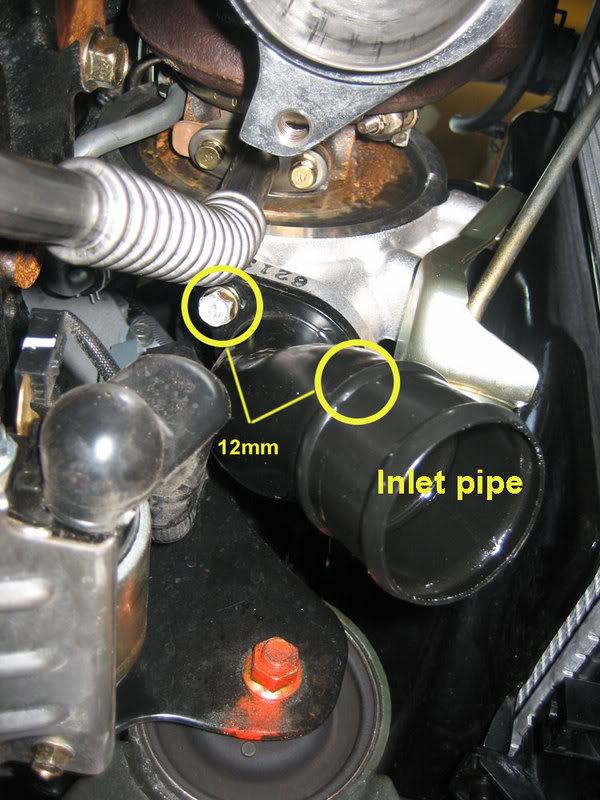
Remove the flex section of the lower intercooler hose. This will allow you a little more room to work. I also removed the inlet pipe off the turbo. Just be carefull when putting it back together. The one screw is a little tough to get started. You don�t want to cross thread it

Manifold Removal:
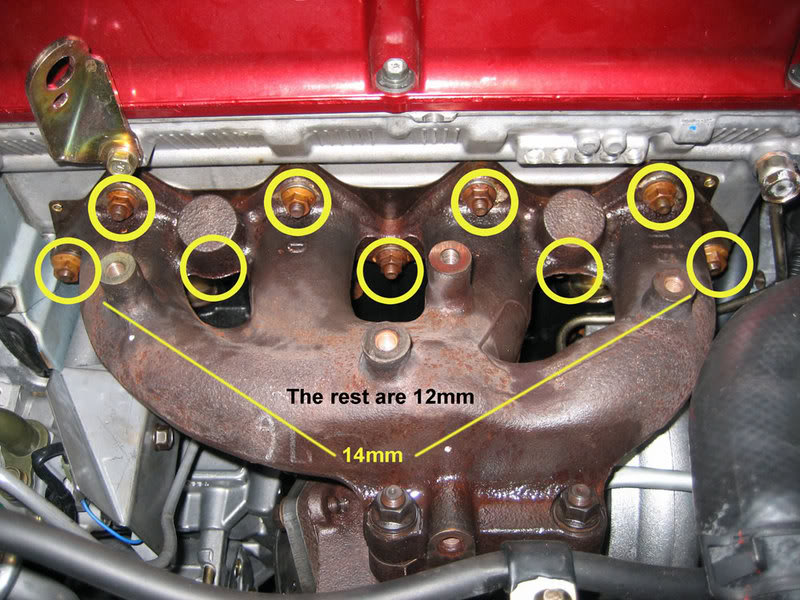
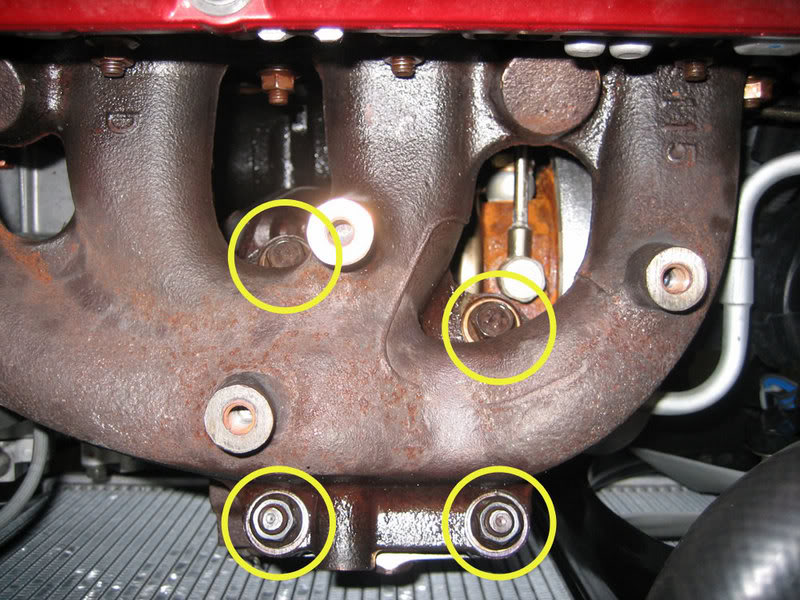
Make sure you soak these nuts and bolts. Remove the heat shield. Remove the 9 nuts holding the manifold to the head. (the 2 outers are 14mm, the 7 inners are 12mm) Remove the 2 nuts and 2 studs (14mm) from the manifold to the turbo. Now your downpipe is off and the manifold is disconnected from the head. Now push down on the turbo a little bit and wiggle the manifold off.
02 Housing Removal: Now that you have more room to work. Take out your 02 sensor from the 02 Housing. Remove the lower heat shield. The top three studs you can get from the top pretty easily. The bottom two are nuts though. You will have to get to these from under the car.
Now go ahead and reinstall in the reverse order. Be careful when putting the inlet pipe back on the turbo. Mine wasn�t on tight enough and produced a huge boost leak. Try to tighten each side equally to avoid boost leaks.
Tools needed:
12mm socket & open wrench
14mm socket & open wrench (It�s nice if you have a ratcheting 14mm wrench also)
17mm socket & open wrench
22mm open wrench (02 Sensor)
Different size extensions
Swivel sockets or a universal
Philips head screw driver
Breaker Bar
Drop light
Telescopic Magnet really helps to not lose the washers during the manifold removal
WD40, PB Blaster, Liquid Wrench�Pick one
Remove the plastic undertray first. These little screw clips can be a real pain in the a**. A philips head screw driver with a dexterity works, but a screw gun works better.
Downpipe Removal:
If you have an extra jack stand, set it up under the catback section so its not just hanging after you remove the downpipe. Disconnect the DP from your cat/testpipe and remove the two 12mm screws from the exhaust hangers holding it up. Now disconnect the two 17mm spring bolts connecting the downpipe to the 02 housing. The down pipe will be free now being held up by the two lower arm bars. Tale off the lower arm bars and remove the downpipe. Before you proceed, make sure you remove the bracket holding the factory 02 Housing to the motor.
Remove the flex section of the lower intercooler hose. This will allow you a little more room to work. I also removed the inlet pipe off the turbo. Just be carefull when putting it back together. The one screw is a little tough to get started. You don�t want to cross thread it
Manifold Removal:
Make sure you soak these nuts and bolts. Remove the heat shield. Remove the 9 nuts holding the manifold to the head. (the 2 outers are 14mm, the 7 inners are 12mm) Remove the 2 nuts and 2 studs (14mm) from the manifold to the turbo. Now your downpipe is off and the manifold is disconnected from the head. Now push down on the turbo a little bit and wiggle the manifold off.
02 Housing Removal: Now that you have more room to work. Take out your 02 sensor from the 02 Housing. Remove the lower heat shield. The top three studs you can get from the top pretty easily. The bottom two are nuts though. You will have to get to these from under the car.
Now go ahead and reinstall in the reverse order. Be careful when putting the inlet pipe back on the turbo. Mine wasn�t on tight enough and produced a huge boost leak. Try to tighten each side equally to avoid boost leaks.
I worked from outer to inner to not loosen one side too much more then the other. Im not sure what the "correct pattern is"but it worked for me. no leaks. The four connecting the hotside to the manifold I went in diagonals and then removed them after each was cracked loose. and the 9 nuts connecting it to the head. i worked from the outers to the inners. If you have the "correct" pattern post it up for others. thanks dude.
Evolved Member
iTrader: (7)
Joined: Sep 2004
Posts: 1,457
Likes: 0
From: South Beach, FL / Miami, FL / Pt. St. Lucie, FL / NYC
I'm going to do this install this weekend but I see you mention removing the manifold from the head and disconnect the turbo from the manifold. Did you just disconnect these things so you have some play on the turbo to slightly move it while in the engine bay? Oh and if you disconnect the nuts and bolts from the turbo to the manifold how did you keep the turbo in place without disconnecting the oil feed and return line?
disconnecting all the bolts, from the manifold to the head and to the turbo to the manifold, is just so you can free up the manifold and wiggle it off. even after the manifold is removed the turbo will still be secure and hanging there .oil lines stay in place and fastened. Since the turbo is still connected to the intake its pretty secure. its nice to have some removing the manifold up top while you wiggle and tug from under the car. where are you located?
Evolved Member
iTrader: (7)
Joined: Sep 2004
Posts: 1,457
Likes: 0
From: South Beach, FL / Miami, FL / Pt. St. Lucie, FL / NYC
Trending Topics
Your review is excellent. You must add:
- disconnect o2 harness from harness connector(upper part goes on the valve cover, lower part enagges to the o2 sensor on the o2 housing)
- Also, sometimes the removal of the return oil from the turbo is neccesary(the oem return line comes with a flewx section but it is still to solid to yield enough clearance).
Last but not least, we also have to mention the upper heatshirld and its four 12mm screws

Carlos
- disconnect o2 harness from harness connector(upper part goes on the valve cover, lower part enagges to the o2 sensor on the o2 housing)
- Also, sometimes the removal of the return oil from the turbo is neccesary(the oem return line comes with a flewx section but it is still to solid to yield enough clearance).
Last but not least, we also have to mention the upper heatshirld and its four 12mm screws
Carlos
Last edited by fromWRXtoEVO; Mar 23, 2007 at 09:06 PM.
right the harness... You can undo the valve cover cap and unplug it up there first. This lets you take the 02 sensor out of the 02 housing on a bench if you are having a hard time removing it while its still in the car. As far as the heat sheild, pretty self explanatory, 4 12mm bolt. remove them other wise NOTHIGN is coming out

Evolved Member
iTrader: (7)
Joined: Sep 2004
Posts: 1,457
Likes: 0
From: South Beach, FL / Miami, FL / Pt. St. Lucie, FL / NYC
OK so I did the install similar to how you did it but I just took the turbo out of the car but I did find that i didn't have to remove the radiator but I still lost coolant because I took off the coolant lines. So it wasn't so bad. Thanks for all your help now I just have to put in my upper pipe, fule, pump, cams, injectors and go get reflashed. Thanks again dudes
well dude whatever worked best for you. I just didnt feeli like removing the wholel turbo. GOod job though and good luck with the rest of your installs. let us know how the car turns out when its all tuned.

https://www.evolutionm.net/forums/sh...uperhatch+10.5
[quote author=superhatch]
Interested in installing a 10.5 Hotside? Not a big fan of having to pull your turbo? Read up!
So I decided to install a 10.5 Hotside and a Megan Racing O2 Housing before getting dyno tuned again. Here's what I bought and what you'll need to do the install. You'll need everything here minus the O2 to install a hotside if you want to retain your stock O2.

The first thing you'll have to do is remove the stock undertray, and downpipe. These are simple tasks to I didn't take pictures. Once you've got those parts out you'll look up at the stock turbo outlet and see this...

^ Remove the black bracket holding the O2 housing to the Block. You're done under the car for now.
Next remove the manifold heatshield...

Then the O2 Sensor and the lower heatshield...

You'll have to disconnect the O2 sensor under the coil pack cover...

You'll need to pull this clip to remove the wastegate actuator arm from the Turbine Housing...

Voila!

Then you'll need to remove the manifold. Once you have everything unbolted, it will take some convincing to get the manifold out. But trust me, it can be done, as seen below....

Once the clamp is off, slide the turbine housing and O2 housing off together, and be VERY careful not to damage the turbine blades.
You'll then need to remove the v-band clamp holding the hotside to the turbo's center section. Depending on the orientation of the clamp your's might not be as easy to get to as this...


This is what it looks like with the turbine housing out, the turbo is held securely in place by the coolant and oil hardlines...

This is your friend, use it on EVERYTHING you put back together!!

You'll need to attach the O2 housing to the Turbine housing before putting it in the car. You will need to use NEW STUDS where they were on the original hotside. The hotsides do not come with them and even if you are able to get them out of your stock hotside, chances are the threads will be destroyed. So do yourself a favor, order them ahead of time and have new ones ready.

Installation is reverse of disassembly. Total install time... 4 hours for me. Hope this gives some of you DIYer's some confidence to tackle this. Good Luck!!
- Steve
EDIT: Here are the torque specs...

[/quote]
[quote author=superhatch]
Interested in installing a 10.5 Hotside? Not a big fan of having to pull your turbo? Read up!
So I decided to install a 10.5 Hotside and a Megan Racing O2 Housing before getting dyno tuned again. Here's what I bought and what you'll need to do the install. You'll need everything here minus the O2 to install a hotside if you want to retain your stock O2.
The first thing you'll have to do is remove the stock undertray, and downpipe. These are simple tasks to I didn't take pictures. Once you've got those parts out you'll look up at the stock turbo outlet and see this...
^ Remove the black bracket holding the O2 housing to the Block. You're done under the car for now.
Next remove the manifold heatshield...
Then the O2 Sensor and the lower heatshield...
You'll have to disconnect the O2 sensor under the coil pack cover...
You'll need to pull this clip to remove the wastegate actuator arm from the Turbine Housing...
Voila!
Then you'll need to remove the manifold. Once you have everything unbolted, it will take some convincing to get the manifold out. But trust me, it can be done, as seen below....
Once the clamp is off, slide the turbine housing and O2 housing off together, and be VERY careful not to damage the turbine blades.
You'll then need to remove the v-band clamp holding the hotside to the turbo's center section. Depending on the orientation of the clamp your's might not be as easy to get to as this...
This is what it looks like with the turbine housing out, the turbo is held securely in place by the coolant and oil hardlines...
This is your friend, use it on EVERYTHING you put back together!!
You'll need to attach the O2 housing to the Turbine housing before putting it in the car. You will need to use NEW STUDS where they were on the original hotside. The hotsides do not come with them and even if you are able to get them out of your stock hotside, chances are the threads will be destroyed. So do yourself a favor, order them ahead of time and have new ones ready.
Installation is reverse of disassembly. Total install time... 4 hours for me. Hope this gives some of you DIYer's some confidence to tackle this. Good Luck!!
- Steve
EDIT: Here are the torque specs...
[/quote]
There are a few ways to do this. If you are set on NOT removing the manifold you can split the turbo in half on the car by removing the hotside with the 02 housing attached and then do the 02 housing on a bench. I was going to do this but I decided to take the manifold off instead.
Tools needed:
12mm socket & open wrench
14mm socket & open wrench (It’s nice if you have a ratcheting 14mm wrench also)
17mm socket & open wrench
22mm open wrench (02 Sensor)
Different size extensions
Swivel sockets or a universal
Philips head screw driver
Breaker Bar
Drop light
Telescopic Magnet really helps to not lose the washers during the manifold removal
WD40, PB Blaster, Liquid Wrench…Pick one
Remove the plastic undertray first. These little screw clips can be a real pain in the a**. A philips head screw driver with a dexterity works, but a screw gun works better.
Downpipe Removal:
If you have an extra jack stand, set it up under the catback section so its not just hanging after you remove the downpipe. Disconnect the DP from your cat/testpipe and remove the two 12mm screws from the exhaust hangers holding it up. Now disconnect the two 17mm spring bolts connecting the downpipe to the 02 housing. The down pipe will be free now being held up by the two lower arm bars. Tale off the lower arm bars and remove the downpipe. Before you proceed, make sure you remove the bracket holding the factory 02 Housing to the motor.
Remove the flex section of the lower intercooler hose. This will allow you a little more room to work. I also removed the inlet pipe off the turbo. Just be carefull when putting it back together. The one screw is a little tough to get started. You don’t want to cross thread it


Manifold Removal:
Make sure you soak these nuts and bolts. Remove the heat shield. Remove the 9 nuts holding the manifold to the head. (the 2 outers are 14mm, the 7 inners are 12mm) Remove the 2 nuts and 2 studs (14mm) from the manifold to the turbo. Now your downpipe is off and the manifold is disconnected from the head. Now push down on the turbo a little bit and wiggle the manifold off.


02 Housing Removal: Now that you have more room to work. Take out your 02 sensor from the 02 Housing. Remove the lower heat shield. The top three studs you can get from the top pretty easily. The bottom two are nuts though. You will have to get to these from under the car.
Now go ahead and reinstall in the reverse order. Be careful when putting the inlet pipe back on the turbo. Mine wasn’t on tight enough and produced a huge boost leak. Try to tighten each side equally to avoid boost leaks.
from: https://www.evolutionm.net/forums/sh...d.php?t=239047
Tools needed:
12mm socket & open wrench
14mm socket & open wrench (It’s nice if you have a ratcheting 14mm wrench also)
17mm socket & open wrench
22mm open wrench (02 Sensor)
Different size extensions
Swivel sockets or a universal
Philips head screw driver
Breaker Bar
Drop light
Telescopic Magnet really helps to not lose the washers during the manifold removal
WD40, PB Blaster, Liquid Wrench…Pick one
Remove the plastic undertray first. These little screw clips can be a real pain in the a**. A philips head screw driver with a dexterity works, but a screw gun works better.
Downpipe Removal:
If you have an extra jack stand, set it up under the catback section so its not just hanging after you remove the downpipe. Disconnect the DP from your cat/testpipe and remove the two 12mm screws from the exhaust hangers holding it up. Now disconnect the two 17mm spring bolts connecting the downpipe to the 02 housing. The down pipe will be free now being held up by the two lower arm bars. Tale off the lower arm bars and remove the downpipe. Before you proceed, make sure you remove the bracket holding the factory 02 Housing to the motor.
Remove the flex section of the lower intercooler hose. This will allow you a little more room to work. I also removed the inlet pipe off the turbo. Just be carefull when putting it back together. The one screw is a little tough to get started. You don’t want to cross thread it
Manifold Removal:
Make sure you soak these nuts and bolts. Remove the heat shield. Remove the 9 nuts holding the manifold to the head. (the 2 outers are 14mm, the 7 inners are 12mm) Remove the 2 nuts and 2 studs (14mm) from the manifold to the turbo. Now your downpipe is off and the manifold is disconnected from the head. Now push down on the turbo a little bit and wiggle the manifold off.
02 Housing Removal: Now that you have more room to work. Take out your 02 sensor from the 02 Housing. Remove the lower heat shield. The top three studs you can get from the top pretty easily. The bottom two are nuts though. You will have to get to these from under the car.
Now go ahead and reinstall in the reverse order. Be careful when putting the inlet pipe back on the turbo. Mine wasn’t on tight enough and produced a huge boost leak. Try to tighten each side equally to avoid boost leaks.
from: https://www.evolutionm.net/forums/sh...d.php?t=239047