
How To: HVAC Double Din Mod

Thread Starter
Evolved Member
iTrader: (12)
Joined: Jul 2005
Posts: 1,404
Likes: 0
From: Westchester, NY
How To: HVAC Double Din Mod
Okay guys, so here's how to do a CLEAN modification of your stock bezel, to allow you to run a double-din navigation unit or carputer. There is LOTS of pictures here to bring you through step-by-step. This is a very time consuming and tedious mod, but well worth the end result. Patience is a MUST, if you want it to come out like this. Okay, now that you've read this far, and have commited, here are the tools you'll need to do it my way (if you have other tools you feel comfortable using, by all means). BTW I can confirm this mod works on Gruppe-S bezels as well.
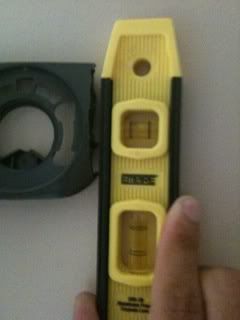
A Level: I use a mini level, we all know what these look like
A finishing sander: (any size is fine although it's much easier when you have big one like mine covering the length of the modified bezel to keep lines straight, the size of mine is 1/3 sheet)
Sandpaper for your finishing sander: I use 80 grit (300 for finishing), it's the perfect compromise between speed/finishing for the hard plastic
Dremel with cutting disc: We all know what these look like
A work place where you can make a mess since plastic will be everywhere
A mask: Black plastic boogers suck
Goggles: Chunks of plastic will fly, you'll want to protect your eyes
That's it.
Now you have to remove the stock bezel. You do this by popping off the left, and right HVAC knobs, and removing the two screws behind them. Once you have done that, just pull the bezel off (it has clips holding it on behind, so pull hard, don't forget the middle knob as well).
Now you'll need to whip out the dremel (don't be scared). Attach the cutting disk and begin to make your first cut angling downward from the radio/gauge opening like so (repeat for other side).
If you have a Gruppe-S bezel you'll also need to cut the gauge openings.
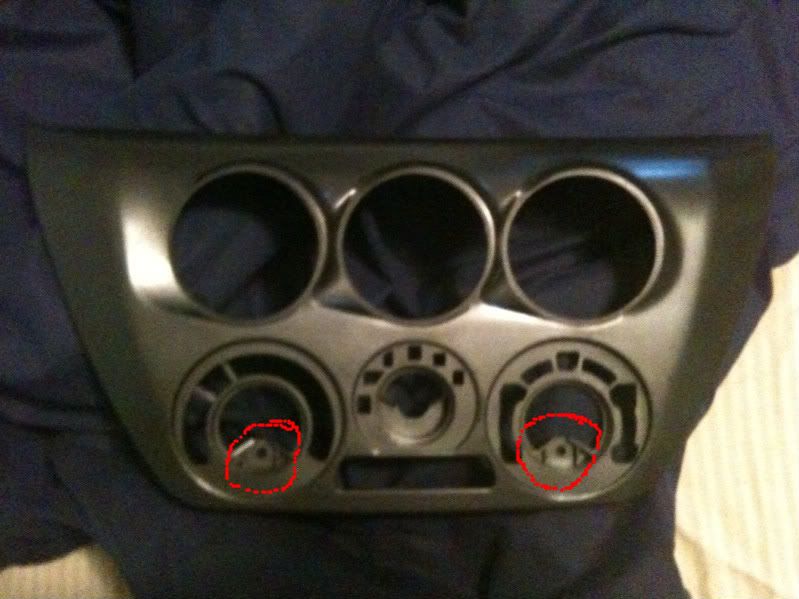
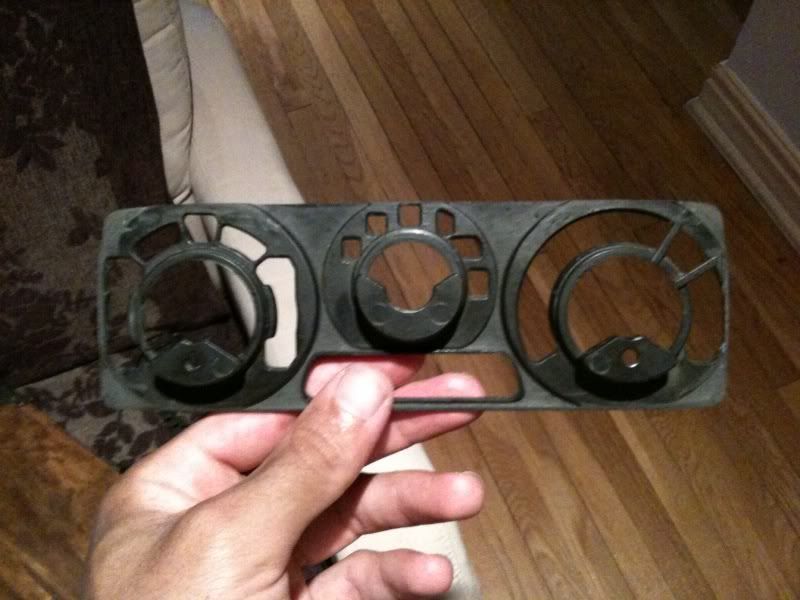
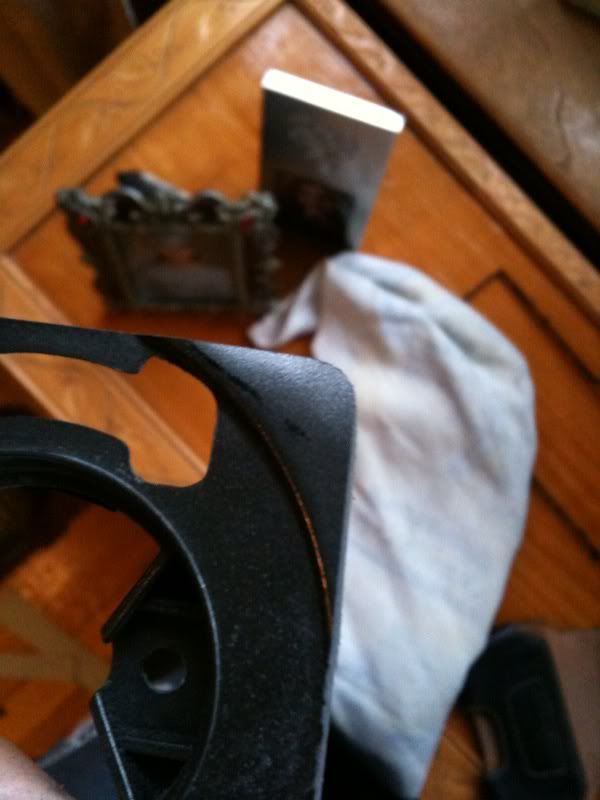
Now a lay a towel, or paper towel down wherever you're working so you don't scratch the face of the bezel every time you need to lay it down face first. Me personally, I like holding the bezel in my hand when I work on it unless I'm cutting, but some may not feel comfortable doing so. Flip the bezel, and cut off the tabs in the back. These protrude, and get in the way of cutting (also not needed anymore). Repeat for other side.
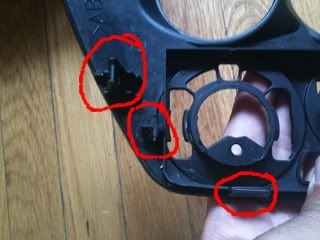
Take note of the black box/lip surrounding the HVAC controls in the picture above. You can now start making careful cuts around the bezel to start the basic shape. This will be used as the template for the face. Be as straight as you can be with the Dremel. The only sides that need cutting are the sides and the top, DO NOT touch the bottom. You will want to begin cutting by laying the plate face DOWN. Stay about a 1/2" away from the black lip (almost all cutting/sanding should be done face down, keeping your eye on that surrounding lip). If you don't feel comfortable at a 1/2", back off until necessary. Don't worry too much about making a mess (plastic melts and starts building up on the cuts, and becomes an eyesore....this is NORMAL), but more on keeping it as straight as possible. Keep in mind I have already done a couple of these. THIS IS THE SINGLE MOST VITAL STEP that will determine whether it comes out good, or like crap, so please take your time and make sure you're comfortable with you're distance. Be aware as well you don't want to step back too far from the lip as this will directly affect how long this project will take you.
This is what it looks like once You've done the top.


Same for the sides.
This is now where you whip out the finishing sander. You now want to sand down to spec from here. The Dremel will be needed again later so don't get rid of it just yet. You will also want to get the leveler ready. You need to start by taking just a bit off the top like so (we will take care of the crookedness after the next step).
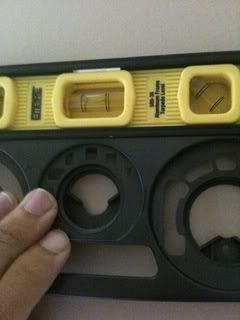
Once you've done that, you will now need to pick a side of your choice (I like the right), and sand that down to level. You will use this side to stick your level to when leveling out the top. Once you've achieved a level side (easy to do very little plastic to work with), you will level that, then while keeping it in the exact same position (I find a wall to press hard against, and apply pressure so the face won't move), take the level and place it on top. This procedure is to make sure you're line is straight as can be BEFORE you hit the black lip surrounding the HVAC. When you're in too deep near the lip, and crooked, you're screwed. So DO NOT SKIP this step. This will be repeated for both the sides, but not the bottom (not needed will explain later). The pic below is for demonstration only! The side where the level is pressed should be sanded by now. When the sides are finished you should be into the surrounding lip a tad (this is NORMAL).
Sides and top leveled.
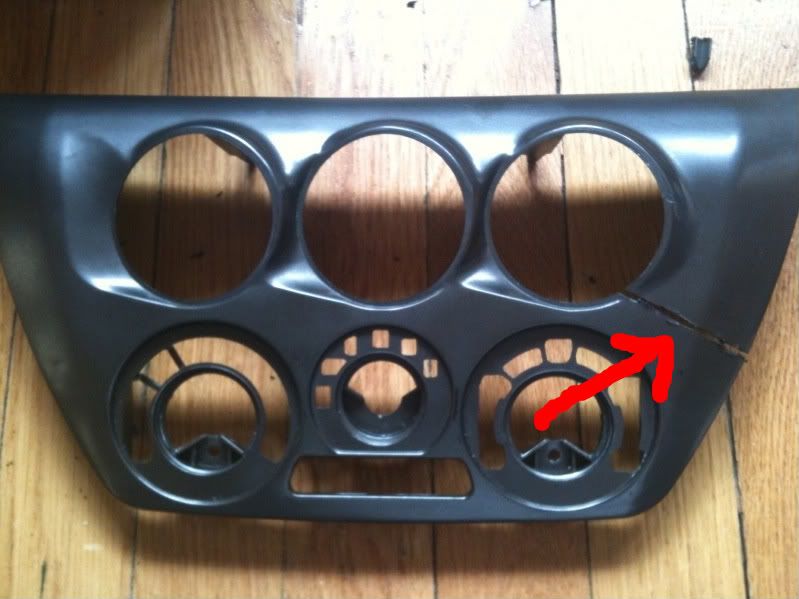
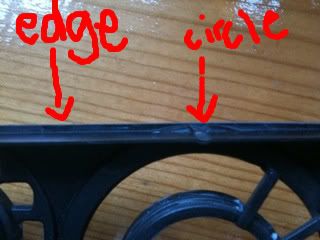
From here you now want to grind/sand your way down to the lip on top. You need to keep that line straight, so be careful of your motions with the sander. You can use the edge closing in on the lip, and top of the circles as a reference to keep your line in check. This needs to stay even on both sides. Pic below to see what I'm talking about.
When you come in far enough on the top, you also have little squares at the inner top of the circles that you should use for reference to keep your line straight. You should also be creating an oval shape that should match both sides. By now you should be sanding into the black lip surrounding the HVAC (don't worry you go into it a tad....this is NORMAL) Pictures below.
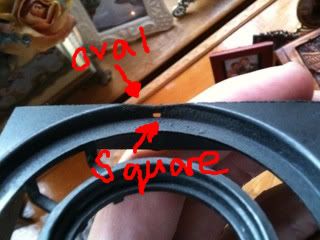
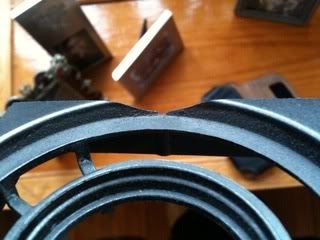
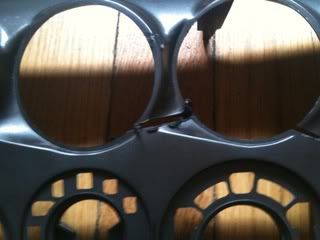
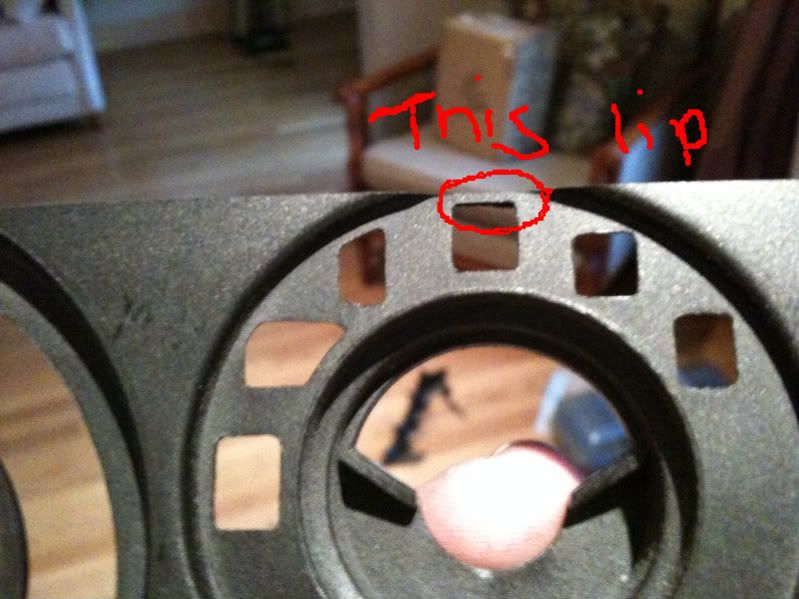
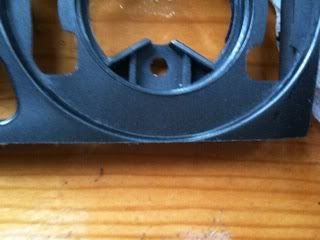
When the top is done, this lip in the middle circle on top should be pretty thin. Picture.
The bottom has a very small lip to it already which is why it didn't need cutting to begin with (which is also why a level is not required for the bottom). This can easily be done by eye unless you have crooked vision, by following the edge just like the step above, keeping it straight across. That's why this gets sanded from where it is. Here's a picture, keeping that edge straight across the way (blurry on the right). This is also where you need to STOP sanding for the bottom. Once you have that amount of edge on the bottom, you will want to turn it over and look at the front. The bottom picture is about where you should be at.
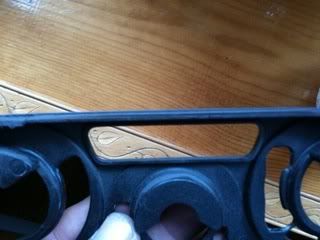
You DO NOT want to go too much into the bottom, since that is what's most visible by the driver/passengers in the vehicle. You want it to stay as clean as possible on the bottom, while still achieving enough space at the top. You DO NOT want to cut into the circle where the decal is placed, to achieve that clean look. In other words, the bottom of the decal should require NO TRIMMING at all. You CAN cut into the lip heading into the circle, but not into the circle itself. Picture below (paper stuck on the bottom from wiping clean lol).

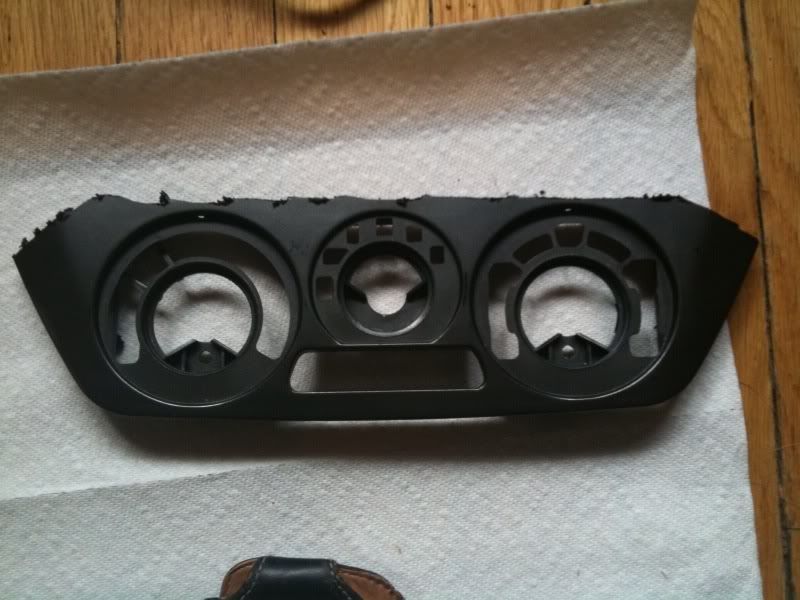
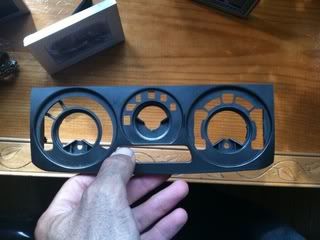
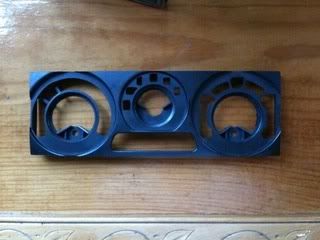
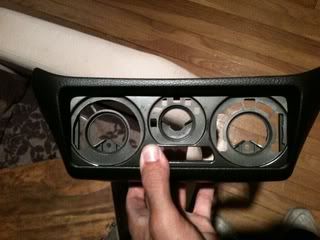
This is what your bezel should look like now.
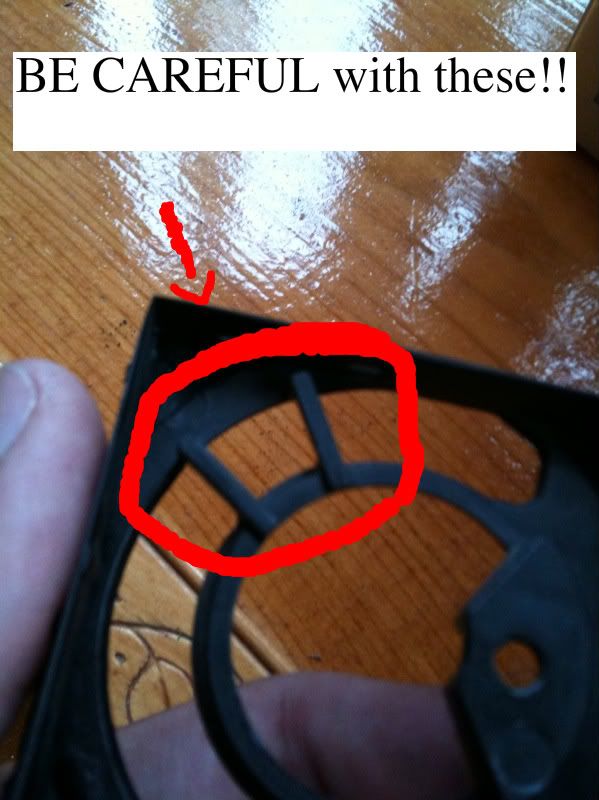
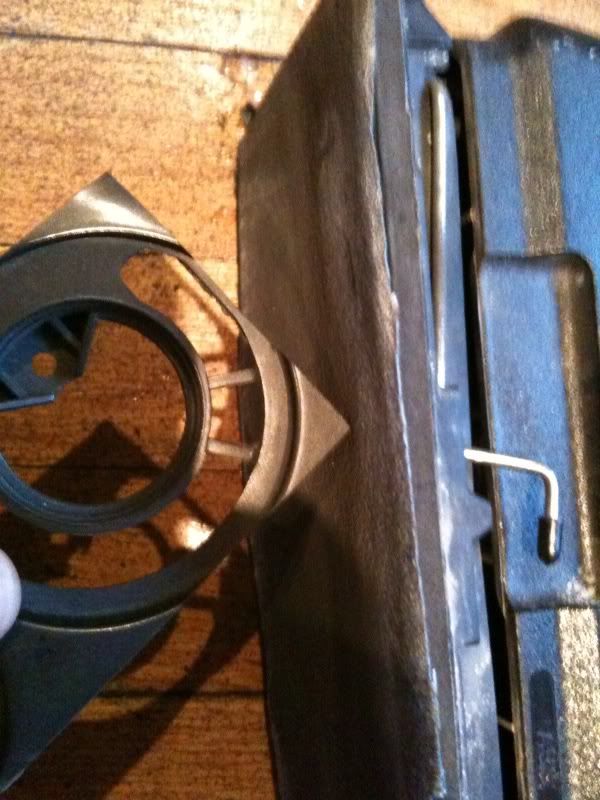
We are done with the face, and shape for now. We now have to get to work on cleaning up the rear end. Whip out the Dremel again, and make sure those goggles are on. The surrounding "black box", lip, edge thing now needs to go. BEFORE REMOVING THIS make sure you're completely satisfied and confident you're lines are straight! After this there is no template, nothing to base your accuracy on, aka the POINT OF NO RETURN. You must have a steady hand and be VERY careful when cutting this lip off. There is an area with two arms protruding from the back that you must especially be weary of. Picture of what I'm talking about.
A Level: I use a mini level, we all know what these look like
A finishing sander:
(any size is fine although it's much easier when you have big one like mine covering the length of the modified bezel to keep lines straight, the size of mine is 1/3 sheet)Sandpaper for your finishing sander: I use 80 grit (300 for finishing), it's the perfect compromise between speed/finishing for the hard plastic
Dremel with cutting disc: We all know what these look like
A work place where you can make a mess since plastic will be everywhere
A mask: Black plastic boogers suck
Goggles: Chunks of plastic will fly, you'll want to protect your eyes
That's it.
Now you have to remove the stock bezel. You do this by popping off the left, and right HVAC knobs, and removing the two screws behind them. Once you have done that, just pull the bezel off (it has clips holding it on behind, so pull hard, don't forget the middle knob as well).
Now you'll need to whip out the dremel (don't be scared). Attach the cutting disk and begin to make your first cut angling downward from the radio/gauge opening like so (repeat for other side).
If you have a Gruppe-S bezel you'll also need to cut the gauge openings.
Now a lay a towel, or paper towel down wherever you're working so you don't scratch the face of the bezel every time you need to lay it down face first. Me personally, I like holding the bezel in my hand when I work on it unless I'm cutting, but some may not feel comfortable doing so. Flip the bezel, and cut off the tabs in the back. These protrude, and get in the way of cutting (also not needed anymore). Repeat for other side.
Take note of the black box/lip surrounding the HVAC controls in the picture above. You can now start making careful cuts around the bezel to start the basic shape. This will be used as the template for the face. Be as straight as you can be with the Dremel. The only sides that need cutting are the sides and the top, DO NOT touch the bottom. You will want to begin cutting by laying the plate face DOWN. Stay about a 1/2" away from the black lip (almost all cutting/sanding should be done face down, keeping your eye on that surrounding lip). If you don't feel comfortable at a 1/2", back off until necessary. Don't worry too much about making a mess (plastic melts and starts building up on the cuts, and becomes an eyesore....this is NORMAL), but more on keeping it as straight as possible. Keep in mind I have already done a couple of these. THIS IS THE SINGLE MOST VITAL STEP that will determine whether it comes out good, or like crap, so please take your time and make sure you're comfortable with you're distance. Be aware as well you don't want to step back too far from the lip as this will directly affect how long this project will take you.
This is what it looks like once You've done the top.
Same for the sides.
This is now where you whip out the finishing sander. You now want to sand down to spec from here. The Dremel will be needed again later so don't get rid of it just yet. You will also want to get the leveler ready. You need to start by taking just a bit off the top like so (we will take care of the crookedness after the next step).
Once you've done that, you will now need to pick a side of your choice (I like the right), and sand that down to level. You will use this side to stick your level to when leveling out the top. Once you've achieved a level side (easy to do very little plastic to work with), you will level that, then while keeping it in the exact same position (I find a wall to press hard against, and apply pressure so the face won't move), take the level and place it on top. This procedure is to make sure you're line is straight as can be BEFORE you hit the black lip surrounding the HVAC. When you're in too deep near the lip, and crooked, you're screwed. So DO NOT SKIP this step. This will be repeated for both the sides, but not the bottom (not needed will explain later). The pic below is for demonstration only! The side where the level is pressed should be sanded by now. When the sides are finished you should be into the surrounding lip a tad (this is NORMAL).
Sides and top leveled.
From here you now want to grind/sand your way down to the lip on top. You need to keep that line straight, so be careful of your motions with the sander. You can use the edge closing in on the lip, and top of the circles as a reference to keep your line in check. This needs to stay even on both sides. Pic below to see what I'm talking about.
When you come in far enough on the top, you also have little squares at the inner top of the circles that you should use for reference to keep your line straight. You should also be creating an oval shape that should match both sides. By now you should be sanding into the black lip surrounding the HVAC (don't worry you go into it a tad....this is NORMAL) Pictures below.
When the top is done, this lip in the middle circle on top should be pretty thin. Picture.
The bottom has a very small lip to it already which is why it didn't need cutting to begin with (which is also why a level is not required for the bottom). This can easily be done by eye unless you have crooked vision, by following the edge just like the step above, keeping it straight across. That's why this gets sanded from where it is. Here's a picture, keeping that edge straight across the way (blurry on the right). This is also where you need to STOP sanding for the bottom. Once you have that amount of edge on the bottom, you will want to turn it over and look at the front. The bottom picture is about where you should be at.
You DO NOT want to go too much into the bottom, since that is what's most visible by the driver/passengers in the vehicle. You want it to stay as clean as possible on the bottom, while still achieving enough space at the top. You DO NOT want to cut into the circle where the decal is placed, to achieve that clean look. In other words, the bottom of the decal should require NO TRIMMING at all. You CAN cut into the lip heading into the circle, but not into the circle itself. Picture below (paper stuck on the bottom from wiping clean lol).
This is what your bezel should look like now.
We are done with the face, and shape for now. We now have to get to work on cleaning up the rear end. Whip out the Dremel again, and make sure those goggles are on. The surrounding "black box", lip, edge thing now needs to go. BEFORE REMOVING THIS make sure you're completely satisfied and confident you're lines are straight! After this there is no template, nothing to base your accuracy on, aka the POINT OF NO RETURN. You must have a steady hand and be VERY careful when cutting this lip off. There is an area with two arms protruding from the back that you must especially be weary of. Picture of what I'm talking about.
Thread Starter
Evolved Member
iTrader: (12)
Joined: Jul 2005
Posts: 1,404
Likes: 0
From: Westchester, NY
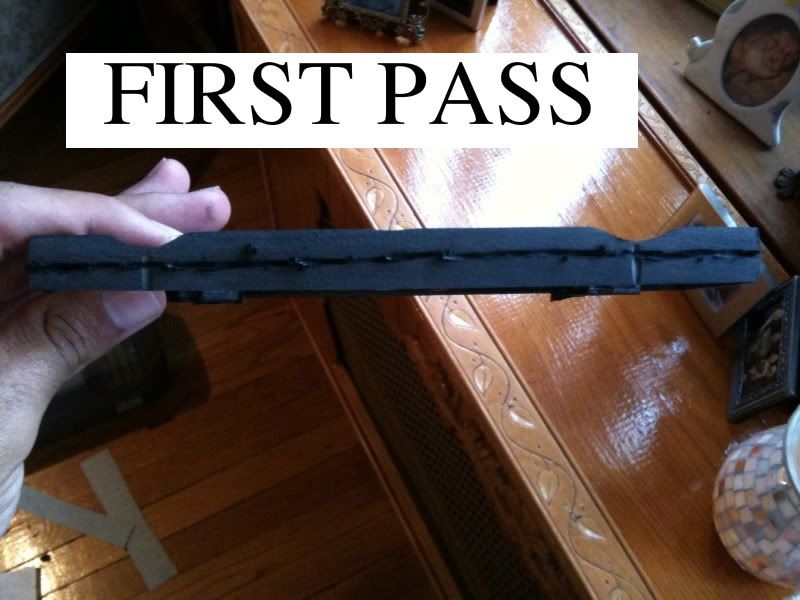
Now to get started with this you don't want to make a cut on the first pass with the Dremel. The trick to this is on the first pass you just want to "mark" a straight line with the Dremel. This is achieved by placing the Dremel in what you believe is as straight as you can get it, then PRESSING, not CUTTING into the lip for a quick second creating a hash mark, then lifting. DO this across the way. Press, lift, press, lift, press, lift. This is done all the way around. DO NOT attempt to cut all the way across this is where things get crooked and sloppy fast. On the second pass (doing the same thing), you should now be able to cut into it like butter. THIS STEP is ESPECIALLY IMPORTANT when you're near those two arms. GENTLE is key. If you attempt to cut on first pass you will cut through hard by applying too much pressure, and into those arms before you can stop it. Here are pics of this procedure. Notice I did NOT go through on first pass. Goes through like butter (almost no pressure at all) on second pass.

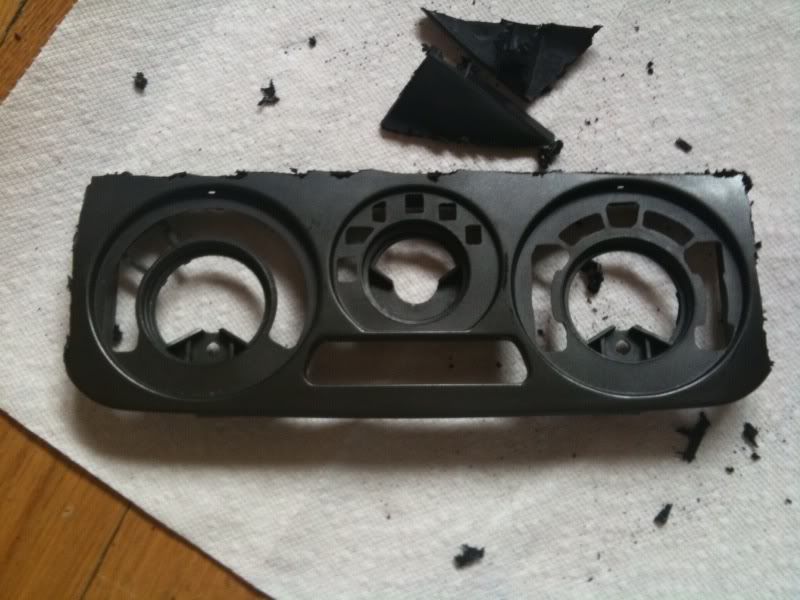
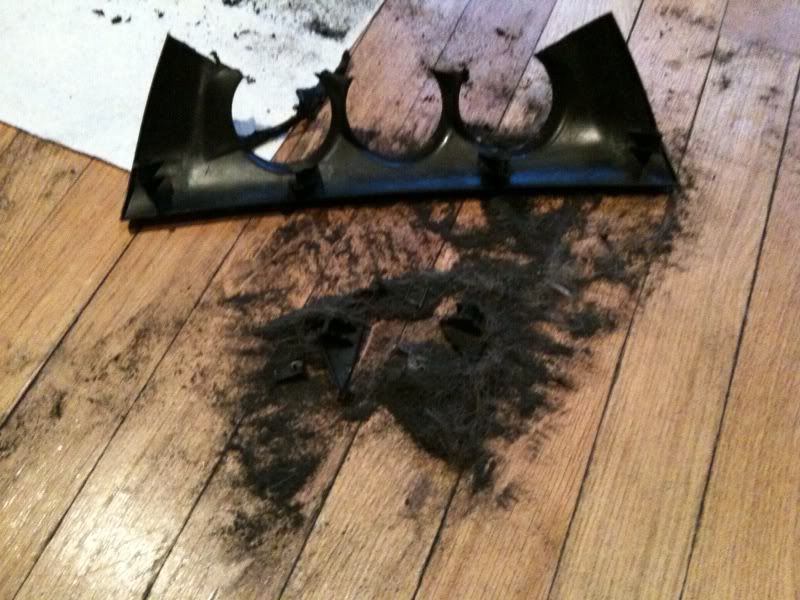
This is what you should be left with.
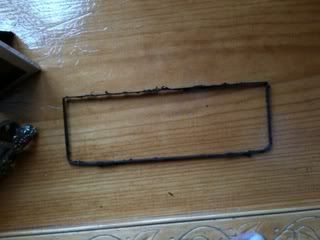
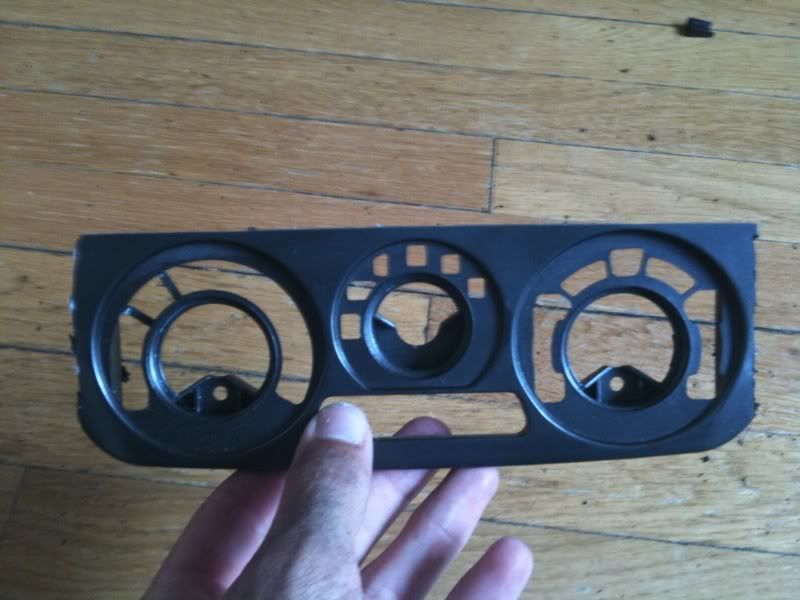
You now need to finish up on the back by sanding down the lip until there's practically nothing. If you fail to do this it will not fit INTO the cubby, but protrude on the bottom. You WILL tap the arms with the sander, it's almost impossible to miss them completely. Just be careful with them and not break them, or sand them to the point where they're too frail. The edges should also be sanded completely flat. Here's what the rear should look like when complete.

This is what you should be left with.
You now need to finish up on the back by sanding down the lip until there's practically nothing. If you fail to do this it will not fit INTO the cubby, but protrude on the bottom. You WILL tap the arms with the sander, it's almost impossible to miss them completely. Just be careful with them and not break them, or sand them to the point where they're too frail. The edges should also be sanded completely flat. Here's what the rear should look like when complete.
Thread Starter
Evolved Member
iTrader: (12)
Joined: Jul 2005
Posts: 1,404
Likes: 0
From: Westchester, NY
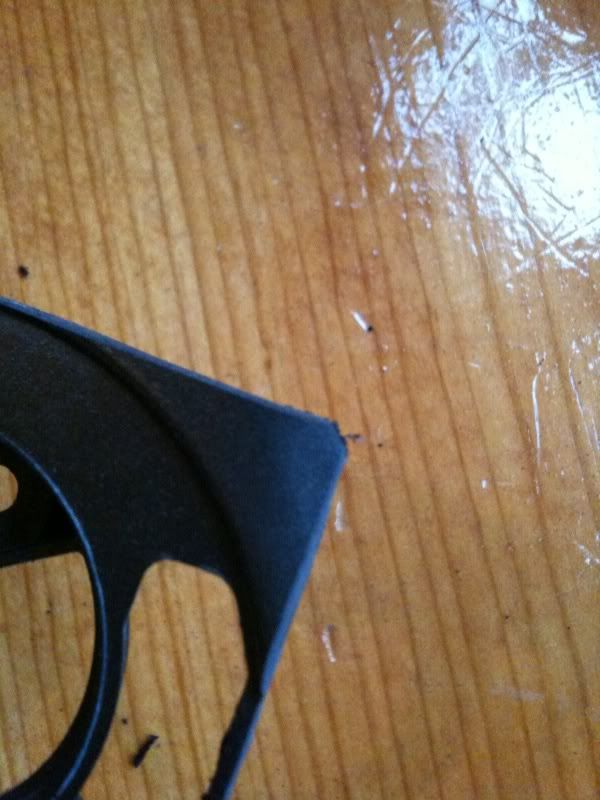
You're almost done!! The finish line is near!! This is also a VERY CRUCIAL step, and could ruin the total clean look if done incorrectly so be very careful. Right now you're saying hey I tried test fitting it but it won't fit in. DUH, that's cause you have now reached the dreaded corners. To make them as perfect as can be (and look as good as mine  ) you must follow this to the tee. You're going to want to place the finishing sander in a position where the point of the bezel has a perfect 45 degree angle on each side (sander OFF). Picture below.
You now want to flip it on and count 9 seconds (remember if you're using a different grit, this will be different for you). You're goal is to flatten the corner perfectly. Picture below.
Now, you must be QUICK AND CAREFUL with this motion. You need to do a quick sweeping motion back and forth 3-4 times (depends on how quick, how much pressure you apply) to round it out evenly. You want to take off as little material as possible while doing this. Don't stress if they don't all come out EXACTLY the same, but they should all look ALMOST perfect. You will be repeating this step after test-fitting by hand to get them perfect. It should now look like this (rubbed off paint was there when I received the bezel).
You must repeat this for all four corners. I've found the top needs to be slightly rounder than the bottom to get it to fit correctly. Picture below.

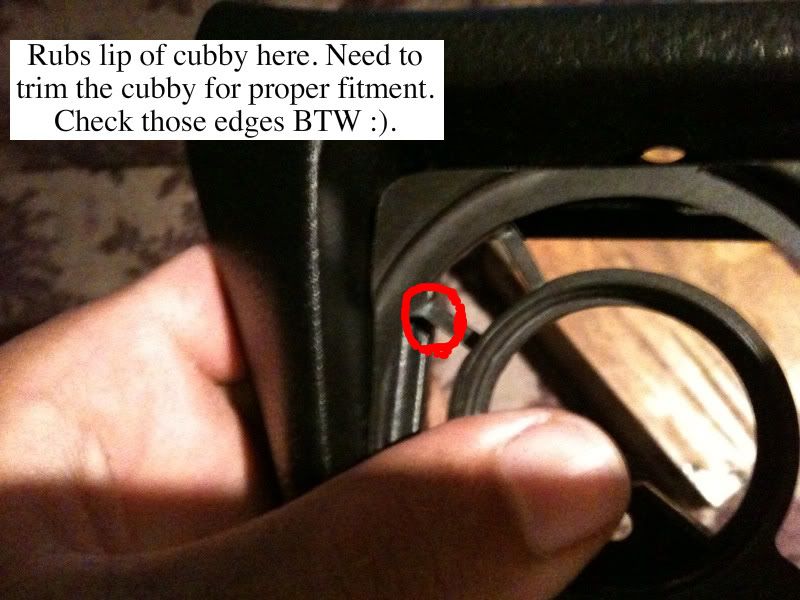
You can now start test fitting into the cubby if done correctly. You can trim and tidy little by little to get it to fit the way you like (more sanding=looser, less=tighter). I personally trim it to where it's a very tight fit to retain as much of the decal circles as possible (looks much cleaner), and getting it to "snap in" with pressure. You will now notice once it's in, and you're staring at your work of art, that the top left corner doesn't want to completely go in. DO NOT PANIC you need to trim the cubby to get it to sit completely flush and clean (you made it this far, this should be cake). Pictured below.
YOU'RE NOT DONE YET. You've made it this far don't slack!!
You're going to now take a much finer sandpaper and fine tune the edges even further by hand until satisfied or perfect. You're now officially done, and ready for prep/paint if you choose! Clean up that mess!!
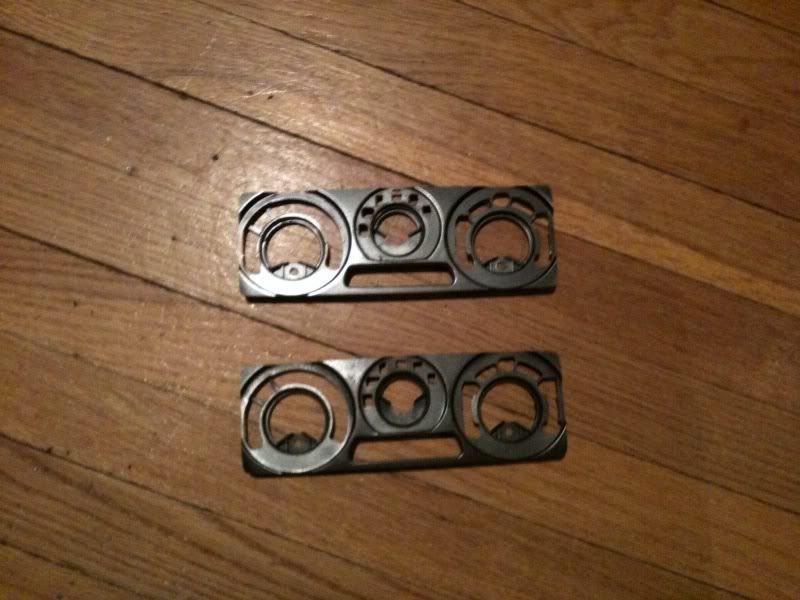
Mine and WhiteEvo's (mine on top, his on bottom)
I have been in talks with some of the people here on EvoM about offering this for the community for those who are afraid to tackle this job so we'll see where that goes. I did this write-up to help the community out, and big thanks goes to kinglasserres, who came up with this idea. I just kind of took his train of thought and made it better/cleaner. If anyone has any questions regarding these feel free to PM. I'll help as much as I can. Enjoy!
) you must follow this to the tee. You're going to want to place the finishing sander in a position where the point of the bezel has a perfect 45 degree angle on each side (sander OFF). Picture below.You now want to flip it on and count 9 seconds (remember if you're using a different grit, this will be different for you). You're goal is to flatten the corner perfectly. Picture below.
Now, you must be QUICK AND CAREFUL with this motion. You need to do a quick sweeping motion back and forth 3-4 times (depends on how quick, how much pressure you apply) to round it out evenly. You want to take off as little material as possible while doing this. Don't stress if they don't all come out EXACTLY the same, but they should all look ALMOST perfect. You will be repeating this step after test-fitting by hand to get them perfect. It should now look like this (rubbed off paint was there when I received the bezel).
You must repeat this for all four corners. I've found the top needs to be slightly rounder than the bottom to get it to fit correctly. Picture below.
You can now start test fitting into the cubby if done correctly. You can trim and tidy little by little to get it to fit the way you like (more sanding=looser, less=tighter). I personally trim it to where it's a very tight fit to retain as much of the decal circles as possible (looks much cleaner), and getting it to "snap in" with pressure. You will now notice once it's in, and you're staring at your work of art, that the top left corner doesn't want to completely go in. DO NOT PANIC you need to trim the cubby to get it to sit completely flush and clean (you made it this far, this should be cake). Pictured below.
YOU'RE NOT DONE YET. You've made it this far don't slack!!
You're going to now take a much finer sandpaper and fine tune the edges even further by hand until satisfied or perfect. You're now officially done, and ready for prep/paint if you choose! Clean up that mess!!
Mine and WhiteEvo's (mine on top, his on bottom)
I have been in talks with some of the people here on EvoM about offering this for the community for those who are afraid to tackle this job so we'll see where that goes. I did this write-up to help the community out, and big thanks goes to kinglasserres, who came up with this idea. I just kind of took his train of thought and made it better/cleaner. If anyone has any questions regarding these feel free to PM. I'll help as much as I can. Enjoy!
Sick... thanks so much for posting this,  I really have to try my hand at it now. I have an ES, so I think I would want to purchase an EVO bezel to get that glossy look. Do you know where to get spare bezels?
I really have to try my hand at it now. I have an ES, so I think I would want to purchase an EVO bezel to get that glossy look. Do you know where to get spare bezels?
Trending Topics
 Hehe!! Anyway great job on the write-up.


Cheaper than I can get one from here? http://www.japanparts.com/db/partsli...ey=180-042-001