
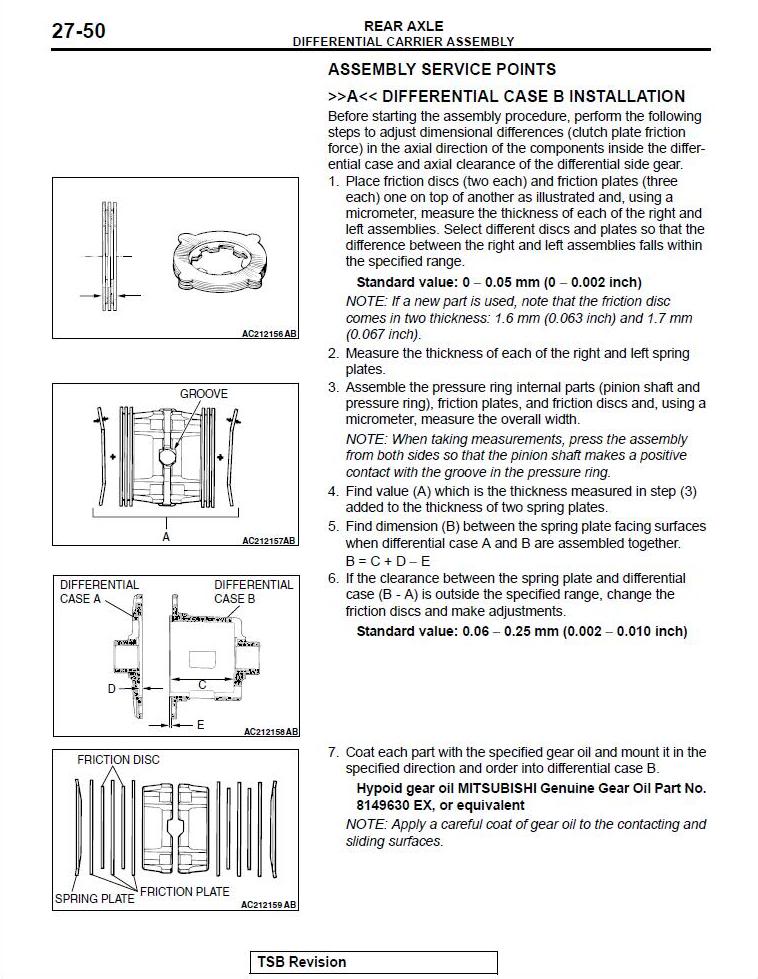
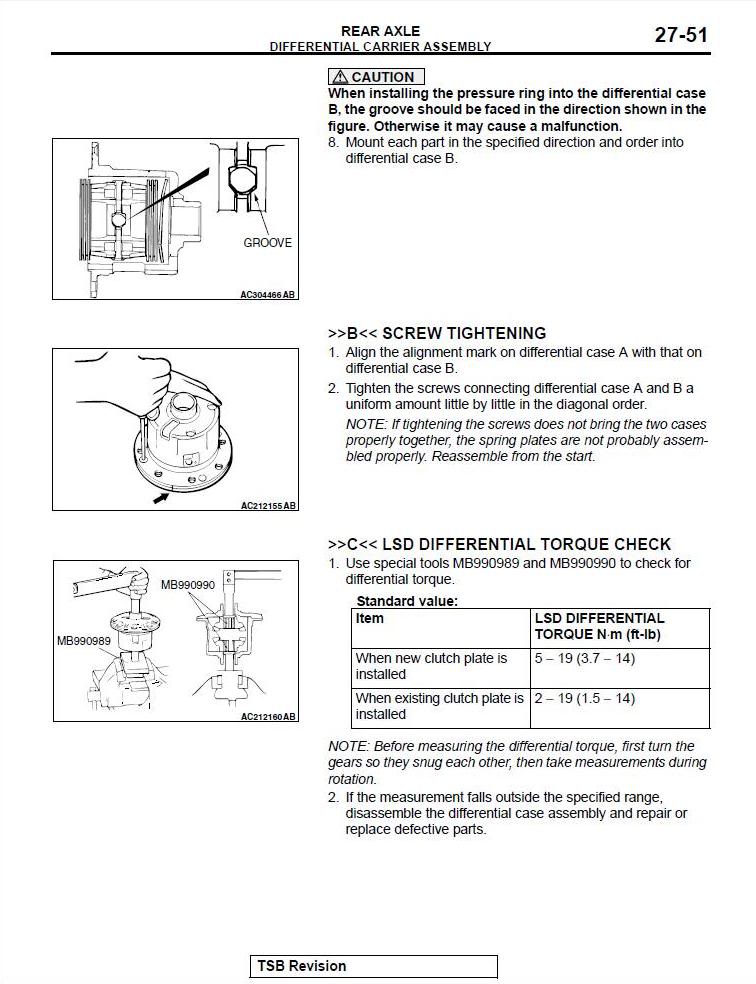
How to assemble the rear diff


Thread Starter
Evolved Member
iTrader: (23)
Joined: Feb 2009
Posts: 951
Likes: 3
From: Milwaukee, WI
How to assemble the rear diff
The service manual on how to take apart the rear diff can be found here. As much as it shows you how to take it apart, it doesn't really show you how to put it back in. Just shows you how to align the plates correctly and at the end of the page, gives you torque specs of a couple things. If you are still nervous taking the rear diff apart, don't be. This is my first time taking it apart and it was very easy. Putting it all back together though, was a small challenge of going backwards.
This writeup is mainly for those that want to re-arrange your plates (more info can be found here).
This writeup is also for Weir Performance Maxgrip 12 plate LSD rebuild kit. It's pretty much the same except there's an extra disc on each side.
Googled and searched around the forum for something like this and there isn't much of anything on a how to (just the service manual). Decided to write my own to help others out.
Tools:
1/2" ratchet
14mm socket (1/2 drive)
torque wrench (1/2 drive)
screwdriver, phillips head
table vice
gear oil
plastic or foam bowl/plate (actual bowls/plates would work too but I don't think you would want the taste of gear oil in your mouth whereas you can just throw the plastic/foam away)
bottles of brake cleaner
C clamps
threadlocker (like Loc-tite) High/heavy strength recommended
gasket maker
hammer (non-metal/steel hammers as you might make dents)
small piece of wood
To start off, re-arrange your plates as seen here.
(The blue thing represents the spider gear assembly, which are numbers 13,12,11,10,9 on the service manual)
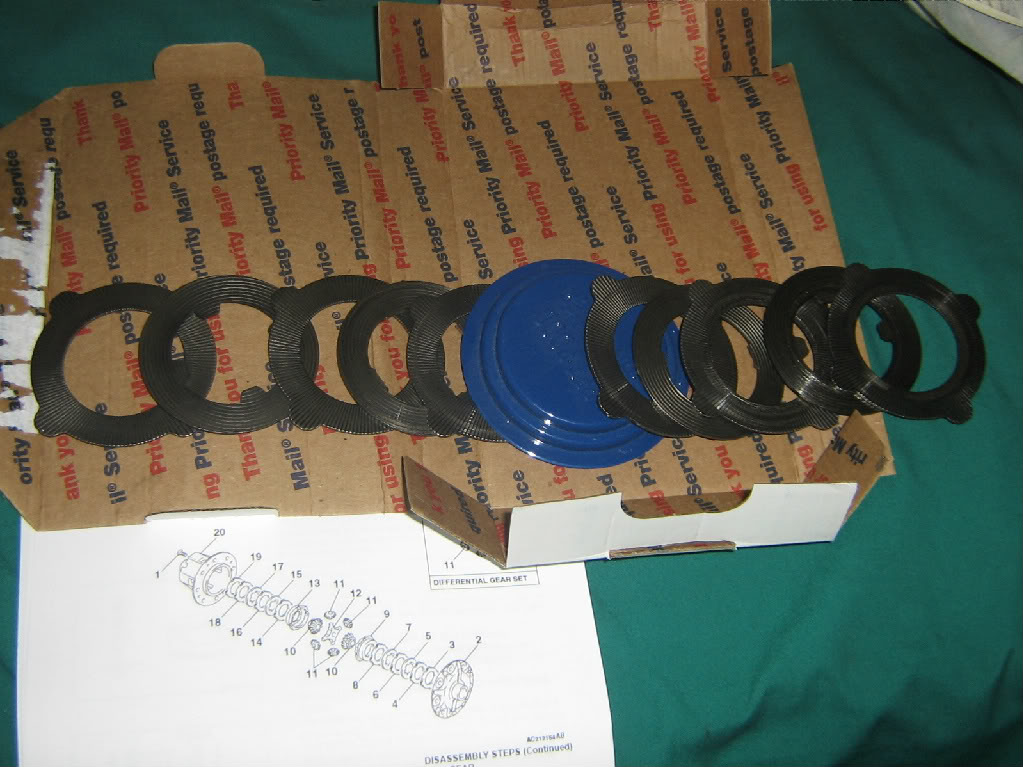
If anyone noticed something wrong in that picture, then you are correct. 2 of my discs are broken and caused 5 other plates to have big indents in them.
Instead of buying OEM (and spending over $500 on OEM plates), I just bought the Maxgrip LSD rebuild kit from Weir Performance. $180 for a 12 plate, can't go wrong.
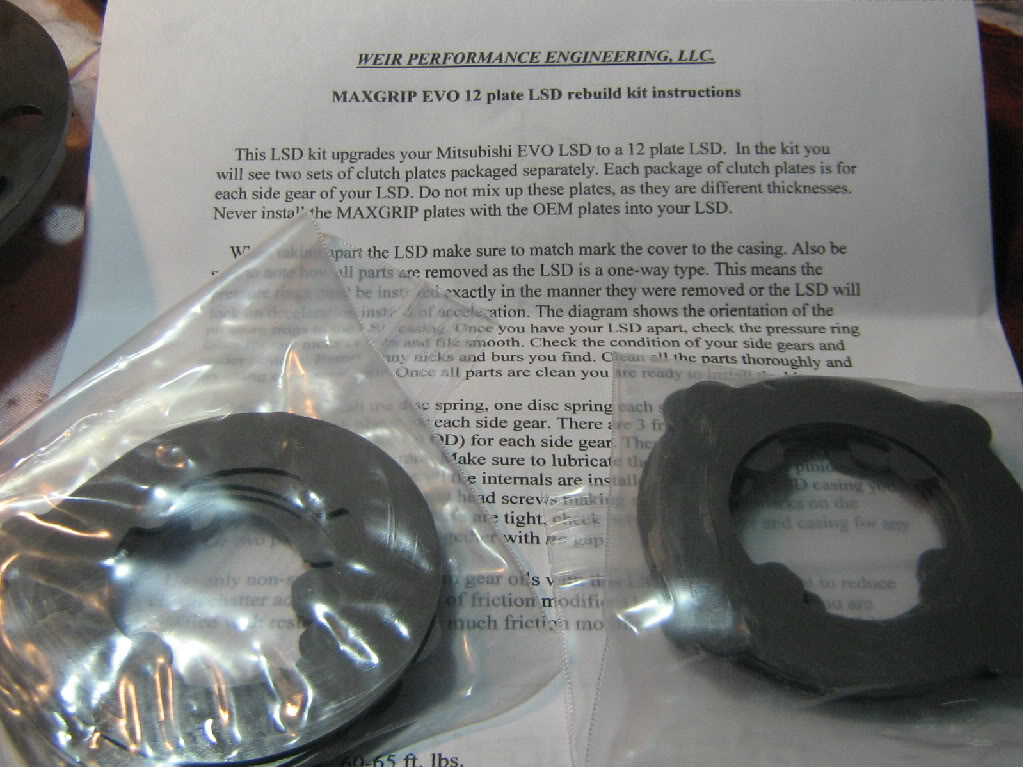
The Maxgrip LSD kit also comes pre-arranged, as you can see above. One bag goes to one side and the other bag goes to the other. This is part of the instructions that came with it that shows you how you should arrange them.
Please note that you SHOULD NOT MIX both bags together. Each bag has different size plates and are arranged already. If you mix them up and put 2 big plates on one side and 2 small plates on the other, it could cause problems. That being said, take the plates out of the bag and clean them off with brake cleaner.
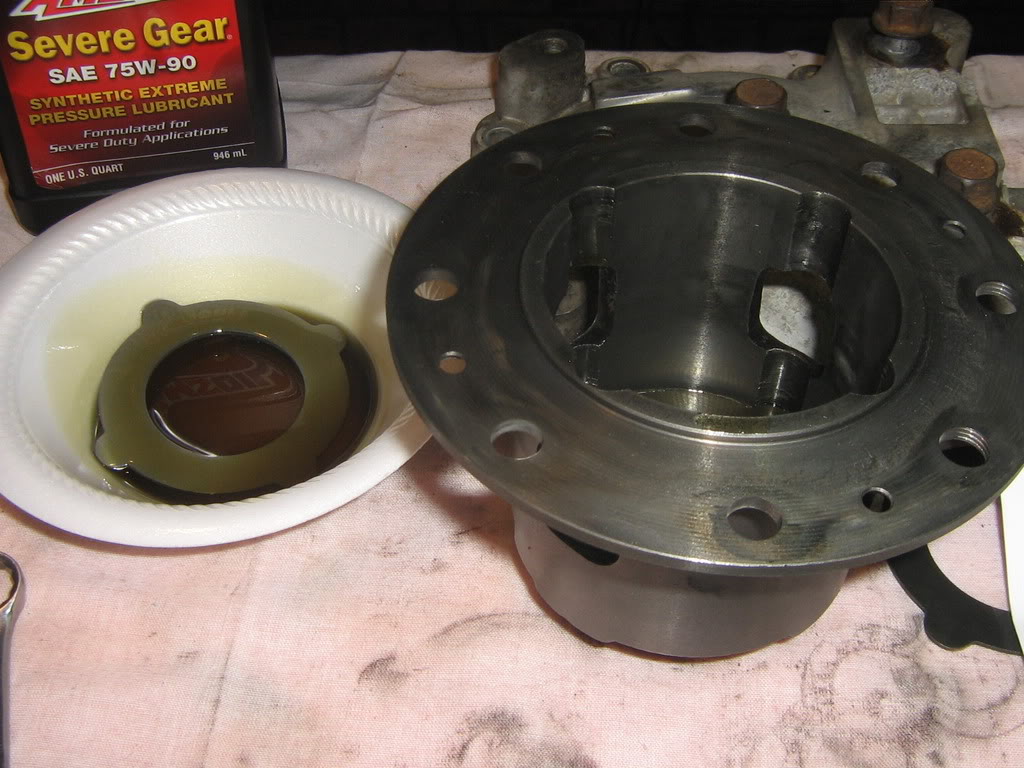
After arranging your plates, it's time to put them all together. Pour some gear oil into the plastic/foam bowl, lube the plates with the oil by dipping it in the bowl, and start stacking them in the main LSD cover (or "differential case B" as what the service manual calls it).
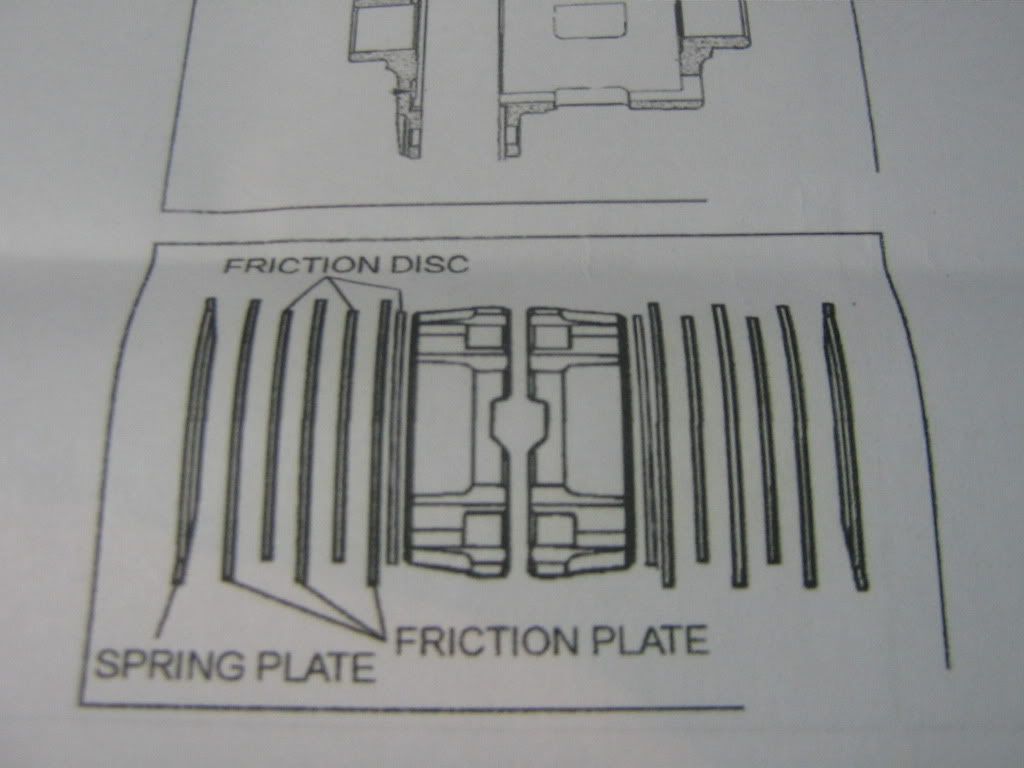
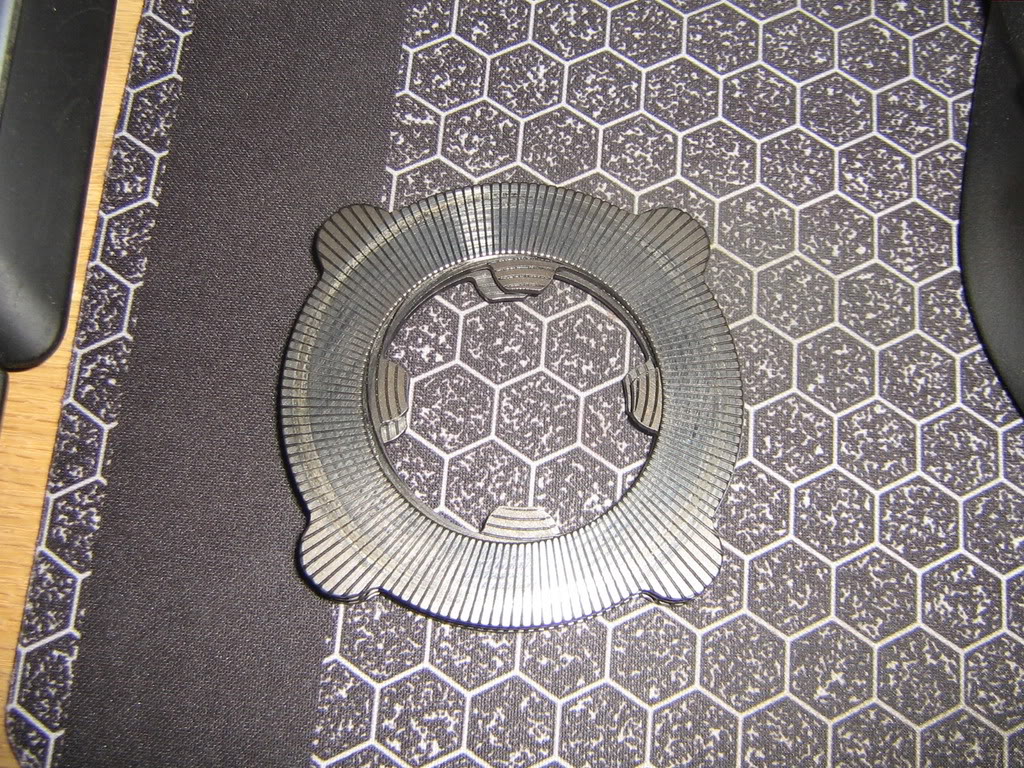
Please DO NOT FORGET about the spring plates. Since there's only 2 spring plates, it'll be the first and last plates you'll stack. Stack them properly as how the service manual shows you (in the second picture).
If you are just taking your diff apart, it would make it easier if you kept both spring plates separate and label which side is which. If you mixed up the plates and don't know which side is which, let's just hope you drove enough miles for the LSD cover and side cover to leave imprints on the spring plates themselves.
While you're stacking the first stack, try to align the friction disc teeth (the teeth in the middle) as best as you can. Don't worry about it not being perfectly aligned at this point.
When you drop the first spider gear end, spin the gear around so that the disc teeth falls into the spider gear grooves.
Now put the smaller spider gears in and put the last spider gear end on top.
Note: Make sure the pinion gear that holds the smaller spider gears is facing the correct way with the spider gear covers.
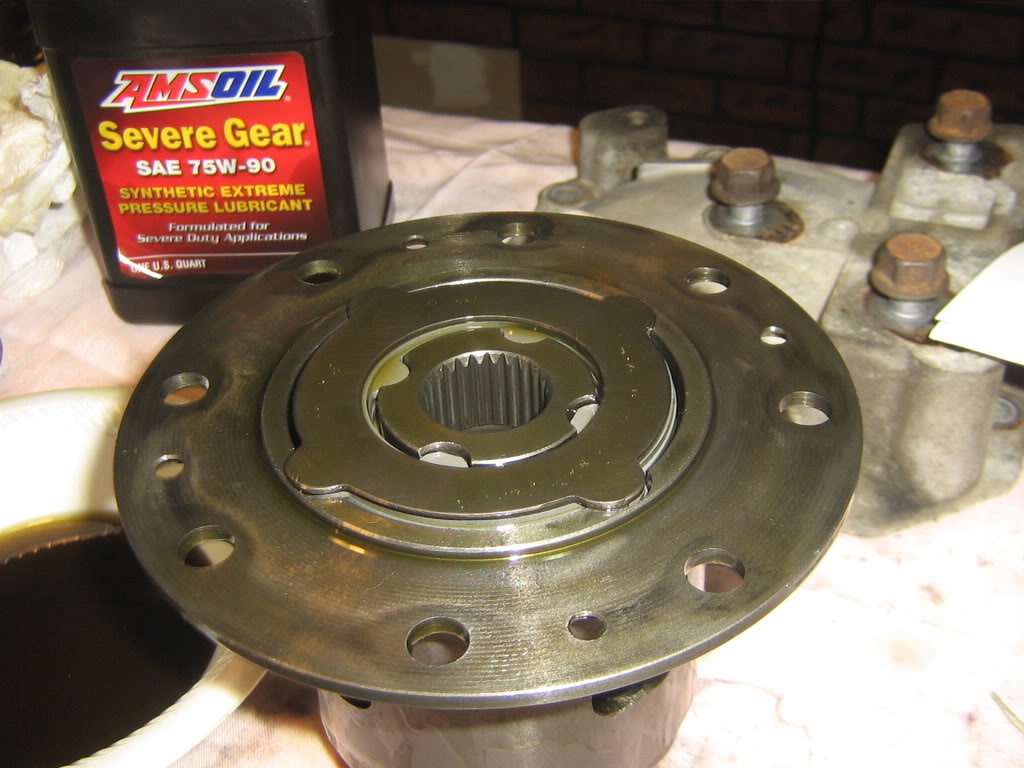
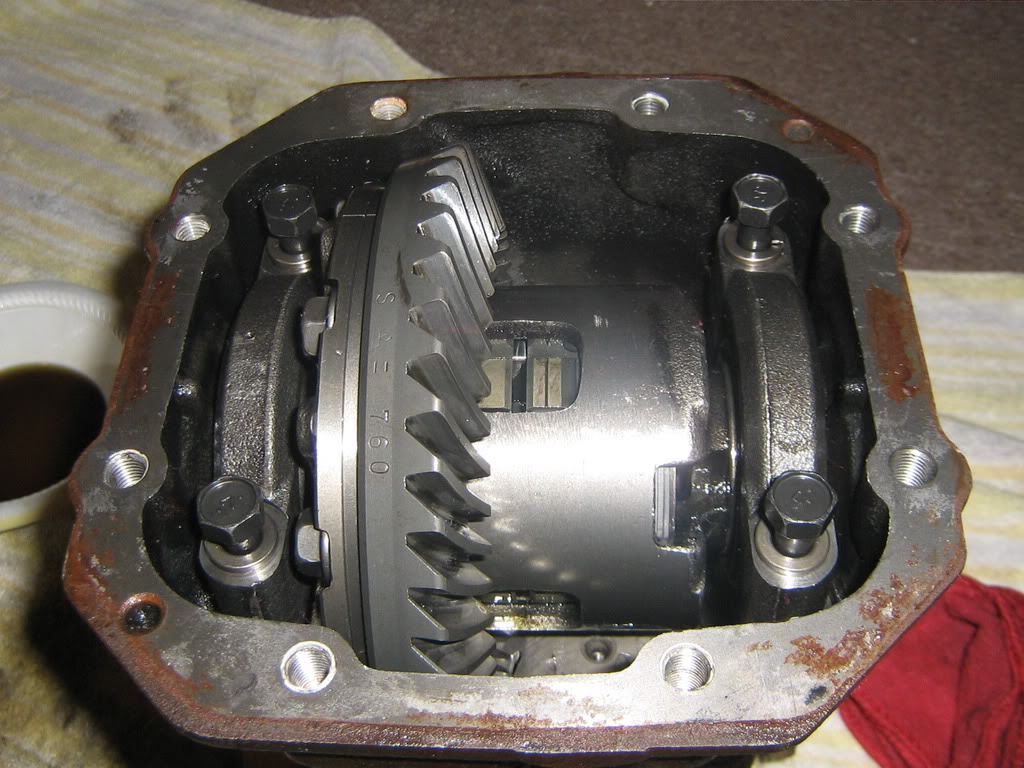
Stacking the plates is fairly easier as you follow the groove of the LSD cover. In the end, it should look like this.
After stacking all the plates, it's time to put the side cover on. Don't forget to align the markings together. Don't know what'll happen if you don't but I'm sure it won't be a happy day for you. Also make sure the top spring plate doesn't move around while you're trying to align the screw holes or else, the screws just won't go down.
Now, put the screws in and finger tighten them as much as you can. Carefully flip it over. Don't let the LSD assembly hit the table sideways or the spring plate might move and then the screws just won't go down all the way. Now, start screwing them, little by little, in a uniform matter. Criss-cross them too as you would a 4 lug wheel.
Once you hit the point where you're about to strip them, you can use your C clamps to clamp them down and screw them in some more.
Do this to each screw until the side cover and LSD cover are flush to each other. Don't forget to criss-cross here too. There isn't much of a torque spec on these. Just screw them down as much as possible and you should be good.
NOTE: From what I heard, you do not need the C clamps for just the 8 plate mod. Since I have a 12 plate, it fits a lot more snug and is a little more difficult to tighten the screws. For 12 plate, the gap between the housing and side cover is pretty big, which is why you would need the C clamp.
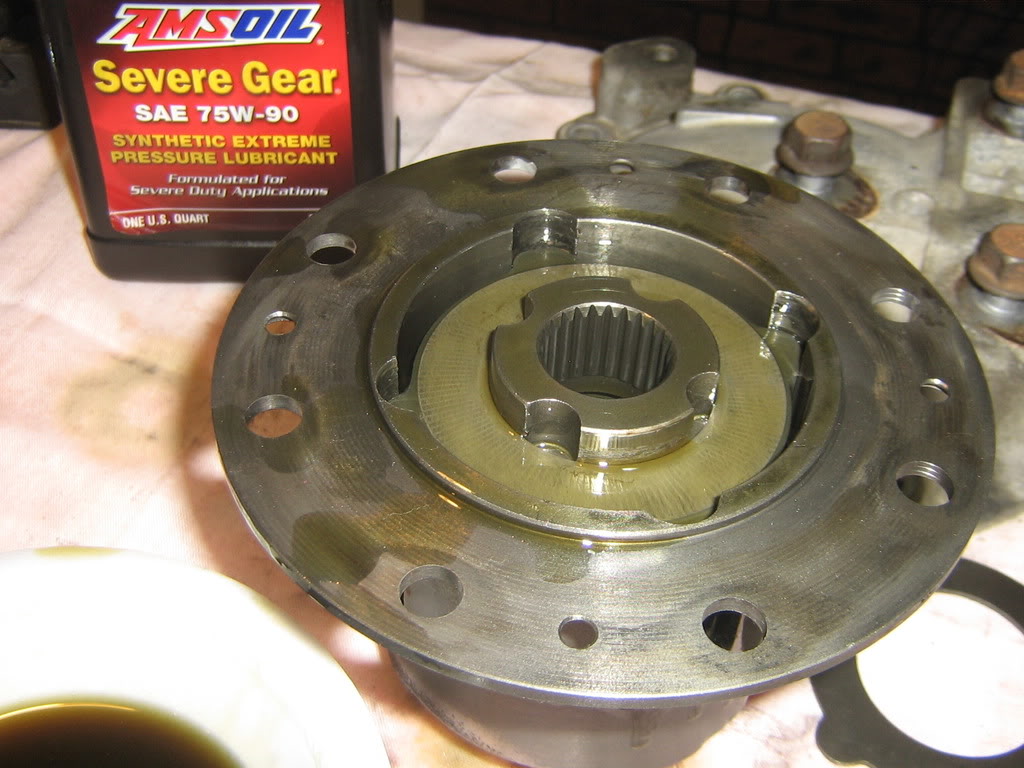
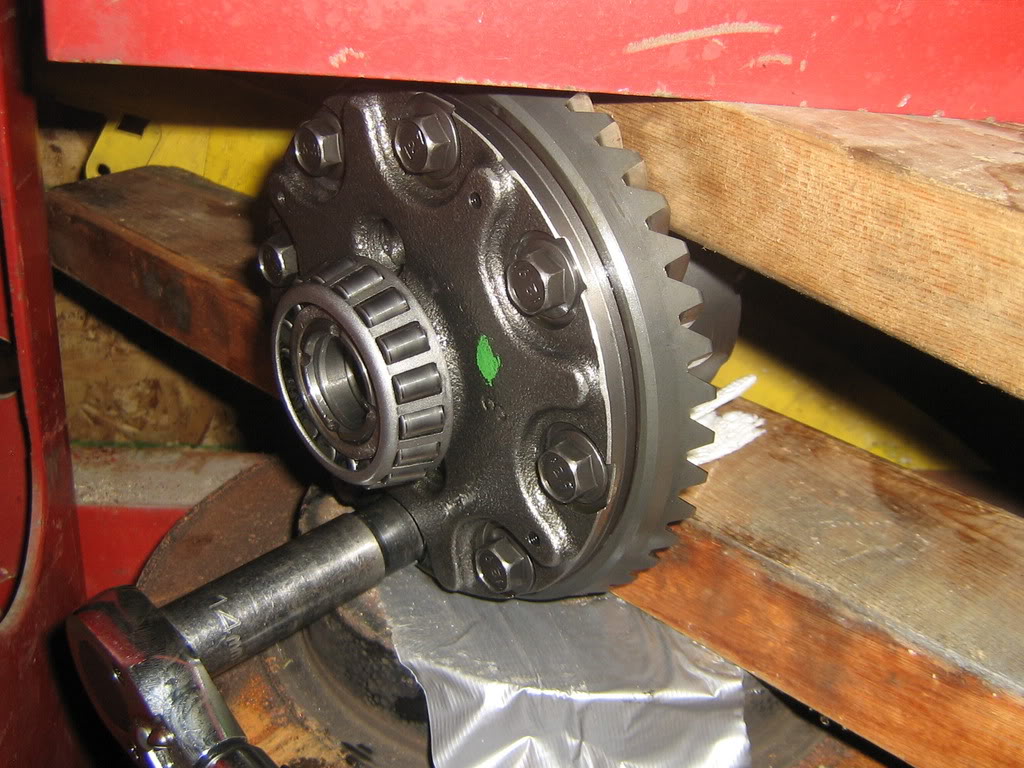
Next up is the ring gear or drive gear.
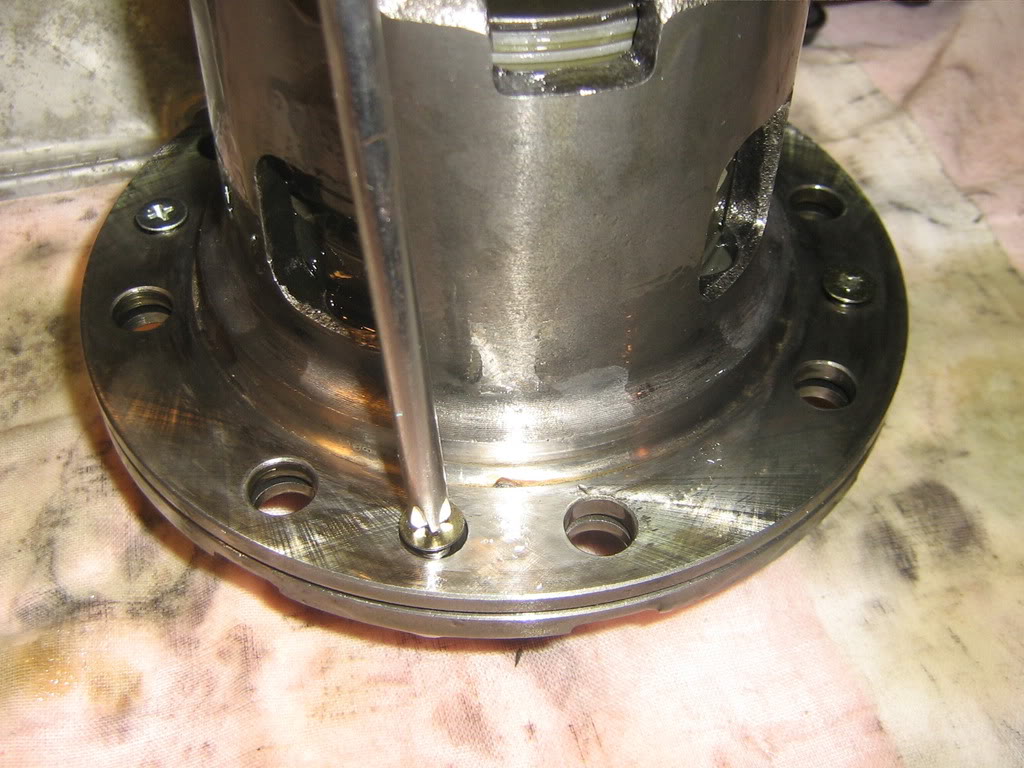
I would first check each hole to see if the bolt would go in correctly. Sometimes, the threadlocker that was applied from factory might cause the bolt to not go in all the way and hard to install the ring gear. Easiest thing to do is re-thread it with the bolt itself and an impact gun.
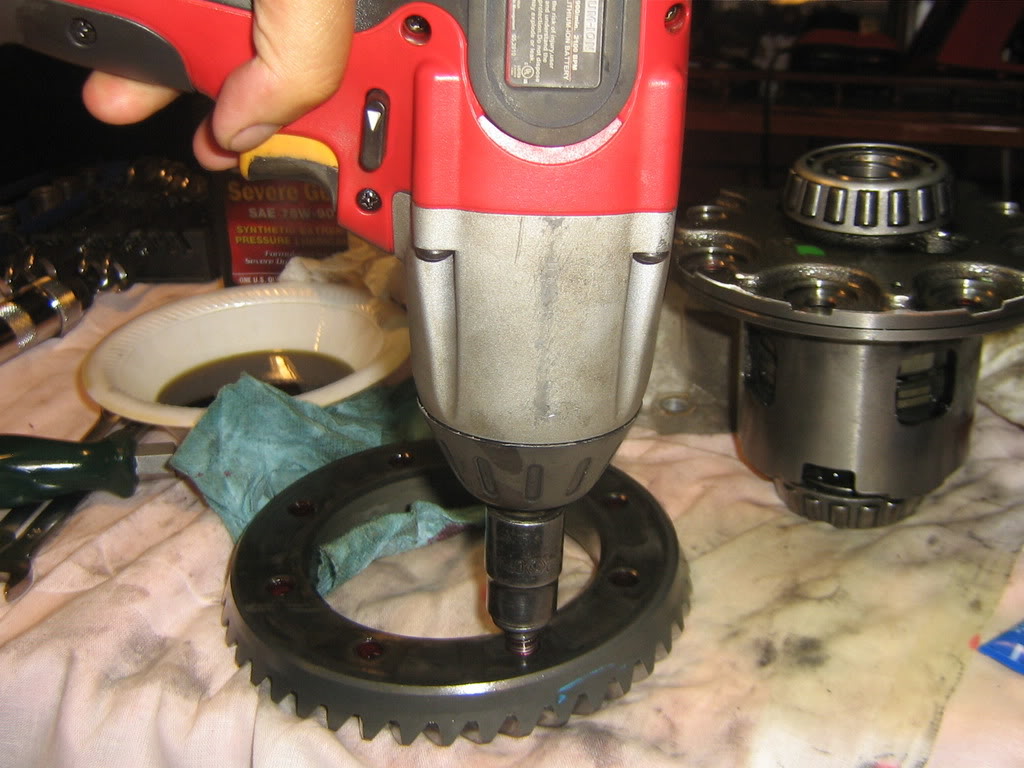
I highly suggest not using an impact gun while installing the ring gear to the LSD cover as it might cause some damages.
Next, apply threadlocker such as Loc-Tite, to each hole of the ring gear.
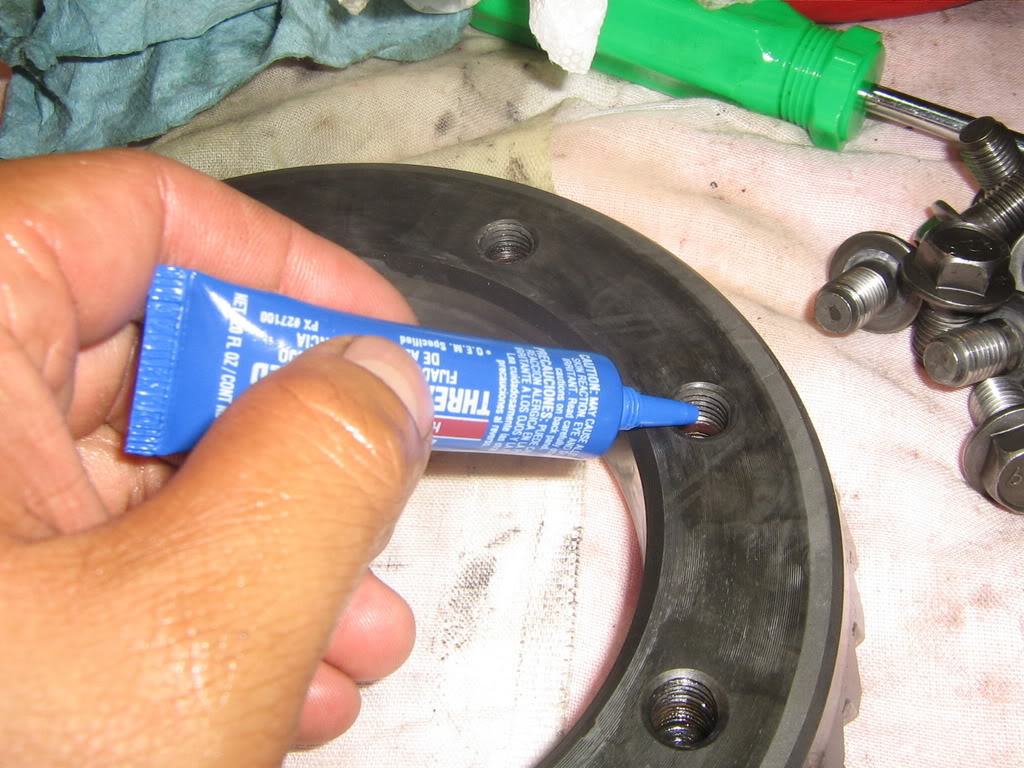
High/heavy strength threadlocker recommended. If you're extra cautious, you can also apply threadlocker to the bolts too.
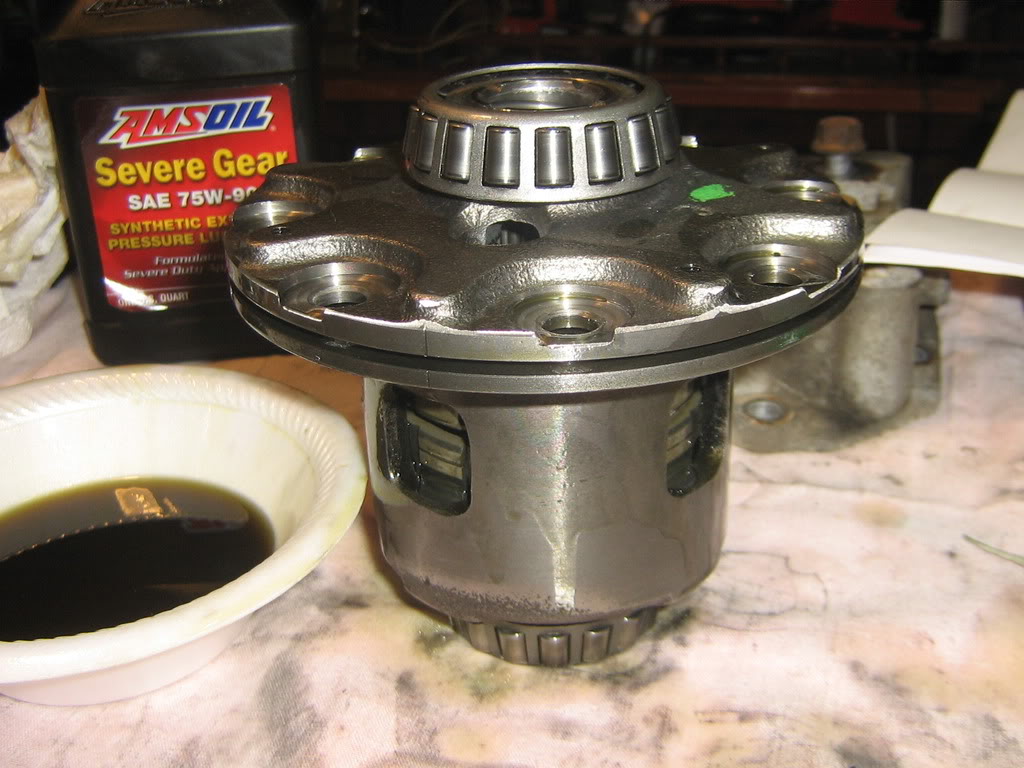
And finally, installing the ring gear to the LSD cover.
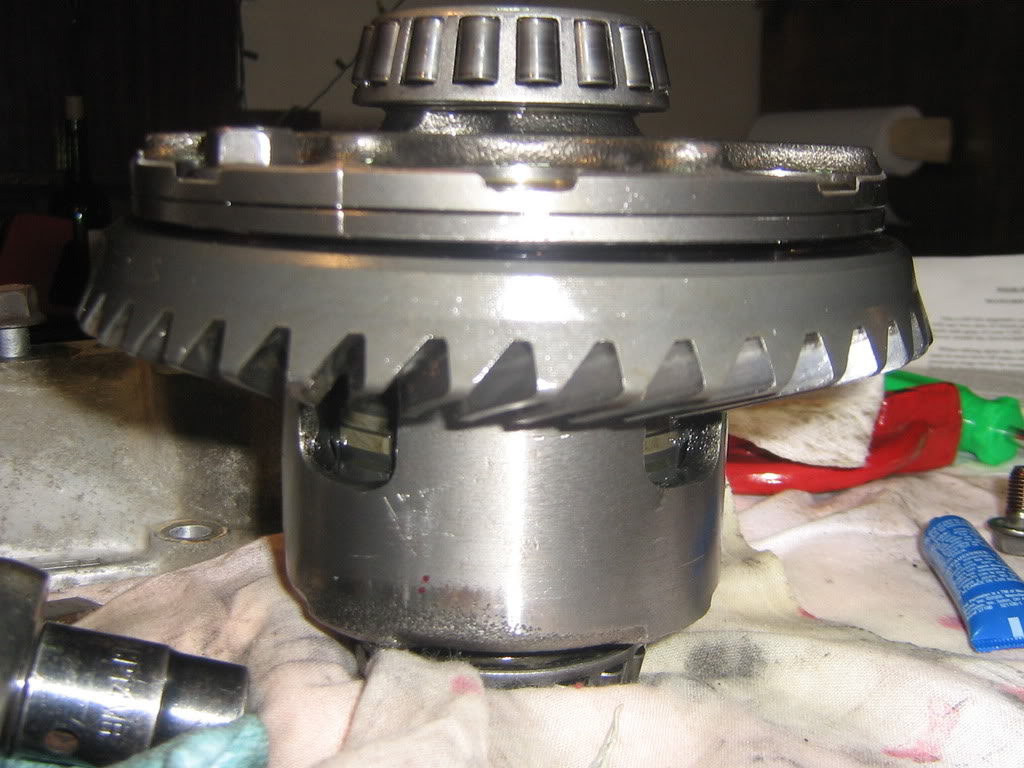
This is actually pretty tricky as the ring gear should be installed correctly and flush. If the ring gear tilts while tightening one bolt, you might have problems with the other side. I would suggest tightening each bolt uniformly until the ring gear is flush with the cover. Tighten as much as you can but don't kill yourself over it as you have to torque it down anyways.
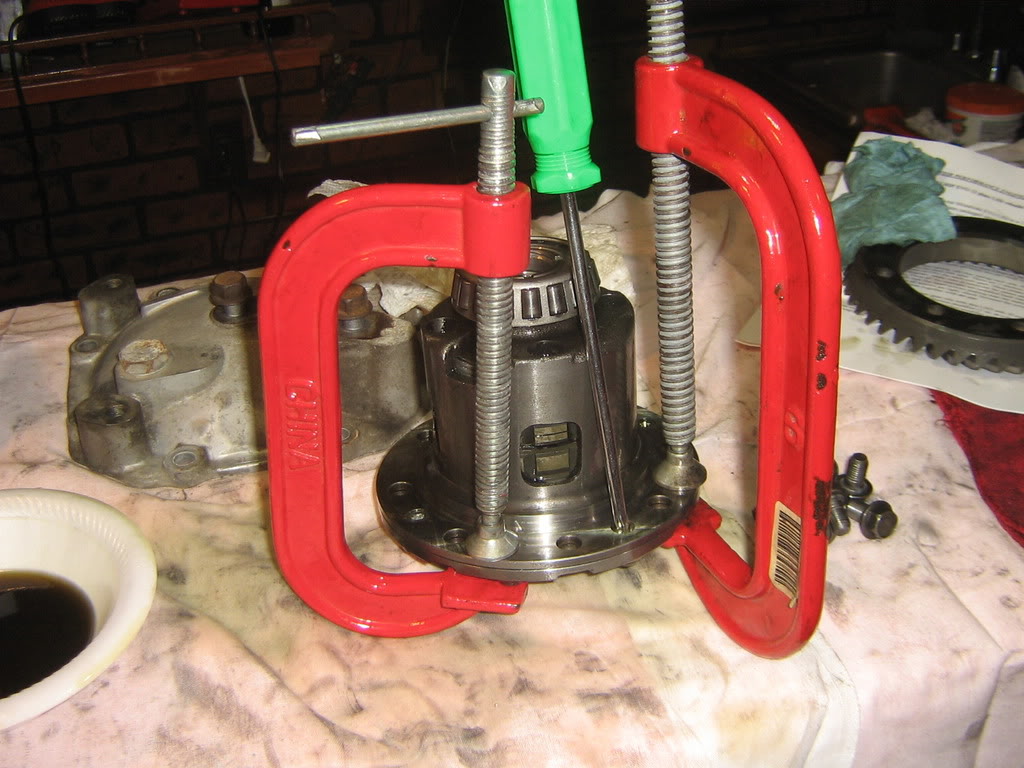
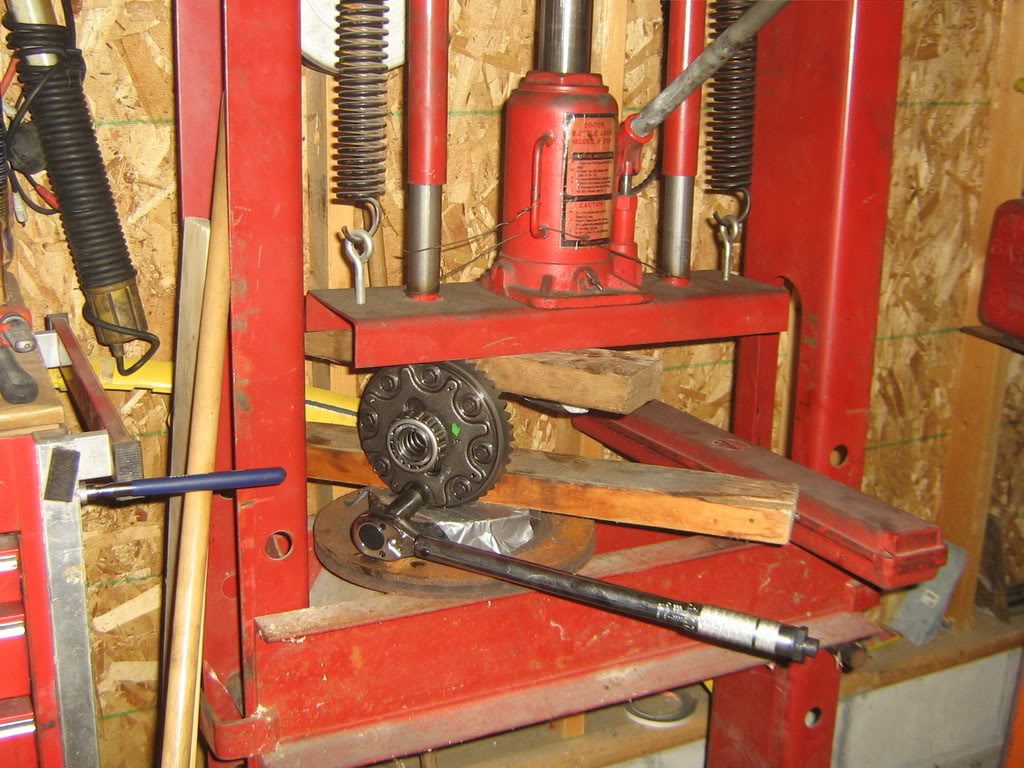
Now take the LSD assembly and put it in a table vice (last picture). Before you do that, makes sure you have 2 peices of wood to put on each side to avoid metal-to-metal contact.
If you don't have a table vice, either go to a neighbor with one or improvise. As you can see, I improvised with my hydraulic press.
Tighten each bolt with the torque wrench. The torque spec of this should be 62ft-lbs. I torqued them to 65ft-lbs to be safe ($30 torque wrench, sometimes can't trust it).
Hopefully, you didn't mix up the left and right side bearings and spacers (as what the first paragraph says, keep each side separate).
Now you are ready to install the LSD assembly into the diff housing.
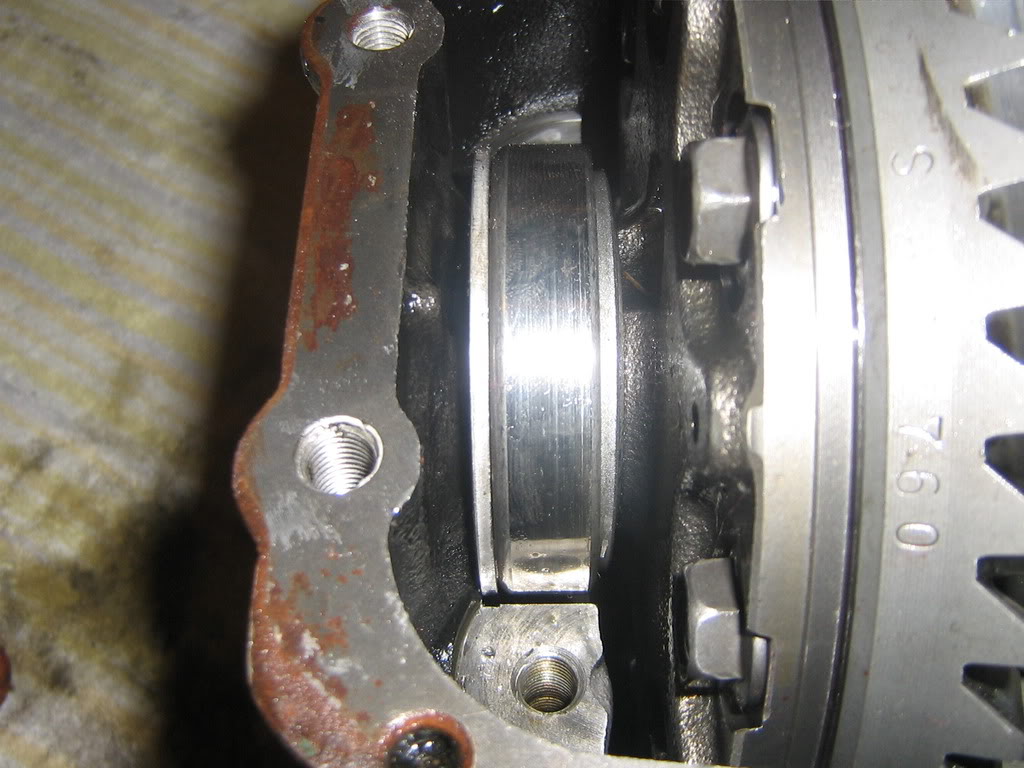
First and foremost, make sure the rings in the housing that hold the LSD are clean and free of debris.

Brake cleaner and shop towels work wonders.
Next put the side bearings on their respective sides of the LSD and then put the spacer on their respective sides too. Now drop the LSD into the housing in a uniform matter.
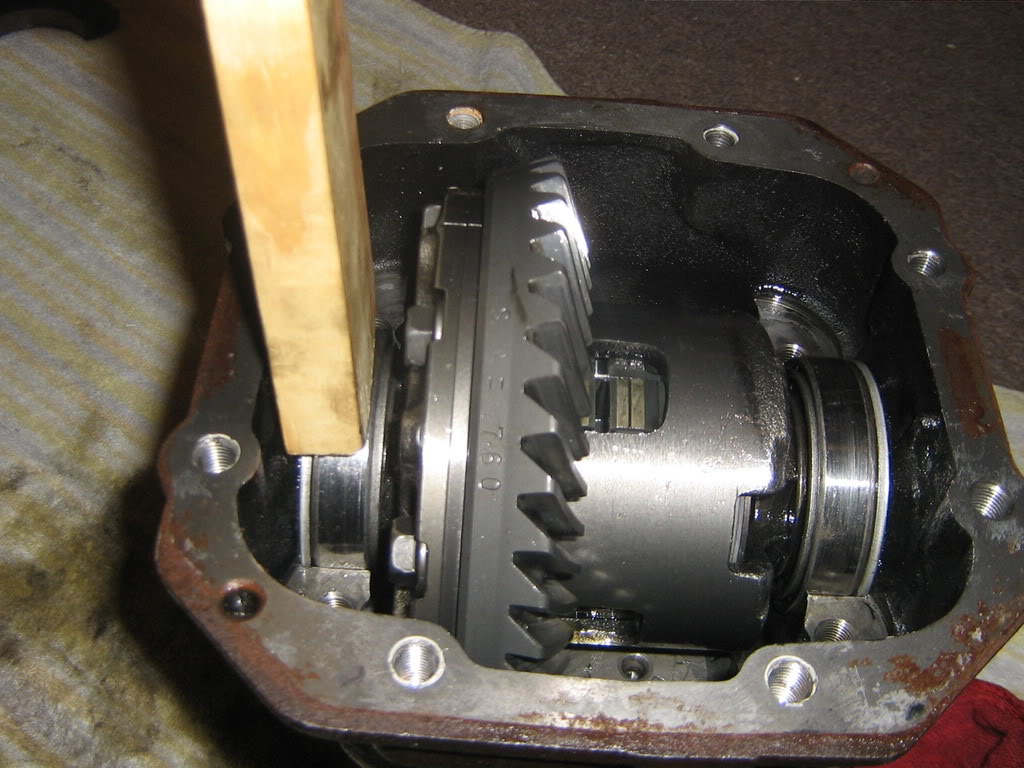
This might take a few tries if this is your first time. Maybe one of the hardest things to do in the rear diff. The LSD will not go completely in like what you see in the picture. You would need a mallet or a non-metal hammer to put each side down. Remember, hammer the LSD down uniformly.
If you do not have a small hammer or small mallet, a piece of wood would work wonders. Hammer it down uniformly until it's all the way down in the diff housing. You will know you can't hammer any more in when it just stops going down and the side holes are lined up for your axles.
Now put the bearing caps in and secure that LSD. Right before that, if you look in the housing where the bolt goes, you'll see a cresant. Match the cresant to the cresant of the bearing caps. Then, put the bolts in and tighten them. After tightening, torque them down to 27ft-lbs.
To make torquing easier, you do not have to put the diff in a vice. You can just put a foot down on the housing since 27ft-lbs is weak.
Apply that gasket maker around the housing, making sure there's enough to get it sealed up, and put the diff cover on. Torque each bolt to 26ft-lbs (or 35ft-lbs to make sure no fluid can leak out) and install it back into your car.
Tilt the front of the car lower than the back and fill about 22oz-24oz of your choice of fluid. If you want, you can also add friction modifiers to dumb down the chatter. Finally, torque the fill plug to 37ft-lbs, make sure all nuts and bolts are tightened and torqued, drop the car off those jack stands and test drive your like new rear diff.
Note:
Too much friction modifier will cause the plates to be very slippery and your LSD won't really be much of an LSD anymore. You might as well keep running an "open" diff.
This is my FIRST HOW TO so please be easy on me. I did everything that I explained here and if you have any other suggestions that would make the install easier, I can add it to this how to. This is just a way I did things. Everyone's different and creative with their own mechanical skills.
I called Weir and asked them about a break in procedure for the Maxgrip LSD kit. He just told me to drive around with a lot of turning left and right for a bit but other then that, no procedure. Drove it hard right away and noticed a lot less understeering and when I did a small circle, the inside wheel locks up and I can just hear the tire chirping off the ground. CRAZY! Recommend this kit to anyone that wants a 12 plate and/or wants to avoid spending $75 a plate at the dealership if you broke a plate or 7.
Edited: added a few steps in between to help with stacking the plates.
This video is very similar to our diffs. Worth a watch. Besides the design being different, it works and assembles the same.

This writeup is mainly for those that want to re-arrange your plates (more info can be found here).
This writeup is also for Weir Performance Maxgrip 12 plate LSD rebuild kit. It's pretty much the same except there's an extra disc on each side.
Googled and searched around the forum for something like this and there isn't much of anything on a how to (just the service manual). Decided to write my own to help others out.
Tools:
1/2" ratchet
14mm socket (1/2 drive)
torque wrench (1/2 drive)
screwdriver, phillips head
table vice
gear oil
plastic or foam bowl/plate (actual bowls/plates would work too but I don't think you would want the taste of gear oil in your mouth whereas you can just throw the plastic/foam away)
bottles of brake cleaner
C clamps
threadlocker (like Loc-tite) High/heavy strength recommended
gasket maker
hammer (non-metal/steel hammers as you might make dents)
small piece of wood
To start off, re-arrange your plates as seen here.
(The blue thing represents the spider gear assembly, which are numbers 13,12,11,10,9 on the service manual)
If anyone noticed something wrong in that picture, then you are correct. 2 of my discs are broken and caused 5 other plates to have big indents in them.
Instead of buying OEM (and spending over $500 on OEM plates), I just bought the Maxgrip LSD rebuild kit from Weir Performance. $180 for a 12 plate, can't go wrong.
The Maxgrip LSD kit also comes pre-arranged, as you can see above. One bag goes to one side and the other bag goes to the other. This is part of the instructions that came with it that shows you how you should arrange them.
Please note that you SHOULD NOT MIX both bags together. Each bag has different size plates and are arranged already. If you mix them up and put 2 big plates on one side and 2 small plates on the other, it could cause problems. That being said, take the plates out of the bag and clean them off with brake cleaner.
After arranging your plates, it's time to put them all together. Pour some gear oil into the plastic/foam bowl, lube the plates with the oil by dipping it in the bowl, and start stacking them in the main LSD cover (or "differential case B" as what the service manual calls it).
Please DO NOT FORGET about the spring plates. Since there's only 2 spring plates, it'll be the first and last plates you'll stack. Stack them properly as how the service manual shows you (in the second picture).
If you are just taking your diff apart, it would make it easier if you kept both spring plates separate and label which side is which. If you mixed up the plates and don't know which side is which, let's just hope you drove enough miles for the LSD cover and side cover to leave imprints on the spring plates themselves.
While you're stacking the first stack, try to align the friction disc teeth (the teeth in the middle) as best as you can. Don't worry about it not being perfectly aligned at this point.
When you drop the first spider gear end, spin the gear around so that the disc teeth falls into the spider gear grooves.
Now put the smaller spider gears in and put the last spider gear end on top.
Note: Make sure the pinion gear that holds the smaller spider gears is facing the correct way with the spider gear covers.
Stacking the plates is fairly easier as you follow the groove of the LSD cover. In the end, it should look like this.
After stacking all the plates, it's time to put the side cover on. Don't forget to align the markings together. Don't know what'll happen if you don't but I'm sure it won't be a happy day for you. Also make sure the top spring plate doesn't move around while you're trying to align the screw holes or else, the screws just won't go down.
Now, put the screws in and finger tighten them as much as you can. Carefully flip it over. Don't let the LSD assembly hit the table sideways or the spring plate might move and then the screws just won't go down all the way. Now, start screwing them, little by little, in a uniform matter. Criss-cross them too as you would a 4 lug wheel.
Once you hit the point where you're about to strip them, you can use your C clamps to clamp them down and screw them in some more.
Do this to each screw until the side cover and LSD cover are flush to each other. Don't forget to criss-cross here too. There isn't much of a torque spec on these. Just screw them down as much as possible and you should be good.
NOTE: From what I heard, you do not need the C clamps for just the 8 plate mod. Since I have a 12 plate, it fits a lot more snug and is a little more difficult to tighten the screws. For 12 plate, the gap between the housing and side cover is pretty big, which is why you would need the C clamp.
Next up is the ring gear or drive gear.
I would first check each hole to see if the bolt would go in correctly. Sometimes, the threadlocker that was applied from factory might cause the bolt to not go in all the way and hard to install the ring gear. Easiest thing to do is re-thread it with the bolt itself and an impact gun.
I highly suggest not using an impact gun while installing the ring gear to the LSD cover as it might cause some damages.
Next, apply threadlocker such as Loc-Tite, to each hole of the ring gear.
High/heavy strength threadlocker recommended. If you're extra cautious, you can also apply threadlocker to the bolts too.
And finally, installing the ring gear to the LSD cover.
This is actually pretty tricky as the ring gear should be installed correctly and flush. If the ring gear tilts while tightening one bolt, you might have problems with the other side. I would suggest tightening each bolt uniformly until the ring gear is flush with the cover. Tighten as much as you can but don't kill yourself over it as you have to torque it down anyways.
Now take the LSD assembly and put it in a table vice (last picture). Before you do that, makes sure you have 2 peices of wood to put on each side to avoid metal-to-metal contact.
If you don't have a table vice, either go to a neighbor with one or improvise. As you can see, I improvised with my hydraulic press.
Tighten each bolt with the torque wrench. The torque spec of this should be 62ft-lbs. I torqued them to 65ft-lbs to be safe ($30 torque wrench, sometimes can't trust it).
Hopefully, you didn't mix up the left and right side bearings and spacers (as what the first paragraph says, keep each side separate).
Now you are ready to install the LSD assembly into the diff housing.
First and foremost, make sure the rings in the housing that hold the LSD are clean and free of debris.
Brake cleaner and shop towels work wonders.
Next put the side bearings on their respective sides of the LSD and then put the spacer on their respective sides too. Now drop the LSD into the housing in a uniform matter.
This might take a few tries if this is your first time. Maybe one of the hardest things to do in the rear diff. The LSD will not go completely in like what you see in the picture. You would need a mallet or a non-metal hammer to put each side down. Remember, hammer the LSD down uniformly.
If you do not have a small hammer or small mallet, a piece of wood would work wonders. Hammer it down uniformly until it's all the way down in the diff housing. You will know you can't hammer any more in when it just stops going down and the side holes are lined up for your axles.
Now put the bearing caps in and secure that LSD. Right before that, if you look in the housing where the bolt goes, you'll see a cresant. Match the cresant to the cresant of the bearing caps. Then, put the bolts in and tighten them. After tightening, torque them down to 27ft-lbs.
To make torquing easier, you do not have to put the diff in a vice. You can just put a foot down on the housing since 27ft-lbs is weak.
Apply that gasket maker around the housing, making sure there's enough to get it sealed up, and put the diff cover on. Torque each bolt to 26ft-lbs (or 35ft-lbs to make sure no fluid can leak out) and install it back into your car.
Tilt the front of the car lower than the back and fill about 22oz-24oz of your choice of fluid. If you want, you can also add friction modifiers to dumb down the chatter. Finally, torque the fill plug to 37ft-lbs, make sure all nuts and bolts are tightened and torqued, drop the car off those jack stands and test drive your like new rear diff.
Note:
Too much friction modifier will cause the plates to be very slippery and your LSD won't really be much of an LSD anymore. You might as well keep running an "open" diff.
This is my FIRST HOW TO so please be easy on me. I did everything that I explained here and if you have any other suggestions that would make the install easier, I can add it to this how to. This is just a way I did things. Everyone's different and creative with their own mechanical skills.
I called Weir and asked them about a break in procedure for the Maxgrip LSD kit. He just told me to drive around with a lot of turning left and right for a bit but other then that, no procedure. Drove it hard right away and noticed a lot less understeering and when I did a small circle, the inside wheel locks up and I can just hear the tire chirping off the ground. CRAZY! Recommend this kit to anyone that wants a 12 plate and/or wants to avoid spending $75 a plate at the dealership if you broke a plate or 7.
Edited: added a few steps in between to help with stacking the plates.
This video is very similar to our diffs. Worth a watch. Besides the design being different, it works and assembles the same.
Last edited by Piro Fyre; Aug 5, 2011 at 06:16 PM.

Account Disabled
Joined: Jul 2011
Posts: 34
Likes: 0
From: FL
Nice write up  . I am tackling this job tomorrow and this was very helpful. This is definitely the new DIY mod that will become very popular. When reinstalling the diff in the housing I am thinking about nailing two three pieces of wood, two vertical and one horizontal like a table, and hammering that in the middle so both sides get even pressure as it presses in.
. I am tackling this job tomorrow and this was very helpful. This is definitely the new DIY mod that will become very popular. When reinstalling the diff in the housing I am thinking about nailing two three pieces of wood, two vertical and one horizontal like a table, and hammering that in the middle so both sides get even pressure as it presses in.


Thread Starter
Evolved Member
iTrader: (23)
Joined: Feb 2009
Posts: 951
Likes: 3
From: Milwaukee, WI
Very aggressive in the corners. It can whip it's rear end out if you mad the gas but if you apply correct amount of gas, the rear end will follow you through the corners. Before, I would get massive understeer when I step on the gas but now, it's very minimal. I guess this is how FR cars feel like. Only problem is when steering out of my drive way (or any tight steering), I have to give it more gas because the diff locks up very easily.
As for noise, I don't know what noise I'm looking for as my car's loud and I hear other things clunking that isn't because of the diff. Only noise I hear is when I'm steering left or right, the inside tires squeak and rub since the rear diff locks on accel. I don't know if you can call this chatter or not but it doesn't bother me much.
It can whip it's rear end out if you mad the gas but if you apply correct amount of gas, the rear end will follow you through the corners. Before, I would get massive understeer when I step on the gas but now, it's very minimal. I guess this is how FR cars feel like. Only problem is when steering out of my drive way (or any tight steering), I have to give it more gas because the diff locks up very easily.As for noise, I don't know what noise I'm looking for as my car's loud and I hear other things clunking that isn't because of the diff. Only noise I hear is when I'm steering left or right, the inside tires squeak and rub since the rear diff locks on accel. I don't know if you can call this chatter or not but it doesn't bother me much.
Last edited by Piro Fyre; Jul 8, 2011 at 10:45 PM.


Trending Topics


Very aggressive in the corners. It can whip it's rear end out if you mad the gas but if you apply correct amount of gas, the rear end will follow you through the corners. Before, I would get massive understeer when I step on the gas but now, it's very minimal. I guess this is how FR cars feel like. Only problem is when steering out of my drive way (or any tight steering), I have to give it more gas because the diff locks up very easily.
As for noise, I don't know what noise I'm looking for as my car's loud and I hear other things clunking that isn't because of the diff. Only noise I hear is when I'm steering left or right, the inside tires squeak and rub since the rear diff locks on accel. I don't know if you can call this chatter or not but it doesn't bother me much.
It can whip it's rear end out if you mad the gas but if you apply correct amount of gas, the rear end will follow you through the corners. Before, I would get massive understeer when I step on the gas but now, it's very minimal. I guess this is how FR cars feel like. Only problem is when steering out of my drive way (or any tight steering), I have to give it more gas because the diff locks up very easily.As for noise, I don't know what noise I'm looking for as my car's loud and I hear other things clunking that isn't because of the diff. Only noise I hear is when I'm steering left or right, the inside tires squeak and rub since the rear diff locks on accel. I don't know if you can call this chatter or not but it doesn't bother me much.
Thread Starter
Evolved Member
iTrader: (23)
Joined: Feb 2009
Posts: 951
Likes: 3
From: Milwaukee, WI
IMO, if you have the down time and money, TRE is worth it. They do a lot more to a rear diff than just swap plates to a 12 plate system. But if you're like me and always wanting to stride to learn more about a car or just really short on money, then DIY. As I said, $180 for a 12 plate isn't bad, considering OEM plates cost $75 each.
Last edited by Piro Fyre; Jul 10, 2011 at 07:45 PM.


(don't have tre's diff just fyi, not saying that because i have it or something)
VERY good thread though - should be stickied. more info:
https://www.evolutionm.net/forums/ev...ound-here.html
https://www.evolutionm.net/forums/ev...y-factory.html
like OP said, TRE is def worth it - but for those running in STU, wanting to save money, or just for anyone wanting more lock up in the rear (oversteer), this mod is a no brainer.
Last edited by kyoo; Jul 10, 2011 at 07:56 PM.