Simple 6 pot brake setup
 Mar 6, 2014, 07:37 PM
#31
Evolving Member
Thread Starter
iTrader: (13)
Join Date: May 2006
Location: utah
Posts: 310
Likes: 0
Received 0 Likes
on
0 Posts
 Nice work Boostzealot... It will be hard not to try this out if I come by a nice set... Keep the thread alive on how well this holds up!
 I still need to sell them actually.
 Mar 6, 2014, 07:55 PM
#32
Evolving Member
Thread Starter
iTrader: (13)
Join Date: May 2006
Location: utah
Posts: 310
Likes: 0
Received 0 Likes
on
0 Posts
Wow thanks!
Never wouldve thought about this.
I was also wondering if the matching rear brakes would fit in the rear and if you would need a larger master cylinder for the new rotors.
The head of the bolts dont sit flush on the caliper due to them being elongated right?
Did you also have a width comparison by any chance?
Once again thanks so much for the info!
Youre super awesome!

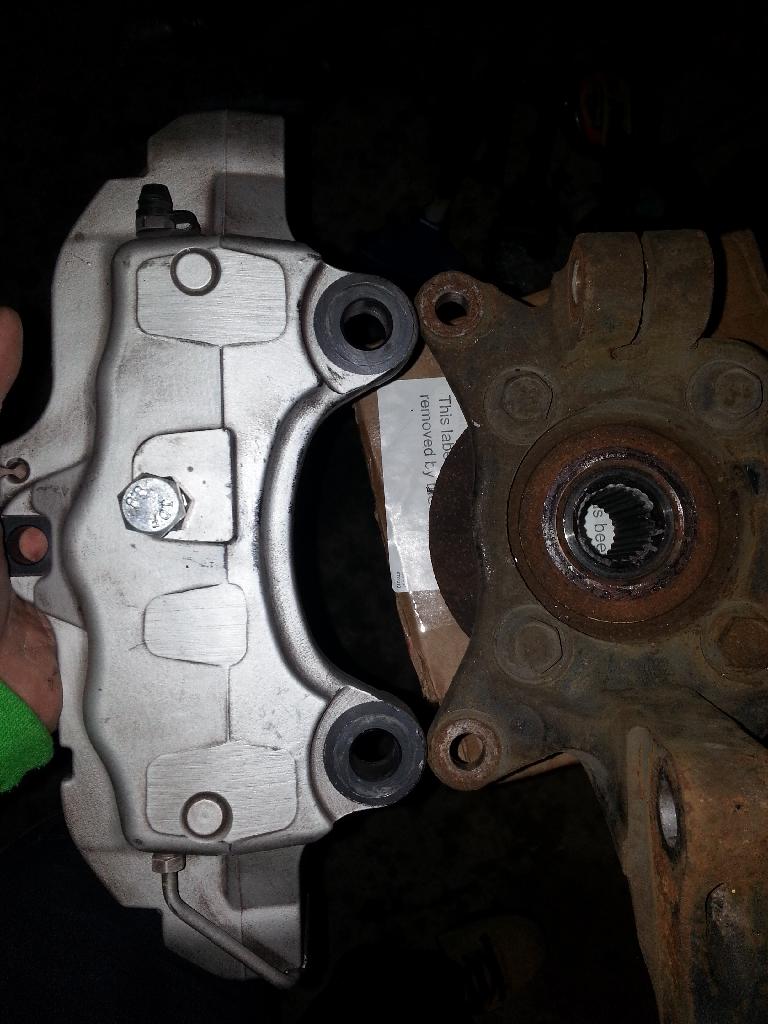
and this one is with using the dust shield as a template for modding the 17z caliper's mounting holes.

Again, all you have to do is elongate the mounting holes appropriately on the 6pots to match our hubs and shave about 1/16-1/8" off the surface of the mounting ear that contacts the hub and boom. I would recommend shaving the casting off the the hub just enough to allow the caliper to sit on something flat when mounting them to the hub. Do make certain not to alter the stock mounting tabs on the hub to make the caliper fit. Instead mod the caliper to fit. If you are not confident in getting a level cut on the caliper have a machine shop shave the necessary amount off so that the caliper sits flush on the hub and does not tilt when mounted. If it sits tilted it WILL ruin the biased pad sooner and your pedal will feel soft no matter what you do because the unbiased side of the caliper will have to extend its pistons further in order to apply the brake pressure required by your pedal travel.
As far as having to upgrade the master cylinder in order to run the matching rears. I think the 22mm diameter suits the weight of the car better than upgrading it. You can always have too much brake. Imagine the force the cayenne produces to stop its lofty weight from 120mph applied to a vehicle that is and can be 40% lighter. You can get to the point where you eat through tires or worse, lock them up. So I believe sacrificing some of that power in favor of having better braking for extended periods of hard abuse is much more beneficial.
I hope to be able to test some 17's this weekend to confirm whether they will work or not for 17's. In theory they should considering they fit on 330mm rotors and are labeled 17z for being designed for 17in wheel options. That is also why there are other variants of these calipers that allow for bigger wheel and rotor options. Like the 18z caliper set can be fitted on 350mm rotors under an 18in wheel. Make sense?
Mar 6, 2014, 09:03 PM
#33
Evolving Member
Thread Starter
iTrader: (13)
Join Date: May 2006
Location: utah
Posts: 310
Likes: 0
Received 0 Likes
on
0 Posts
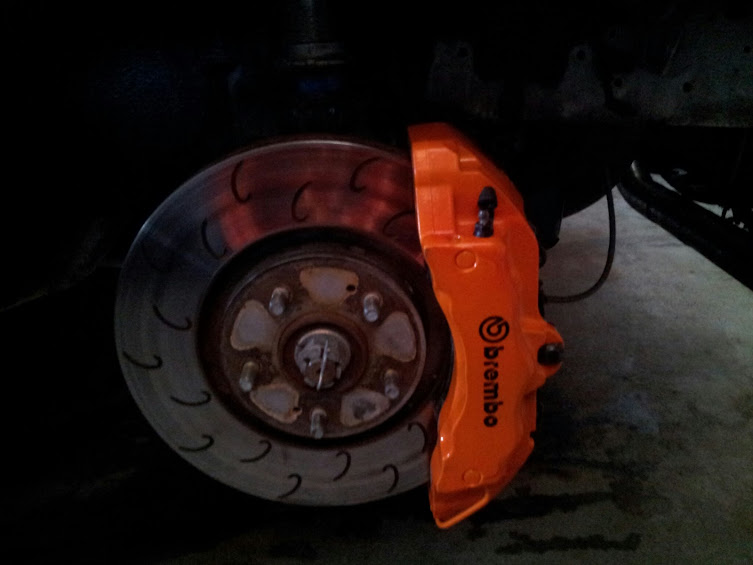
Here are some more pics from Monday before the first drive.
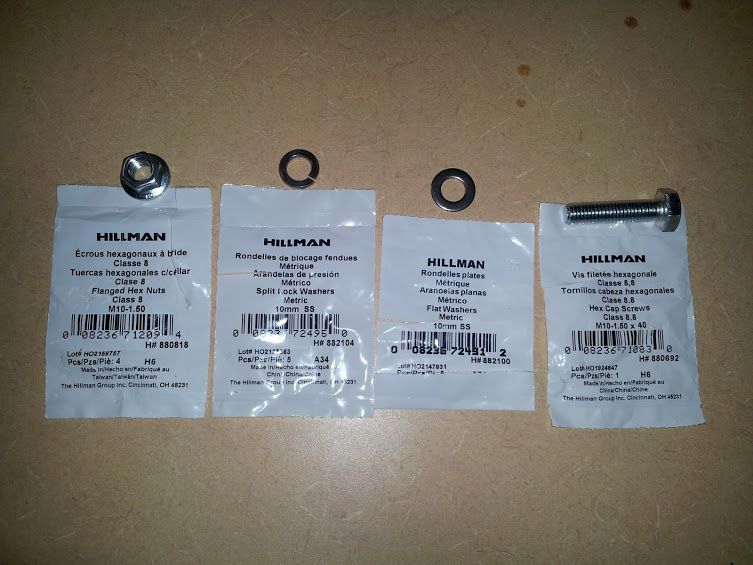
The hardware I used.

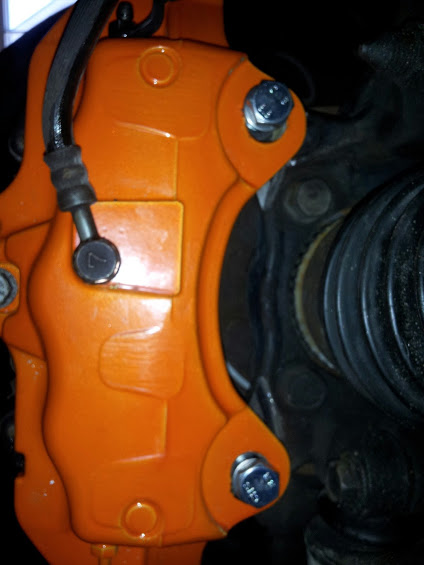
Fully bolted down and ready for bleeding
Attached using said hardware. My advice would be to use a washer that has more diameter so that the bolt is able to hold onto the caliper across a greater surface area rather than what is right under it. I will be changing mine out this weekend.
Calipers all bled, wheels installed, ready to go for a drive almost.

The hardware I used.

Fully bolted down and ready for bleeding

Attached using said hardware. My advice would be to use a washer that has more diameter so that the bolt is able to hold onto the caliper across a greater surface area rather than what is right under it. I will be changing mine out this weekend.

Calipers all bled, wheels installed, ready to go for a drive almost.
 Mar 7, 2014, 06:49 AM
#34
Here are some more pics from Monday before the first drive.
The hardware I used.
Fully bolted down and ready for bleeding

Attached using said hardware. My advice would be to use a washer that has more diameter so that the bolt is able to hold onto the caliper across a greater surface area rather than what is right under it. I will be changing mine out this weekend.

Calipers all bled, wheels installed, ready to go for a drive almost.

The hardware I used.
Fully bolted down and ready for bleeding
Attached using said hardware. My advice would be to use a washer that has more diameter so that the bolt is able to hold onto the caliper across a greater surface area rather than what is right under it. I will be changing mine out this weekend.
Calipers all bled, wheels installed, ready to go for a drive almost.
With that hardware above what was the nut for?
Anthony
Mar 7, 2014, 09:10 PM
#36
Evolving Member
Thread Starter
iTrader: (13)
Join Date: May 2006
Location: utah
Posts: 310
Likes: 0
Received 0 Likes
on
0 Posts
Anthony, the hardware was what I proposed when I first started. The bolt is a 40mm bolt in length and truly looking at it now I needed a 45mm bolt to allow myself to run a lock washer on the hardware setup. But instead I installed only the bolt, washer, and nut.
The nut is for the other side of the mounting ear on the hub. The bolt goes through the caliper mounting ear with the washer attached so that there is a flat non wavering surface for the bolt to seat upon. The bolt should protrude then through the mounting ear on the hub if you elongated the caliper mounting holes enough and then the nut is installed. So looking directly at the caliper (as if you were looking down the middle of the rotor looking into the vanes) the hardware would be installed starting from the right: bolt then washer then caliper mounting ear sitting against hub mounting ear then nut. I torqued mine to 36 ft/lbs to start. I will be checking them tomorrow again after I drive the car back from Kansas City and before I swap the washer to one with more diameter. The thickness of the washer was not a concern but it needs to not bend when you torque the bolt and it must not take away from the length of the bolt. Once the nut is installed on the bolt the end of the bolt should be at very minimum flush with the head of the nut. Space is limited back there because if the bolt is too long it has the possibility to contact the back of the rotor. I would stay no longer than a 50mm bolt back there to avoid this.
Brendan, I totally agree! I have always wanted a BBK and had been admiring the stoptech trophy kit but never could justify spending that kind of money on just the fronts. These work very well so far and they aren't even fully bled just yet. I wish I had more time to bleed them before I took it to get tuned but I get her back tomorrow and its supposed to snow so I guess I will have all day to verify they are bled well and then sunday give an all out test and pics with the car. I can't wait to finally say I have this all done.
Mar 8, 2014, 01:28 PM
#38
Evolving Member
Thread Starter
iTrader: (13)
Join Date: May 2006
Location: utah
Posts: 310
Likes: 0
Received 0 Likes
on
0 Posts
See I was actually looking at those or the cadillac ctsv rears since they are also mega cheap but just wasnt sure on the fitment. That would balance the brake bias out a bit but again would take a full circuit bleed and ss lines to take advantage of four more pistons out back in a car thats already forward biased. I would love to try it out. Give me a month. 
Mar 9, 2014, 06:01 AM
#41

Certainly appreciate your craftiness & willingness to take on a retrofit project
This view here is a real project killer & looks very un-sound / un-safe. Would not trust this on the street or certainly on the track
This project really needs a proper adapter bracket to make it worthy
BTW, If you'd like to see the proper way to retrofit Porsche 6 pots see this thread page here. Scroll down to post #177 & you will see the adapter brkts used
http://www.lancerregister.com/showth...268523&page=12
Last edited by MinusPrevious; Mar 9, 2014 at 06:53 AM.
Mar 9, 2014, 08:48 PM
#42
Evolving Member
Thread Starter
iTrader: (13)
Join Date: May 2006
Location: utah
Posts: 310
Likes: 0
Received 0 Likes
on
0 Posts
Minus, Thank you for the kind words and an opportunity to explain the setup along with comparisons between my porsche 6pots and his.
In retrospect, I have been going over improvements on the setup in my mind since Monday of last week and have been thinking of more sound ways to get the calipers mounted considering the closeness of the unmodified mounting holes. A bracket would very nicely clean up the setup for sure and would even reposition the caliper a few degrees clockwise or counter clockwise depending on the orientation of the bracket. Not anything bad but definitely something to consider when spearheading a retrofit.
If we are to compare my setup to Clive's, there are massive amounts of differences that don't really allow them to be compared. The GT2 6pots are a totally different caliper to the 17z calipers I used from the Cayenne. On the GT2's they are top mounted not side mounted like mine. So that would have made a necessity for a bracket to be made like Clive did. Since I saw that the caliper mounting position was close to ours I decided to get ready to bite the bullet if they didnt work and went ahead and purchased them after researching if they were a viable upgrade in the first place. And when I say research I mean I went over dozens of documentation, hundreds of posts, a handful of people who had converted to them and much more for months (6 to be exact) before purchasing them. Once I got them I made sure that I wasnt going to have to mod the hub in anyway that would keep me from returning to the oem brembos. I felt that the amount of material on the 17z caliper justified modifying the caliper to fit. Again, its not by much at all. I remember it being like literally under 5mm on each ear that needed to be removed in order to properly align the holes.
Now, about the picture not giving warm fuzzies. Yeah I admit that the washer that I used is not the one that will stay there. But I presented that info in the previous pages as simply saying that I plan to go with one that covers more area. Not as to cheat the obvious but actually to provide the bolt enough surface material that was harder than the soft aluminum of these calipers. The reason there is a nut on the rotor side is because the oem brembos are threaded. These are not. Even if they were they are on the inboard side of the hub mounting instead of the outboard. As far as any of my concerns for the caliper maybe moving due to the holes being elongated, that concern is non-existent. Reason is, the holes are not the same distance apart between the hub and the caliper. That being said, the hub has the holes positioned further apart and since I had to modify the calipers holes to match it by moving each hole in the respective direction (i.e. away from center) the caliper, in a way, is now in a position that won't allow for movement nor will it allow the hardware to become loose over time and then allow it to move.
Again, the only reason I didn't have a bracket made was to prove these could be mounted to our hubs with very little effort and money along with gaining a great amount of consistency and initial bite without tearing up the implemented design brake bias.
Mar 13, 2014, 06:15 PM
#43

Nice to know yours works out. I currently have the 18Z calipers and was going to do something like this as a project as soon as I can get my car up and running. Might not happen and I might just sell the calipers off to some Audi/VW guy. Really depends on if I feel like dealing with this much trouble of trying to retrofit it to the car. Anyways, here are some pics of the holes for those thinking about doing the 18Z calipers. Kind of the same except the holes are a lot bigger.
I also have the rears. The holes are really close and very little will have to be milled out.

Rotor sizes are 350mm fronts and 330mm rears. Same as an X. I was looking for X rotors to see if they would work but no one seemed to have any spares they don't need.

I also have the rears. The holes are really close and very little will have to be milled out.

Rotor sizes are 350mm fronts and 330mm rears. Same as an X. I was looking for X rotors to see if they would work but no one seemed to have any spares they don't need.
Mar 14, 2014, 09:33 AM
#44
Evolving Member
Thread Starter
iTrader: (13)
Join Date: May 2006
Location: utah
Posts: 310
Likes: 0
Received 0 Likes
on
0 Posts
Aw heck yeah! I was wondering about the offset for the rears and how they fit based on our rotor design and offset from the hub.
Basically if you take a CT9A rotor and put it on the hub, how well do the cayenne calipers line up with the rotor for the rears? If they are able to slip over the hub and have the same clearance as far as distance between the pistons and the rotor surface on each side then modding the rear caliper holes to work wont be too much work. And if you are thinking about getting rid of the calipers for the rear if that is the case then we may need to talk. lol
Thanks for the pics and more info!
