
HOW TO: In car ACD reflash / logging / tuning (evo 8/9)

Thread Starter
Evolved Member
iTrader: (34)
Joined: May 2010
Posts: 1,142
Likes: 46
From: Bethesda, MD
HOW TO: In car ACD reflash / logging / tuning (evo 8/9)
First off I am making this how-to to encourage open source tuning of our ACDs and to make it more accessible to regular people. There are vendors that are now offering to reflash but I think its so easy to DIY so why go through the hassle of pulling it out. The whole ACD tuning scene is made possible because of people like Merlin, sba, tactrix and many others over the past 2 years or so. To be clear, none of this is my own invention, but I am consolidating all the info on how to get started for you.
Refer to this thread for more info: https://www.evolutionm.net/forums/ec...789-acd-2.html
What you need:
-Evo8 engine ecu large pins (there is a large pin size and a small pin size) - sourcing these was actually harder than evo9 ecu pins, but use your google-foo
-18 to 20 gauge wire, anywhere from 3 to 4 feet long as long as it can reach basically to your OBD2 port under the steering column. You may want to run it behind the dash for style points so add length for that.
-2.5mm headphone / microphone jack (NOT the standard 3.5mm jack!)
-ACD ecu pins like these: http://www.mouser.com/ProductDetail/TE-Connectivity-AMP/175269-1/?qs=AplfTeSvkkBjTmtdQkEO5w%3d%3d
-wire cutters/crimpers
-soldering iron
-very small (electrian's) flat head screwdriver
-openport 2.0
-laptop
-ecuflash 1.43 or newer
-evoscan 2.9 or newer
The concept:
As you guys may be aware there are more and more vendors claiming to offer ACD tuning services. They require you to send in your ECU for reflashing, which is a bit of a hassle for most of us. Especially since you're literally 1 wire away from being able to reflash in your car just like you would reflash your ECU.
The 1 wire is the write wire ("K-line") that for the engine ecu you would plug into headphone jack like port in your openport 2.0. Otherwise you hook it up to your regular OBD2 port and if you use the attached xml files you can read and write just like you would for tuning your engine ecu. You can also log with evoscan this way. So basically you can keep logging, tweaking and reflashing until you get something that works well for you. Refer to Merlin's thread above for tuning strategies. Best part, if you already have the tools and the openport 2.0 then this mod costs less than $10 to do.
Hardware setup:
1. Expose some bare wire and crimp the wire onto your ecu pin. The pins look like this:
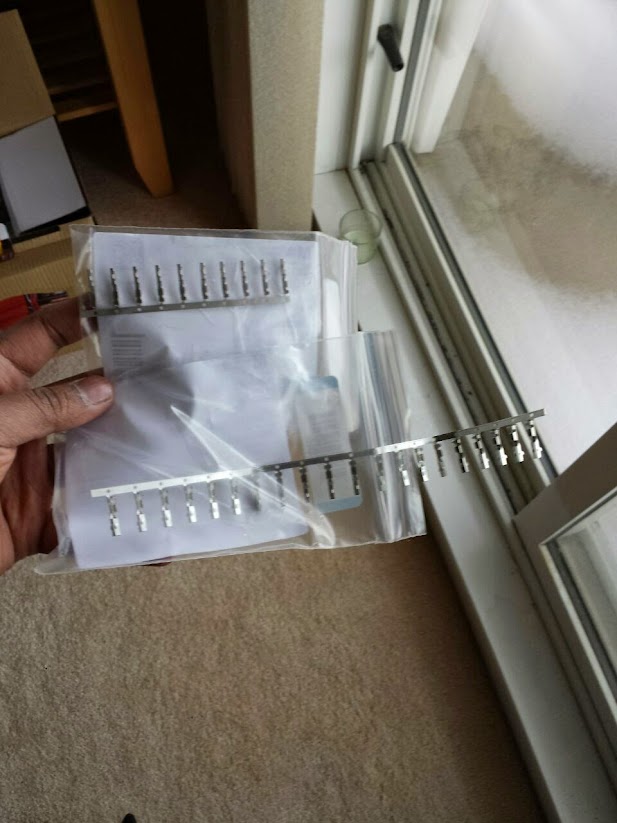
Its the top row, the bottom row are the big pins (wrong ones). I had a bit of trial and error finding the right one. I have included a link to where I bought the ACD pins above. Unfortunately I don't have a pic of the wire crimped to the ecu pin but its not hard to figure out.
2. Get your 2.5mm jack out. Again, this isn't the standard 3.5mm headphone jack that most jacks come with. I got mine from radioshack ("the Source" in Canada where I live) for less than a dollar.

Solder the other end of the wire to the connector on the jack. It helps if you put a drop of solder on the wire and the connector first. Make sure it is the connector for the tip of the jack (in case you have a 2 lead jack), which is what the tactrix cable reads. The ground doesn't matter since the tactrix grounds through your obd2 port anyways.

Make sure you crimp the holder onto the insulating sheath (see above pic) to provide strain relief and take the tension off your solder. Same goes with the ecu pin side. Then slide your protective sheath on.

3. Now time to install the write wire into the stock ACD ecu plugs. First pull out your glove box. You need to pop the left stopper out like this:

Then you flex the box a little on the right to get the right stopper free. The whole thing should drop and pull away. Make sure you take out the kick panel too to make it easier to reach the plugs.

You can just barely see the yellow ACD plugs there to the right of the HVAC filter (white rectangle). Heres a closer shot.

If you reach from underneath the dash panel, you will probably just be able to get your finger tips on the plug, or at least thats how it was for me. But thats all you need to press the release tab and get the 2 plugs out.

You can pull the plugs lower down into the foot well, they look like this:

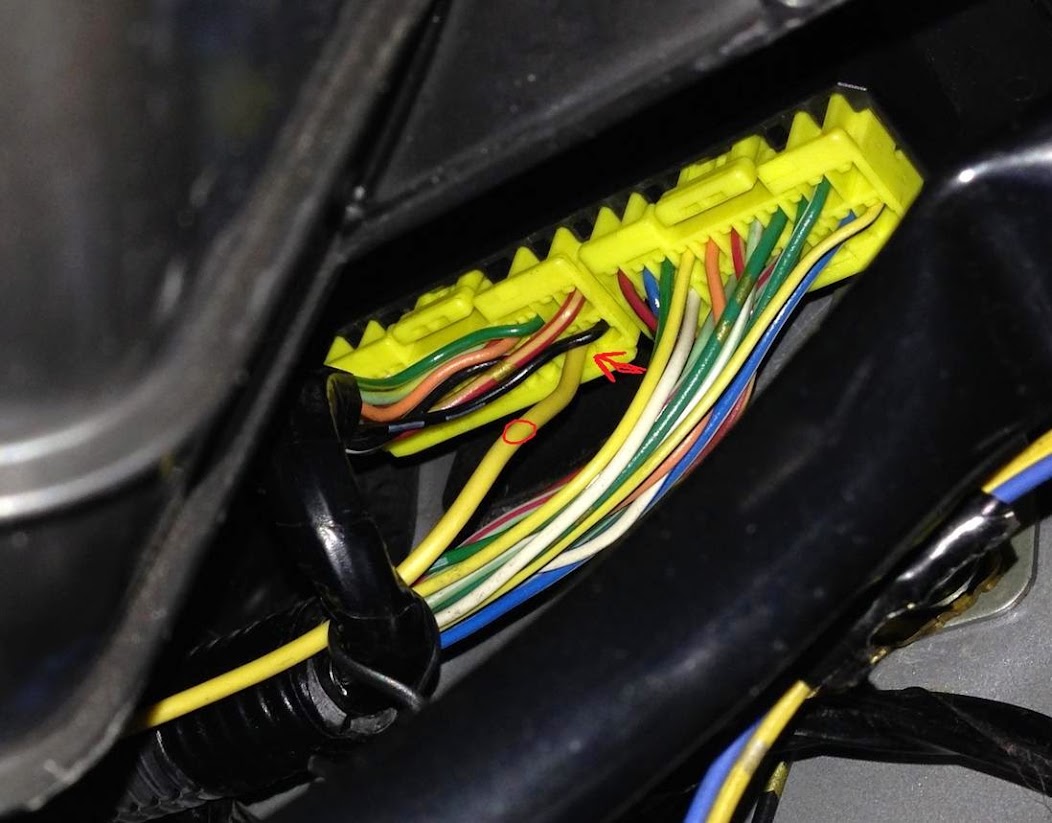
You're going to put the ecu pin into pin25, which is on the larger connector. Ie. where you see the yellow line in this diagram:

You can also refer to the pic below to see what other colour wires are around to know if you got the right slot.
But before you can slide the ECU pin, you need to release the lock first. The lock is on the side with white strip. You need a very small flat head to pop the lock up:

You need to use your flathead on both slots to pop the lock up. Then you can slide your pin into the right slot. Be careful when you put it in, it is already keyed to go in only one way. And you need to push it alll the way in before the lock will be able to snap back into place. Should look like this:

Now plug your ACD back in. You can remount the glovebox.
4. Hook your write wire into your openport 2.0 cable like below:

Now you're ready to plug into your regular OBD2 port and read/write to your ACD ecu!
5. Load both xml files I've attached in this post into your ecuflash rom metadirectory. Search on here to see how to use ecuflash if you don't know what I'm referring to.
6 (bonus). You can tuck the wire behind the dash and run it to close to where your OBD2 port is, since thats where your openport 2.0 will be that you need to plug into. Theres conveniently a little pocket in the dash panel under the steering column that I tuck my plug into when not in use.
Boot up ecuflash and try to read your ACD ecu, if everything is hooked up right it will read no problem. I recommend saving your original file. You can try writing Merlin's mildly tuned rom into your ACD as well (its USDM only file). Others have tested and have found a nice performance improvement. You can also use it to compare the differences between the stock rom to see what parameters will effect what changes in the car's handling.
When logging with evoscan make sure you switch to openport 2.0 (if you don't have it set to this already). That will let you log all the sensors associated with ACD.
Hope that helps! Let me know if there is any part of the how-to I can clarify. And please feel free to post your ACD tuning experiences and roms for others to learn as well.
Refer to this thread for more info: https://www.evolutionm.net/forums/ec...789-acd-2.html
What you need:
-Evo8 engine ecu large pins (there is a large pin size and a small pin size) - sourcing these was actually harder than evo9 ecu pins, but use your google-foo
-18 to 20 gauge wire, anywhere from 3 to 4 feet long as long as it can reach basically to your OBD2 port under the steering column. You may want to run it behind the dash for style points so add length for that.
-2.5mm headphone / microphone jack (NOT the standard 3.5mm jack!)
-ACD ecu pins like these: http://www.mouser.com/ProductDetail/TE-Connectivity-AMP/175269-1/?qs=AplfTeSvkkBjTmtdQkEO5w%3d%3d
-wire cutters/crimpers
-soldering iron
-very small (electrian's) flat head screwdriver
-openport 2.0
-laptop
-ecuflash 1.43 or newer
-evoscan 2.9 or newer
The concept:
As you guys may be aware there are more and more vendors claiming to offer ACD tuning services. They require you to send in your ECU for reflashing, which is a bit of a hassle for most of us. Especially since you're literally 1 wire away from being able to reflash in your car just like you would reflash your ECU.
The 1 wire is the write wire ("K-line") that for the engine ecu you would plug into headphone jack like port in your openport 2.0. Otherwise you hook it up to your regular OBD2 port and if you use the attached xml files you can read and write just like you would for tuning your engine ecu. You can also log with evoscan this way. So basically you can keep logging, tweaking and reflashing until you get something that works well for you. Refer to Merlin's thread above for tuning strategies. Best part, if you already have the tools and the openport 2.0 then this mod costs less than $10 to do.
Hardware setup:
1. Expose some bare wire and crimp the wire onto your ecu pin. The pins look like this:
Its the top row, the bottom row are the big pins (wrong ones). I had a bit of trial and error finding the right one. I have included a link to where I bought the ACD pins above. Unfortunately I don't have a pic of the wire crimped to the ecu pin but its not hard to figure out.
2. Get your 2.5mm jack out. Again, this isn't the standard 3.5mm headphone jack that most jacks come with. I got mine from radioshack ("the Source" in Canada where I live) for less than a dollar.
Solder the other end of the wire to the connector on the jack. It helps if you put a drop of solder on the wire and the connector first. Make sure it is the connector for the tip of the jack (in case you have a 2 lead jack), which is what the tactrix cable reads. The ground doesn't matter since the tactrix grounds through your obd2 port anyways.
Make sure you crimp the holder onto the insulating sheath (see above pic) to provide strain relief and take the tension off your solder. Same goes with the ecu pin side. Then slide your protective sheath on.
3. Now time to install the write wire into the stock ACD ecu plugs. First pull out your glove box. You need to pop the left stopper out like this:
Then you flex the box a little on the right to get the right stopper free. The whole thing should drop and pull away. Make sure you take out the kick panel too to make it easier to reach the plugs.
You can just barely see the yellow ACD plugs there to the right of the HVAC filter (white rectangle). Heres a closer shot.
If you reach from underneath the dash panel, you will probably just be able to get your finger tips on the plug, or at least thats how it was for me. But thats all you need to press the release tab and get the 2 plugs out.
You can pull the plugs lower down into the foot well, they look like this:
You're going to put the ecu pin into pin25, which is on the larger connector. Ie. where you see the yellow line in this diagram:
You can also refer to the pic below to see what other colour wires are around to know if you got the right slot.
But before you can slide the ECU pin, you need to release the lock first. The lock is on the side with white strip. You need a very small flat head to pop the lock up:
You need to use your flathead on both slots to pop the lock up. Then you can slide your pin into the right slot. Be careful when you put it in, it is already keyed to go in only one way. And you need to push it alll the way in before the lock will be able to snap back into place. Should look like this:
Now plug your ACD back in. You can remount the glovebox.
4. Hook your write wire into your openport 2.0 cable like below:
Now you're ready to plug into your regular OBD2 port and read/write to your ACD ecu!
5. Load both xml files I've attached in this post into your ecuflash rom metadirectory. Search on here to see how to use ecuflash if you don't know what I'm referring to.
6 (bonus). You can tuck the wire behind the dash and run it to close to where your OBD2 port is, since thats where your openport 2.0 will be that you need to plug into. Theres conveniently a little pocket in the dash panel under the steering column that I tuck my plug into when not in use.
Boot up ecuflash and try to read your ACD ecu, if everything is hooked up right it will read no problem. I recommend saving your original file. You can try writing Merlin's mildly tuned rom into your ACD as well (its USDM only file). Others have tested and have found a nice performance improvement. You can also use it to compare the differences between the stock rom to see what parameters will effect what changes in the car's handling.
When logging with evoscan make sure you switch to openport 2.0 (if you don't have it set to this already). That will let you log all the sensors associated with ACD.
Hope that helps! Let me know if there is any part of the how-to I can clarify. And please feel free to post your ACD tuning experiences and roms for others to learn as well.
Last edited by deeman101; Sep 17, 2015 at 11:48 PM.


Trending Topics

Thread Starter
Evolved Member
iTrader: (34)
Joined: May 2010
Posts: 1,142
Likes: 46
From: Bethesda, MD


Thread Starter
Evolved Member
iTrader: (34)
Joined: May 2010
Posts: 1,142
Likes: 46
From: Bethesda, MD
Thread Starter
Evolved Member
iTrader: (34)
Joined: May 2010
Posts: 1,142
Likes: 46
From: Bethesda, MD
I updated the OP with a link to where I bought the ACD pins. http://mouser.com/ProductDetail/TE-C...liN80oxFE3h5Jy
Evolving Member
Joined: Sep 2012
Posts: 125
Likes: 1
From: kuwait