
Evo 5.9 build from a mirage

Now for more OEM parts..

Ordered more parts from isicar japan. Right and left trunk strut bars to help lift the heavy wing and trunk lid. Parts number MR432217 left and MR43218 left.
I first removed the trunk then both hinge with struts as a unit.

No more sagging trunk to come crushing down unexpectedly onto my head! ox-( As you can see above, the stock bar in grey is slightly smaller than the OEM evo 5/6 replacement. You don't need to worry about replacing the trunk hinges as that part number is the same in all models.
I took some time here and covered both ends with a rag to release tension while taking them off the hinges.

All installed, it performs as expected. With much twisting turning and lots of force I was able to get the struts back on.
This is quite dangerous as you need to pre-load both ends before re-installing them. If your unsure how, do not attempt it by yourself.
Ordered more parts from isicar japan. Right and left trunk strut bars to help lift the heavy wing and trunk lid. Parts number MR432217 left and MR43218 left.
I first removed the trunk then both hinge with struts as a unit.
No more sagging trunk to come crushing down unexpectedly onto my head! ox-( As you can see above, the stock bar in grey is slightly smaller than the OEM evo 5/6 replacement. You don't need to worry about replacing the trunk hinges as that part number is the same in all models.
I took some time here and covered both ends with a rag to release tension while taking them off the hinges.
All installed, it performs as expected. With much twisting turning and lots of force I was able to get the struts back on.
This is quite dangerous as you need to pre-load both ends before re-installing them. If your unsure how, do not attempt it by yourself.
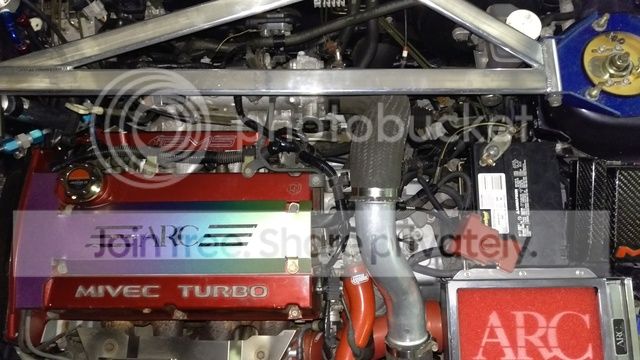
More OEM JDM goodness straight outta Japan!!


A super rare CP9A evo6 ARC radiator! 8-. The down side.. smart guy swapped out the ARC cap before selling it.

Still in its original condition, really good for its age with almost no oxidation or major damage to its fins. It even has the original part numbers stamped onto the end tanks on both sides. Now to give it a good polish and pair it up with the OEM radiator fan I picked up earlier.

Beatrush Japan also pulled through finally after making the "made to order" battery tray. Beatrush Part number S143051BB it measures 8" X 5.5" which requires a 38B19 battery size. Smaller than OEM but way more reliable than a mini drag battery for sure.

As you can see above, our mirage chassis has the 3 bolt on locations so no modification is needed here. It's not bolted on at this point, just trying to show how good it is designed. Too bad the logo is gonna be covered up when the battery is installed.

As you can see above, the battery will fill a void that would have been if I moved it to the back. It also clears the evo9 style arc filter box and brake assembly nicely. Yes I'm running a evo9 stock intercooler up pipe for now until I get something better. For now its needed to clear the ARC filter box and battery setup that I'm running. Now for a battery to fit and final assembly. :thumbsup:
A super rare CP9A evo6 ARC radiator! 8-. The down side.. smart guy swapped out the ARC cap before selling it.
Still in its original condition, really good for its age with almost no oxidation or major damage to its fins. It even has the original part numbers stamped onto the end tanks on both sides. Now to give it a good polish and pair it up with the OEM radiator fan I picked up earlier.
Beatrush Japan also pulled through finally after making the "made to order" battery tray. Beatrush Part number S143051BB it measures 8" X 5.5" which requires a 38B19 battery size. Smaller than OEM but way more reliable than a mini drag battery for sure.
As you can see above, our mirage chassis has the 3 bolt on locations so no modification is needed here. It's not bolted on at this point, just trying to show how good it is designed. Too bad the logo is gonna be covered up when the battery is installed.
As you can see above, the battery will fill a void that would have been if I moved it to the back. It also clears the evo9 style arc filter box and brake assembly nicely. Yes I'm running a evo9 stock intercooler up pipe for now until I get something better. For now its needed to clear the ARC filter box and battery setup that I'm running. Now for a battery to fit and final assembly. :thumbsup:
Found a temporary battery that fits! It's available for a Mazda Miata MX5.
At 23lb and being a OEM replacement for a Mazda, it's not bad at all. Although other mini drag battery's are better for weight savings, they tend to burn out quite quickly as its life span isn't as long and durable for daily use. As far as replacing this when it goes bad, I'll have an easier time finding one plus less down time. It's possible I will be replacing this with a Kenetik 800 series battery in the future.

More stuff.. the originals were toast and the controls were smashed. I've located this genuine left hand drive carbon fiber switch unit which wasn't bad for its price. The evo9 switches fit but the mounting points under it is a bit off. I'll probably use an adhesive to keep everything together when I start on the panels.
At 23lb and being a OEM replacement for a Mazda, it's not bad at all. Although other mini drag battery's are better for weight savings, they tend to burn out quite quickly as its life span isn't as long and durable for daily use. As far as replacing this when it goes bad, I'll have an easier time finding one plus less down time. It's possible I will be replacing this with a Kenetik 800 series battery in the future.
More stuff.. the originals were toast and the controls were smashed. I've located this genuine left hand drive carbon fiber switch unit which wasn't bad for its price. The evo9 switches fit but the mounting points under it is a bit off. I'll probably use an adhesive to keep everything together when I start on the panels.
Voltex EVO 6.5 TM edition MIVEC build from a Mirage
So I had an idea browsing Instagram @GraphiteMRevo5

I came across a hybrid evo6 bumper which I I thought was real at first to later discovered that it was only a computer rendering or photo shop of some sort. It mixed together 2 famous Evo bumpers, the Tommi Makenin edition evo6 with Voltex ct9a cyber Street version. Since I had the voltex lip and part of the bumper, I thought about it being made into reality.

Crossing the 2 together, in width they both line up and could possibly be done. At first, I was thinking about hacking up this original bumper to make it but it would be too insane and costly.

Luckily there was a used fiberglass version molded from a genuine bumper up for grabs. I jumped on that opportunity to have it hacked up and shipped to me. The only way was to have it cut into sections to save on shipping from the states to Hawaii otherwise it would've been close to $500 in shipping it whole. No other companies out there is willing to deal with sending a new one to me cut and since it was gonna be chopped up anyway, a used one will be just fine.

Reassembly after it arrived, I used gorilla glue which is strong enough to hold but not permanent for its super glue like properties and expanding part like foam. It will be temporary until I start glassing it back together.


How genuine is your $h�t! Just in case you don't believe, it's real and I'm insane!

Starting on one side, I did a rough cut to see where both parts would align to get them to blend without major distortion to both designs.

Since I will be using the Voltex cannards, I will temporarily attach them to retain the shape of the mounting areas and to see where to avoid so it can be attached back on later.

Onto the other side, I'll do the same thing as above. This time I need to figure out how to retain the round intake part of the Tommi bumper as the Voltex cannards interfere with the opening.


This is a rough cut for now and there is more trimming and fitment to do. When I'm finally satisfied and figured out the design, I will start the fiberglass process.
As far as it is, it looks like I'll be able to pull this one off with a one off unique design retaining both Cyber Evo and Tommi Makenin rolled all into one. Maybe I'll call it the Cyber Tommi Makenin Evo one day! :thumbsup:
I came across a hybrid evo6 bumper which I I thought was real at first to later discovered that it was only a computer rendering or photo shop of some sort. It mixed together 2 famous Evo bumpers, the Tommi Makenin edition evo6 with Voltex ct9a cyber Street version. Since I had the voltex lip and part of the bumper, I thought about it being made into reality.
Crossing the 2 together, in width they both line up and could possibly be done. At first, I was thinking about hacking up this original bumper to make it but it would be too insane and costly.
Luckily there was a used fiberglass version molded from a genuine bumper up for grabs. I jumped on that opportunity to have it hacked up and shipped to me. The only way was to have it cut into sections to save on shipping from the states to Hawaii otherwise it would've been close to $500 in shipping it whole. No other companies out there is willing to deal with sending a new one to me cut and since it was gonna be chopped up anyway, a used one will be just fine.
Reassembly after it arrived, I used gorilla glue which is strong enough to hold but not permanent for its super glue like properties and expanding part like foam. It will be temporary until I start glassing it back together.
How genuine is your $h�t! Just in case you don't believe, it's real and I'm insane!
Starting on one side, I did a rough cut to see where both parts would align to get them to blend without major distortion to both designs.
Since I will be using the Voltex cannards, I will temporarily attach them to retain the shape of the mounting areas and to see where to avoid so it can be attached back on later.
Onto the other side, I'll do the same thing as above. This time I need to figure out how to retain the round intake part of the Tommi bumper as the Voltex cannards interfere with the opening.
This is a rough cut for now and there is more trimming and fitment to do. When I'm finally satisfied and figured out the design, I will start the fiberglass process.
As far as it is, it looks like I'll be able to pull this one off with a one off unique design retaining both Cyber Evo and Tommi Makenin rolled all into one. Maybe I'll call it the Cyber Tommi Makenin Evo one day! :thumbsup:
Last edited by GraphiteMRevo; Apr 4, 2016 at 03:08 AM.
Mirage to EVO 6 Tommi Voltex Cyberevo
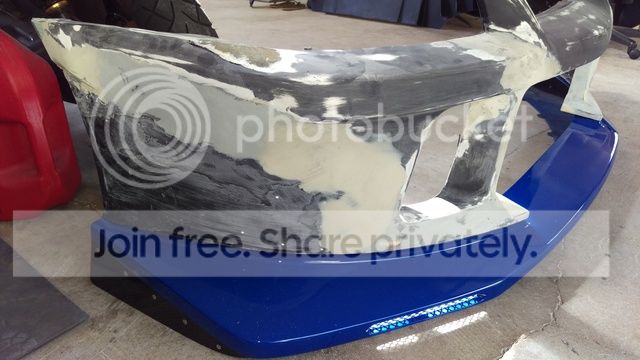
Bolted up, I get a first chance to check clearance and hight. I did some adjustments so it would sit properly and for the lip to be level as it was pointed slightly upwards. The clearance from the ground to the lip is 3 inches. There were other areas too that adjustments were made so that the back of the lip sits as close as possible to the tire as it originally was. I used rivets and gorilla glue to keep the parts temporarily together.

Glass resin I used, works well, although it's from Home depot it does the job. It's also a product of 3M. Fiber glass mat is what I use for added strength.

On the open areas with large gaps, I used a combination of aluminum tape and painters tape to help with the molding process. The aluminum tape was used in reversed with the sticky side away from the repair end. The painters blue tape is for added reinforcement and to keep the resin from going all over. Anywhere I didn't want the resin and glass to stick, the aluminum tape was used.

2 to 3 layers of glass and resin should do it for the back making sure all bubbles are squeezed out and not trapped under the layers using a small paint brush.

2 hours later, the resin is cured and I can remove the tape to check for good coverage. Without the aluminum ducting tape, it wouldn't be easy to remove.

Looks rough now but it's a good start! Now to remove the carbon lip and canards to get it ready for sanding and grinding.

Wherever I had the rivets or any sharp protruding edges, it was sanded/grinded down level. Some weight was also reduced by taking off the excess material.

The jel coat also needs to be taken off of the repair areas for proper adhesion for the resin. Since the back was reinforced quite heavily, I might just use a single layer of glass in certain areas.


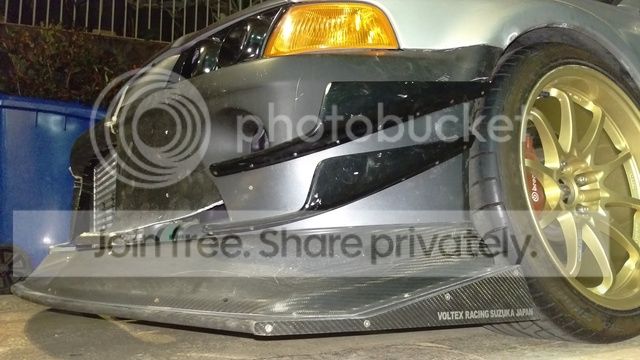
Onto the evo9 voltex parts..

Above you can see the similarities of the white OEM bumper to my prototype voltex hybrid evo6. I did a final fiberglass layover and used a sanding disk to knock down the high areas to get the rough shape within 1/4 of an inch in prep of body filler.

This is part of the voltex cyber street lip which comes with the evo9 kit. It's a front bumper under tray designed to smooth out air turbulence under the car and help with the airflow through the intercooler and radiator where it's needed the most. The aluminum brackets are for added stability and anchoring points for the bracing straps that come with the kit.

This voltex front under tray is made of honeycomb lightweight fiberglass and aluminum parts to reduce the weight by 50%. It also has fins to direct and channel the airflow to the brakes and away from the car.

The straps that are included with the kit are designed for a evo9. Slight trimming and re-drilling of the straps were needed to get it to fit just right. I also used 5 rivet nuts (revnuts) for the mounting points of the straps to the body.
With the bumper back on over the diffuser, it totally gives the evo a more aggressive look. Added the canards back on to complete the visual side but they will be coming off so the bumper can be soothed over with filler. Before it gets there, I might need to add some fiberglass near the intercooler to fill in that gap. :thumbsup:
Onto the build!
I've been thinking about getting a regular voltex street FRP lip since I've started the build. It nice to have options on switching out the carbon for a painted lip if I ever decide to use it on a cruise.

I got lucky to locate this piece from a guy near by that was in the process up upgrading his lip to the carbon cyber street version.
He claims that it's not possible to just buy the lip alone and that I would need to get the entire bumper from voltex if I just wanted that part. Just was in the right place at the right time I guess.

I used a short stranded fiberglass reinforced body filler for the initial process. Then finished it off with lightweight filler all while keeping it under a 1/4th of an inch of filler throughout. Using a 2 part high build filler primer, I gave it 2-3 heavy coats on the areas that I used body filler following one last coat overall.

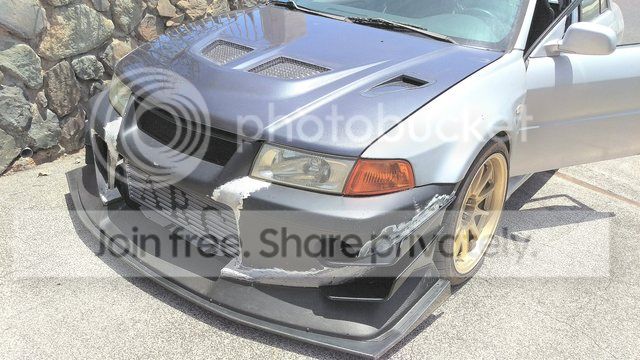
OEM Tommi Makinen bumper behind my voltex creation. Different but new and totally evo. You can see what I kept in the original design of the evo6 bumper.

On again with the canards and lower lip this time. I like to visually see my progress by constantly test fitting and mounting all the parts as I go. It's time consuming but easier to catch a mistake and fix it while I can.

Here's my evolving collection over the years. Far left a 98 OEM evo5 bumper, 99 OEM Tommi Makinen (white), 06 Voltex Japan carbon cyber street lip and my voltex Tommi prototype with voltex street lip (blue) with voltex canards. No fake or knock off parts except that fiberglass upper Tommi bumper I used for the build.
Sorry guys, bumpers are not for sale!
I've been thinking about getting a regular voltex street FRP lip since I've started the build. It nice to have options on switching out the carbon for a painted lip if I ever decide to use it on a cruise.
I got lucky to locate this piece from a guy near by that was in the process up upgrading his lip to the carbon cyber street version.
He claims that it's not possible to just buy the lip alone and that I would need to get the entire bumper from voltex if I just wanted that part. Just was in the right place at the right time I guess.
I used a short stranded fiberglass reinforced body filler for the initial process. Then finished it off with lightweight filler all while keeping it under a 1/4th of an inch of filler throughout. Using a 2 part high build filler primer, I gave it 2-3 heavy coats on the areas that I used body filler following one last coat overall.
OEM Tommi Makinen bumper behind my voltex creation. Different but new and totally evo. You can see what I kept in the original design of the evo6 bumper.
On again with the canards and lower lip this time. I like to visually see my progress by constantly test fitting and mounting all the parts as I go. It's time consuming but easier to catch a mistake and fix it while I can.
Here's my evolving collection over the years. Far left a 98 OEM evo5 bumper, 99 OEM Tommi Makinen (white), 06 Voltex Japan carbon cyber street lip and my voltex Tommi prototype with voltex street lip (blue) with voltex canards. No fake or knock off parts except that fiberglass upper Tommi bumper I used for the build.
Sorry guys, bumpers are not for sale!


Rocking the street lip in blue as I shouldn't use the carbon lip too often.


I will be using the carbon Cyber lip for shows as it's only 3 inches above the ground. This fiberglass lip provides more clearance for driveways and rough roads while retaining the Voltex bumper parts.
4X4 height problems.. how to solve them.
Although it has coilovers which could slam the car to the ground, it won't have the clearance needed to stuff 18X9.5 rims without killing a fender.
I searched the internet for answers on how to solve a problem that our evos have, Height and gap problems.

Going though Google Images I found a company that directly supply carbon products to big companies, Rallytech.com.uk
Direct link to their parts page http://rallytech.co.uk/index.php/pro...i-evo-parts/67

After 2 months of waiting I've finally got my carbon skirts in from the UK. OK, it's not JDM but let's face it, so is the Tommi Makinen edition evo which is Euro spec.. Carbon goodies also sells these carbon side skirts but Rallytech is the manufacturer. It took all of 2 weeks from build and shipping as it is a made to order item. They have a wait time after the order and payment because of their rally team and high order demand. The wait was well worth it.

The attention to detail and mounting points make it worthy of its price. They even have the areas marked on it where to drill out the mounting points and It's definitely light and thin and ridged in areas that need to be the most. Like Voltex, this was engineered with purpose in mind by keeping the airflow out from under.
Paula from Rallytech told me I'll be the first known with their side skirt product in the states. Definitely the only one in Hawaii.

2 side skirts and 2 rear completes the exterior without taking away more of the OEM look. This should solve my problems and complement the voltex carbon lip in the future.
If you noticed, I have changed the rear fender overs to white, It's because it's a wider aftermarket version from Feast-power Japan

Link to their website http://www.feast-power.com/rsf/top.htm

I've gained about 2inches on each side which makes both front and back rims flush using 18x9.5 +12 Volk ce28n rims, no spacers.

Unlimited Works Japan has also done a write-up in 2015 about the fender install as seen above.
Link to Unlimited Works entry http://s.ameblo.jp/unlimitedworks/en...057282748.html


Above, the blue voltex evo8/9 street lip is installed for better clearance and daily use if I decide to do so. It's 100% voltex Japan and so are the four canards.


Here is a Voltex Cyber Street lip wich is full carbon fiber. It could be used around town but clearance is almost none. It too is a 100% voltex Japan part of a evo 8/9 kit.

A side view of the rallytech.co.uk carbon extensions and Feast-power Japan wider rear arch.