


Evo 5.9 build from a mirage


How about some rare radiator brackets?

Solid aluminum, got them from the UK, brand unknown but it sure beats the OEM one! They were just oxidized badly and needed a good refurbishing. 1000 grit wet sand and a good polish brought back the shine.

In its polished glory, the brackets really go well with the ARC parts and complements them well.
Interior time to get me going again.

This back panel is definitely in need of a upgrade and refurbishment. There's holes in it that won't be needed and the color is way off from what would match. Since the third brake light has been relocated into the wing, there's definitely no use for the bracket holes.

The fabric used is cut larger than what is needed so it can be trimmed down to match after the glue sets. I'll be using a 3M adhesive fabric glue which is sprayed on both parts. Glue needs to be applied on the back side of the fabric and on the top surface of the panel. Since I didn't remove the old fabric, I generously applied the glue and let it stand for 5 min before laying the fabric onto the panel. At this point, the glue is really sticky and you have only one shot to align it right.

With the glue set, I took a razor blade and cut the hole for the speakers and rear wiper motor.

The speaker grills are next but these are grey and faded so they will need to be color matched as well. I used a light spray of brake cleaner to de-grease it just in case there were any contaminants from oil based shiners. Wax and oils will give a spray job runny or lumpy textures which will ruin the final result if not cleaned properly. Using a flat black plastic interior paint from duplicolor, the result were perfect.

With the speaker grills done and the panel covered it totally changes the appearance and cleans up all the unnecessary holes that were there previously.


Installed and cleaned up, it definitely is a good little upgrade that keeps the back area simple and smelling like a new car!

Another JDM part to add to the collection. Sourced and shipped out of Japan from a close friend of mine.

ARC radiator slam panel. Designed to direct more airflow through the radiator instead of going over it. It's made from titanium with the ARC badge riveted to it. Unlike the evo8/9, this must be one of the smaller panels ARC made for evos.

Partiality installed, it fills the gap nicely and adds more ARC bling to the collection. It's specifically made only for the evo5/6 as the evo 4 has a different shape and is made only for that one year. ARC also produced them in aluminum and is hard to tell the difference between the 2. A heat test could be used to verify titanium as it will change color.
Although I like my evo9 SE interior, nothing like a real old school JDM original and especially rare piece of interior could stop me of wanting it over anything else.


I've sourced a set of rear TME seats from the UK. From what I've been through with searching for this was that it is super hard to find and the only way to get one was through word of mouth. The seller also needs to be willing to ship it into the states and deal with the hassle .

Three months later if finally arrived, box came in from Hong Kong of all places. It was on Instagram one year earlier and I totally forgot about it. Good thing the seller still had it for sale and didn't bother to bump up the ad to sell it.

First thing to do was to check for authenticity. There's a description and part number tag which Mitsubishi placed under the seat during manufacturing.
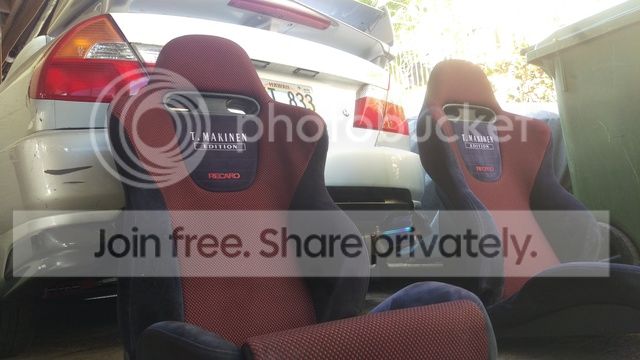
Not bad for old JDM seats. Slight fade on the black which can be re-dyed but in all its my dream seats which will go well with the build!
Solid aluminum, got them from the UK, brand unknown but it sure beats the OEM one! They were just oxidized badly and needed a good refurbishing. 1000 grit wet sand and a good polish brought back the shine.
In its polished glory, the brackets really go well with the ARC parts and complements them well.
Interior time to get me going again.
This back panel is definitely in need of a upgrade and refurbishment. There's holes in it that won't be needed and the color is way off from what would match. Since the third brake light has been relocated into the wing, there's definitely no use for the bracket holes.
The fabric used is cut larger than what is needed so it can be trimmed down to match after the glue sets. I'll be using a 3M adhesive fabric glue which is sprayed on both parts. Glue needs to be applied on the back side of the fabric and on the top surface of the panel. Since I didn't remove the old fabric, I generously applied the glue and let it stand for 5 min before laying the fabric onto the panel. At this point, the glue is really sticky and you have only one shot to align it right.
With the glue set, I took a razor blade and cut the hole for the speakers and rear wiper motor.
The speaker grills are next but these are grey and faded so they will need to be color matched as well. I used a light spray of brake cleaner to de-grease it just in case there were any contaminants from oil based shiners. Wax and oils will give a spray job runny or lumpy textures which will ruin the final result if not cleaned properly. Using a flat black plastic interior paint from duplicolor, the result were perfect.
With the speaker grills done and the panel covered it totally changes the appearance and cleans up all the unnecessary holes that were there previously.
Installed and cleaned up, it definitely is a good little upgrade that keeps the back area simple and smelling like a new car!
Another JDM part to add to the collection. Sourced and shipped out of Japan from a close friend of mine.
ARC radiator slam panel. Designed to direct more airflow through the radiator instead of going over it. It's made from titanium with the ARC badge riveted to it. Unlike the evo8/9, this must be one of the smaller panels ARC made for evos.
Partiality installed, it fills the gap nicely and adds more ARC bling to the collection. It's specifically made only for the evo5/6 as the evo 4 has a different shape and is made only for that one year. ARC also produced them in aluminum and is hard to tell the difference between the 2. A heat test could be used to verify titanium as it will change color.
Although I like my evo9 SE interior, nothing like a real old school JDM original and especially rare piece of interior could stop me of wanting it over anything else.
I've sourced a set of rear TME seats from the UK. From what I've been through with searching for this was that it is super hard to find and the only way to get one was through word of mouth. The seller also needs to be willing to ship it into the states and deal with the hassle .
Three months later if finally arrived, box came in from Hong Kong of all places. It was on Instagram one year earlier and I totally forgot about it. Good thing the seller still had it for sale and didn't bother to bump up the ad to sell it.
First thing to do was to check for authenticity. There's a description and part number tag which Mitsubishi placed under the seat during manufacturing.
Not bad for old JDM seats. Slight fade on the black which can be re-dyed but in all its my dream seats which will go well with the build!


Thanks! Here's a bit more!
Evo/mirage Headliner install and modifications.
I took the front half of a evo9 headliner and grafted it into the mirage headliner saving the sides and back half. Reason why it's needed is because of the shape in the headliner to use the evo9 visors and maplight/sunglass holder.

Plan of attack is to use brackets off of the Evo. Above is a entire piece of the front rib that holds the windshield and roof together.

Only certain parts are needed to work so I removed only the visor brackets and center maplight bracket.
After recovering the headliner, I worked on spot-welding the brackets up to the roof.

Doing a test fit above, the headliner shows sagging in some areas where exterior brackets mount up to.

With the visor and clips in, the headliner looks good as new. Don't mind the different led lights, my bad..eBayChina! Lol
The car didn't have a good radiator coolant resivoir so I decided to order one that would fit. An oem style one would've worked well but the plastic look wouldn't match with the rest of the build.

Although the power steering resivoir is a Forge prduct bought somewhere on evom, it still won't look right with the other polished parts.

Since I'll be buying a reservoir tank for the radiator, I decided to get matching tanks for both the radiator and power steering. The resivoirs above are from STM and one is meant to replace the ACD resivoir of a evo9. I will be using the ACD resivoir as a coolant tank to match. The ACD resivoir comes with 2 outlets I'll utilize it for the radiator instead by plugging the unused outlet with a standard rubber coolant plug.

With the power steering and radiator tank installed, it looks much better and fills up the empty space which was there earlier. From the ARC air box to the ARC radiator and finally the resivoirs, the polished look will be much more balanced under the hood!
Although the power steering resivoir is a Forge prduct bought somewhere on evom, it still won't look right with the other polished parts.
Since I'll be buying a reservoir tank for the radiator, I decided to get matching tanks for both the radiator and power steering. The resivoirs above are from STM and one is meant to replace the ACD resivoir of a evo9. I will be using the ACD resivoir as a coolant tank to match. The ACD resivoir comes with 2 outlets I'll utilize it for the radiator instead by plugging the unused outlet with a standard rubber coolant plug.
With the power steering and radiator tank installed, it looks much better and fills up the empty space which was there earlier. From the ARC air box to the ARC radiator and finally the resivoirs, the polished look will be much more balanced under the hood!
Let's spice up the interior a bit more!

Already Tommi Makenin seats are just the bomb but what about adding the cherry on top! A set of Takata racing cam lock 4 point (optional 6 point expendable) seat belt harness in black should do it right.

Although Takata is going through some rough time in the OEM department of airbags, it won't stop me from obtaining them JDM jewels just to fill in the headrest holes of the Tommi recaro seats.

To temporarily hold them in place, NRG harness bars were installed (just for show)

Now the seats and harness can have that race car look, for now.

Totally not recommended for use with the harness as a safety restraint on or off road. Back passengers are totally prohibited because of the bar. My install is just for show.

Real carbon fiber to surround both left and right window switches. The housing with the carbon fiber overlay is a original mirage piece while the switches are from the evo9. I'm able to use the 9 switches because the entire wire harness was used from the donor. With some slight modification, the evo9 switches will work but won't just bolt on.

Now for some titanium bolts to go along with the ARC oil cap.

These bolts are top burnt and are made to fit perfect. They are on instagram and could also be found on facebook. https://www.facebook.com/mazterpieceautoworkz/


To add more of the JDM flair, both sun visors were replaced with OEM Japan evo9 visors. Only difference in them are the kanji warning labels on both sides. As mentioned previously, my headliner and visors are grafted from a evo9 and are not a direct fit into a mirage or evo4-6.
:thumbsup:
Already Tommi Makenin seats are just the bomb but what about adding the cherry on top! A set of Takata racing cam lock 4 point (optional 6 point expendable) seat belt harness in black should do it right.
Although Takata is going through some rough time in the OEM department of airbags, it won't stop me from obtaining them JDM jewels just to fill in the headrest holes of the Tommi recaro seats.
To temporarily hold them in place, NRG harness bars were installed (just for show)
Now the seats and harness can have that race car look, for now.
Totally not recommended for use with the harness as a safety restraint on or off road. Back passengers are totally prohibited because of the bar. My install is just for show.
Real carbon fiber to surround both left and right window switches. The housing with the carbon fiber overlay is a original mirage piece while the switches are from the evo9. I'm able to use the 9 switches because the entire wire harness was used from the donor. With some slight modification, the evo9 switches will work but won't just bolt on.
Now for some titanium bolts to go along with the ARC oil cap.
These bolts are top burnt and are made to fit perfect. They are on instagram and could also be found on facebook. https://www.facebook.com/mazterpieceautoworkz/
To add more of the JDM flair, both sun visors were replaced with OEM Japan evo9 visors. Only difference in them are the kanji warning labels on both sides. As mentioned previously, my headliner and visors are grafted from a evo9 and are not a direct fit into a mirage or evo4-6.
:thumbsup:


Didn't bother adding it all up but I'm sure it would roughly exceed that of a new evo when it's all done. It's just a hobby of mine and what's the fun of just buying a car already done

So I'm starting to get into switching out some of the bolts to titanium...


Got these polished and burnt to the traditional blue and will be replacing the originals.

Here's some of the Ti bolts
Since I have created a Voltex Tommi Makenin hybrid bumper up front, I've been having issues deciding on how to balance out the aggressive look to the rear since it's It's only stock.

I've finally found what I was looking for, almost making myself a rear bumper, stumbling upon this while surfing the net. It's a carbon fiber rear diffuser designed to change the appearance of the factory rear.
Link to Carbon goodies
http://www.carbongoodies.co.uk/Evo-5...tandard-Bumper
**I ordered the optional dual outlet exhaust because of the right side exit.

Carbon goodies is the original makers of the rear diffuser as they designed it from scratch, produced a mold and put it into production.

The amount of time and money going into the design of just this one piece is big.
Back in 2013, carbon goodies was just designing the tool for the mold.
Link to the introduction of the diffuser
http://www.evoowners.co.uk/threads/e...-bumper.11407/
Close your eyes for the next part if you can't sacrifice the OEM bumper!

To fit the diffuser you'll need to first draw a line using the existing ridge in the bumpers upper part then draw a line straight down as shown.

Using a standard utility knife, cut along the lower lip line ony, not the actual bumper itself. Draw a line and cut the same on the other side and remove the lip as it is also bolted from behind onto the bumper.

Just as easy as 2 cuts and unbolting the lip, the diffuser upgrade will now fit into place just inside of the recessed portions of the OEM bumper.

The attention to detail into making the diffuser is top notch. It's vacuumed formed and autoclave baked in the process to make it. That means it's thin yet strong!

Finally complete for now!
The diffuser I got from carbon goodies is the first of its kind. They made the mold just for me as it normally comes with a single exhaust outlet cutout. Although he has it advertised on the website, he claims that this is the second one ever to be made as the first was just a prototype. :thumbsup:
