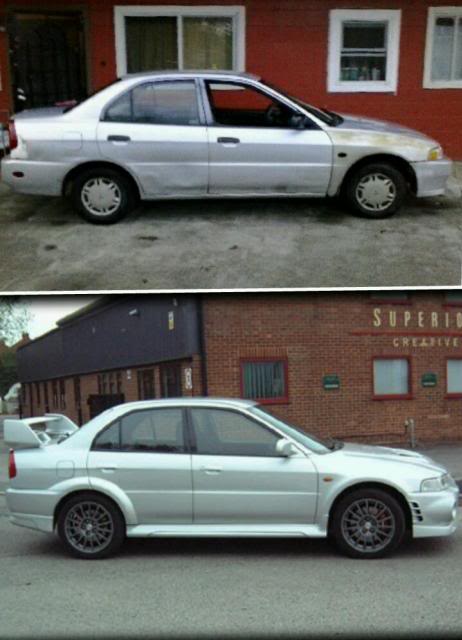
Evo 5.9 build from a mirage

Evo 5 MIVEC 9 build from a 99 mirage
For thoes that were following me on mirageforums.net I will also be posting here since I've officially got the mirage to become a drivable EVO!
Currently as she stands!

By definition; Resto-mods are restored and modified cars utilizing the latest technology and modernized to today's standard.**
A resto-mod looks like a fully restored car, but careful inspection may revel features not available on an original manufacture; such as 4pot disc brakes, turbo, 6 speed transmission, upgraded interior with carbonfiber. These features enhance the ride and safety but would not have been with "correct" parts.
If you build it, they will come.. just messing with pictures I found on the net. ok thats it.. time to make dreams reality
Some guy in Hawaii that I've heard of numerous times. Never thought I will be taking the same path.. only difference is I want to do the whole build my self!
Finally found a shell. A 2000 Mirage DE autotragic. AC doesn't work, has a aftermarket sun roof.
HAWAII plates. Not a bad color but the body looks as if it was in a hail storm! Can't go wrong for $700
120,000 miles and looks good. No engine leaks and I'm quite surprised.
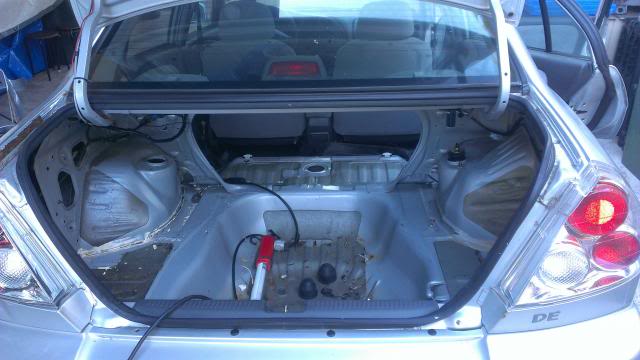
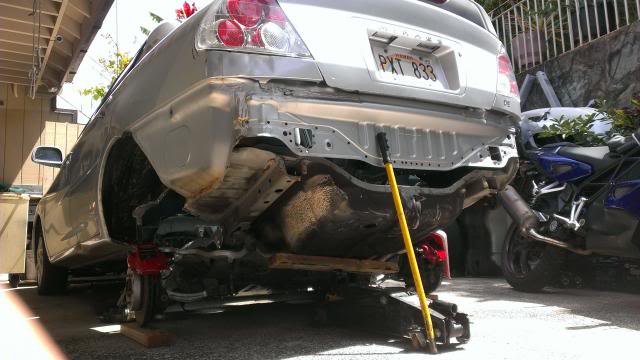
The tear down begins on day 2. Trunk interior and rear seats were the first to get tossed.
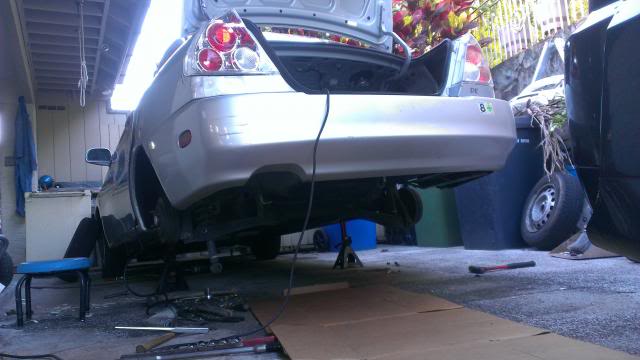
On stands to get to the gas tank and all other unnecessary suspension tossed.
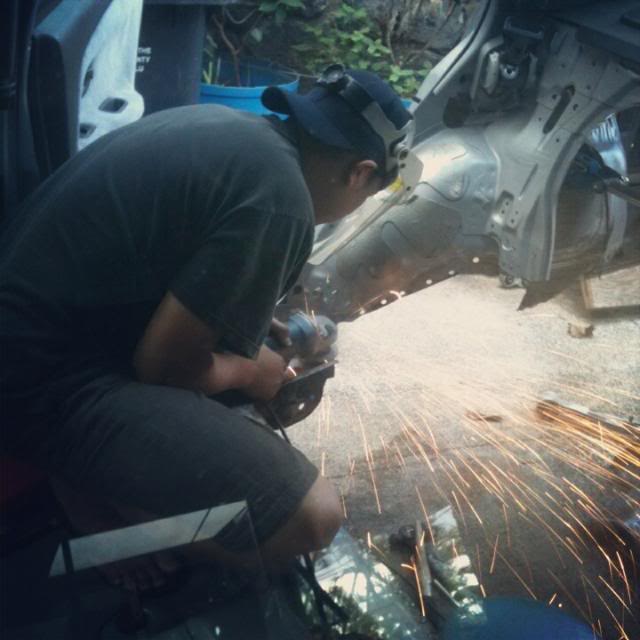
Looking for spot welds to cut out
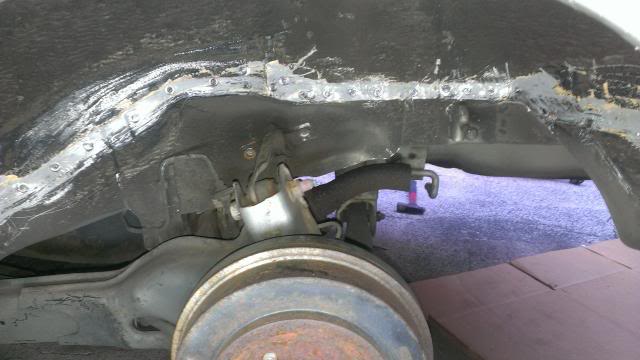
At this point all the spot welds were cut out of the interior side. I'm trying to figure out where I should make my cut on the framerails.
So I decided to cut it here since the EVO has the same trailing arm pivot mount. I will make stich welds to reinforce everything later.
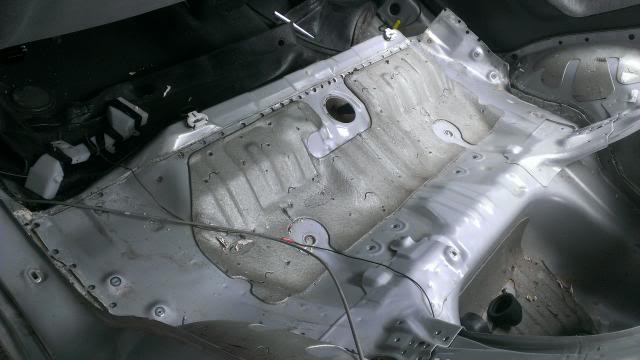
After a million F bombs and under a week of purchasing the car, the rear floor finally came out
Back to the Grind!
Within the week I also removed the rear floorpan from the donar evo9
Proof that its a evo9 rear
Getting the pan all up in there. At this point I didnt think it would fit being that it is a evo9 floorpan
Welded up front and back then installed all suspension parts before doing a complete spot weld job
Knowing that it fits at this point is a big relief!
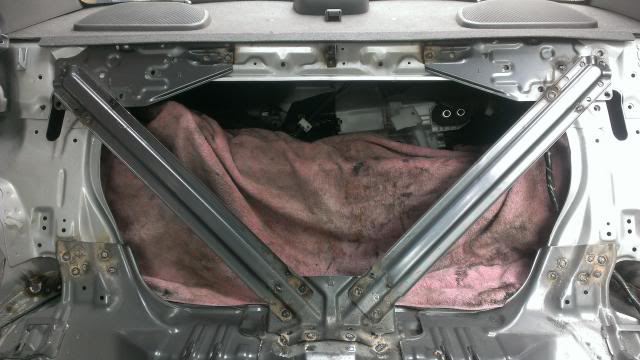
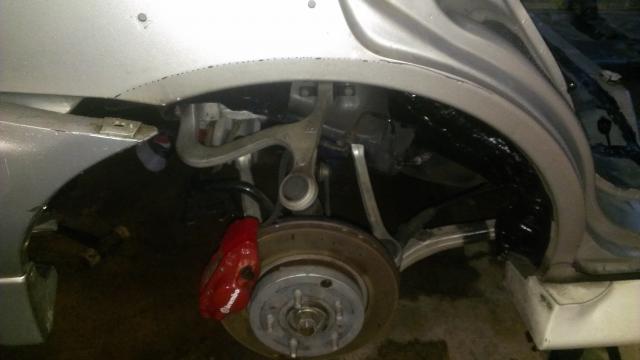
look what came in from Japan! Cusco evo6 rear strut tower brace. What better way to align the rear towers with!

The towers are about 1 1/2 inces higher than stock.
Got all the welds in and just so curious what it would be like stitting with the factory Bilstine shocks
looking beast! just a test fit.. rims are 18x9.5 +20
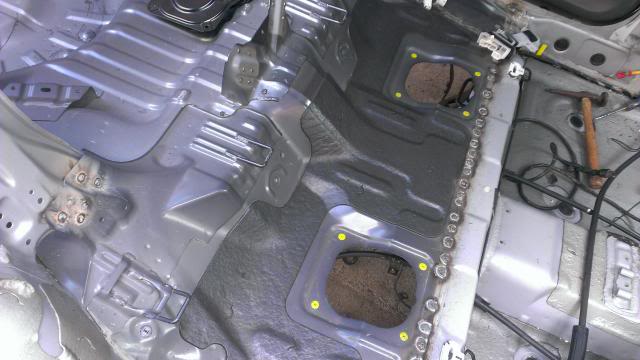
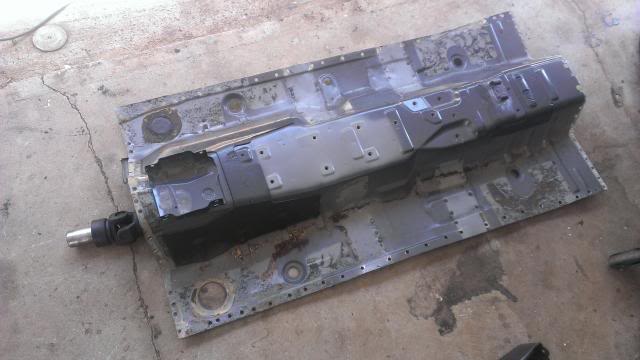
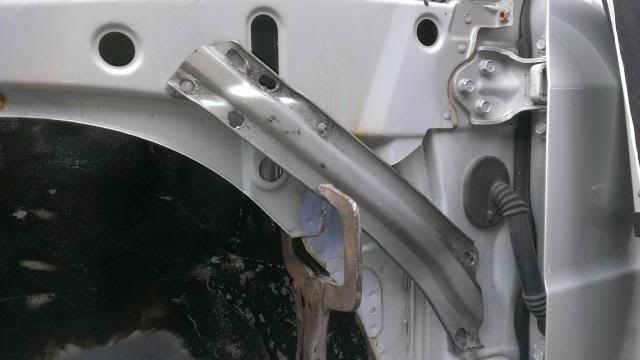
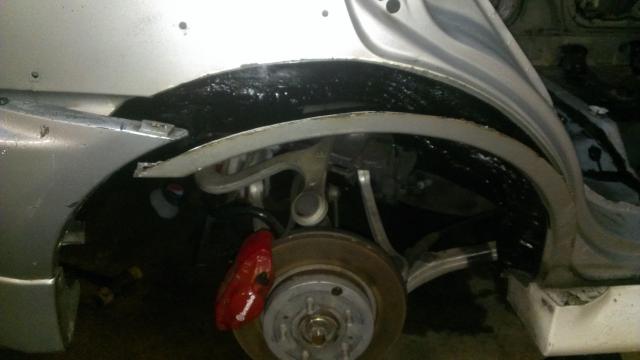
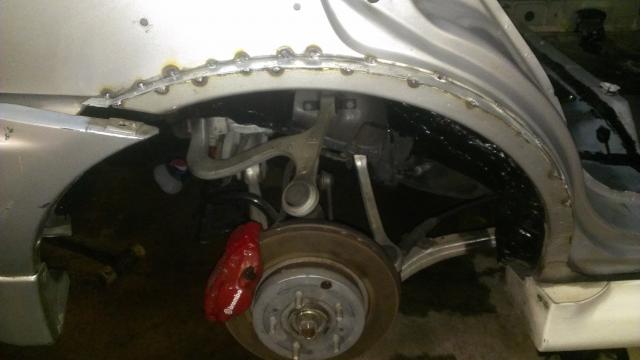
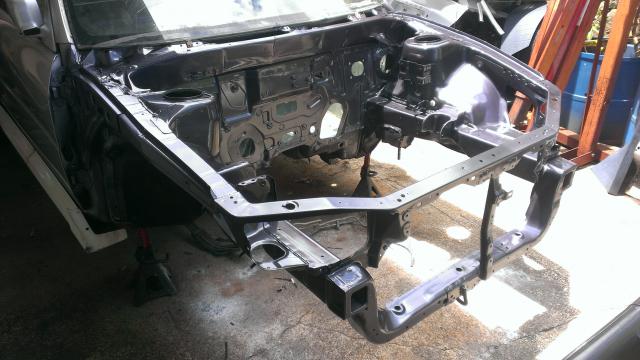
This is a view of the frame looking down from inside of the car on the drivers side. This is were I did my cut. I chose to do it here because there is a hidden frame inside of the exsiting outer frame. I planned on doing a butt weld on the outer and a stich weld on the inner.
Here I've already stiched welded the inner frame before finishing the outer
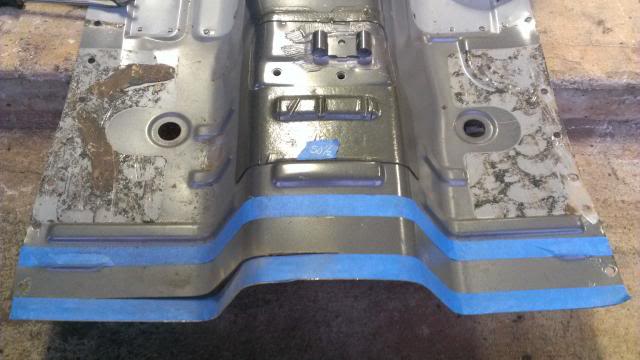
You can see where I've cut the rear floor to expose the fraim rails. I did it along the existing spot welds so it will be easier and stronger when finished.
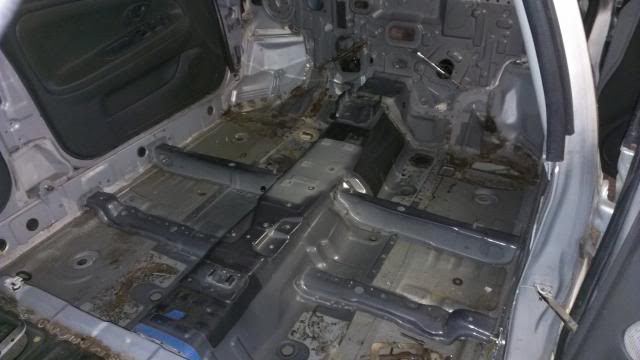
Heres a test fit of the evo9 rear seat back. I didnt install the rear V brace yet. I might need to move the original floor tabs (where the lower parts of the V brace connect) back a inch or so.
I got carried away installing all the seats during my test fit. Fronts seat rails dont fit the mirage locations..
I think im going to use the floor braces from the evo9. They run completely across the floor making it more ridged plus it will make installng the Recaro SE seats safer in the long run. As for the back seats, they are a complete bolt in. It even has the child safety seat anchor points!
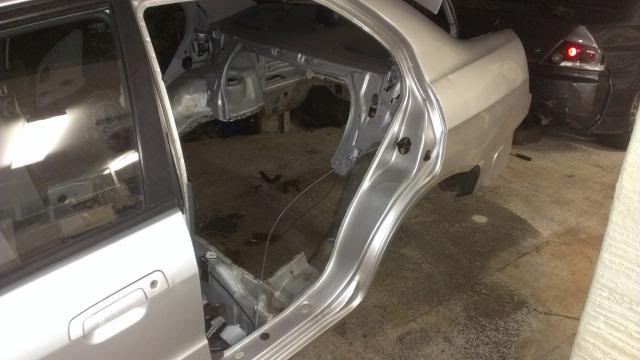
Went from this..
.. a fiew hours later to this. Removed the headlights, grille, bumper, radiator, ac lines, condenser, and wire harness.
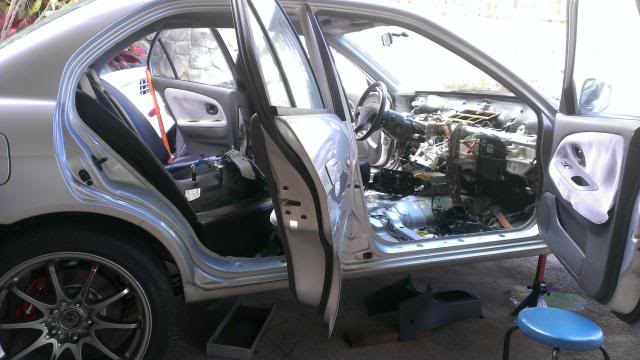
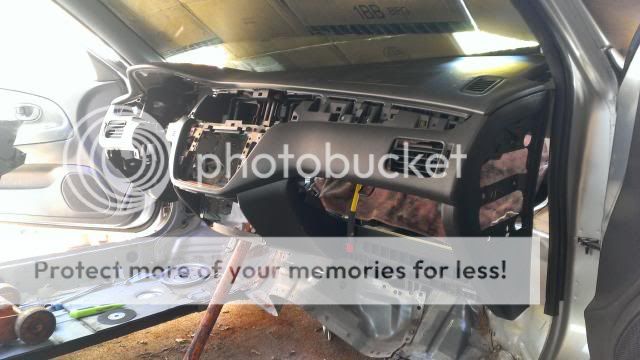
Then went on in to reamove the dash
It was just too hot and humid today.. had to call it quits early
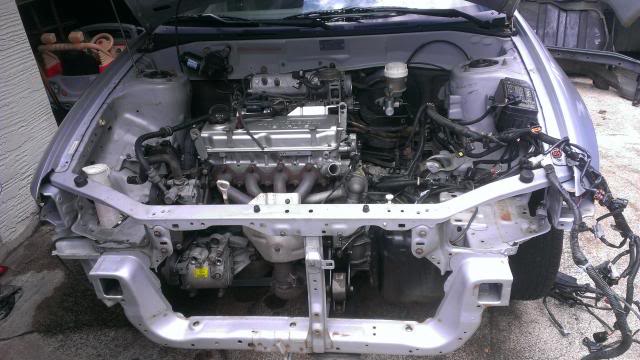
Today, cleared the stock engine and transmission out. Also pressure washed the wheel wells and engine bay

Santa came today dressed up in a FedEx uniform and dropped off this..
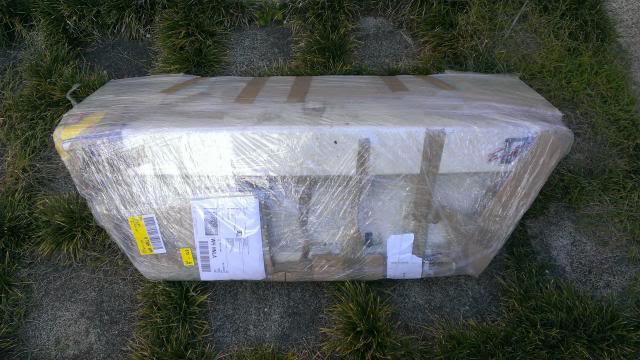
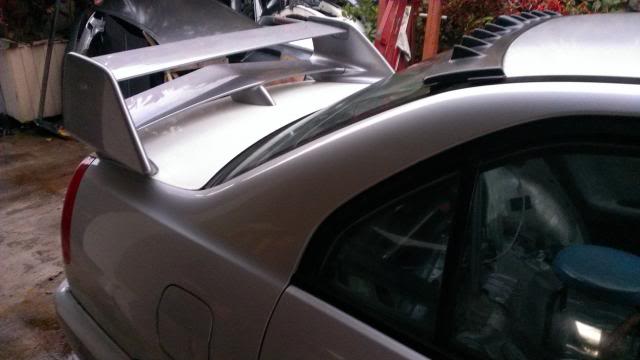
Im going to cut out a hole to mount the reflectors in the trunk later. Right now I cant decide what wing I should go with 5 or 6..
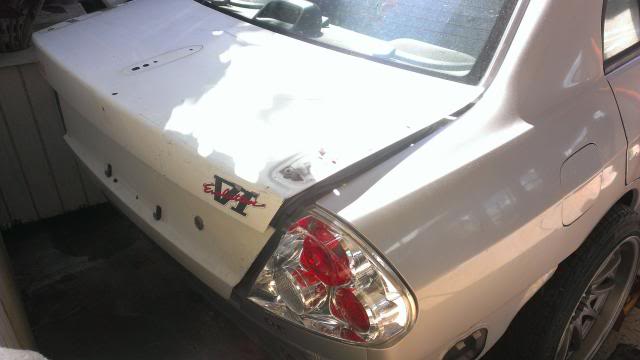
I washed the trunk the best I could. Kinda disappointed that Mitsubishi used a single stage paint for the evo.. guess its for weight and cost reduction.
Got the trunk lid fitted today. Since it was from a evo, found out the wire harness and trunk cable is all on the right side. It had evidence from a harness cut still attatched to it sticking out twards the right. I really dont like the afermarket tail lights that came with the car...
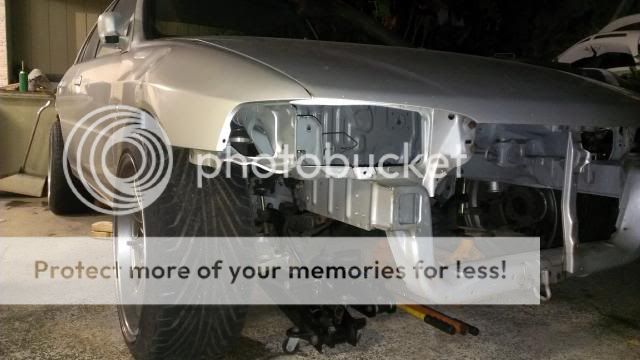
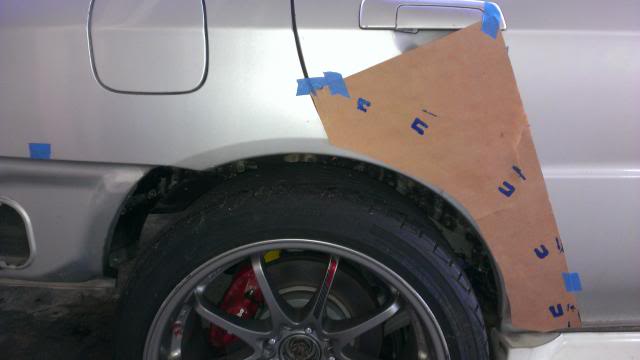
Removed both front fenders and also cleaned up the fire wall. Removed everything and gave it a final scrub down.
I will be doing some stitch welding to add more strength to the towers and other areas.
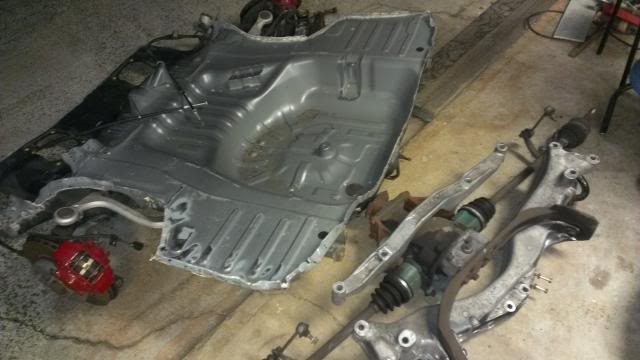
I'm going to be the first to use a complete EVO9 front subframe and document it here. I want to take this route so I can use the much stronger EVO9 transfer case, quick ratio steering rack, complete suspension and stronger aluminum arms.
I�m completely aware that the front subframe isn�t a direct bolt on, but what fun would it be if it involved only 6 bolts!
After mocking it up, it was a big relief that I could make it possible to do this conversion. I'm going to use the OEM mounting pads from the EVO9 and graft it where it needs to be on the Mirage frame and lower fire wall.
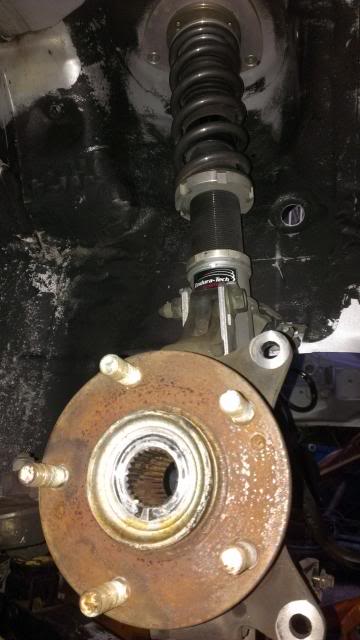
Endura Techhttp://www.pasmag.com/performance/po...vo-x-coilovers
Made in Japan, limited now discontinued. Shall I say JDM non the less! 15 way adjustable and height adjustment exceeding 2.5 inches will make corners feel like I'm riding on rails!
I wanted to see where the wheels line up in the fender so I got a set on and lowered it to the ground. Only thing keeping it all together is the coilovers and the tension of the sway bar.
Took a break and did some planning. Also had to pull the motor out of the way from the donar to see what's up. First I will be taking off the mounts and grafting it to the mirage so I can use the EVO9 front subframe. I could go the easy way and fab brackets to fit but I think going this route will make it look closer to oem.
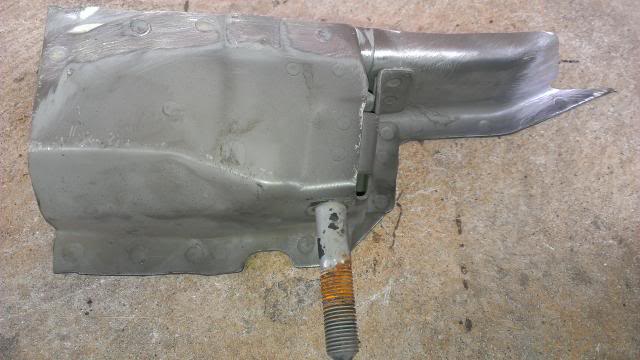
First mount, drivers side near the shock tower.
Here it is cut high so I can trim it down if needed for the proper height. I didn't go with drilling the spot welds just yet as this step is experimental
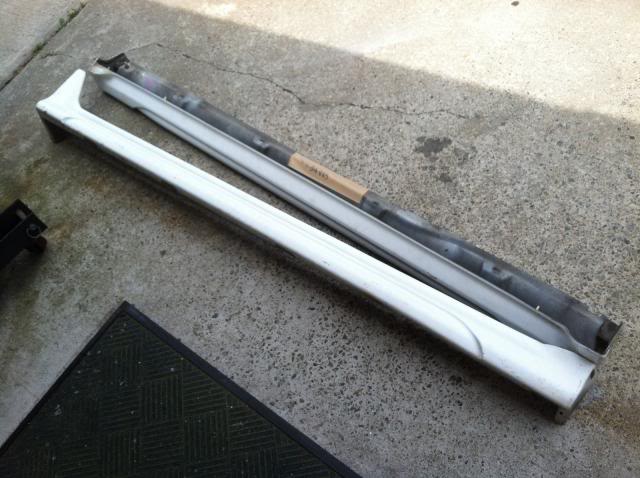
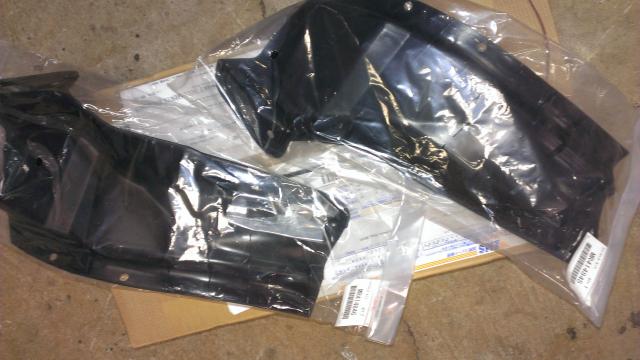
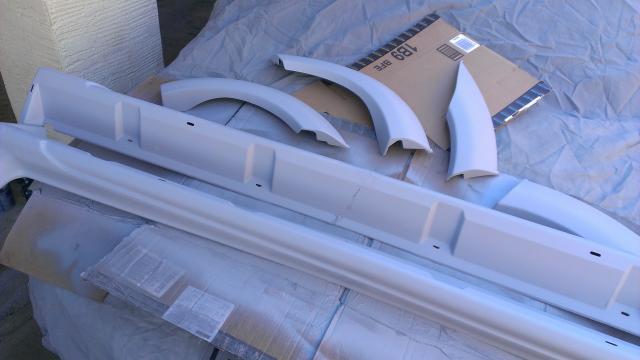
Got the evo5 side skirts in!
Installing the engine and transmission, since it just bolts up, so I can hook up the rear engine mount. That way I can align the front subframe in its correct location when I do the mounts.
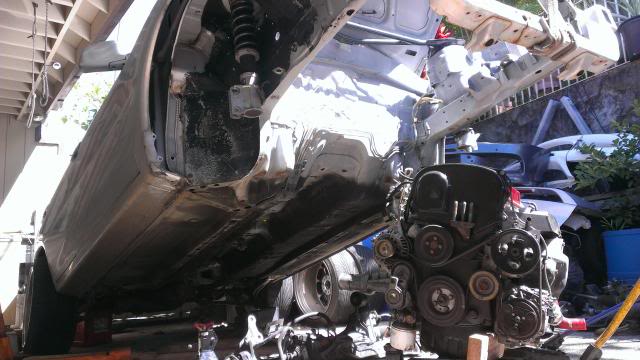
Installing motor and trans from down under
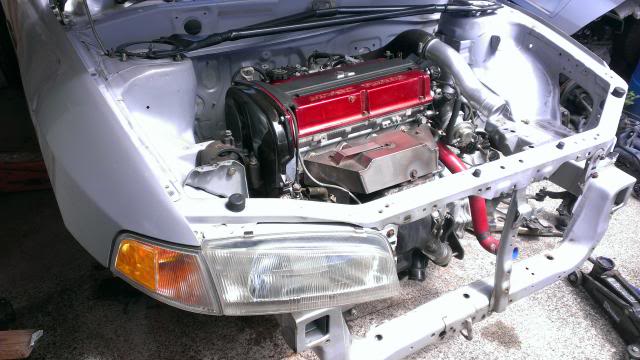
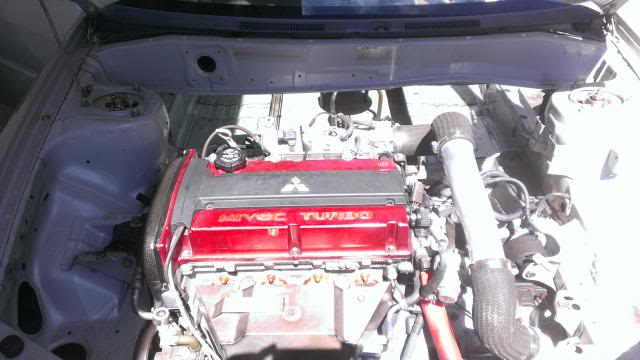
EVO9 MIVEC
Front subframe up and rear motor mount bolted in. Time to work on the mounts
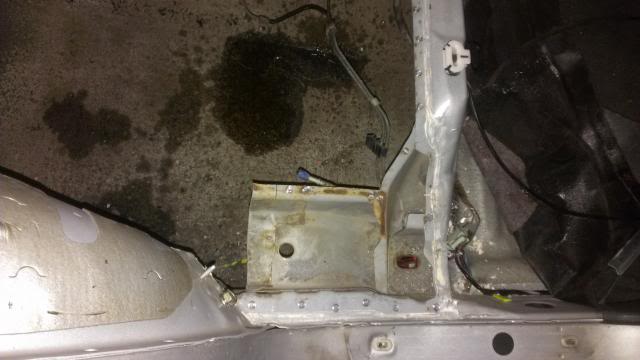
Found some time to strip the remaining bits out of the 9 so I can get to the front subframe mounts, transmission tunnel, and seat mounts. Job for today, remove the seat mounts so I can make a better cut for the tunnel.
Here's why I want them in, as you can see the front mounts run across the floor just like the mirage but mitsu added a full bar for the rear to help make the body ridged plus the rear helps stabilize the rear driveshaft mount. No need for EVO 5/6 seat tracks plus it makes it easier later for fast swaps with the 8/9 evos
I'm so tired and super excited at the same time.. I don't think I'm half way there with the 9 retrofit as there are more frame/body mods that need to be done. Maybe it would have been easier to cut the trunk floor all the way foward to the firewall. Oh well, next time!
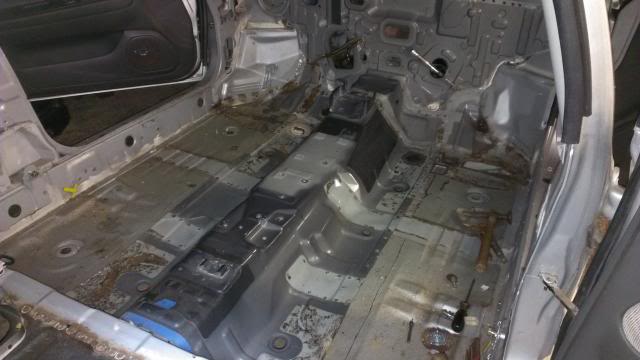
I had to remove the remaining bits of interior and strip the floor from most of the sound proofing to get to the row of spot welds. Later the floor will overlap the mirage rails to make a strong bond.
I even managed to keep the front half of the drive shaft on. Now for sure I will have a full bolt in of EVO 9 parts and even the 6 speed shifter and console.
Between a full time job and finding free time, I finally got back to it. More spot welds than the rear pan, I finally got to the drivers side front main crossmember mount out. Whatever's its called, the ammount of spotwelds it had to get to it matches the description. Lol
EVO9 front mount out and onto the other side...
Finally both sides out! Now on to removing the firewall
Yesterday I got the EVO9 firewall out. Its interesting to see how the car was put together and also where the weak spots for rust will form.

I want to retain the whole wire harness from front to back off of the EVO9. So, I took all the brackets that support the fuse/relay box, Gforce sensors, ACD, ABS, and AC lines. Also took the clutch bracket, foot rest or dead peddle, and brackets that holds the dash support bar. Now that the cats out of the bag.. Yes I will be doing a EVO9 dash conversion later, the right way.
Finally got the rear V brace out and took the time to remove the front fender braces also.
At this point, I've gone through 9 double sided spot weld cutters and well over a thousand welds, feels like it but I wouldn't doubt it.
Last part to come out of the 9. This is the cowl where the back side of the dash and AC intake connets to. Going to fabricate It to fit.
I got my rear arch trim in. Not in the best shape but totally salvageable..
Using tape, mark off the corners of the trim for overall alignment.
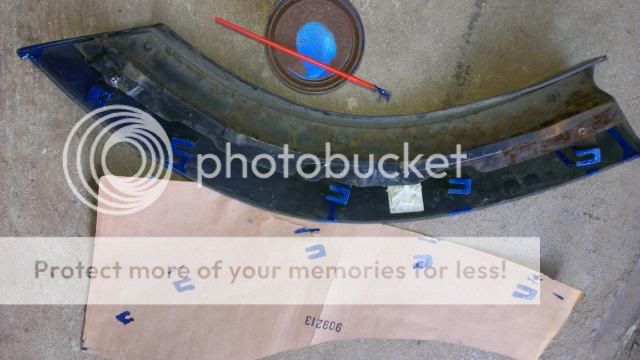
With automotive paint (you can use nail polish) dab on the tabs and corners where the clips go.
Take a sheet of masking paper (newspaper is just as good) rub it over the painted part to reveal a negative print. Trim the paper down for easier alignment.
With the marks made earlier on the body, align the paper and double check the placement using the parts before taping it down.
Use a center punch to mark the holes through the paper and onto the body. You need to hit hard enough to make a starting point for the drill bit but not too hard to create a dent.
I used a 17/64 carbide bit but I think a 3/8 would work also.
Paint the drilled out holes to prevent rust.
If your holes line up you should have no problem popping them in. Make sure your clips are in good condition, broken clips won't hold well. I'm sure you wouldn't want to have them fly off on the highway doing over 100mph!
I still need to source the weatherstrips but I'm sure any auto body supplier can get. For now I'm using what came with it.
Finally going back to the rear..
V brace with all three mounts
Tacked in for now. Moved lower brace back one inch from original for more clearance of passengers seat. Also got the third center upper hook in for top half of cushion.
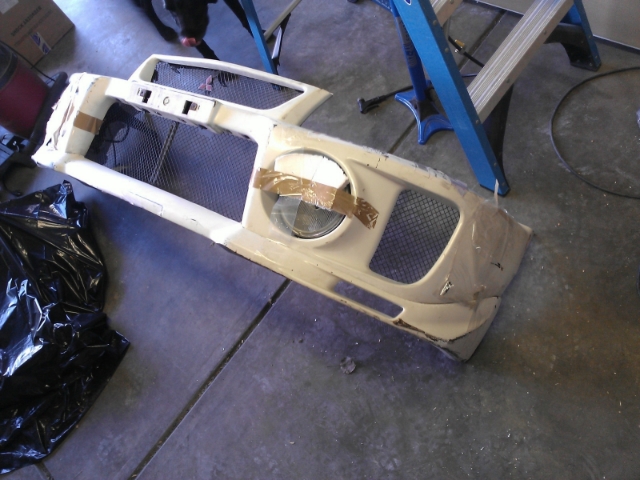
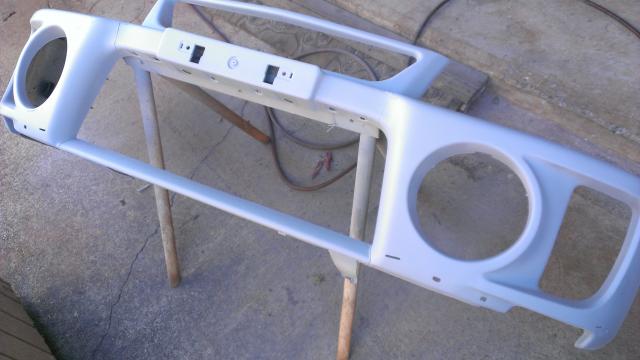
Got this in today. Complete with 4 intercooler sprayers and bumper bar.
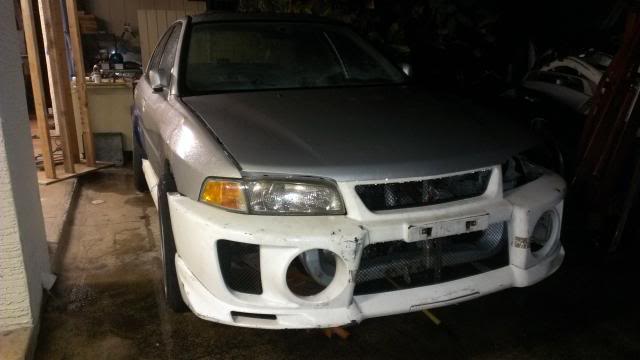
I had to.. stayed up late tweaking on this!
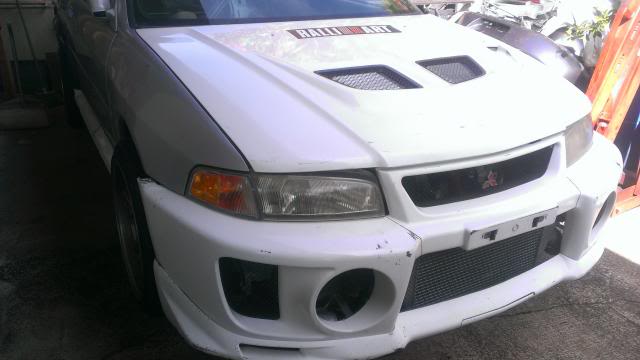
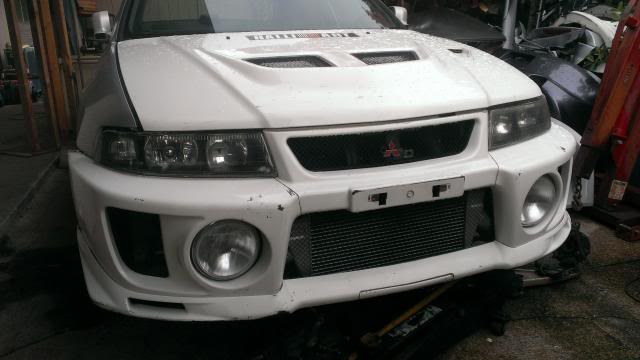
Good example how everything else doesn't fit well without the EVO 5/6 headlights, hood, and fender.
Currently as she stands!
By definition; Resto-mods are restored and modified cars utilizing the latest technology and modernized to today's standard.**
A resto-mod looks like a fully restored car, but careful inspection may revel features not available on an original manufacture; such as 4pot disc brakes, turbo, 6 speed transmission, upgraded interior with carbonfiber. These features enhance the ride and safety but would not have been with "correct" parts.
If you build it, they will come.. just messing with pictures I found on the net. ok thats it.. time to make dreams reality
Some guy in Hawaii that I've heard of numerous times. Never thought I will be taking the same path.. only difference is I want to do the whole build my self!
HAWAII plates. Not a bad color but the body looks as if it was in a hail storm! Can't go wrong for $700
120,000 miles and looks good. No engine leaks and I'm quite surprised.
The tear down begins on day 2. Trunk interior and rear seats were the first to get tossed.
On stands to get to the gas tank and all other unnecessary suspension tossed.
Looking for spot welds to cut out
At this point all the spot welds were cut out of the interior side. I'm trying to figure out where I should make my cut on the framerails.
So I decided to cut it here since the EVO has the same trailing arm pivot mount. I will make stich welds to reinforce everything later.
After a million F bombs and under a week of purchasing the car, the rear floor finally came out
Back to the Grind!
Within the week I also removed the rear floorpan from the donar evo9
Proof that its a evo9 rear
Getting the pan all up in there. At this point I didnt think it would fit being that it is a evo9 floorpan
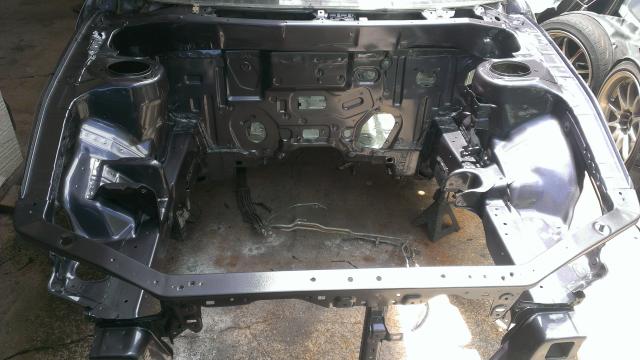
Welded up front and back then installed all suspension parts before doing a complete spot weld job
Knowing that it fits at this point is a big relief!
look what came in from Japan! Cusco evo6 rear strut tower brace. What better way to align the rear towers with!
The towers are about 1 1/2 inces higher than stock.
Got all the welds in and just so curious what it would be like stitting with the factory Bilstine shocks
looking beast! just a test fit.. rims are 18x9.5 +20
This is a view of the frame looking down from inside of the car on the drivers side. This is were I did my cut. I chose to do it here because there is a hidden frame inside of the exsiting outer frame. I planned on doing a butt weld on the outer and a stich weld on the inner.
Here I've already stiched welded the inner frame before finishing the outer
You can see where I've cut the rear floor to expose the fraim rails. I did it along the existing spot welds so it will be easier and stronger when finished.
Heres a test fit of the evo9 rear seat back. I didnt install the rear V brace yet. I might need to move the original floor tabs (where the lower parts of the V brace connect) back a inch or so.
I got carried away installing all the seats during my test fit. Fronts seat rails dont fit the mirage locations..
I think im going to use the floor braces from the evo9. They run completely across the floor making it more ridged plus it will make installng the Recaro SE seats safer in the long run. As for the back seats, they are a complete bolt in. It even has the child safety seat anchor points!
Went from this..
.. a fiew hours later to this. Removed the headlights, grille, bumper, radiator, ac lines, condenser, and wire harness.
Then went on in to reamove the dash
It was just too hot and humid today.. had to call it quits early
Today, cleared the stock engine and transmission out. Also pressure washed the wheel wells and engine bay
Santa came today dressed up in a FedEx uniform and dropped off this..
Im going to cut out a hole to mount the reflectors in the trunk later. Right now I cant decide what wing I should go with 5 or 6..
I washed the trunk the best I could. Kinda disappointed that Mitsubishi used a single stage paint for the evo.. guess its for weight and cost reduction.
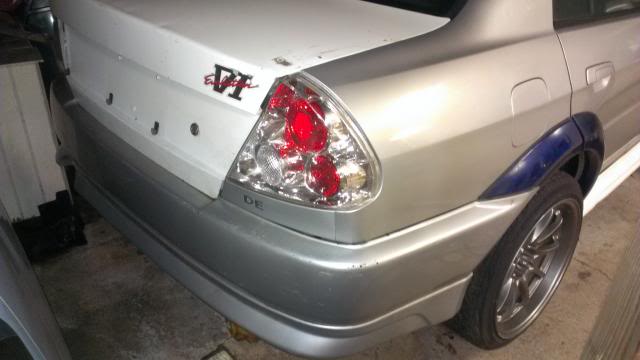
Got the trunk lid fitted today. Since it was from a evo, found out the wire harness and trunk cable is all on the right side. It had evidence from a harness cut still attatched to it sticking out twards the right. I really dont like the afermarket tail lights that came with the car...
Removed both front fenders and also cleaned up the fire wall. Removed everything and gave it a final scrub down.
I will be doing some stitch welding to add more strength to the towers and other areas.
I'm going to be the first to use a complete EVO9 front subframe and document it here. I want to take this route so I can use the much stronger EVO9 transfer case, quick ratio steering rack, complete suspension and stronger aluminum arms.
I�m completely aware that the front subframe isn�t a direct bolt on, but what fun would it be if it involved only 6 bolts!
After mocking it up, it was a big relief that I could make it possible to do this conversion. I'm going to use the OEM mounting pads from the EVO9 and graft it where it needs to be on the Mirage frame and lower fire wall.
Endura Techhttp://www.pasmag.com/performance/po...vo-x-coilovers
Made in Japan, limited now discontinued. Shall I say JDM non the less! 15 way adjustable and height adjustment exceeding 2.5 inches will make corners feel like I'm riding on rails!
I wanted to see where the wheels line up in the fender so I got a set on and lowered it to the ground. Only thing keeping it all together is the coilovers and the tension of the sway bar.
Took a break and did some planning. Also had to pull the motor out of the way from the donar to see what's up. First I will be taking off the mounts and grafting it to the mirage so I can use the EVO9 front subframe. I could go the easy way and fab brackets to fit but I think going this route will make it look closer to oem.
First mount, drivers side near the shock tower.
Here it is cut high so I can trim it down if needed for the proper height. I didn't go with drilling the spot welds just yet as this step is experimental
Got the evo5 side skirts in!
Installing the engine and transmission, since it just bolts up, so I can hook up the rear engine mount. That way I can align the front subframe in its correct location when I do the mounts.
Installing motor and trans from down under
EVO9 MIVEC
Front subframe up and rear motor mount bolted in. Time to work on the mounts
Found some time to strip the remaining bits out of the 9 so I can get to the front subframe mounts, transmission tunnel, and seat mounts. Job for today, remove the seat mounts so I can make a better cut for the tunnel.
Here's why I want them in, as you can see the front mounts run across the floor just like the mirage but mitsu added a full bar for the rear to help make the body ridged plus the rear helps stabilize the rear driveshaft mount. No need for EVO 5/6 seat tracks plus it makes it easier later for fast swaps with the 8/9 evos
I'm so tired and super excited at the same time.. I don't think I'm half way there with the 9 retrofit as there are more frame/body mods that need to be done. Maybe it would have been easier to cut the trunk floor all the way foward to the firewall. Oh well, next time!
I had to remove the remaining bits of interior and strip the floor from most of the sound proofing to get to the row of spot welds. Later the floor will overlap the mirage rails to make a strong bond.
I even managed to keep the front half of the drive shaft on. Now for sure I will have a full bolt in of EVO 9 parts and even the 6 speed shifter and console.
Between a full time job and finding free time, I finally got back to it. More spot welds than the rear pan, I finally got to the drivers side front main crossmember mount out. Whatever's its called, the ammount of spotwelds it had to get to it matches the description. Lol
EVO9 front mount out and onto the other side...
Finally both sides out! Now on to removing the firewall
Yesterday I got the EVO9 firewall out. Its interesting to see how the car was put together and also where the weak spots for rust will form.
I want to retain the whole wire harness from front to back off of the EVO9. So, I took all the brackets that support the fuse/relay box, Gforce sensors, ACD, ABS, and AC lines. Also took the clutch bracket, foot rest or dead peddle, and brackets that holds the dash support bar. Now that the cats out of the bag.. Yes I will be doing a EVO9 dash conversion later, the right way.
Finally got the rear V brace out and took the time to remove the front fender braces also.
At this point, I've gone through 9 double sided spot weld cutters and well over a thousand welds, feels like it but I wouldn't doubt it.
Last part to come out of the 9. This is the cowl where the back side of the dash and AC intake connets to. Going to fabricate It to fit.
I got my rear arch trim in. Not in the best shape but totally salvageable..
Using tape, mark off the corners of the trim for overall alignment.
With automotive paint (you can use nail polish) dab on the tabs and corners where the clips go.
Take a sheet of masking paper (newspaper is just as good) rub it over the painted part to reveal a negative print. Trim the paper down for easier alignment.
With the marks made earlier on the body, align the paper and double check the placement using the parts before taping it down.
Use a center punch to mark the holes through the paper and onto the body. You need to hit hard enough to make a starting point for the drill bit but not too hard to create a dent.
I used a 17/64 carbide bit but I think a 3/8 would work also.
Paint the drilled out holes to prevent rust.
If your holes line up you should have no problem popping them in. Make sure your clips are in good condition, broken clips won't hold well. I'm sure you wouldn't want to have them fly off on the highway doing over 100mph!
I still need to source the weatherstrips but I'm sure any auto body supplier can get. For now I'm using what came with it.
Finally going back to the rear..
V brace with all three mounts
Tacked in for now. Moved lower brace back one inch from original for more clearance of passengers seat. Also got the third center upper hook in for top half of cushion.
Got this in today. Complete with 4 intercooler sprayers and bumper bar.
I had to.. stayed up late tweaking on this!
Good example how everything else doesn't fit well without the EVO 5/6 headlights, hood, and fender.
Last edited by GraphiteMRevo; Aug 22, 2015 at 04:41 PM.


Drilled the spotwelds and cut the floor out to make room for the goodies that will be going in. Firewall and subframe mounts are next then I will be able to bolt the EVO9 subframe in.
Well packed EVO5 hood just got in!
Here you go!
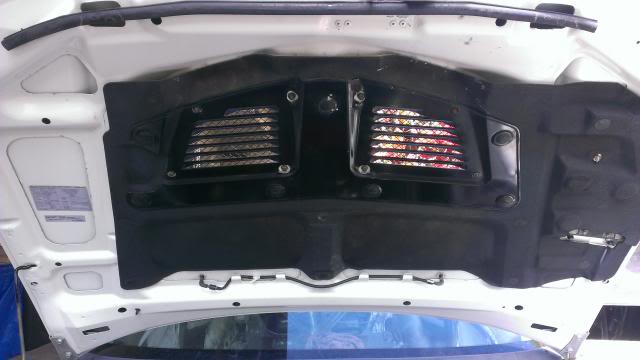
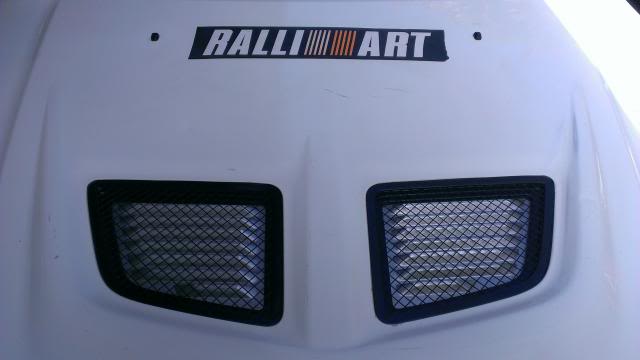
It came with everything attached. Vents, grille, heat pad, duct, washer nozzles and a big RALLI////ART sticker!
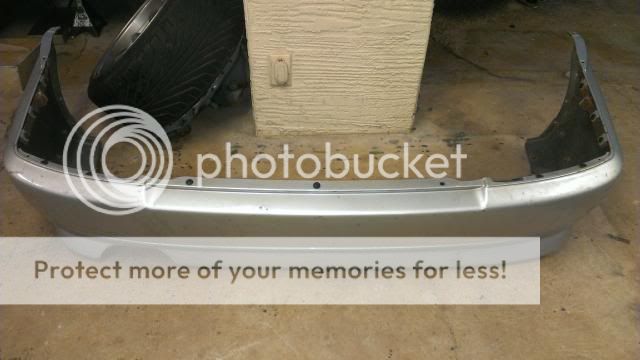
Ok good news, got the rear bumper in. Looks different because I had it shipped folded to cut 30% off the shipping! Nothing a quick heat gun can't fix.
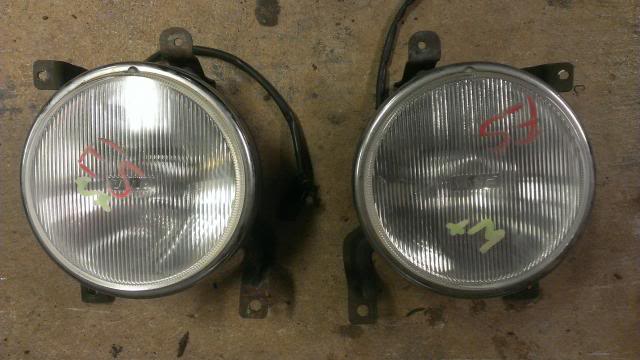
Also got the OEM PIAA fogs. They hitched a ride inside the bumper during shipping! Not bad eh!
Wish I got a picture before I put the heat gun to it. The fold was pretty bad looking but now you can't tell.
Got a replica evo5 rear wing from a friend, thanks Bonsaitree! Not sure if I like it yet as I still might go with the 6 wing. Good thing I have this to try out for now.
Also got a set of oem trunk reflectors. I want them in so it makes the car stand out more than a regular mirage from behind. All I would need to do is use a gasket, make a template cut and drill to have them fit.
Still waiting on the tail lights.. really don't like the chrome look.
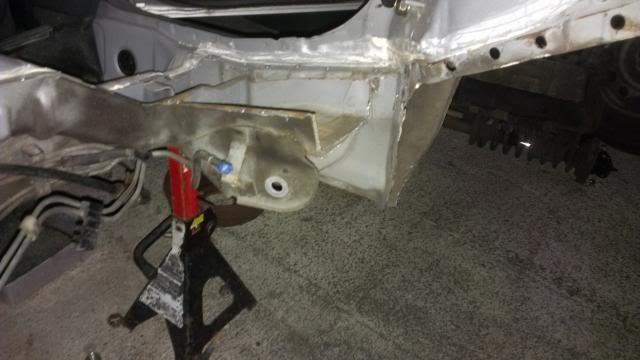
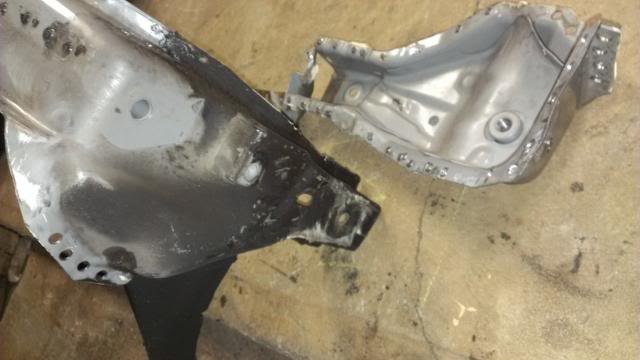
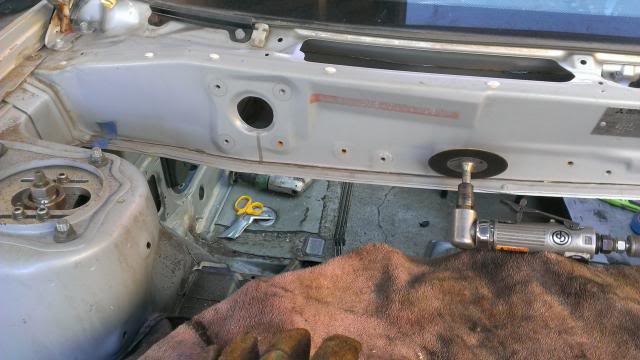
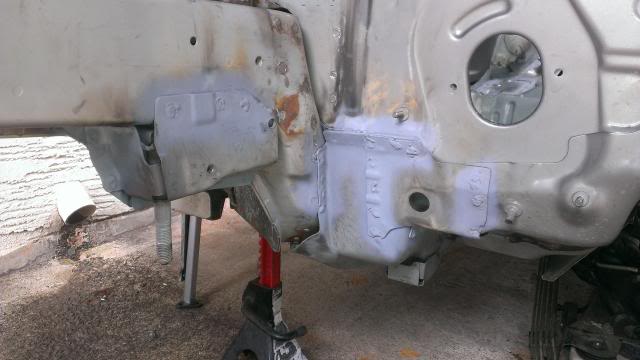
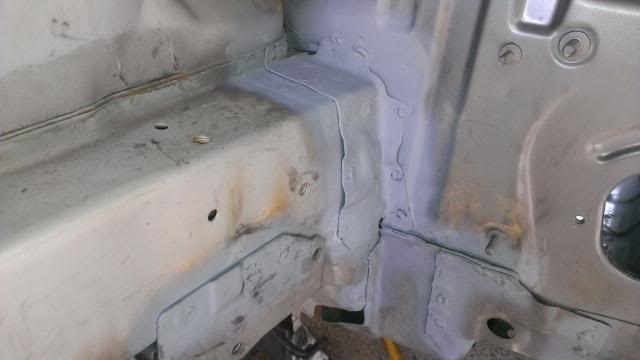
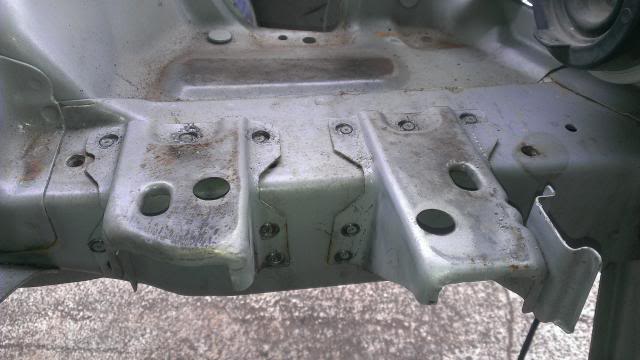
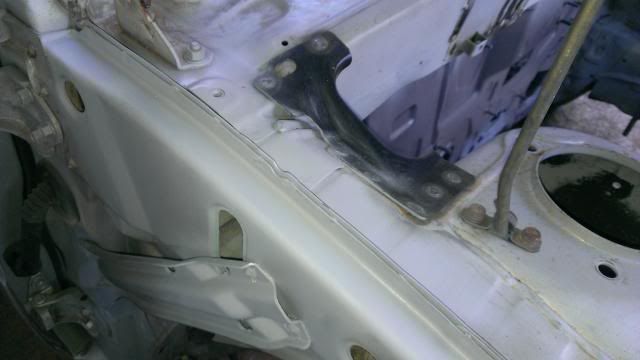
nothing much but after 90+ spotwelds in this area, I removed the front crosmember mounts and part of the firewall as I will be replacing them both.
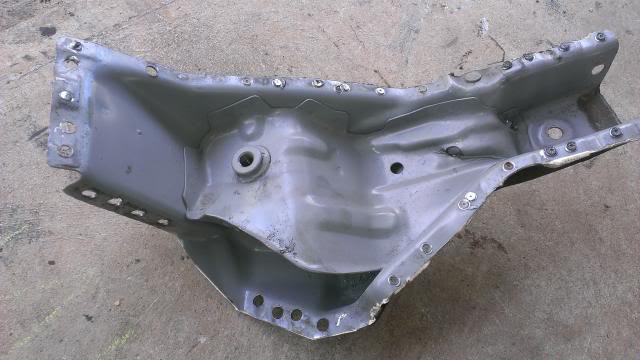
This is a clear shot of the mounts removed. The lower 2 is from the original mirage that has 2 mounting points where the lower A arm bolts through. The upper pair is from the EVO9, this is where the front crosmember bolts to.
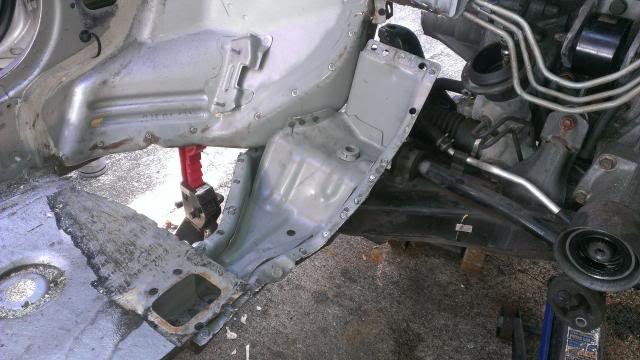
Driver's side EVO9 mount mocked up using the subframe
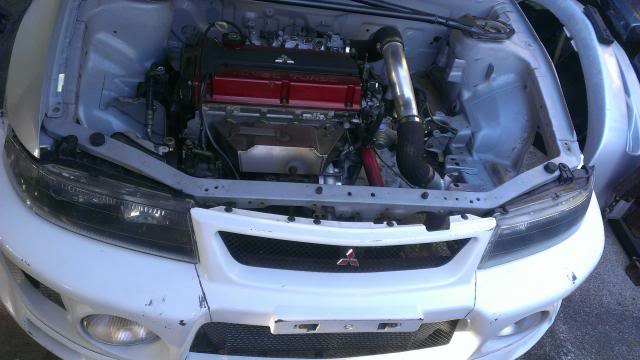
Just a engine bay teaser
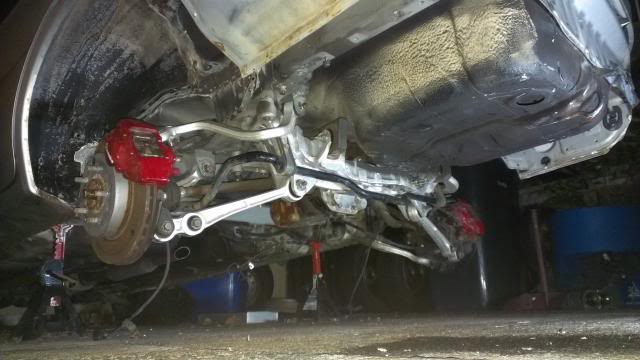
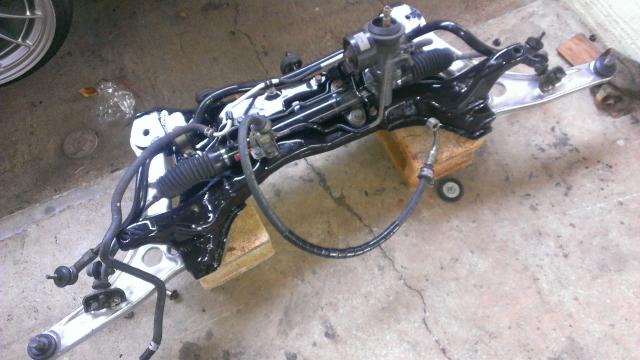
Full front suspension with quick steer straight out of the 9. Old pic because currently the engine is mocked up in the way to show a clear shot.


Lower EVO9 A arms.. there's a write-up on the web about someone that swapped in a EVO 10 lower arm which adds 2 more inches in width! Good ideas driving me crazy!
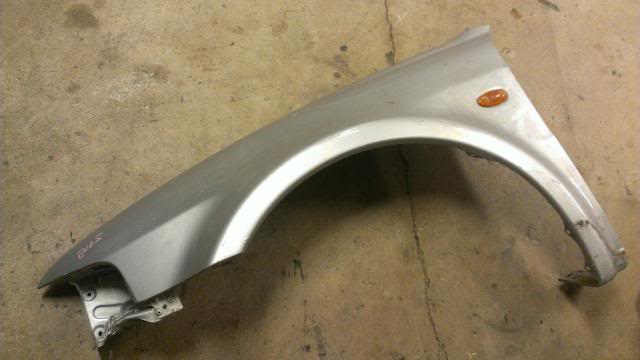
So the fenders were shipped, covered with cardboard and wrapped together with shrink wrap. I was so excited and concerned about dents that I forgot to take a pictue of how crazy scary the wrapping looked. I would of been ok if the added some bubble wrap but after inspecting, it is dent free!

With the fender liners and brake ducts in, its all coming together to be the EVO I wanted! Just need headlights up front..
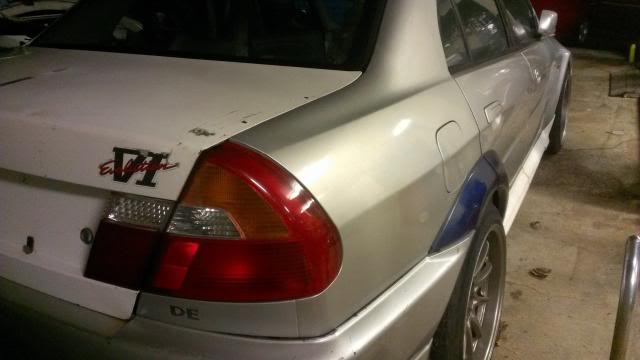
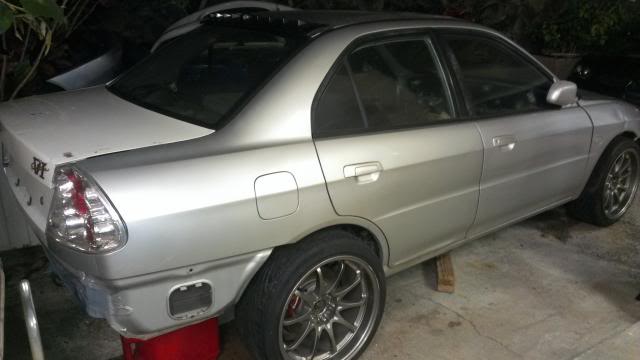
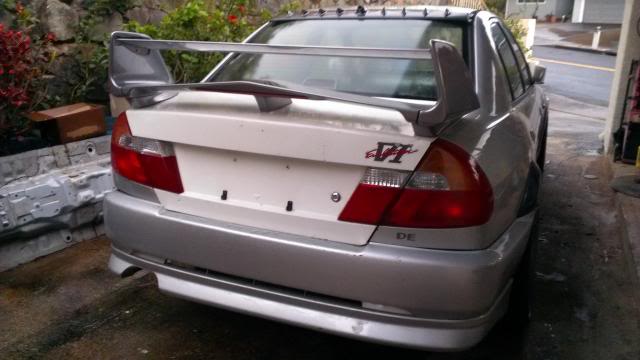
Just a rear shot where she stands. The rims flush well, 18x9.5 +22 with a 10mm spacer. Just need to swap in the rear coilovers for a final touch but that's for later.

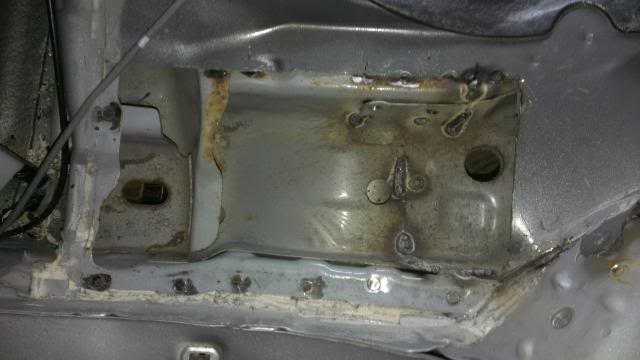
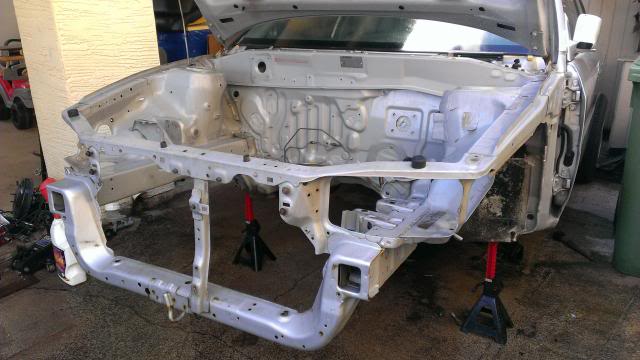
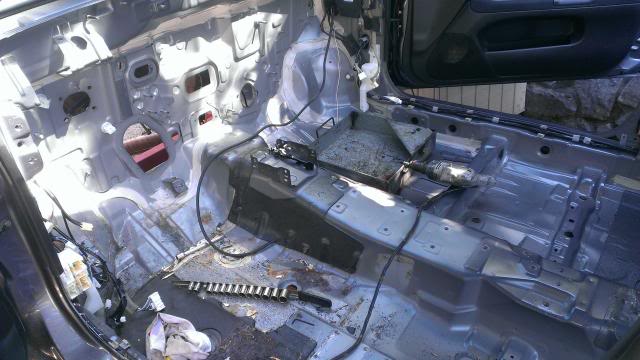
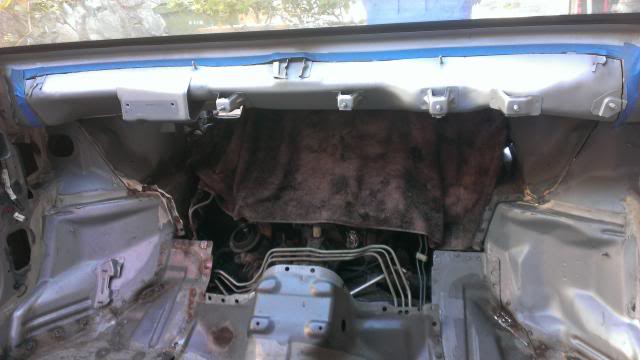
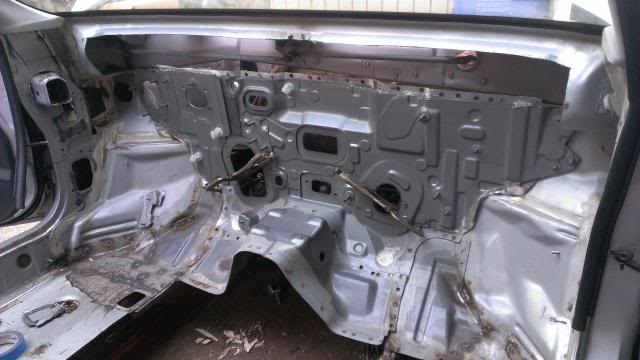
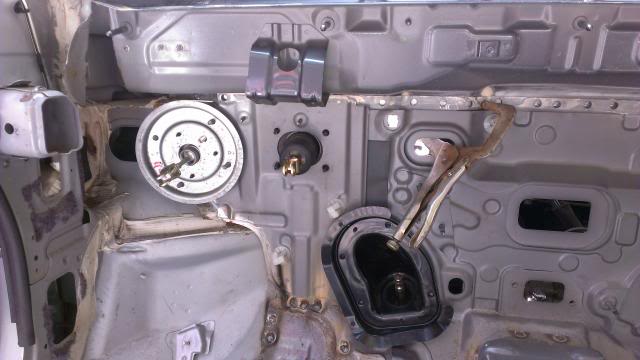
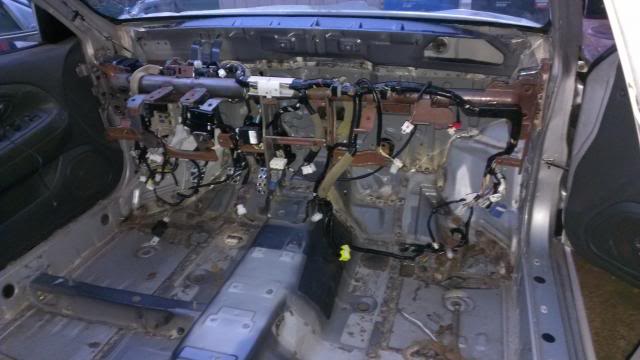
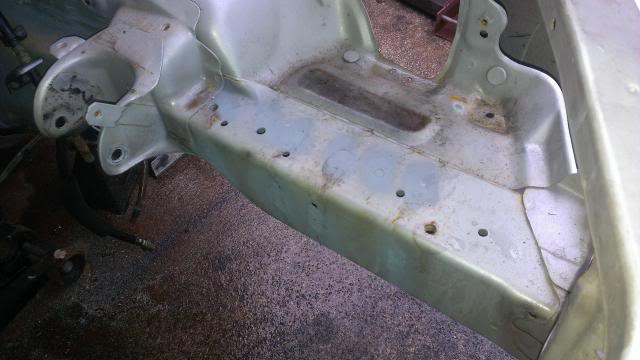
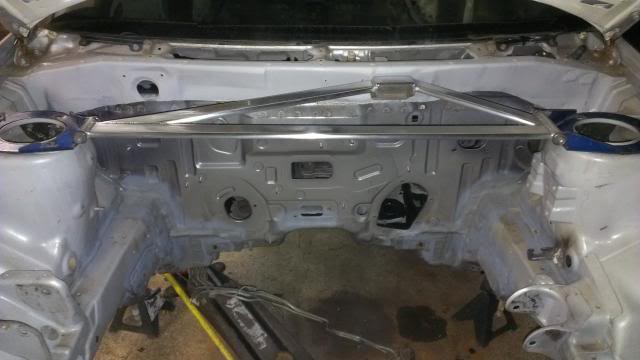
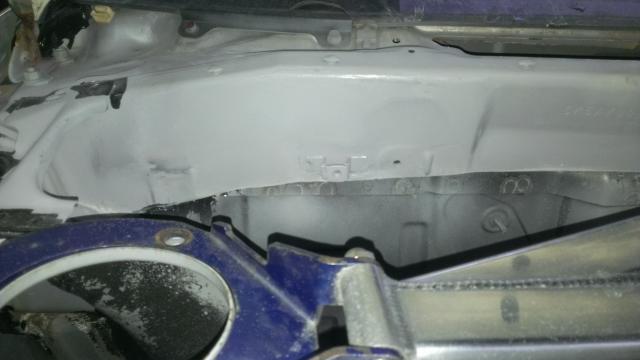
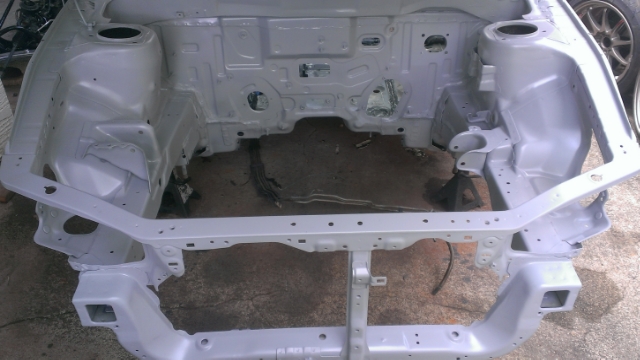
Firewall completely out!
In the engine compartment, I will be keeping the cowl part as is and won't be making any changes on this side.
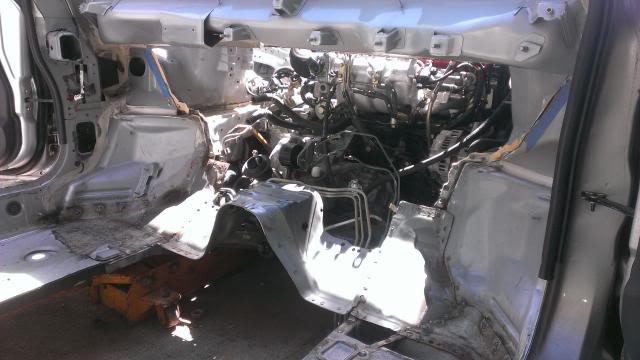
From the inside.. wish the motor had this much accessibility!
What will replace it?

EVO9 firewall! I need to keep it left hand drive for state laws but this will be the right way to update the dashboard. Air conditioning and vents will all line up, even the shifter cables and updated clutch with master cylnder will all be used from the EVO9.
Guess what came in today!
The wing! Thanks BCspeed34 it was well packed! Some assembly was required but 20 min later..
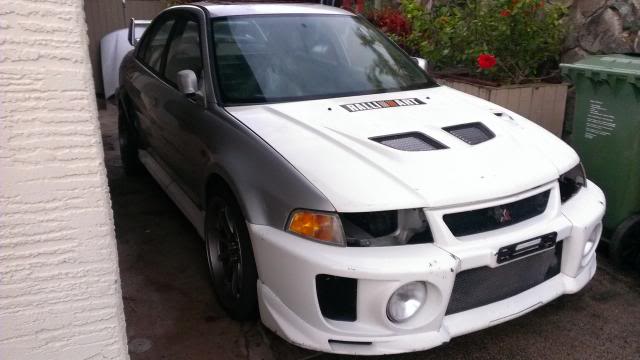
Just needs a set of headlights again.. the one piece isn't for me because I can't cut up a nice set of fenders just yet.
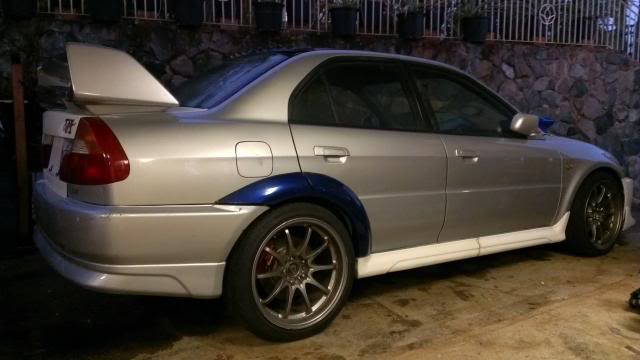
A side shot.. bad lighting but you get the idea!
Its been a long day and tons of measuring twice and cutting once. Oh what fun it was!
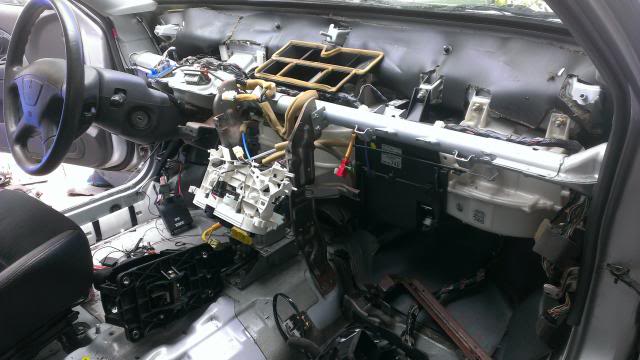
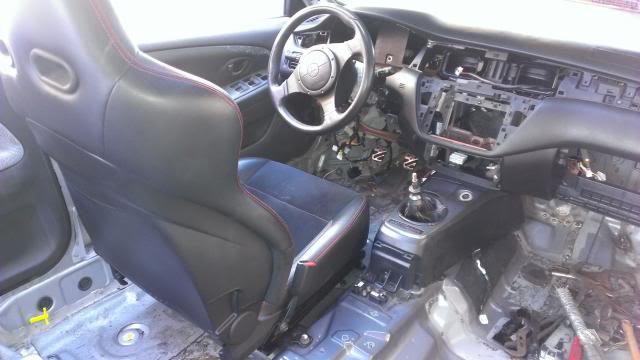
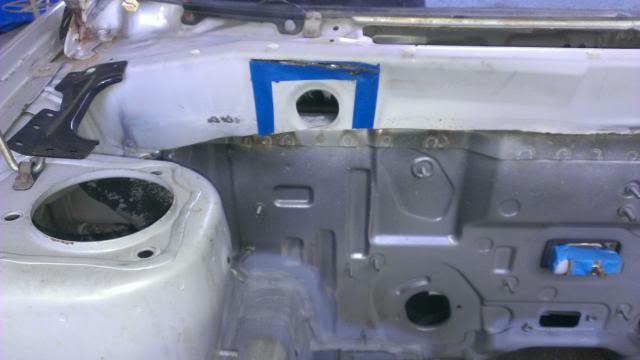
Contuing up the firewall, I needed to see how much more cutting is neded so I decided to test the new dashboard!
The 9 dashboard! I will make it fit. Door panels won't work but I will take care of that later also.
I like to use blue tape to mark off where to cut. Its much better than looking for a black line when there's tons of dust.
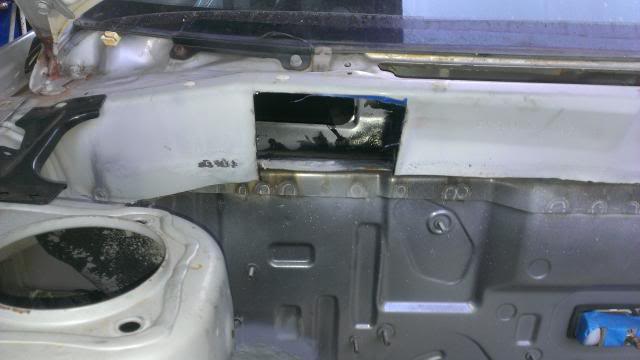
In the engine compartment, I cut the lip off to make it appear smother later down the road.

The area I removed is the lower piece in silver, I will be grafting the evo9 cowl above it. This piece is needed to retain all the dashboard mounts and the AC intake from the 9. It will also complete the firewall. As for the windshield wipers, the original parts will be kept to insure proper operation when it storms.
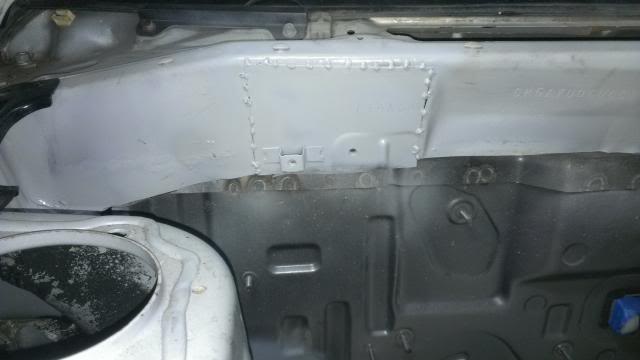
Trimmed and fitted, the firewall looks like it will work just fine. Got it clamped in for now until I'm sure about the position.

Time to do the floor for a quick test fit since I'm on a roll! Reason why I removed it in the first place is because I want to use the EVO9 center console and use the correct floor mounts for the Recaros. Yes, doing a complete EVO9 interior so after this is done, everything should bolt right in. Also the driveshaft and hangers are already there so less to worry about since its already made for it.
The EVO9 floor is 3.5 inches longer than the mirage. The rear section of the driveshaft will be trimmed also in a later time.
All parts are test fitted just rite. I still need to do some sound proofing removal before I tack the floor in but I like it better to work on with it out. Its much cooler and less of a cramped work space.
A last min drop in test of the floor mounts. The mirage might be one inch wider between the rails because there's a half inch gap on both sides of the mounts. I will fill the gap when I get there.
As you can tell, its getting late and time to call it a day.
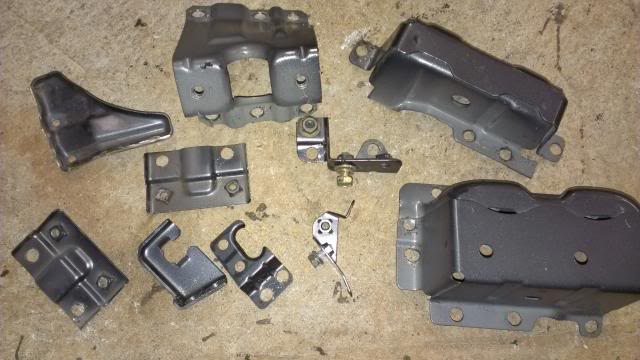
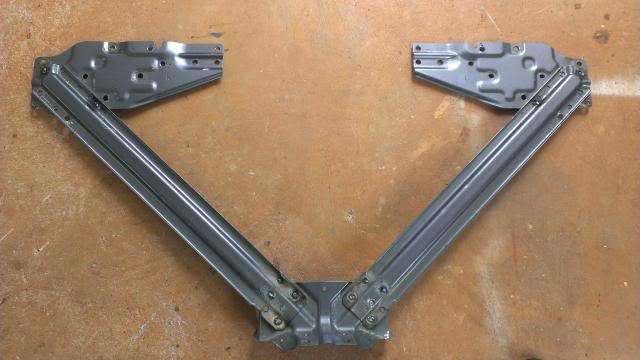
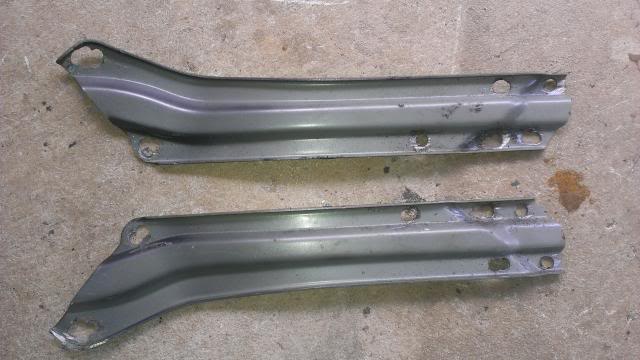
On to the next item.. The "C" braces!
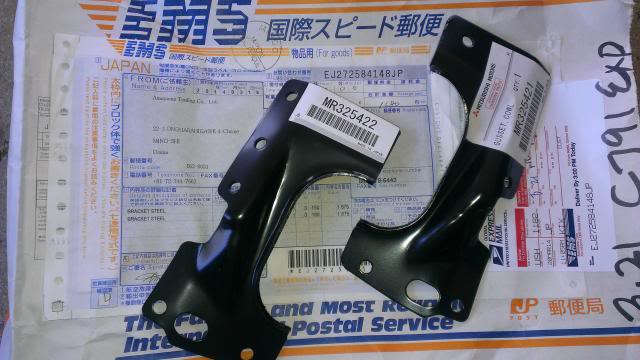
Thanks to Rotarynemisis for shairing this link http://mitsubishi.epc-data.com/lance...ulator/213560/I was able to get the Mitsubishi braces straight from Japan! Among other things I find that I will be getting in the future, this link helped me find lots of parts otherwise hard to get.
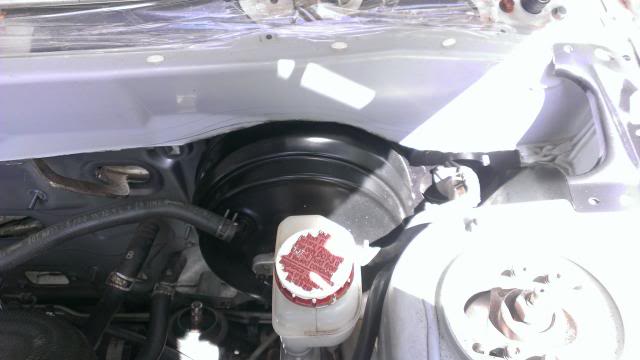
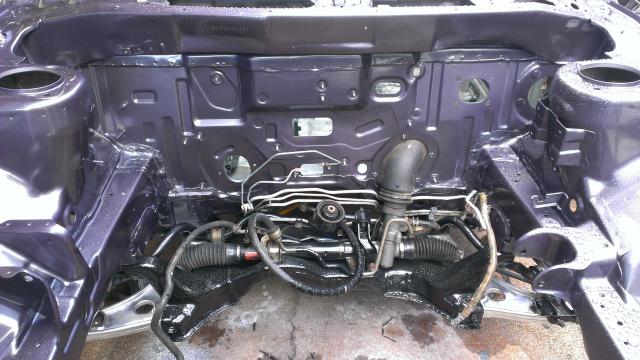
Master cylinder and clutch cylinder test fit. Can't really see the clutch but it shares the same fluid resevoir as the brake, connected by a rubber hose. Also did some trimming to clear the master.
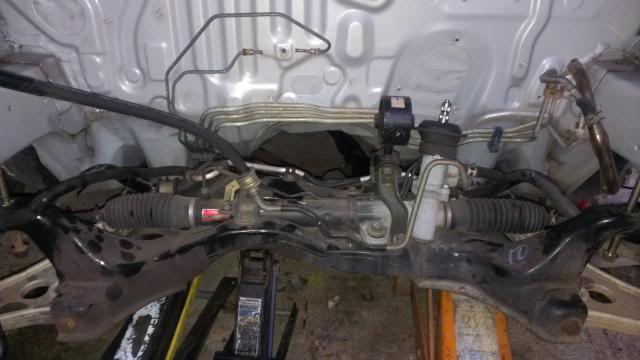
On the inside, body seal to steering rack test fit nicely sealed.
Testing the clutch brake and gas pedals for alignments. No problems here as they were just simply bolt on.
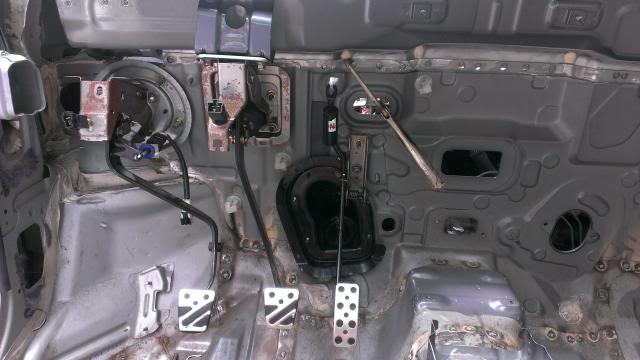
Welded in the drivers side floor mounts and did a quick test fit with the dashboard, steering column, and shifter. Need to stop here, getting to carried away with just bolting on things when I need to take them off again.
So, I took everything back out to finish welding the dashboard crossbar from the Evo9. Its needed because it has all the anchor points for all the dashboard accessories and the Evo9 dash wire harness.
It's 1.5 inches shorter than the mirage one I replaced so I needed to weld up 3/4 inch square tubing for the mounts on both ends. I have about a full inch of adjustment front to back if needed later on.
Thank you ej1power for a generous hook up :thumbsup:
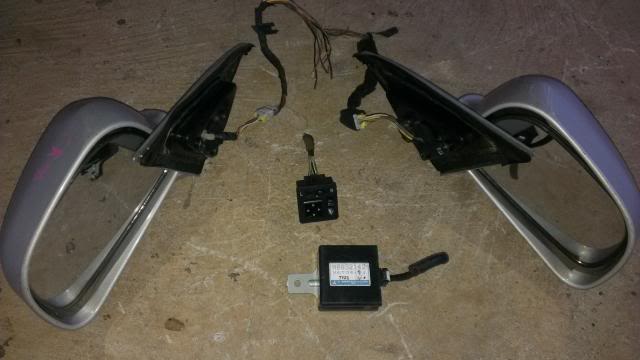
Power folding mirrors with switch and that damn relay! Both mirrors are concaved (image is smaller than they appear) I like it. Can do away with those blind spot dots that you can stick on. If only they had a blue non-glare replacement.
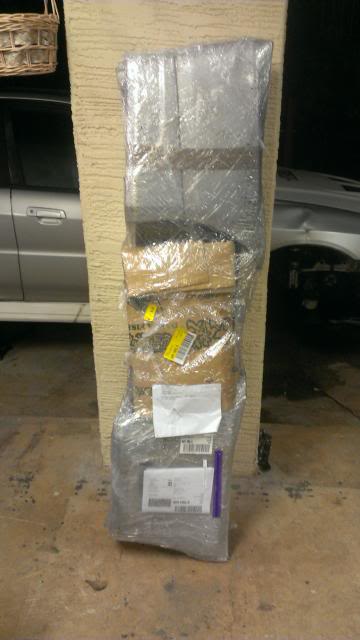
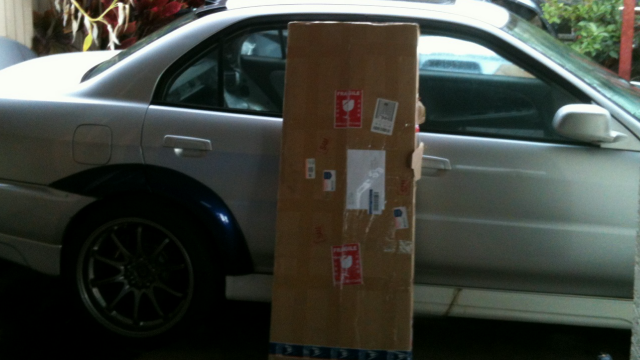
I get 2 packages in today and you can tell right away what's inside!
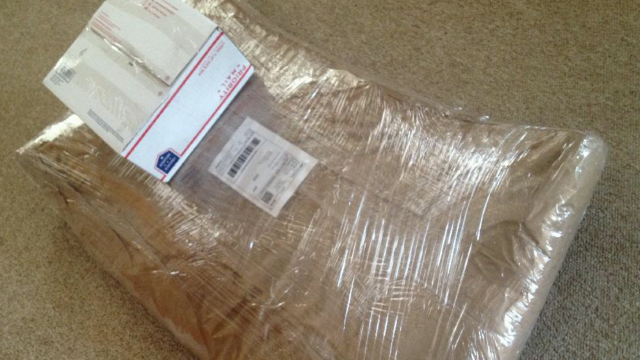
Light but really fluffy. I held the mail carrier until I was sure it wasnt damaged so she just stood there until I gave an all clear. It was for insurance purposes.
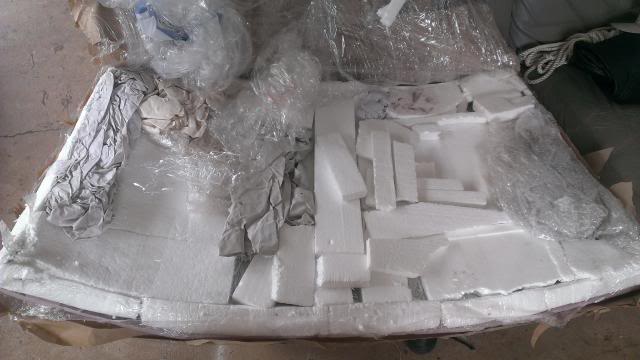
Down to the next layer of packing material and foam.

At last, the glass! Well packed but nervous all the way since day one of shipment.
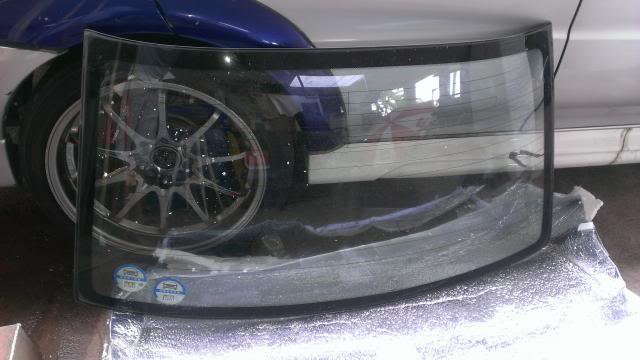
Japan parking/permit stickers.. different from the pictures of what I had up first. Hmm..
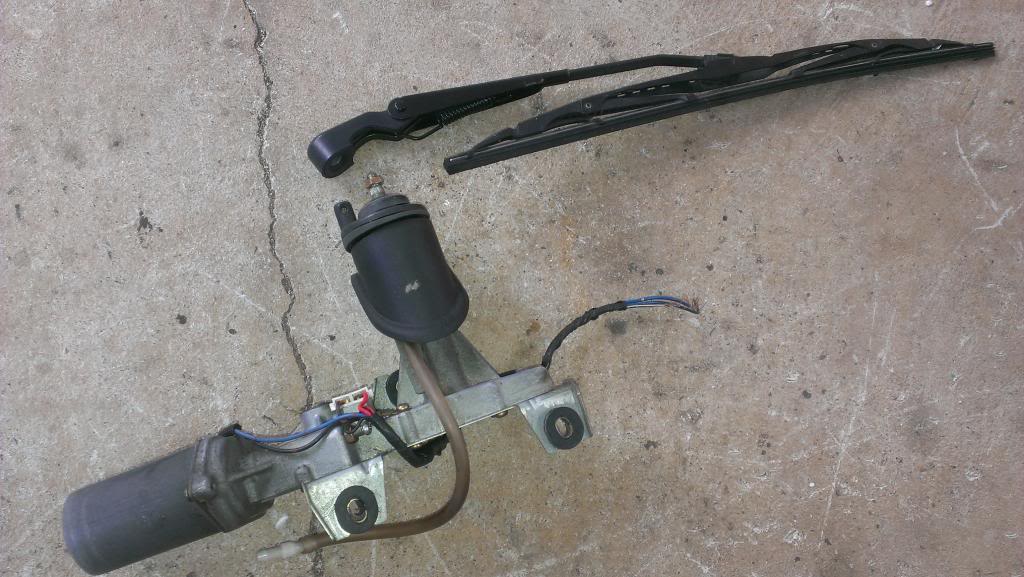
And from the box, rear windshield wiper and motor with harness ends. Also got a universal windshield washer bottle for free. I'm gonna look for a oem type with 2 motors for front and back instead.
Shouldn't be a problem getting this wired up since the Evo9 wire harness already runs to the back.
Looks like another distraction from finishing the welding up front. Time cut the glass out and install!
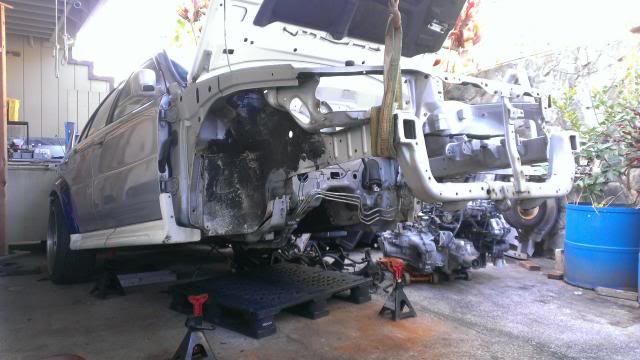
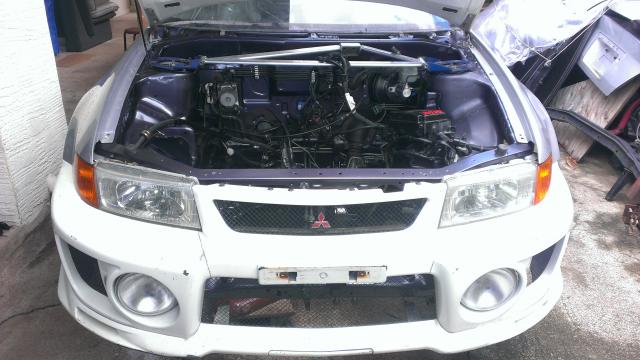
I've been busy cleaning up today making room for the next phase of the build which is finishing up the engine bay.
The last time for this motor to be in here for now. Time to clear out and unbolt everything one last time as it was all for test fitting only. Everything up front is going to come off like the fenders, bumper, hood and all. Damn, I had it so close to looking complete but it needs to be done to look good and done rite!
Since the whole front end is off, I took the time to install a front fender brace.
These pieces comes factory welded OEM on a EVO9. Since I could get them, I drilled them off thinking they just might fit on the mirage.
After looking at the aftermarket fender braces online, I decided to mount them up in a way so that it doesn't interfere with anything.
If I go with aftermarket fender braces for more support, I just hope they clear right over this mod.
Finally! Feels like the last parts to get take the longest to ship.
Headlights..
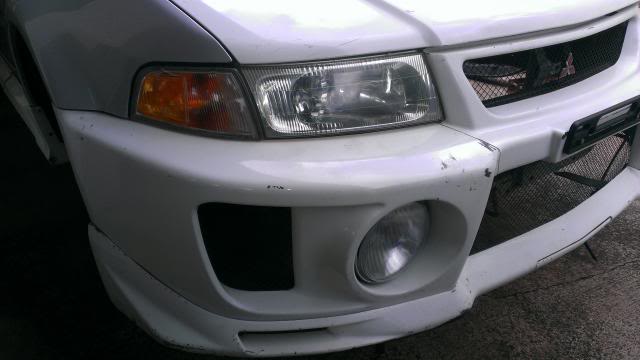
With the oem corner marker
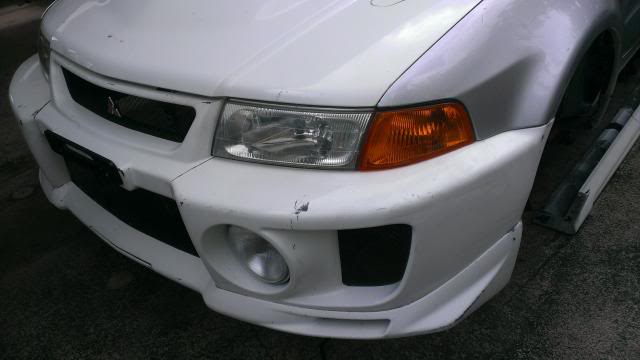
With the JDM amber marker.. decisions..
Dropping the motor and trans then lifting the shell up high so I can roll the motor out from under. Now I can get the rest of the welds on the firewall and install the remainder braces.
More boring updates but its moving along!
Positioning the EVO9 brace to weld since the other side was a success
Finishing up the welds for the EVO9 subframe mounts.
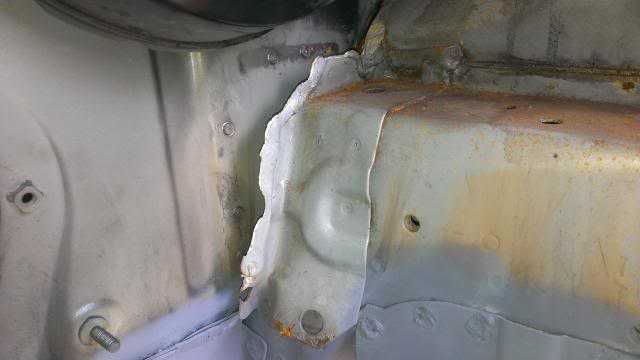
Gap on the firewall to frame..
Drilled off the bracket and moved it closer to the firewall to close the gap.
Decided to move the batery into the trunk so I drilled out the brackets
Nice and clean with no battery mounts! Now I should have more than enough space to run straight intercooler piping.
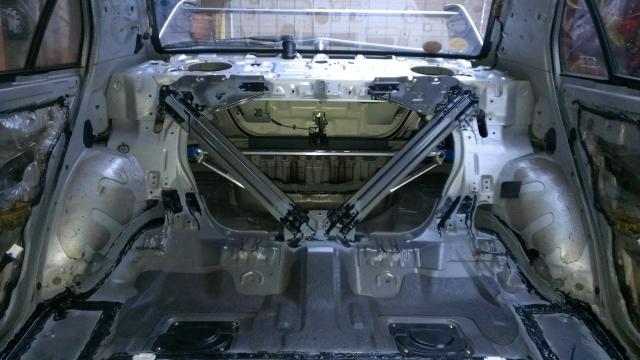
So I got some extra Cusco braces in! Triangle brace for the rear made for a Evo8, it looked like it would fit so I chanced it thinking it would need modifications to fit. Surprising it fits like a glove without any mods!
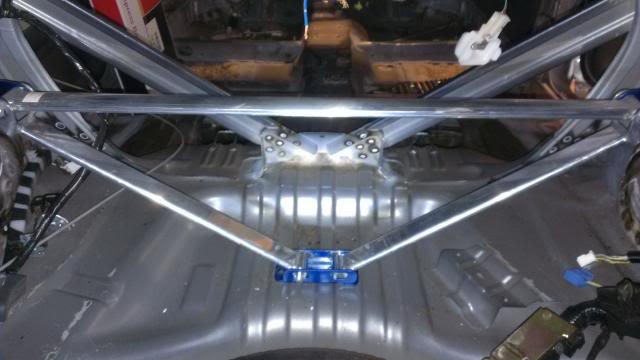
Trunk side view
Interior side view. Double V bracing, more stiff!
Can't wait to to take sharp turns with this!
After I've welded up the exposed areas, I use a wire wheel to polish the welds and treat it with rust converter. Once that dries I use por15 to further seal out moisture the best I can. When that is cured, I will follow it up with a brushable seam sealer as I can control the thikness better and to get the oem type of seal.
Picture above shows the por15 on the joints and welds before I seam seal it.
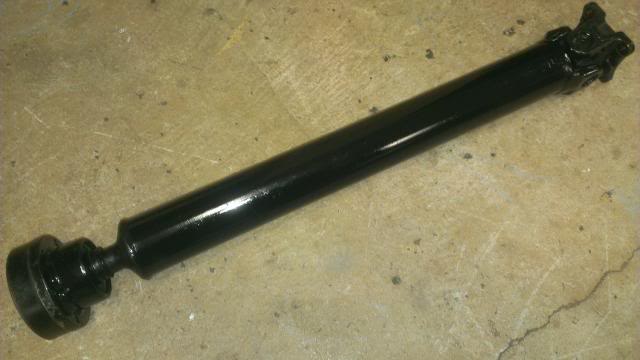
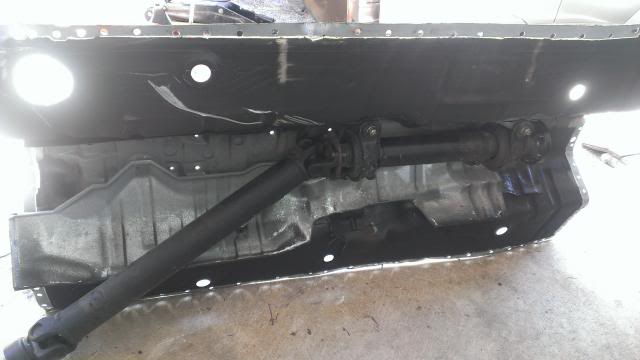
I shortened the driveshaft (universal joint side) 4.5" with the evo9 setup I have and now it fits like a glove. Since I did the mod myself, I'm sure its not balanced but this is only temporary.
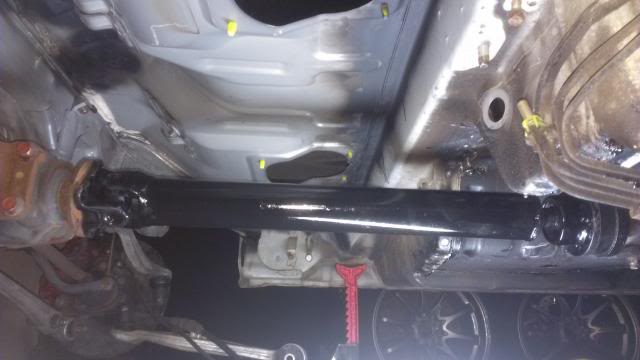
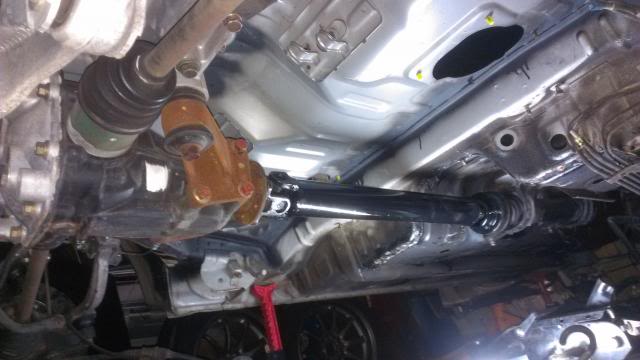
Looks good for now but I'm thinking of making a lighter version in the future. Aluminium, maybe carbon fiber who knows.. I just want it on the road!
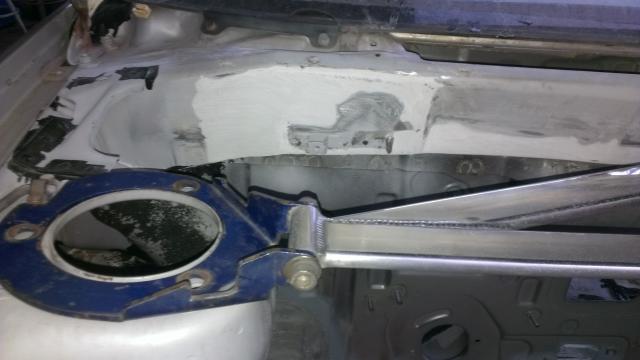
Quickly polished the front Cusco brace and had to throw it under the hood!
The evo9 firewall isn't quite finished on the engine bay side. I still need to relocate and shave off the wiper motor mount and install bracing inside of the cowl side to make use of the Cusco front triangle bracing.

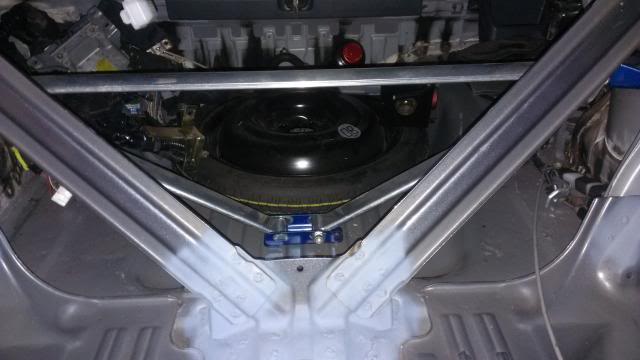
I thought it would be neat to post up the rear triangle bracing again.
Had some free time and decided to take off the wiper motor hole. I will be relocating the wiper motor inside to keep the cowl nicely shaved and adding a mount for a pressure regulator/guage combo in the future. I took the patch panel from the same location as the EVO9. Here's a before, during, and after shot.
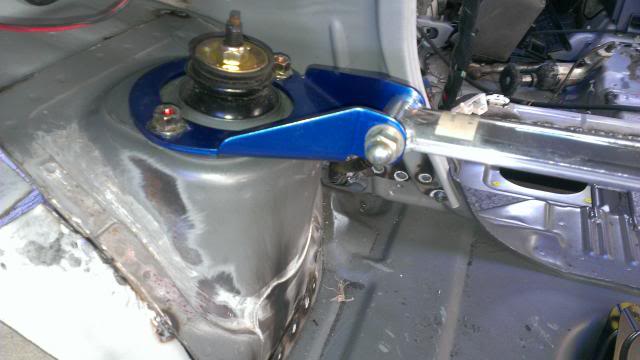
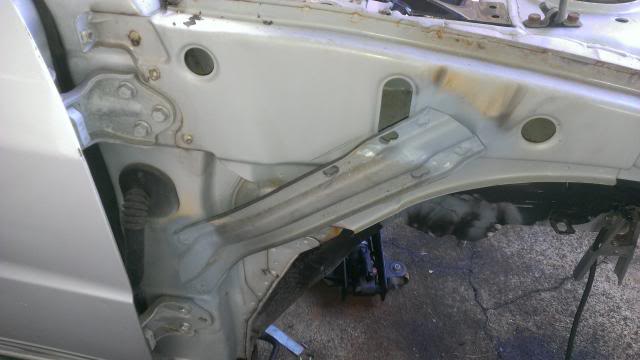
Since I was in the area, I finally got around to add on the EVO5 "C" brace, or strut tower brace.
Looks more ridged with it installed along with the fender brace. Less flex = more fun!
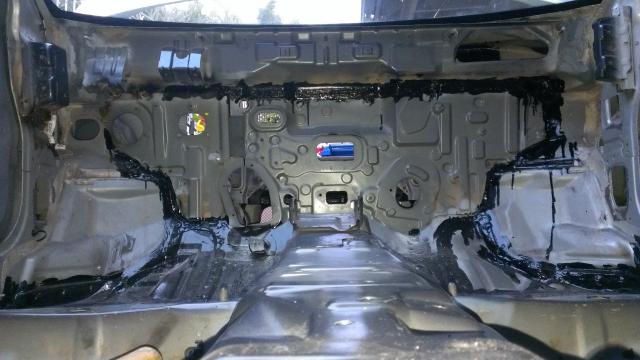
Used por15 to seal the welded joints after they were treated so rust doesn't form. Beginning to prep the area inside for its first coat of primer sealer before I paint.
Rear V brace and surounding areas prepped for primer sealer
Here's the firewall with modified cowl so it all stays functional. Everything else off of the 9 is now a direct bolt on including the AC unit.
Small update of the wiper motor delete.
After the patch panel and the welds grounded flat I used a little bit of lightweight filler..
A shot of primer for now..
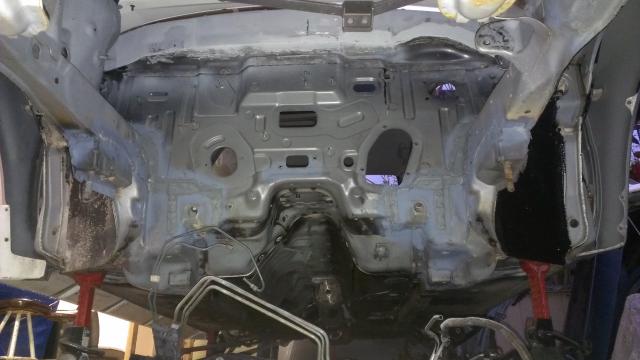
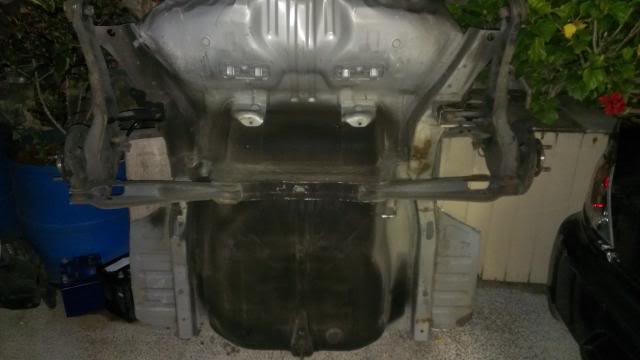
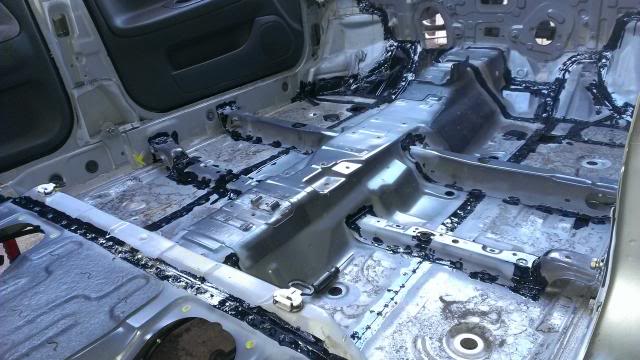
A lot are curious to see what it looks like under so here's a underside shot of the EVO9 front subframe mounts, firewall and floor pan in the mirage! Hope to make it a seamless install
So I've just about had it trying to source the rear inner fender flair and decided to make it instead. How hard could it be anyways!
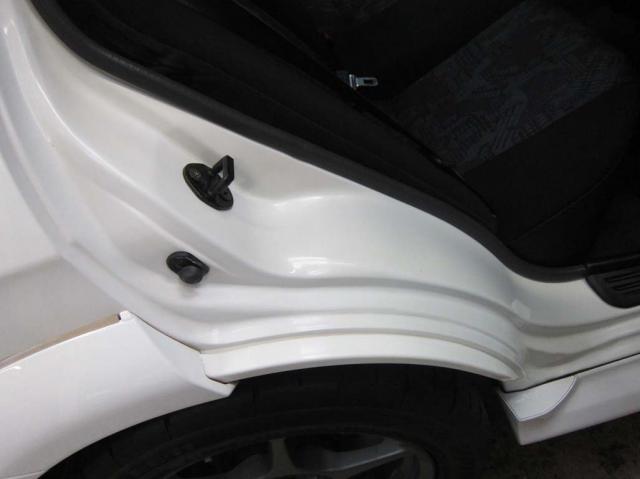
Picture above is a stock photo. The inner lip holds the rear bumper, securely mounts the fender flair, and adds protection from debris.
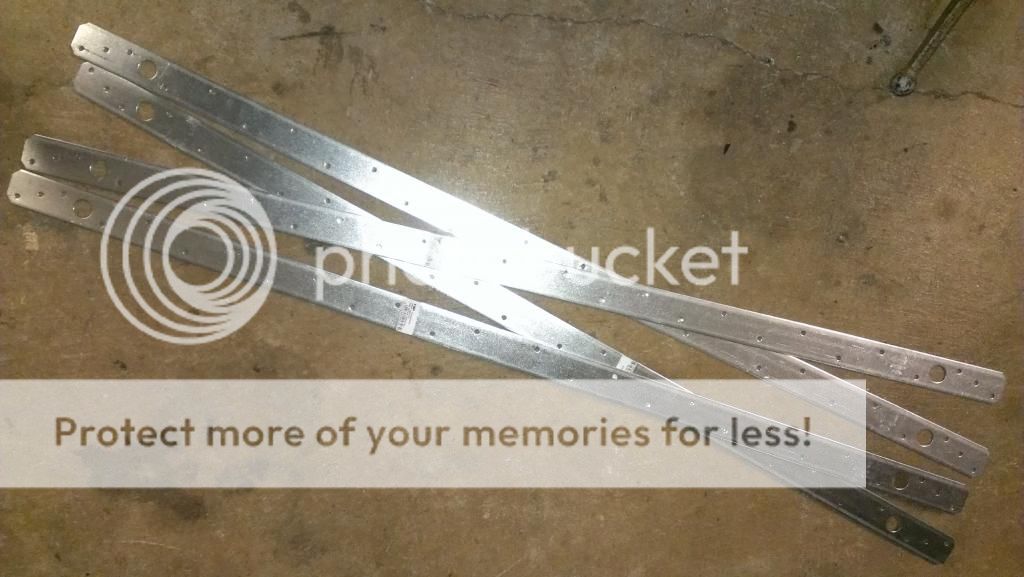
I've purchased 4 - 30" x 1.25" steel straps from Home Depot for less than $3 each! Ended up using only 2
Making a mark along the crease where I plan on making the cut.
I didn't cut both layers completely off because originally it starts to taper back down. I want to make it look oem as close as possible.
With the strip in and a total of 1" sticking out is just what I want. Just tacked in for now but will finish it up more
Its a good snug fit and the cheapest mod yet!
Small update of today
Seam sealed underside and bodywork finished for the inner flair. Best mod is to make it so its hard to tell that anything was done to it.
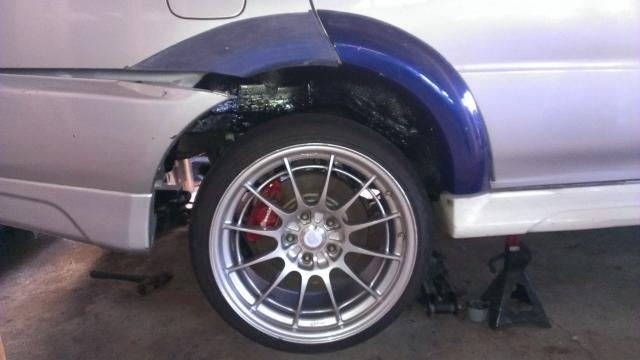
Another set of shoes! 18 x 9.5 Enkei NT03 Not my taste of streatched 205/40 on these so they need to be changed. A set of 235/40 is my goal to get.
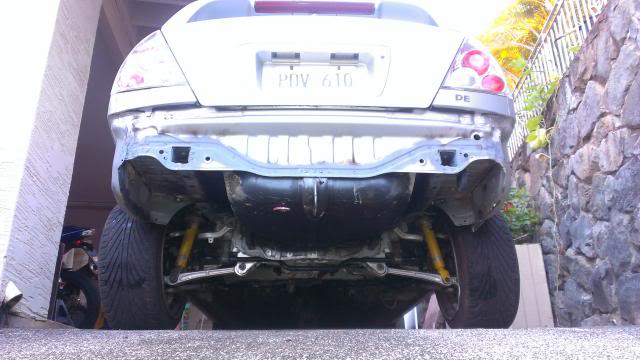
I had a chance to clean and seal more underneath.
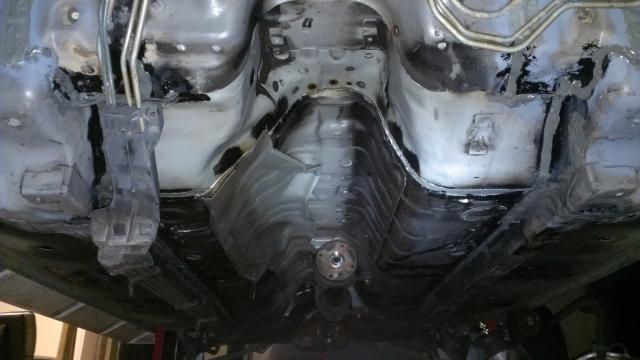
Hard to tell by the pic but there's improvement to the seams and areas I've welded. Its finally sealed all the way back to the rear differential.
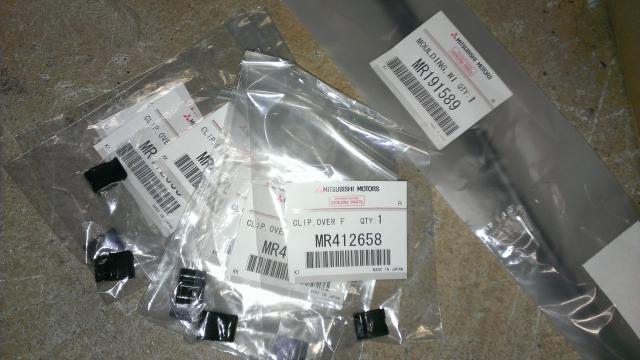
More JDM just in from Mitsubishi! Front windshield top seal MR191589 and 8 clips to securely hold the rear fender over on the door MR412658
Left and right rear inner fender liners MR414846 right, MR414845 left.
Both sides come with all the screws and clips needed for a easy install.

Slightly polished the lower arms and painted the front subframe.
Finally got a good coat of sealer and primer.
EVO9 front subframe completely restored and ready to go in after I finish painting the engine bay.
Sprayed the engine bay EVO10 Graphite grey pearl using color code A39. I want to give it more pop in the engine bay by using this instead of the evo9 graphite color which will be used outside. It seems to have more pearls and flakes in it when the sun hits.
EVO9 Front subframe in!
Jumped ahead to get the wiring in..
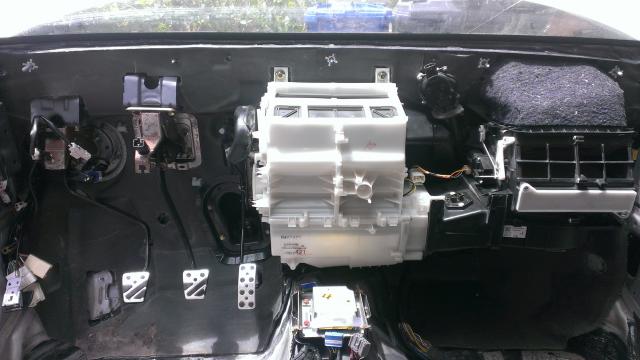
Clutch, brake, and gas pedals along with the blower and AC unit and wiper motor in.
Master cylinder, clutch, and ABS with wire harness and brake lines in. :thumbsup:
The evo9 firewall isn't quite finished on the engine bay side. I still need to relocate and shave off the wiper motor mount and install bracing inside of the cowl side to make use of the Cusco front triangle bracing.
I thought it would be neat to post up the rear triangle bracing again.
Had some free time and decided to take off the wiper motor hole. I will be relocating the wiper motor inside to keep the cowl nicely shaved and adding a mount for a pressure regulator/guage combo in the future. I took the patch panel from the same location as the EVO9. Here's a before, during, and after shot.
Since I was in the area, I finally got around to add on the EVO5 "C" brace, or strut tower brace.
Looks more ridged with it installed along with the fender brace. Less flex = more fun!
Used por15 to seal the welded joints after they were treated so rust doesn't form. Beginning to prep the area inside for its first coat of primer sealer before I paint.
Rear V brace and surounding areas prepped for primer sealer
Here's the firewall with modified cowl so it all stays functional. Everything else off of the 9 is now a direct bolt on including the AC unit.
Small update of the wiper motor delete.
After the patch panel and the welds grounded flat I used a little bit of lightweight filler..
A shot of primer for now..
A lot are curious to see what it looks like under so here's a underside shot of the EVO9 front subframe mounts, firewall and floor pan in the mirage! Hope to make it a seamless install
So I've just about had it trying to source the rear inner fender flair and decided to make it instead. How hard could it be anyways!
Picture above is a stock photo. The inner lip holds the rear bumper, securely mounts the fender flair, and adds protection from debris.
I've purchased 4 - 30" x 1.25" steel straps from Home Depot for less than $3 each! Ended up using only 2
Making a mark along the crease where I plan on making the cut.
I didn't cut both layers completely off because originally it starts to taper back down. I want to make it look oem as close as possible.
With the strip in and a total of 1" sticking out is just what I want. Just tacked in for now but will finish it up more
Its a good snug fit and the cheapest mod yet!
Small update of today
Seam sealed underside and bodywork finished for the inner flair. Best mod is to make it so its hard to tell that anything was done to it.
Another set of shoes! 18 x 9.5 Enkei NT03 Not my taste of streatched 205/40 on these so they need to be changed. A set of 235/40 is my goal to get.
I had a chance to clean and seal more underneath.
Hard to tell by the pic but there's improvement to the seams and areas I've welded. Its finally sealed all the way back to the rear differential.
More JDM just in from Mitsubishi! Front windshield top seal MR191589 and 8 clips to securely hold the rear fender over on the door MR412658
Left and right rear inner fender liners MR414846 right, MR414845 left.
Both sides come with all the screws and clips needed for a easy install.
Slightly polished the lower arms and painted the front subframe.
Finally got a good coat of sealer and primer.
EVO9 front subframe completely restored and ready to go in after I finish painting the engine bay.
Sprayed the engine bay EVO10 Graphite grey pearl using color code A39. I want to give it more pop in the engine bay by using this instead of the evo9 graphite color which will be used outside. It seems to have more pearls and flakes in it when the sun hits.
EVO9 Front subframe in!
Jumped ahead to get the wiring in..
Clutch, brake, and gas pedals along with the blower and AC unit and wiper motor in.
Master cylinder, clutch, and ABS with wire harness and brake lines in. :thumbsup:
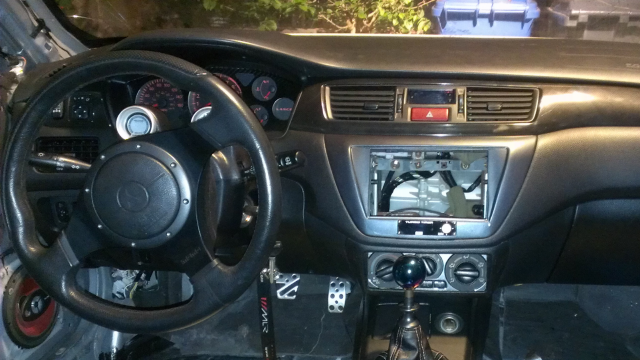
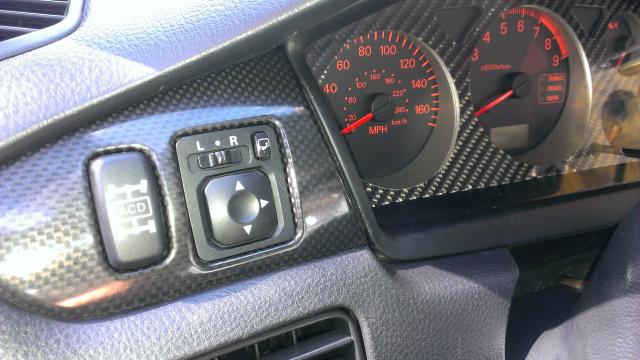
Dashboard complete minus a double din stereo head unit.
My random shots of the day
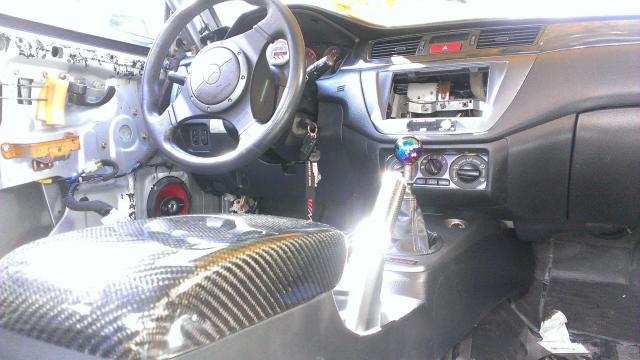
Some carbonfiber goodies
Sourced a super rare evo9 folding mirror switch to work with the evo6 folding mirrors.
Had some time to spray some parts with PPG 2k primer surfacer
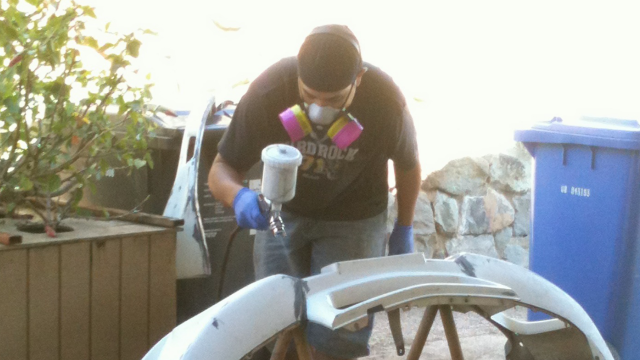
Only in Hawaii, where we can spray outside in paradise!
I picked up a passengers side Carbing foot rest
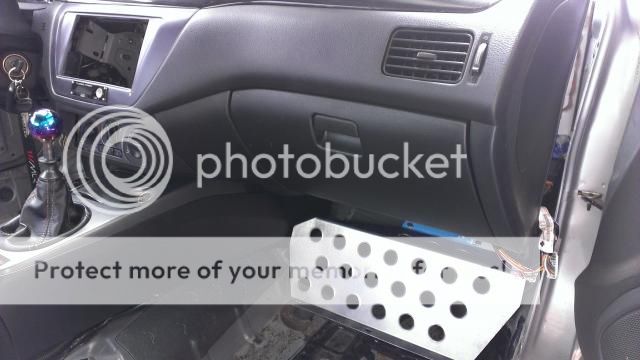
Super light aluminum, gives it a more sporty look.
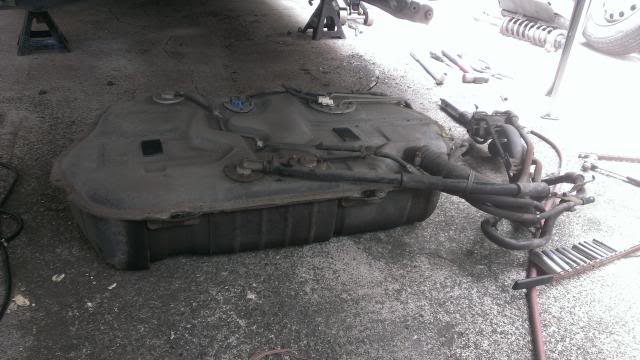
Small update on the gas tank filler neck relocation.
Found out on Mitsubishi lancer register that the evo9 gas tank is a bit taller and won't fit under the evo4-6 floor. I have a 9 floor so since I already have a 9 tank, why not move the neck instead! Mocking up where to relocate before I weld it. I'm thinking of using copper to soder it on since the factory does it.
Gas tank neck relocated and sealed
Pressure line, return, vapor line and brake lines all relocated to the drivers side, the same way a evo9 would have it.
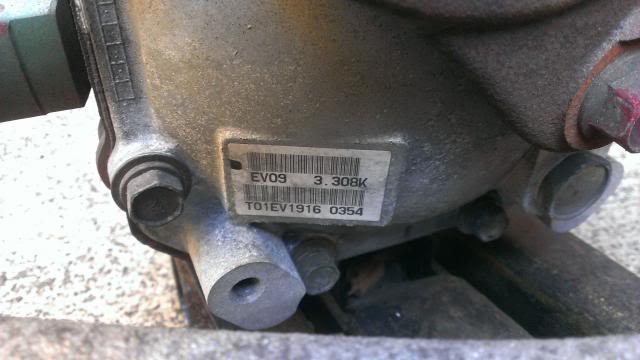
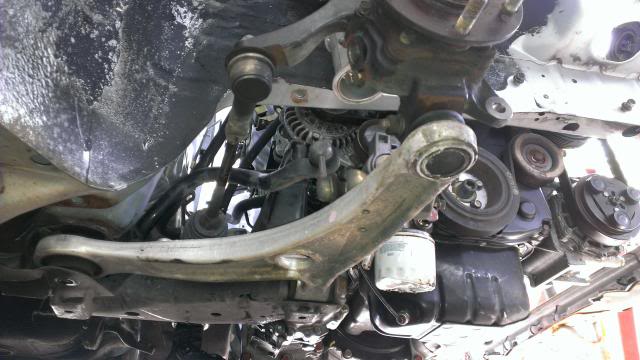
Evo9 Center diff, complete front to rear driveshaft, ACD lines, passengers side front driveshaft, and wire harness all ready to go
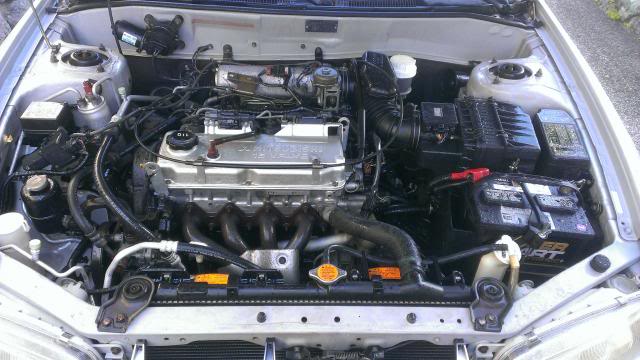
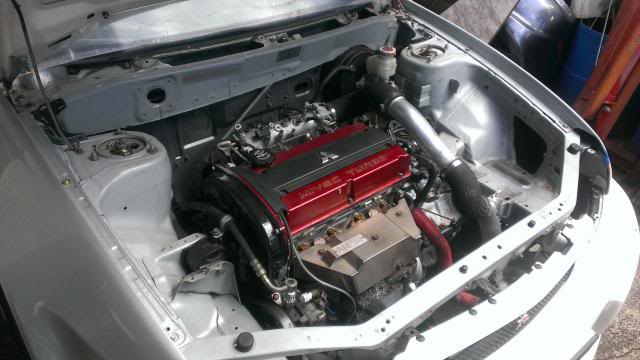
Evo9 motor finally making its way in for the last time!
I took the filler neck from the evo9 and used parts of it to reroute the mirage filler neck. I could of used a evo6 neck but since I already had parts to create my own I went for it.
For safety, I used the rubber hose between the neck and tank for flexabiliy if needed so no cracks can form.
Quick fit modified fuel neck. Still needs to be finished..
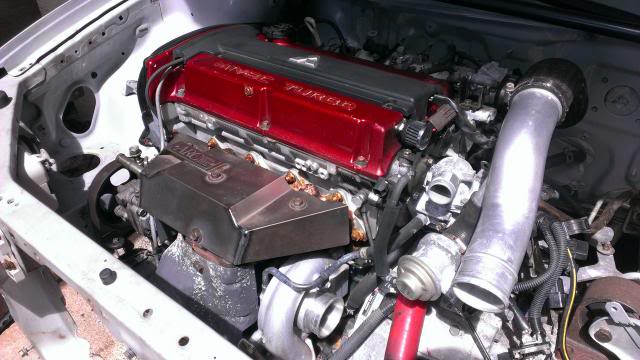
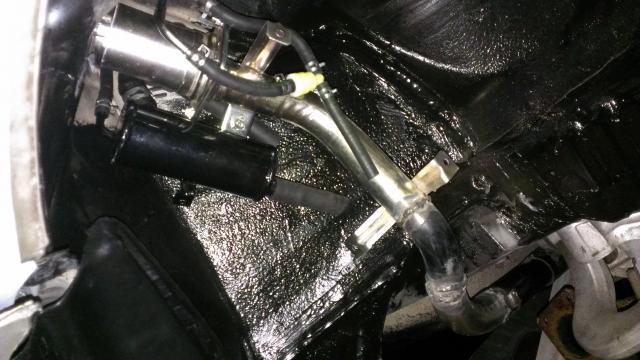
Evo9 oil cooler made to fit
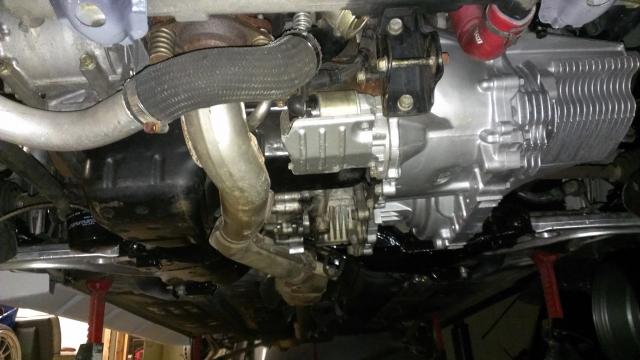
6 speed installed evertything hooked up. Still working on the north south bar for the transmission mounts, giving it a good coat of paint.
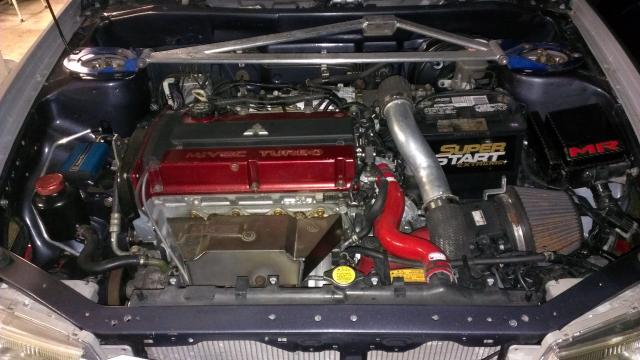
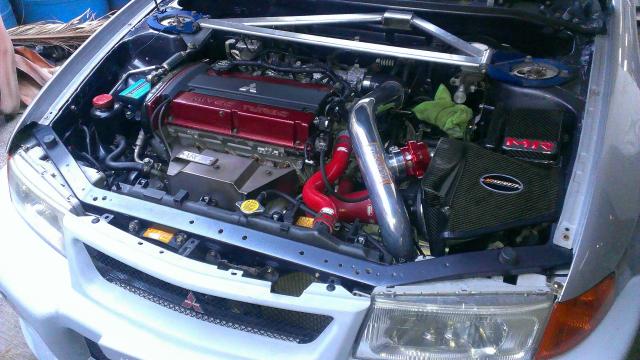
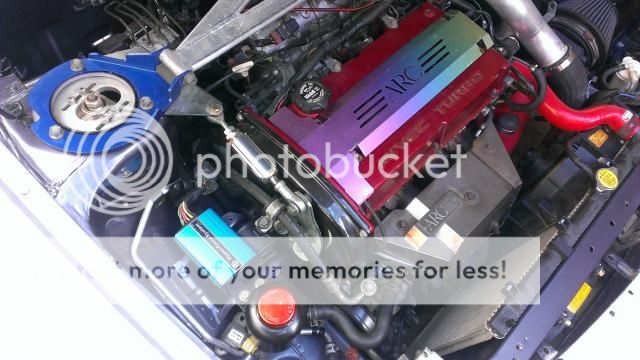
Quick shot of the extra things and some bling. I have more to install but going with the stock pieces first for the initial install.
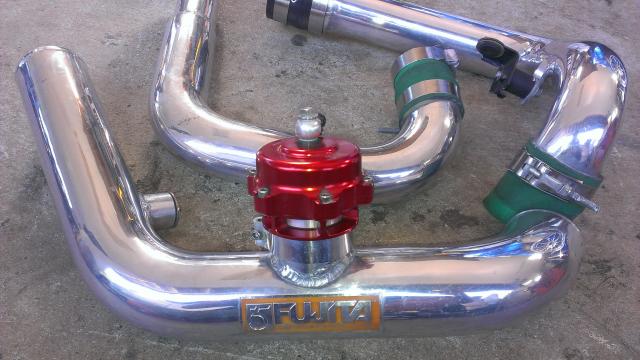
Fujita complete hardpipe kit with Tial BOV!
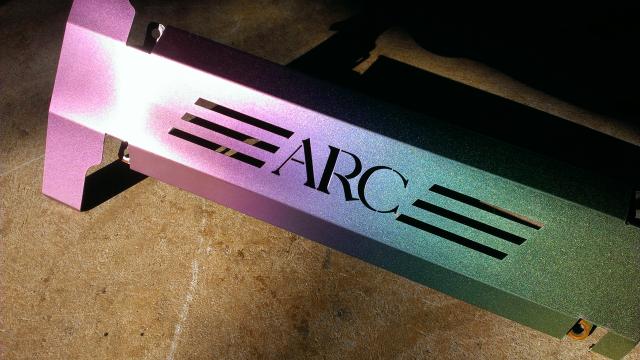
Some rare ARC spark plug cover I had laying around to dress things up a bit
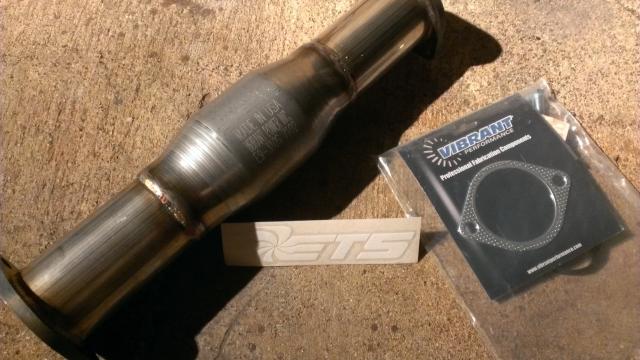
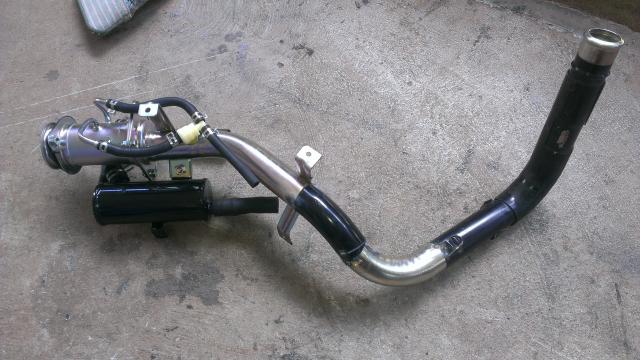
Picked up a ETS evo 9 high flow catalytic converter. Need to replace the old one I have because its crushed and this looks great!
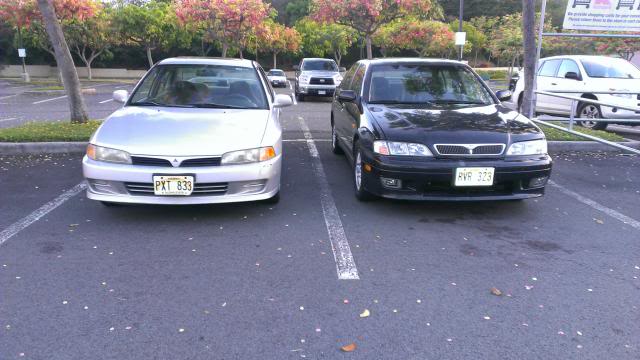
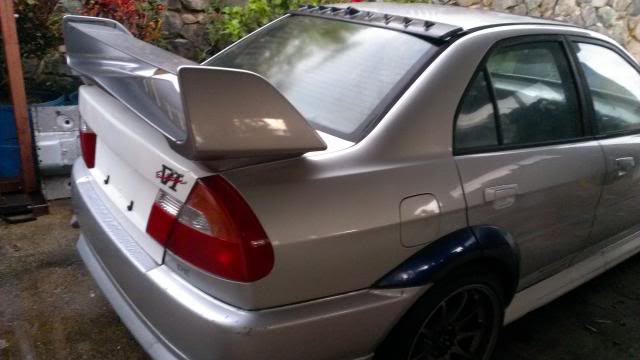
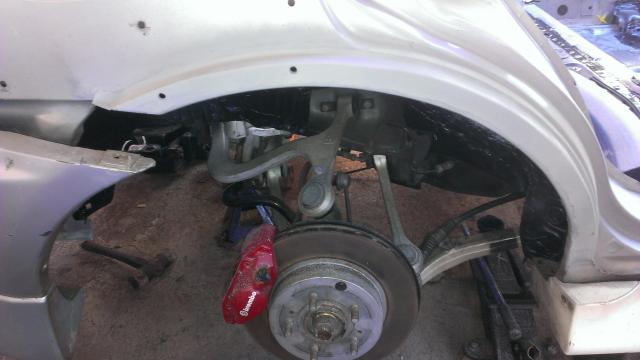
So today I bled the brakes torqued everything down and went for a ride! Here's the results!
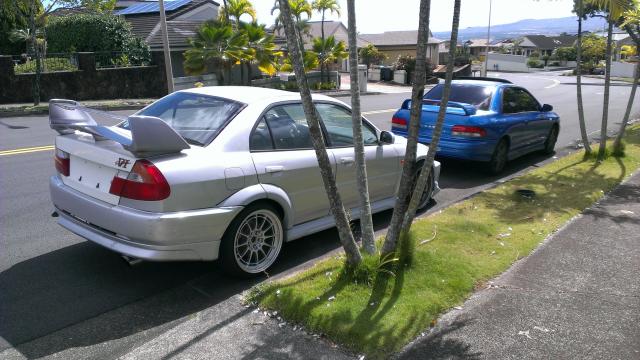

Along side of a rival 98 GC8 impreza imported from Canada.
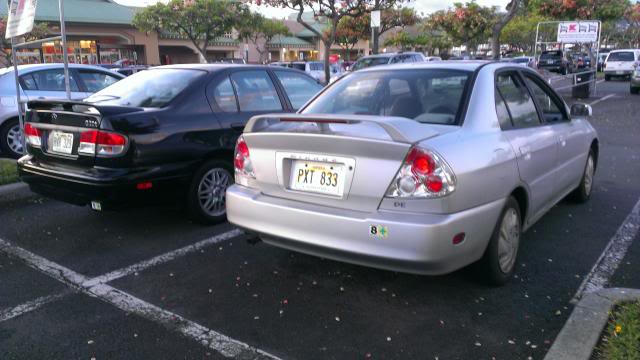
Such a nice day to go to the beach.. for me, a nice day to drive my Evo!
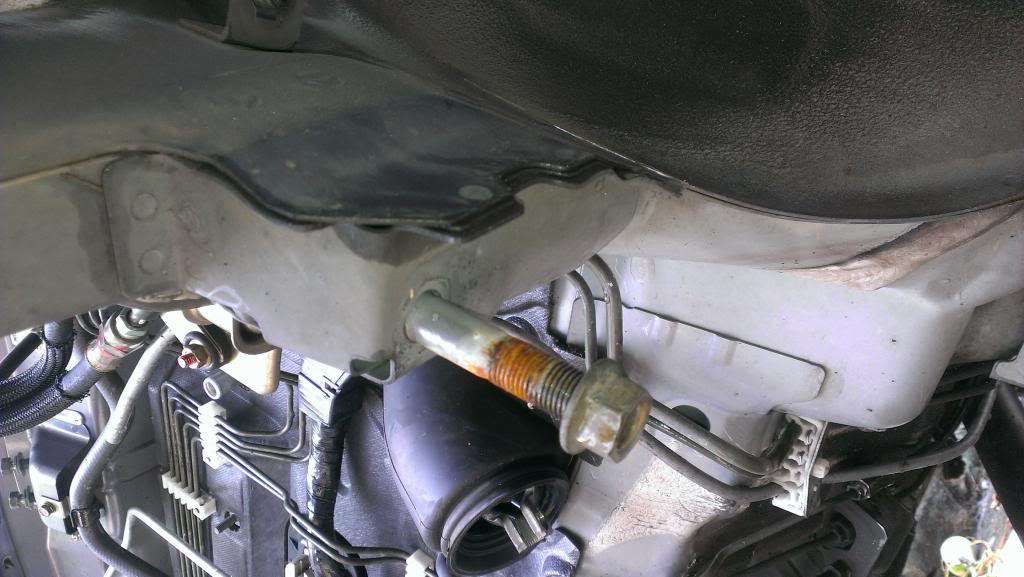
Skip the hard mounts, going with the Ingalls torque damper. Save me from rattling everything but acts just the same as a poly motor mount, as they claim.
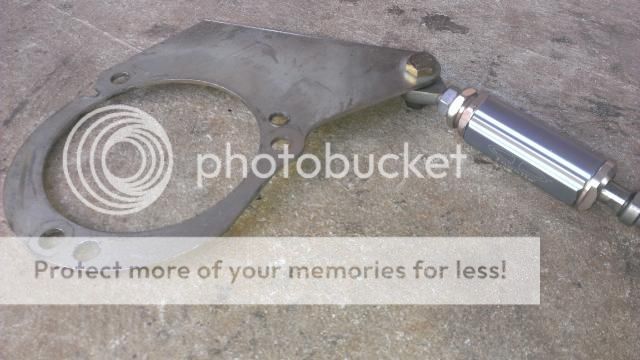
This is from a evo8. All I did was drill a diferent offset for the mirage.. evo5..
Here it is mounted onto a special motor bracket. I got the Forge power steering resivoir and ARC spark plug cover also!
Did some front end wiring..
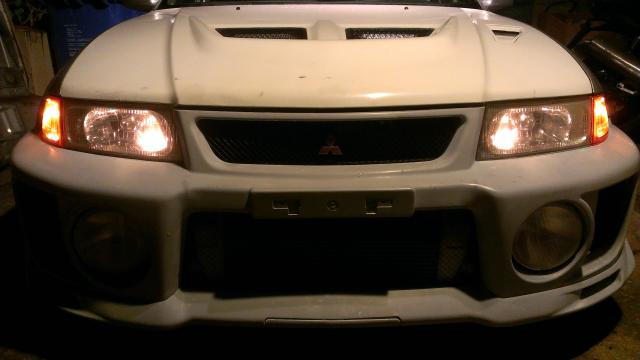
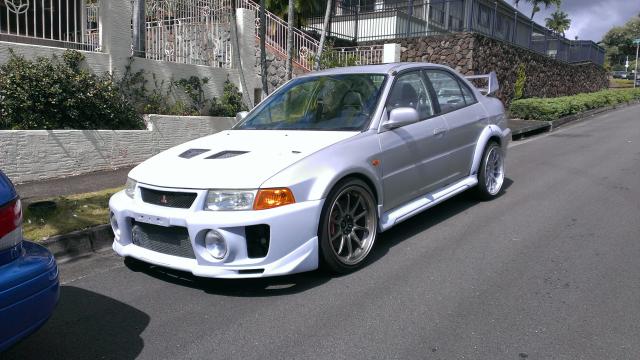
Day driving or marker lights
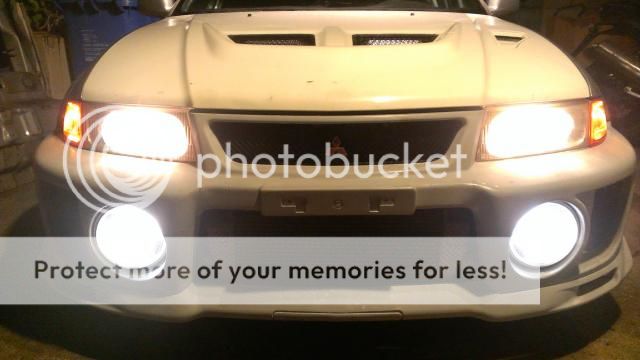
Full driving and Piaa fogs.
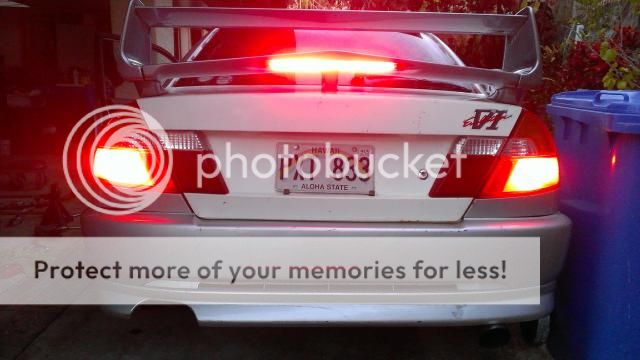
Tail lights all in working order