Vent Boost Gauge VBG1 ( Digital Led Bars & numerics )
 May 9, 2012, 07:33 PM
#16
Newbie
Thread Starter

Join Date: Feb 2012
Location: Arlington
Posts: 14
Likes: 0
Received 0 Likes
on
0 Posts
that's 24 psi on the leds meaning each led is 1 psi, you can change that so that 1 led = 2psi and then you can get up to 48 on the led meter, the OLED screen will display a digital read out good to 48psi
http://www.gtboostgauge.com/VBG1%20-...or%20V1.05.pdf
From the looks of the picture you retain vent functionality? Also I can't find info on A/F options. Only an aux connection for oil/fuel pressure.
I have released quite a few coupons for beta testing. I'm going to wait to see how many orders go through in the next few days before I decide if were full on testers.
Thanks Beta testers - looking forward to your feedback and install info. Thanks!
 May 9, 2012, 10:25 PM
#17
Evolved Member
iTrader: (3)
Join Date: May 2007
Location: PHILLY
Posts: 524
Likes: 0
Received 0 Likes
on
0 Posts
That's correct On page 13 of the manual you can read more about display modes.
http://www.gtboostgauge.com/VBG1%20-...or%20V1.05.pdf
Yes vent functionality is maintained. You can easily get VBG1 to display AFR either from LC1 or PLX. Read more about it in the manual on page 7.
I have released quite a few coupons for beta testing. I'm going to wait to see how many orders go through in the next few days before I decide if were full on testers.
Thanks Beta testers - looking forward to your feedback and install info. Thanks!
@&$!@ I was waiting for a coupon

But looks sick enough to pay full price. Look forward to see some install pics.

 May 11, 2012, 09:41 AM
#20
Evolving Member
iTrader: (1)
Join Date: Oct 2009
Location: Springs, Co
Posts: 360
Likes: 0
Received 0 Likes
on
0 Posts
Quick question: I know that the LED can be 2xBoost (2psi per LED), but on the Menu Chart on page 11 it says that 30psi is "Boost Plot Max". Does this mean that the most boost that is displayed is 30 on the LED screen?
May 11, 2012, 02:45 PM
#21

I have verified my 08 GSR has cig lighter interuption when starter is starting engine. So this is not a good line to tap power due to boost controller calibration, correct? I am not having much luck finding uninterupted acc. power. If I hook up to the cig lighter power what will happen? The boost reading will be off because it will not have calibrated upon startup, is that correct?
May 12, 2012, 06:01 AM
#23
Newbie
Thread Starter
Join Date: Feb 2012
Location: Arlington
Posts: 14
Likes: 0
Received 0 Likes
on
0 Posts
Menu Chart on page 11 it says that 30psi is "Boost Plot Max". Does this mean that the most boost that is displayed is 30 on the LED screen?
You guys normally boost around 24PSI someone said? Is that stock boost for this car?
I have verified my 08 GSR has cig lighter interuption when starter is starting engine. So this is not a good line to tap power due to boost controller calibration, correct? I am not having much luck finding uninterupted acc. power. If I hook up to the cig lighter power what will happen? The boost reading will be off because it will not have calibrated upon startup, is that correct?
Keep in mind that Manual for the VBG1 was written for the subaru group initially - I will be modifying it to be more general. My point is that any of the specifics, like fuse location, may be reference only for the subaru community.
May 12, 2012, 06:47 PM
#25
Cig lighter circuit won't work
Yes - you want to find a line that only comes on with the ignition - and stays on during engine crank. Subaru had an IGG / accessory line that came up when the key was turned , and then would shut off during crank. So the result for the VBG1 was it would take an atmospheric sample after the engine was running, and boost reading were altered. The solution was to find a line that comes up with a key turn and stays live to you shut things down. I'm hoping the beta testers can ID one in your cars too.
Also 30 psi on the boost plot works for me. I'm 27 psi max boost current mods.


 May 16, 2012, 12:39 PM
#28
Evolving Member

Join Date: May 2011
Location: Tampa
Posts: 140
Likes: 0
Received 0 Likes
on
0 Posts
You got to remember its just in beta testing, alot of us are just now getting the packages and I work a lot so it's not like the day I got it I could go out and install. I can say it does look like a quality piece and looks well thought out.
May 16, 2012, 12:50 PM
#29
Newbie
iTrader: (3)

Join Date: Nov 2006
Location: Alexandria, VA
Posts: 49
Likes: 0
Received 0 Likes
on
0 Posts
https://www.evolutionm.net/forums/ev...e-evarrrr.html
Check my thread out. It's installed and so far has been working perfectly. I honestly couldn't be happier.
Check my thread out. It's installed and so far has been working perfectly. I honestly couldn't be happier.
May 16, 2012, 06:09 PM
#30
I'm working on a write up now.
Instal was very simple. Even with taking pictures for the step by step, it took about 3hrs. So I figure 1.5 hours if you are not trying to document along the way. honestly the hardest part was fitting it in the vent and routing the ribbon cable, but I think I documented a pretty good way to do it, that I will have in my write up with pics.
Pros: It has ALOT of features. It is more of a gauge display system, than just a boost gauge. I was looking into a HUD and this is meeting all the needs I wanted for that and I am calling off the search for a HUD. I know it is not technically in my forward field of view, but it is very easy to read and get the info I need at a blink glance.
I will be doing the PLX AFR addition as soon as the PLX arrives in the mail. But even without the ARF as the aux input gauge, you get boost/vac (with boost plot graph which is pretty cool, and the red LED sweep options) and voltmeter.
Out of the package the faceplate looks very small. Much smaller that I was expecting, it has to fit within the vent, but somehow the pictures made it seem bigger. However this turned out not to be a Con, but rather made the gauge very stealth. I love that I don't have the 3 dingleberrys hanging off my A pillar like my Z had for the same gauges this one display does. Also the brightness and crispness of the OLED screens make the display much more legible than one might think looking at pictures. It is very clear and easy to discern from a glance. As far the post above being concerned with the heat going through the air vent, all of the soldering and circuitry looks top notch. It would take more heat than a heater vent can put out to melt this solder job. Plus they have been in Subies and other cars for a while and tested that aspect so I am not at all concerned about the heat or cold coming through the vent.
As for the AC reaching me, it is only 85 here is Texas where I live, but the vent still seems to blow as much air on me as it did before and the move-ability of the louvers remains intact so I can still direct the air. I don't see an issue here either.
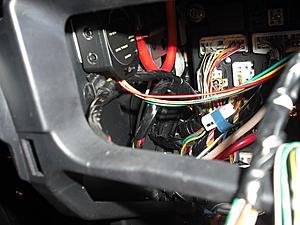
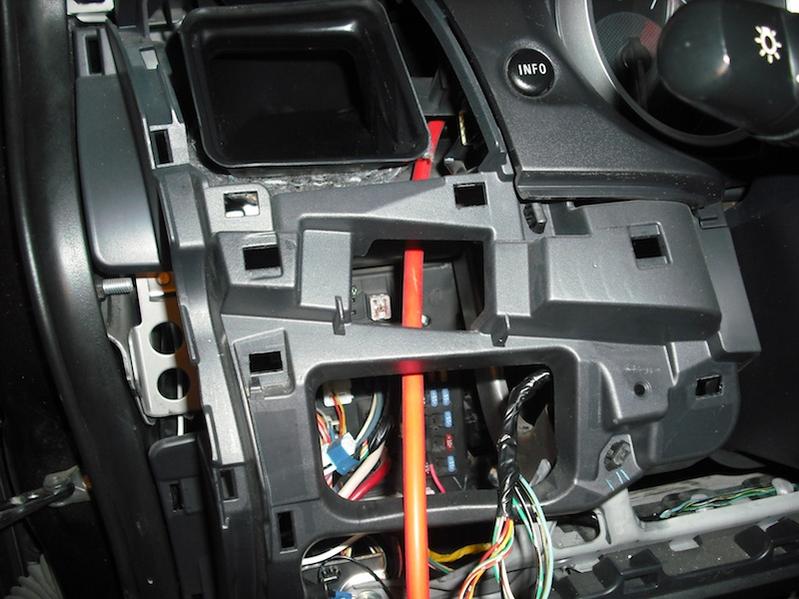
As for instal, I ran silicone vac line through firewall at main wire harness boot. Then over the top of the round roll bar behind dash (mainly to stay above steering linkage) It then pops out right behind the air vent as if it was ment to take that route. The electrical is pretty simple. Just power from fuse 12 (also powers my homelink mirror. And ground to bolt on lower metal dash support, just below fuse box.

My only con is more of a suggestion. Mounting the pressure sensor seemed challenging. Only because our car does not allow a good place to zip tie or screw to that I could find and the boost sensor does not have screw tabs. So I used double sided tape on the back and stuck it to the plastic on the inside below the air vent. My suggestion is that perhaps the double sided tape could com pre attached on the boost sensor for our car's version. Simple fix none the less.
I give this product out of 5!
Pros: It has ALOT of features. It is more of a gauge display system, than just a boost gauge. I was looking into a HUD and this is meeting all the needs I wanted for that and I am calling off the search for a HUD. I know it is not technically in my forward field of view, but it is very easy to read and get the info I need at a blink glance.
I will be doing the PLX AFR addition as soon as the PLX arrives in the mail. But even without the ARF as the aux input gauge, you get boost/vac (with boost plot graph which is pretty cool, and the red LED sweep options) and voltmeter.
Out of the package the faceplate looks very small. Much smaller that I was expecting, it has to fit within the vent, but somehow the pictures made it seem bigger. However this turned out not to be a Con, but rather made the gauge very stealth. I love that I don't have the 3 dingleberrys hanging off my A pillar like my Z had for the same gauges this one display does. Also the brightness and crispness of the OLED screens make the display much more legible than one might think looking at pictures. It is very clear and easy to discern from a glance. As far the post above being concerned with the heat going through the air vent, all of the soldering and circuitry looks top notch. It would take more heat than a heater vent can put out to melt this solder job. Plus they have been in Subies and other cars for a while and tested that aspect so I am not at all concerned about the heat or cold coming through the vent.
As for the AC reaching me, it is only 85 here is Texas where I live, but the vent still seems to blow as much air on me as it did before and the move-ability of the louvers remains intact so I can still direct the air. I don't see an issue here either.
As for instal, I ran silicone vac line through firewall at main wire harness boot. Then over the top of the round roll bar behind dash (mainly to stay above steering linkage) It then pops out right behind the air vent as if it was ment to take that route. The electrical is pretty simple. Just power from fuse 12 (also powers my homelink mirror. And ground to bolt on lower metal dash support, just below fuse box.
My only con is more of a suggestion. Mounting the pressure sensor seemed challenging. Only because our car does not allow a good place to zip tie or screw to that I could find and the boost sensor does not have screw tabs. So I used double sided tape on the back and stuck it to the plastic on the inside below the air vent. My suggestion is that perhaps the double sided tape could com pre attached on the boost sensor for our car's version. Simple fix none the less.

I give this product