
Review & Install: Quarter Master Twin Disk 8 Leg Street Version


Thread Starter
Account Disabled
iTrader: (10)
Joined: Dec 2005
Posts: 2,185
Likes: 2
From: Cleveland, OH
Review & Install: Quarter Master Twin Disk 8 Leg Street Version
I figured I would post up information regarding this clutch to help people out that are looking for a clutch when you start making more than 500 whp / 450 wtq on their setups. This is a twin disk clutch so it will be noisy especially on decel. Also will work well for cars going past 8000 rpm without worrying about lockout in the upper rpm range.
Big Thanks to Chris Carey & Nate @ MAP for their help selecting and purchasing this clutch.
Some Basic Information and Pictures
Weight:
Street Flywheel - 12.0 lbs
Clutch, Floaters, Pressure Plate, Diaphragm - 8.8 lbs
Clutch Assembly & Flywheel - 20.8 lbs
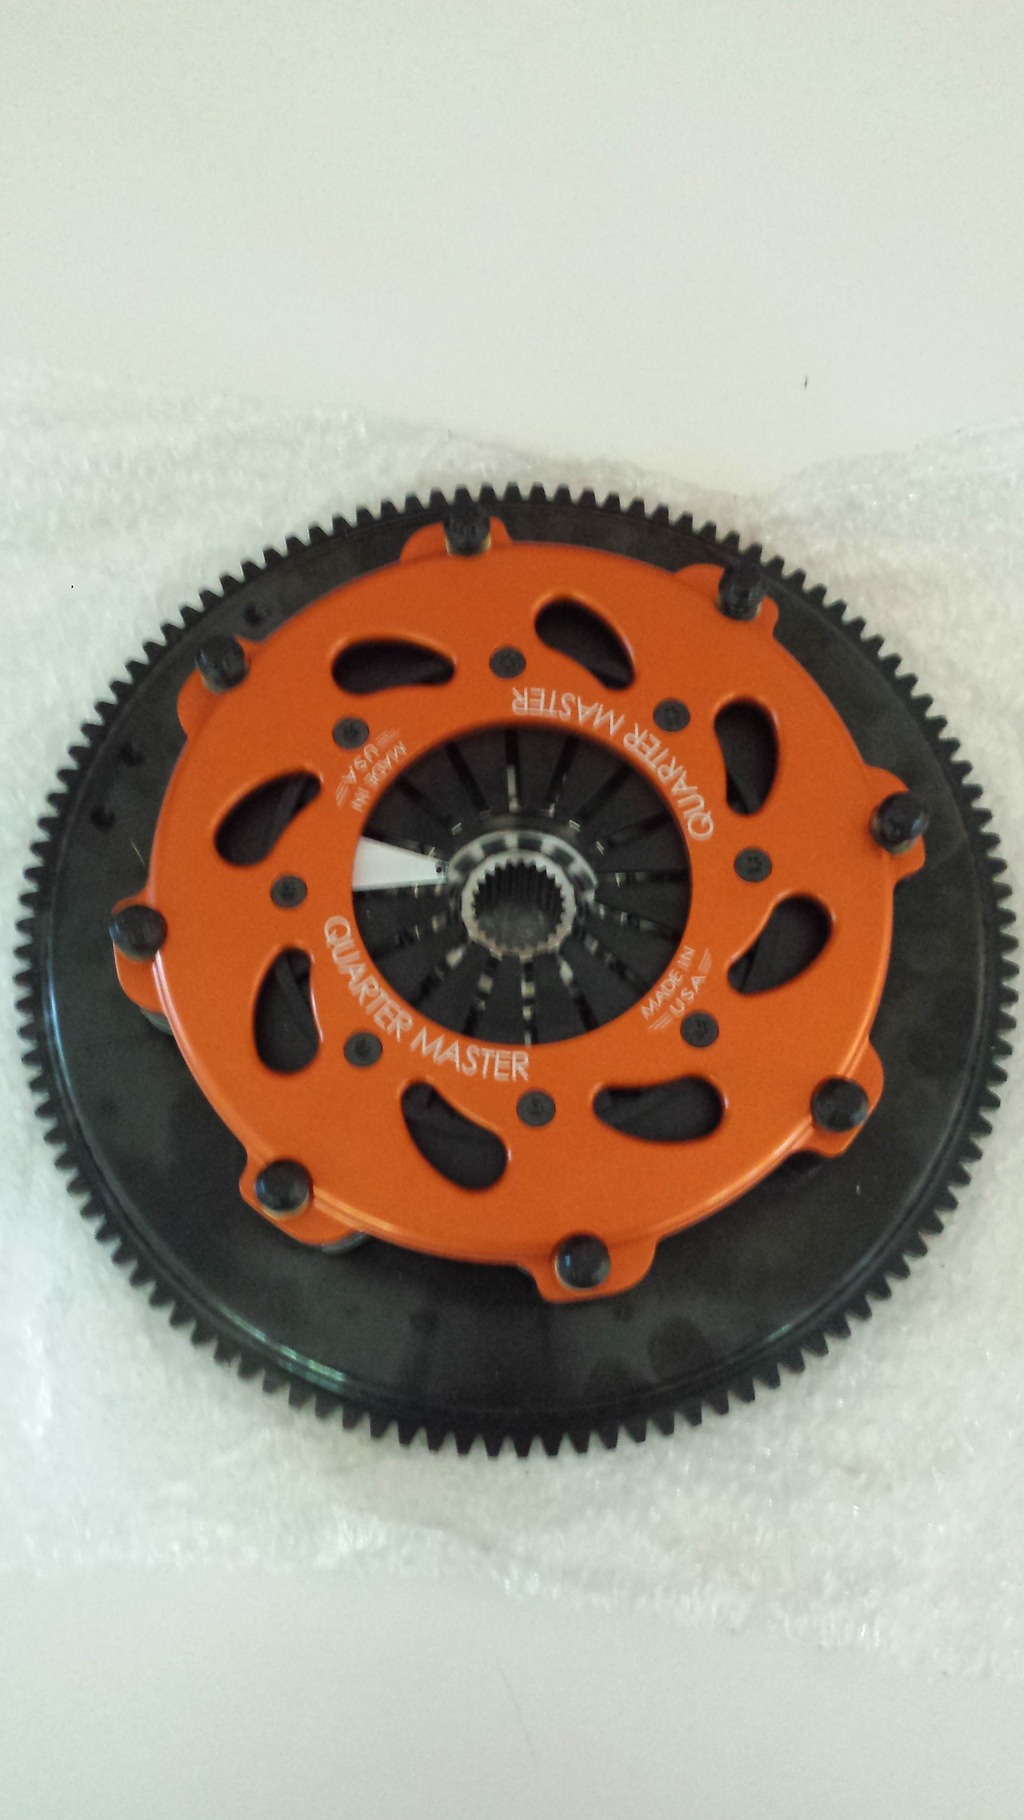
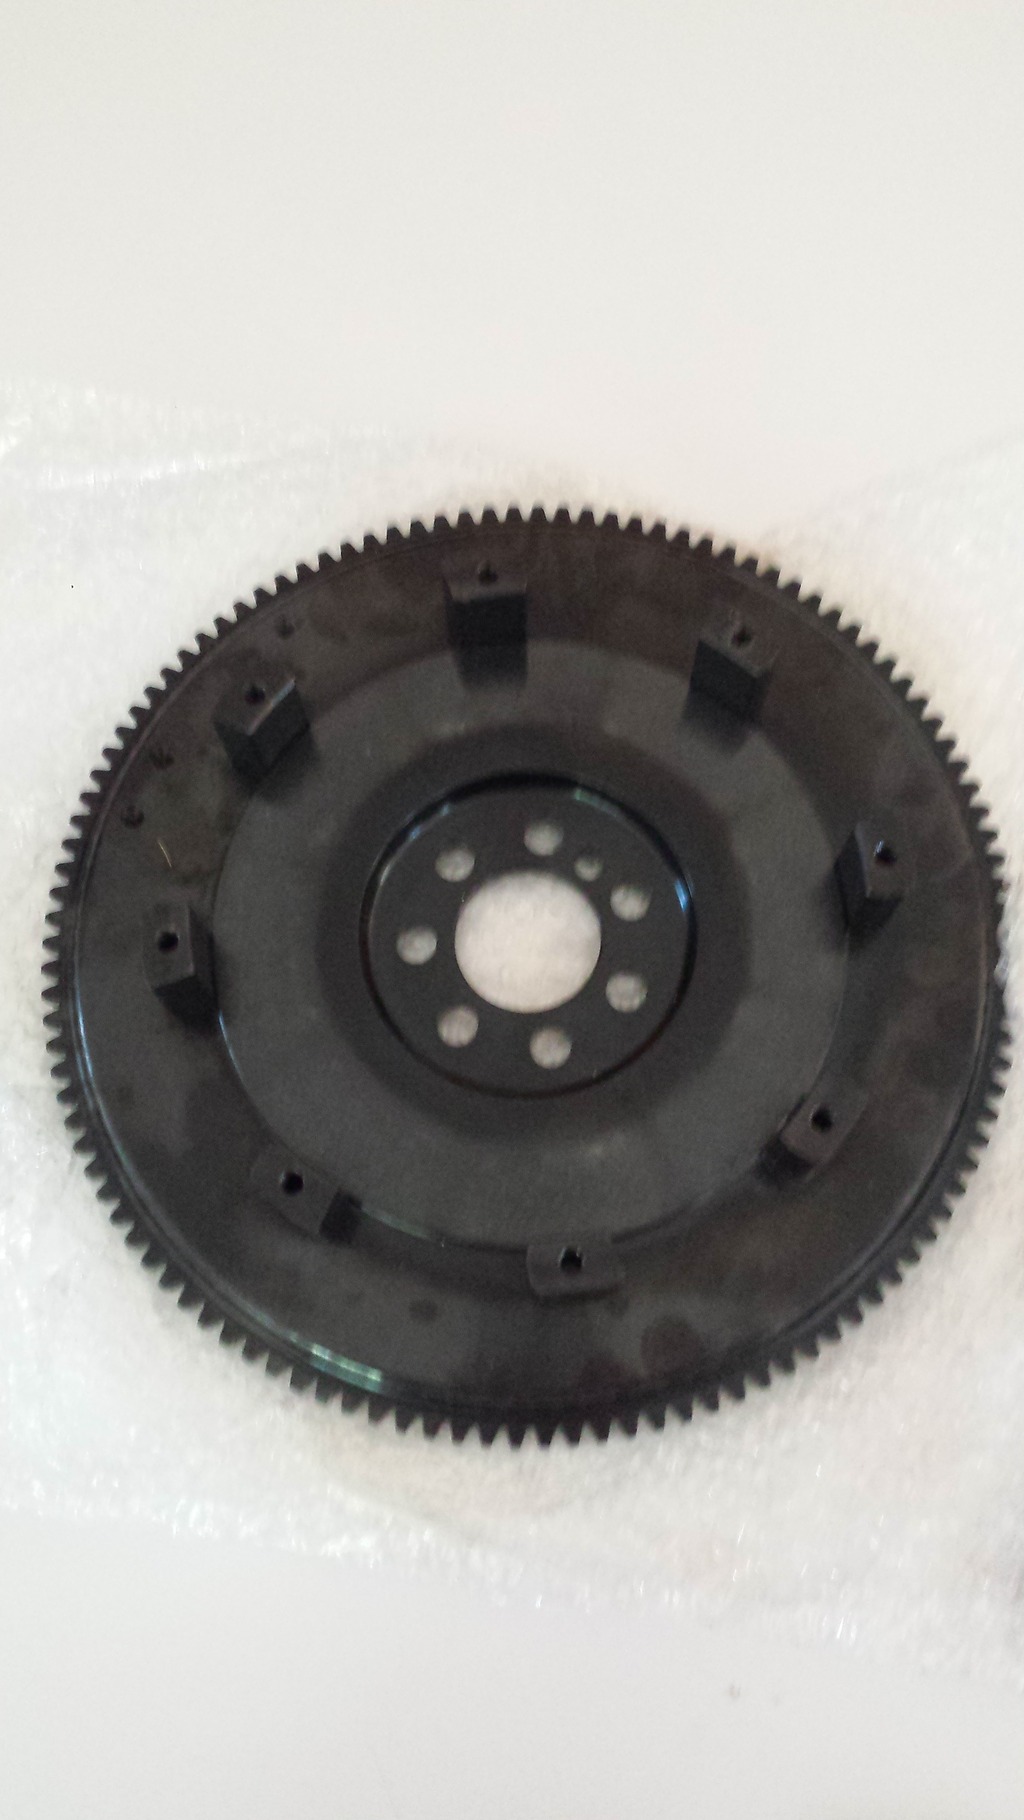
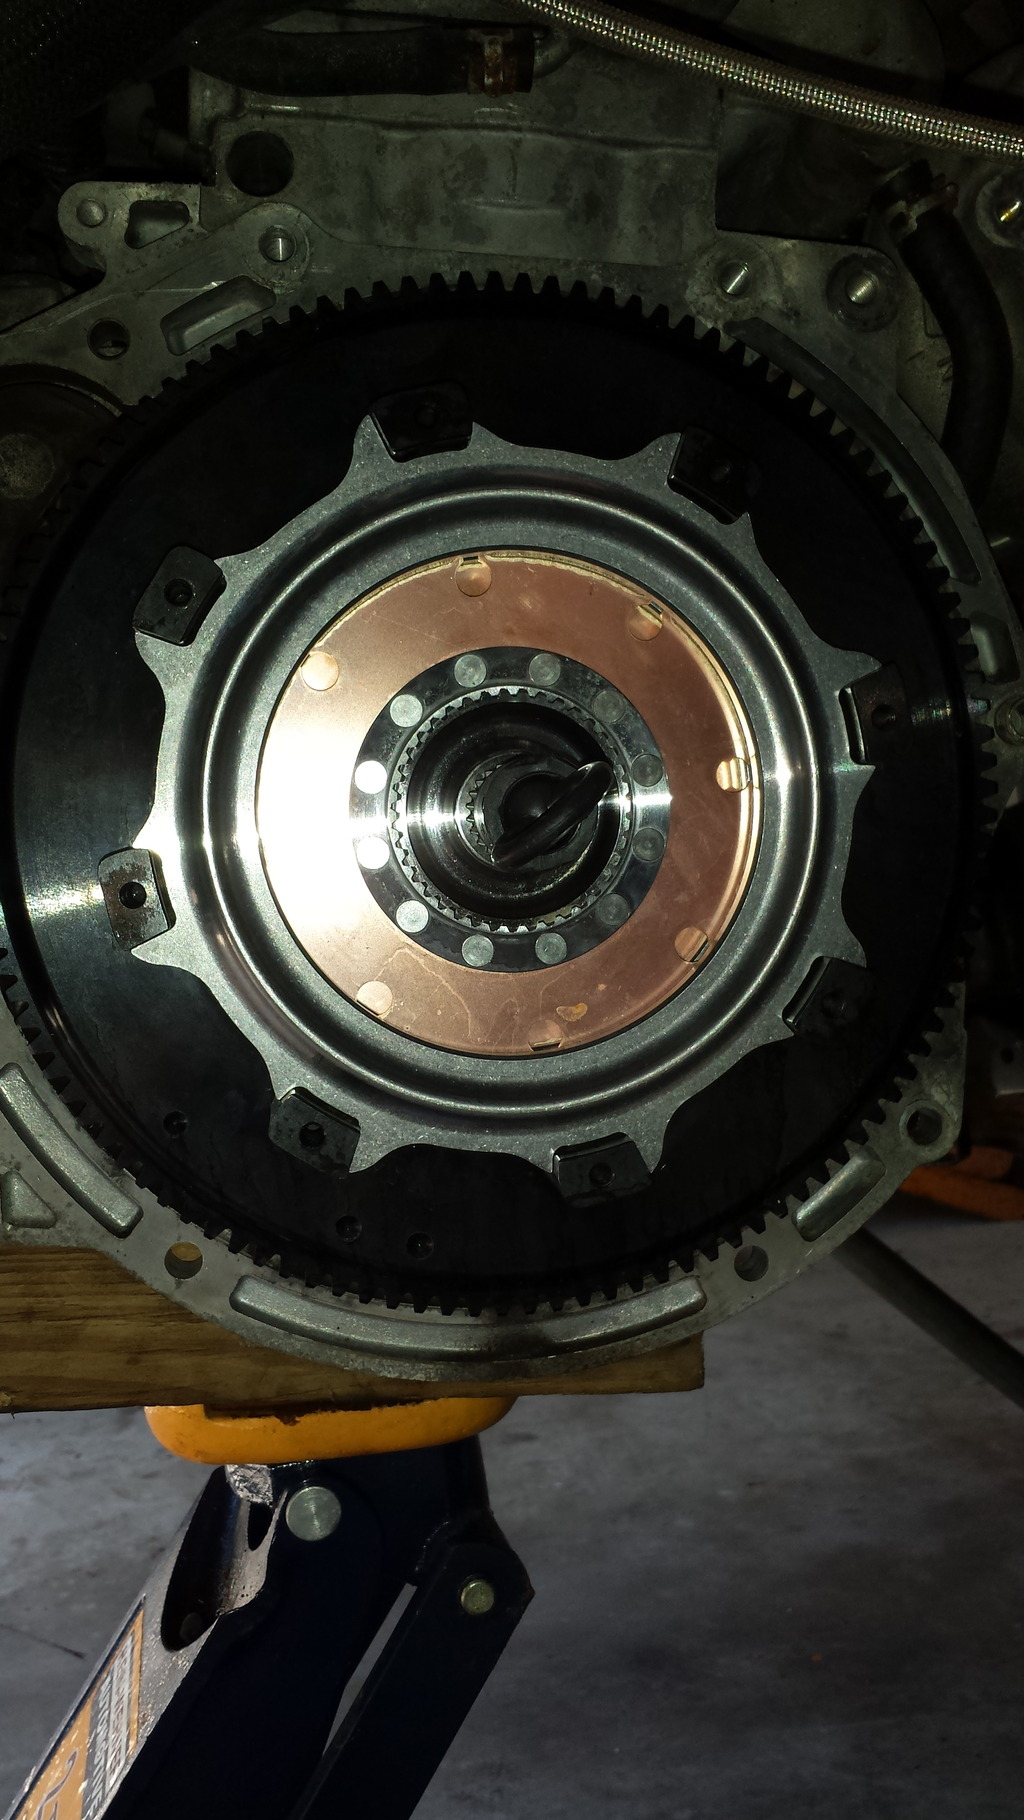
Order & Orientation from Flywheel --> Cover Plate
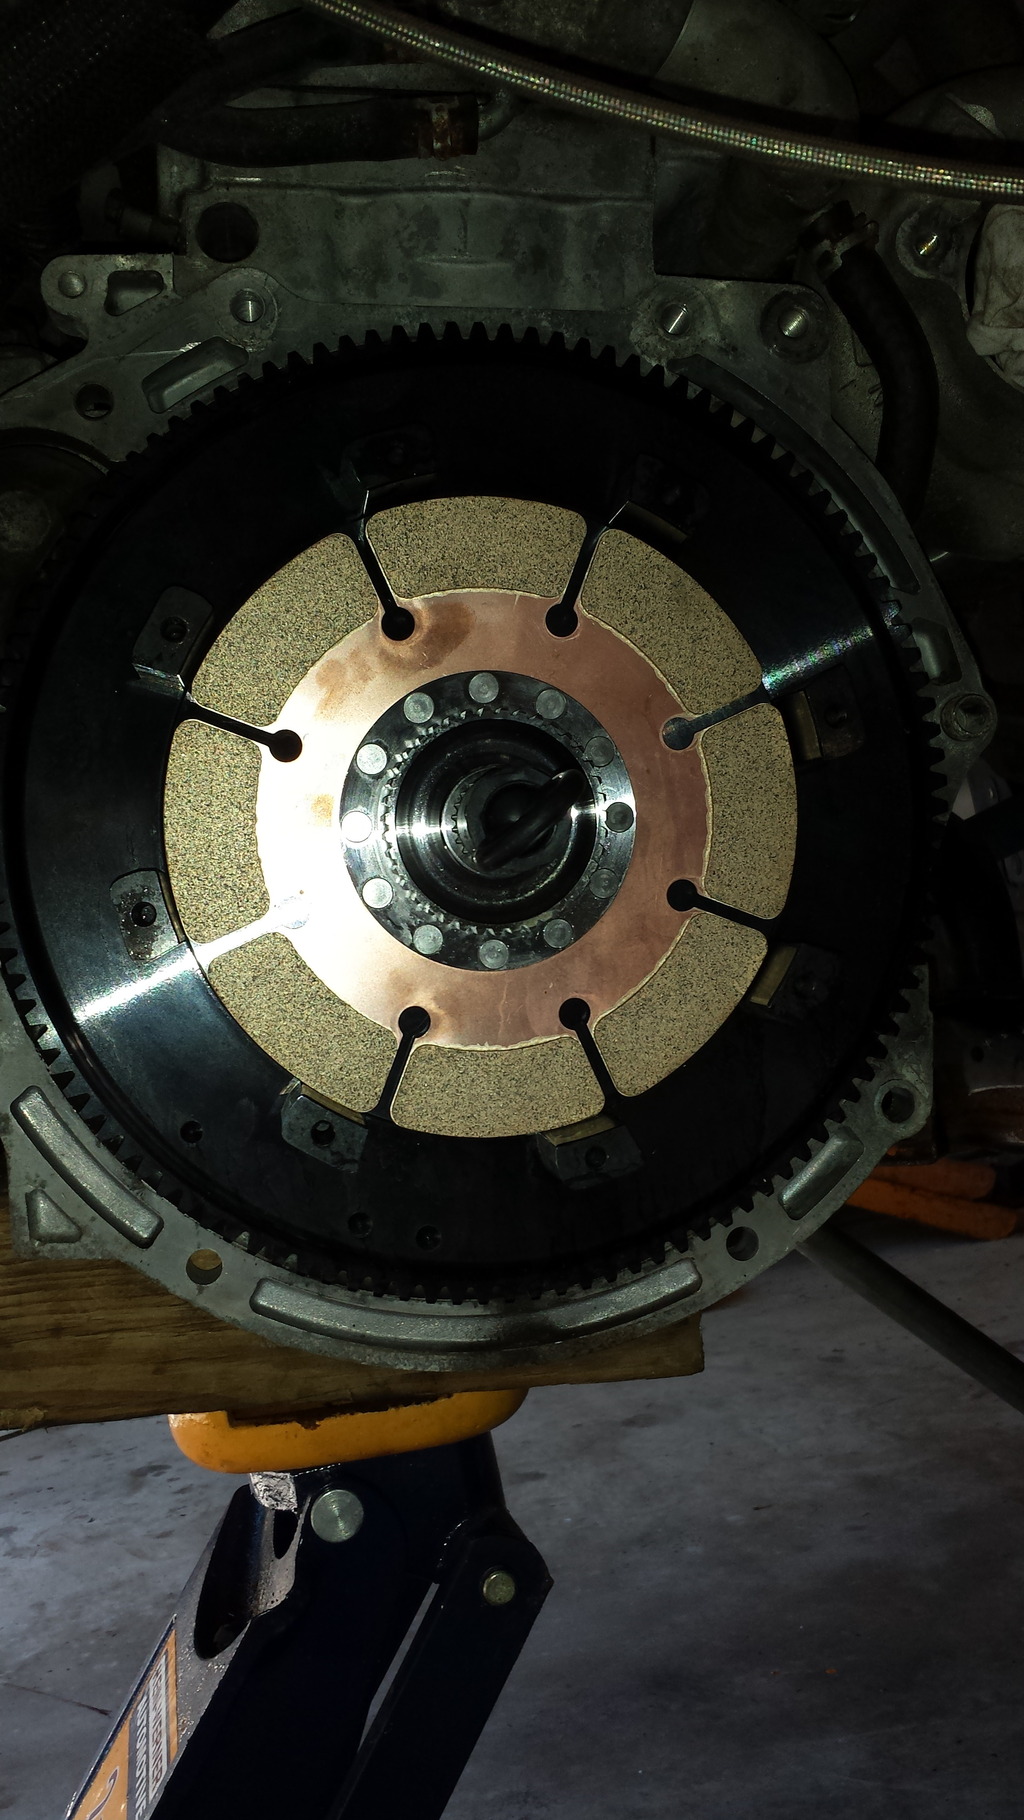
Flywheel
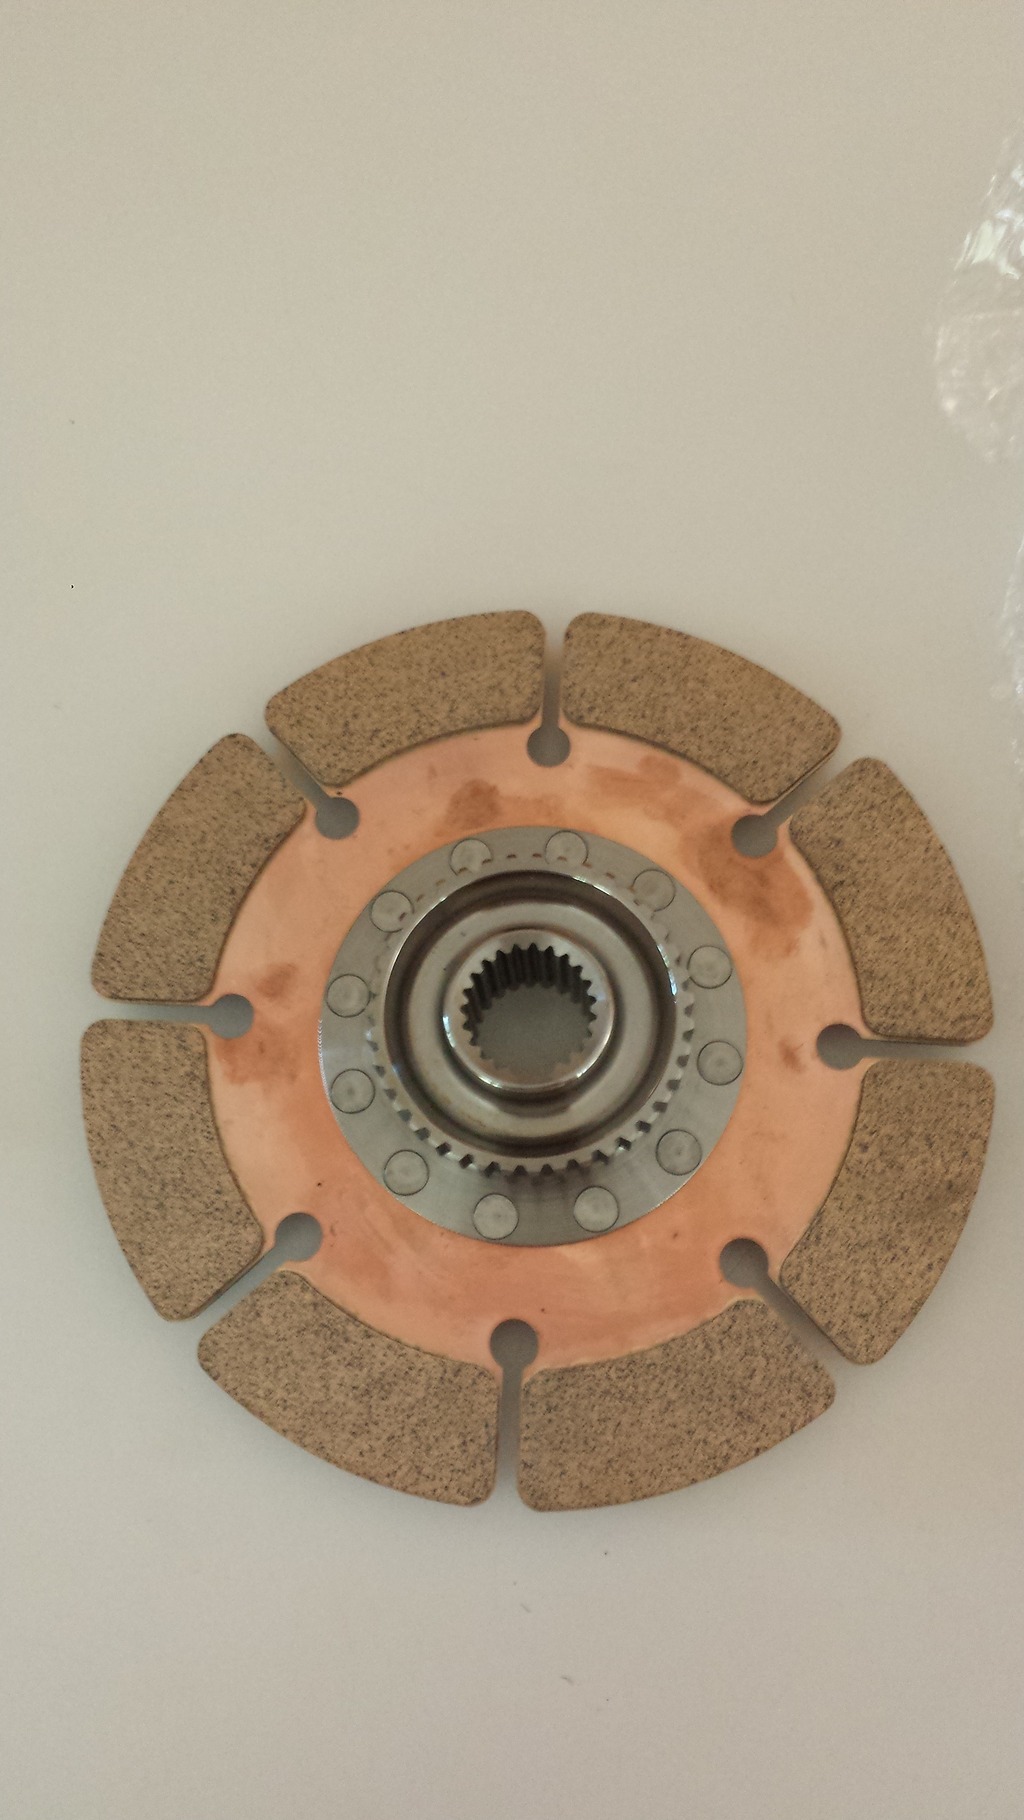
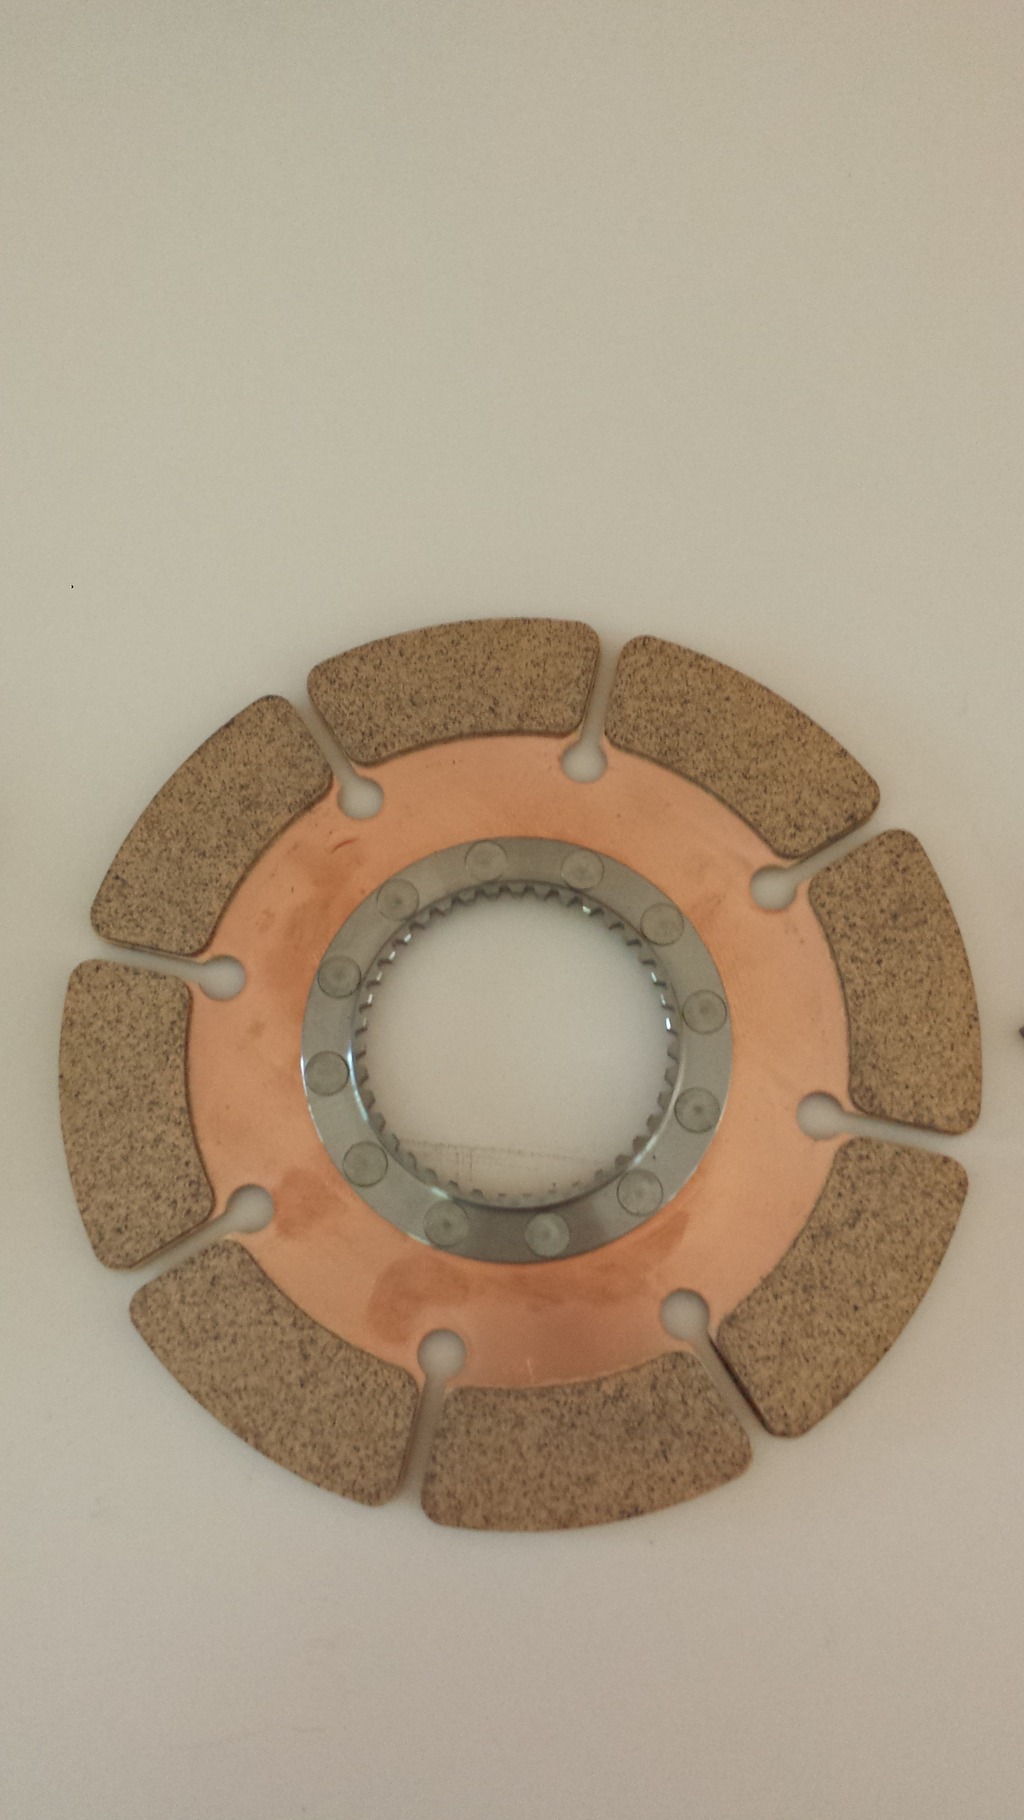
Clutch Disc - First
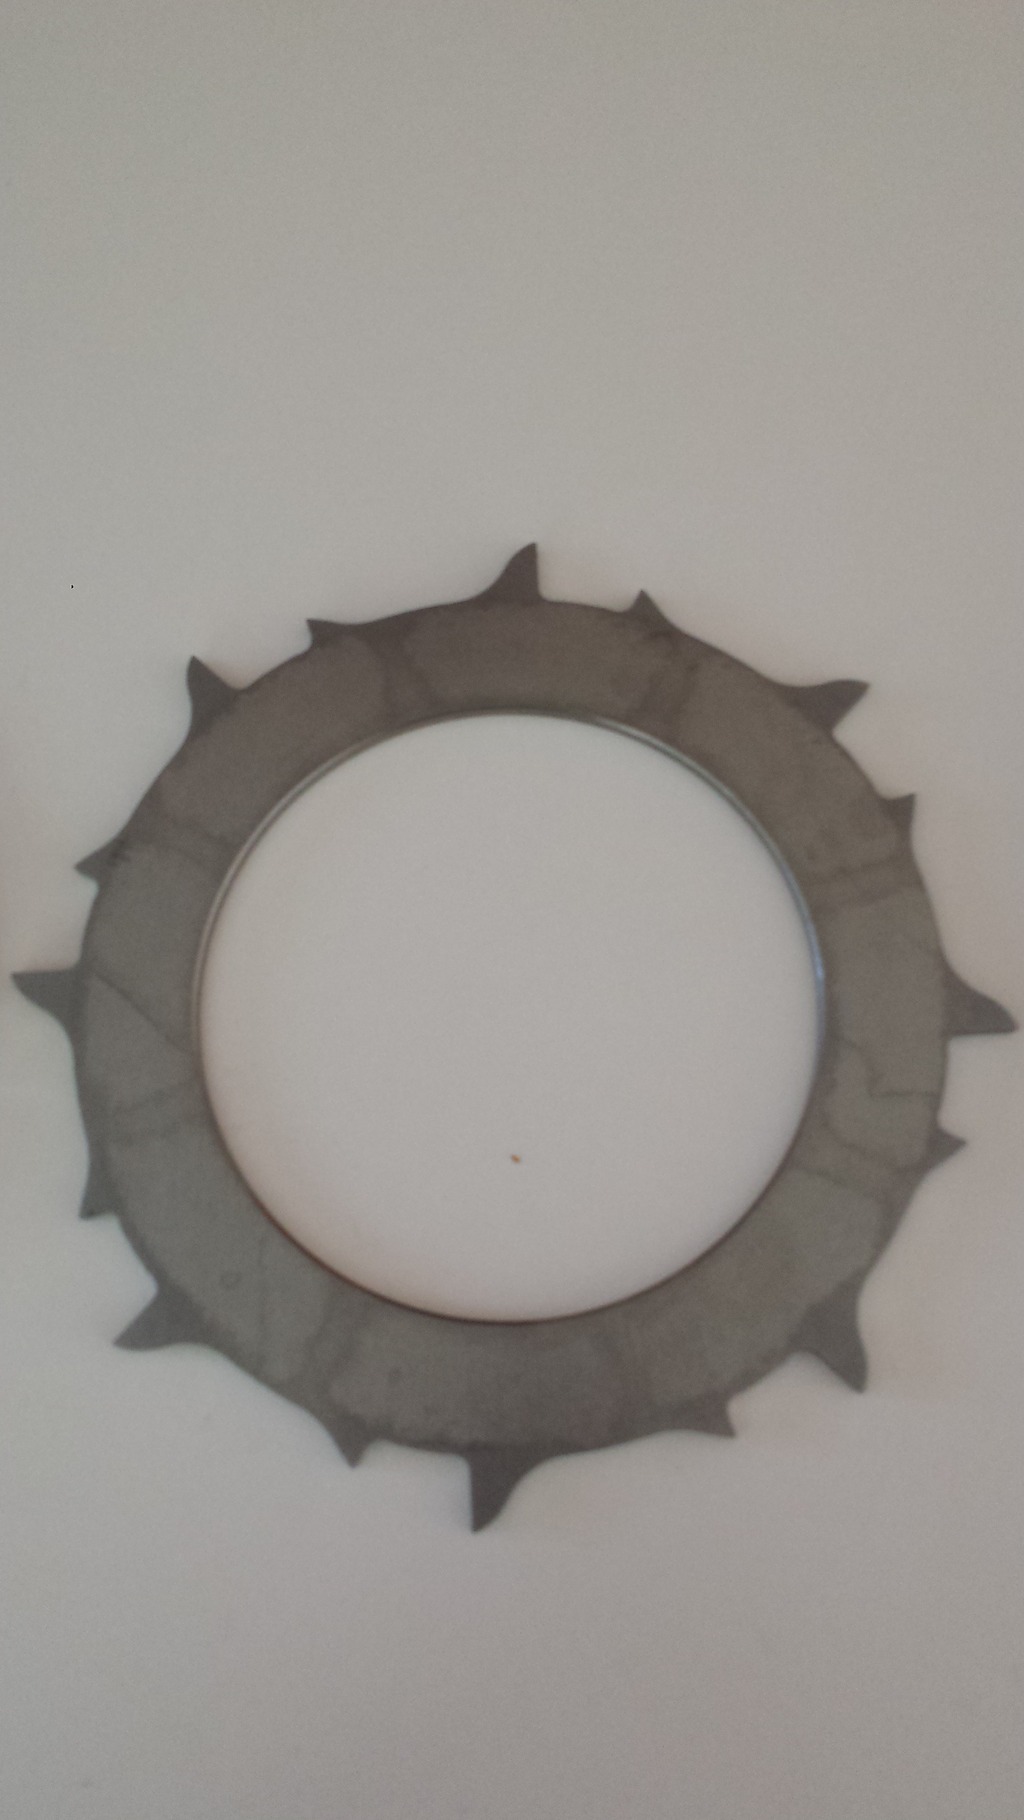
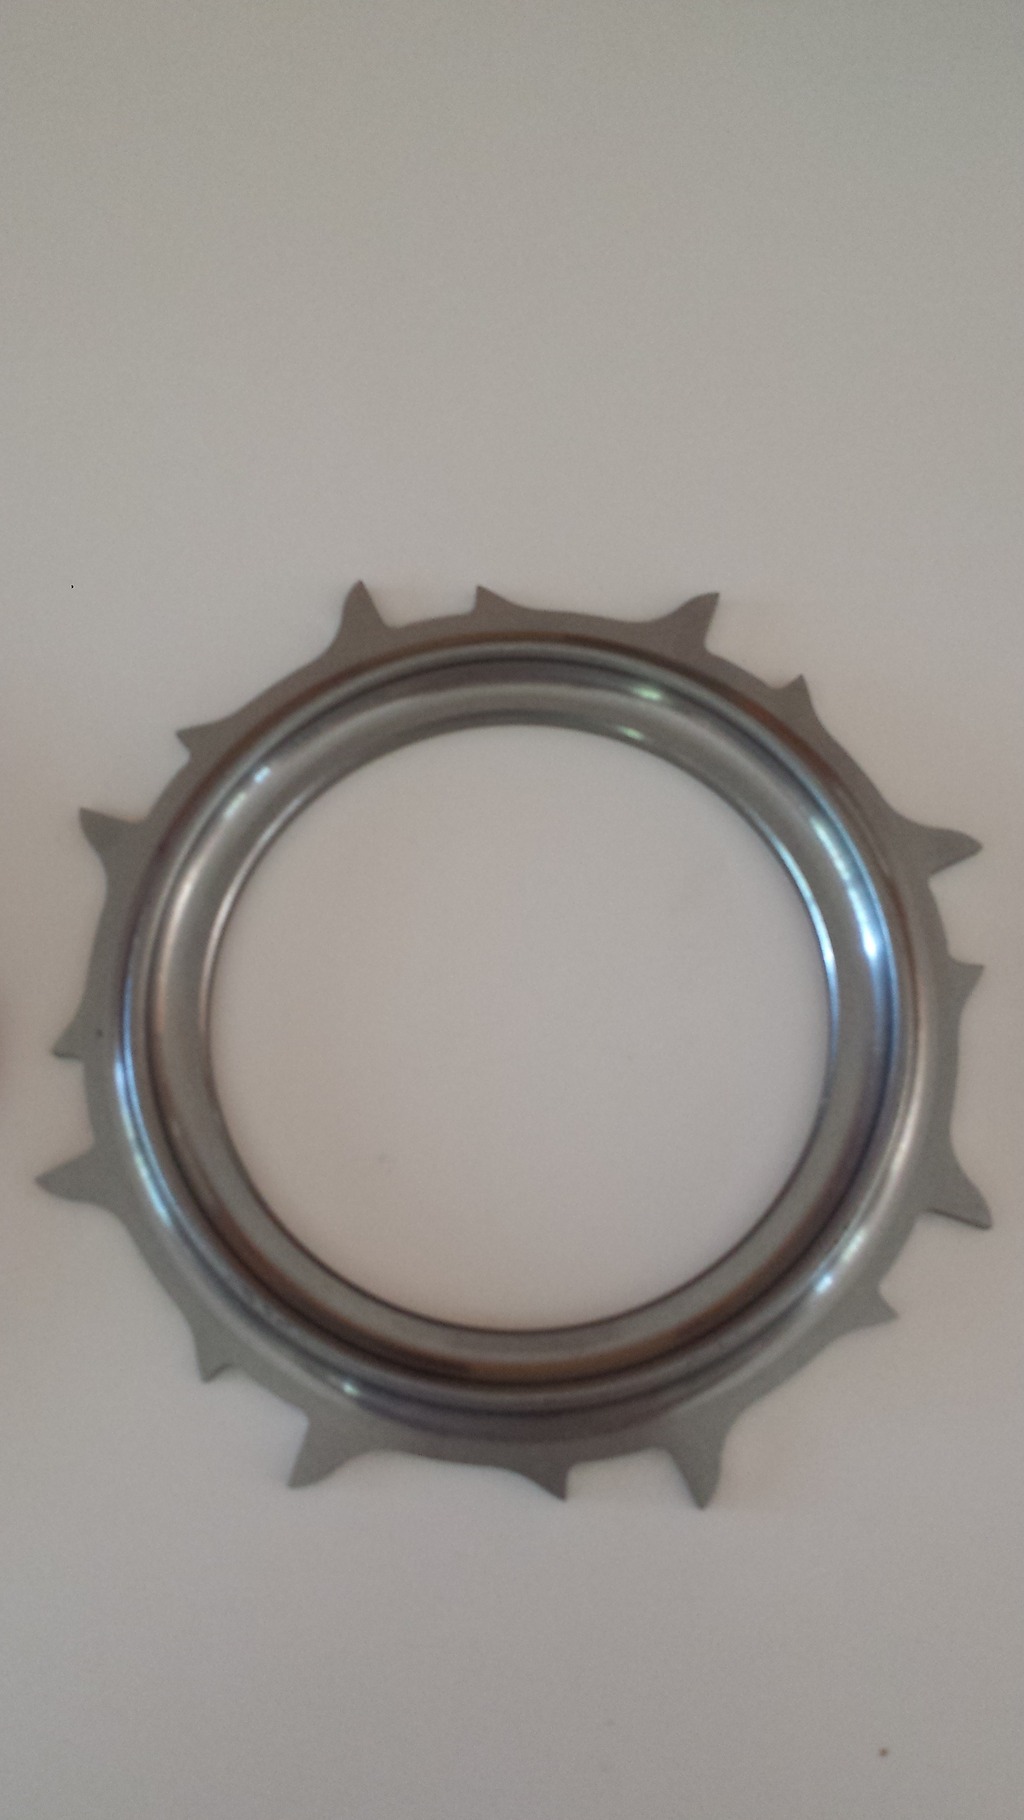
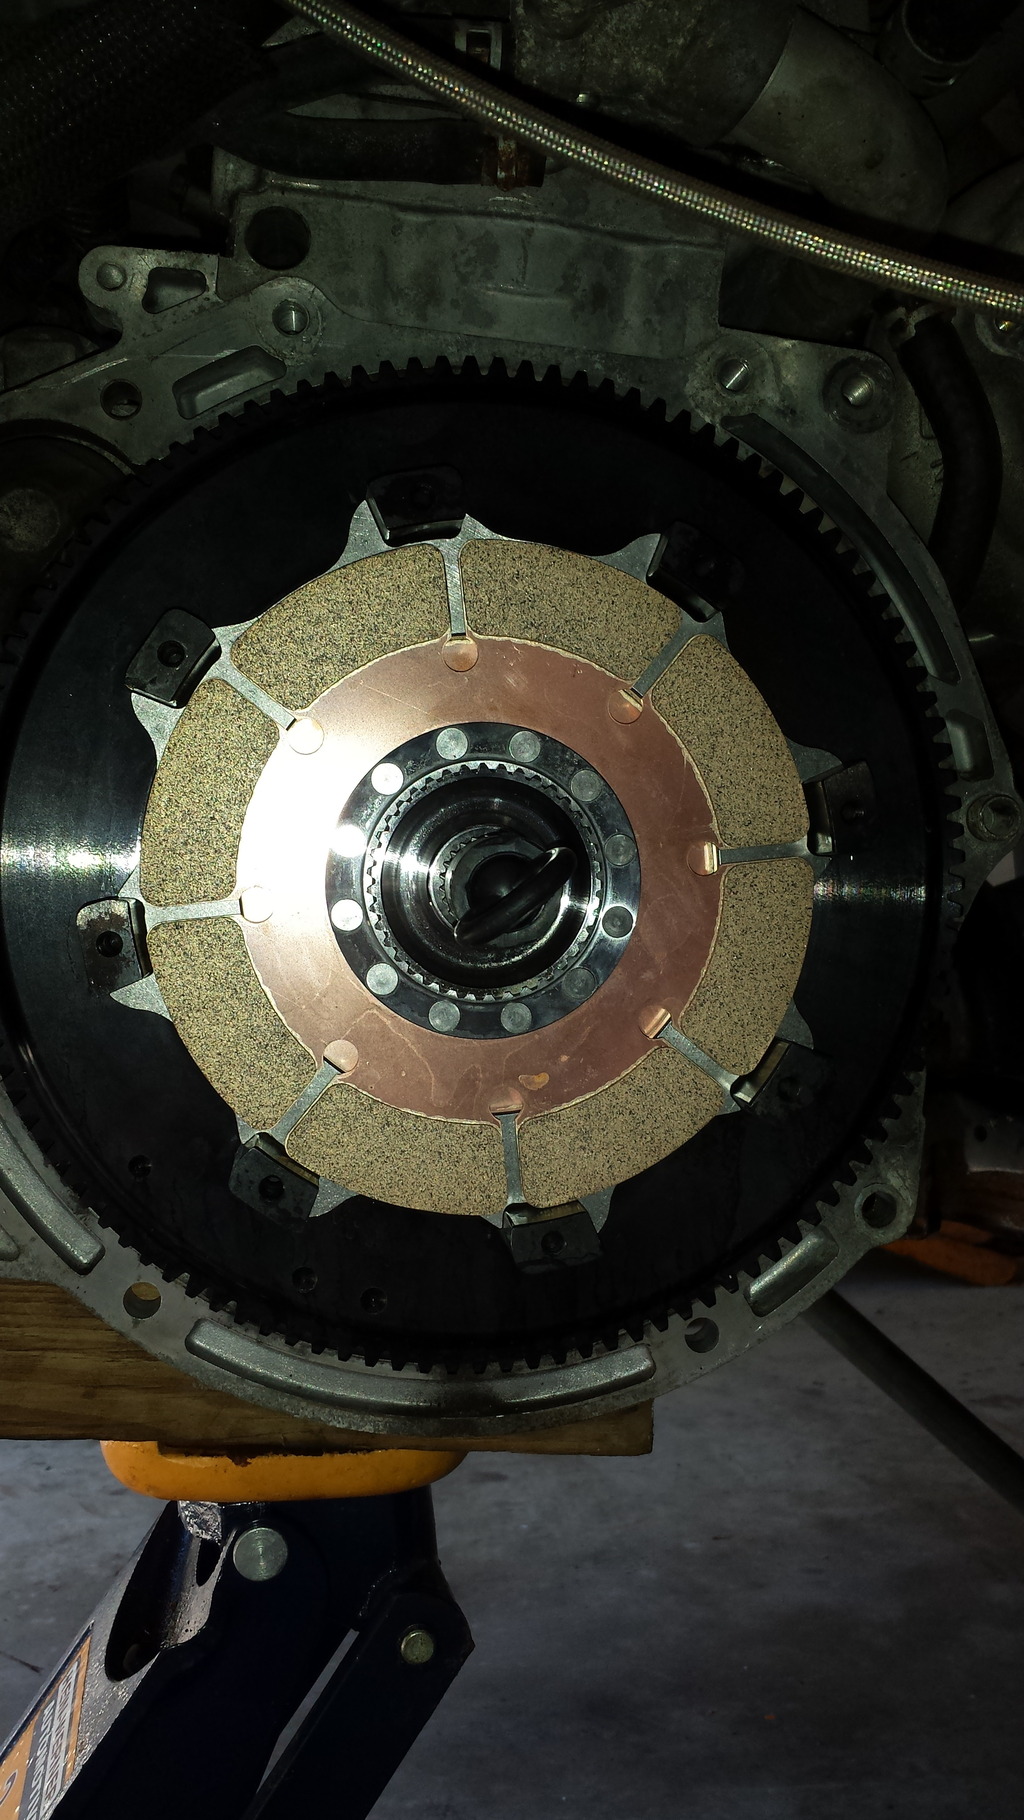
Floater Plate
Clutch Disc - Second
Pressure Plate
Clutch Cover & Diaphragm

Installation:
Clean Crank threaded bolt holes with brake cleaner.
Flywheel installed with ARP PRO 19mm head flywheel bolts torqued to 95 ft./lb. Apply ARP lube to under head of the bolt and 242 "Blue" Loctite to threads.

Install first clutch disc (note orientation) use alignment tool
Install floater plate & second clutch disc
Install Pressure Plate
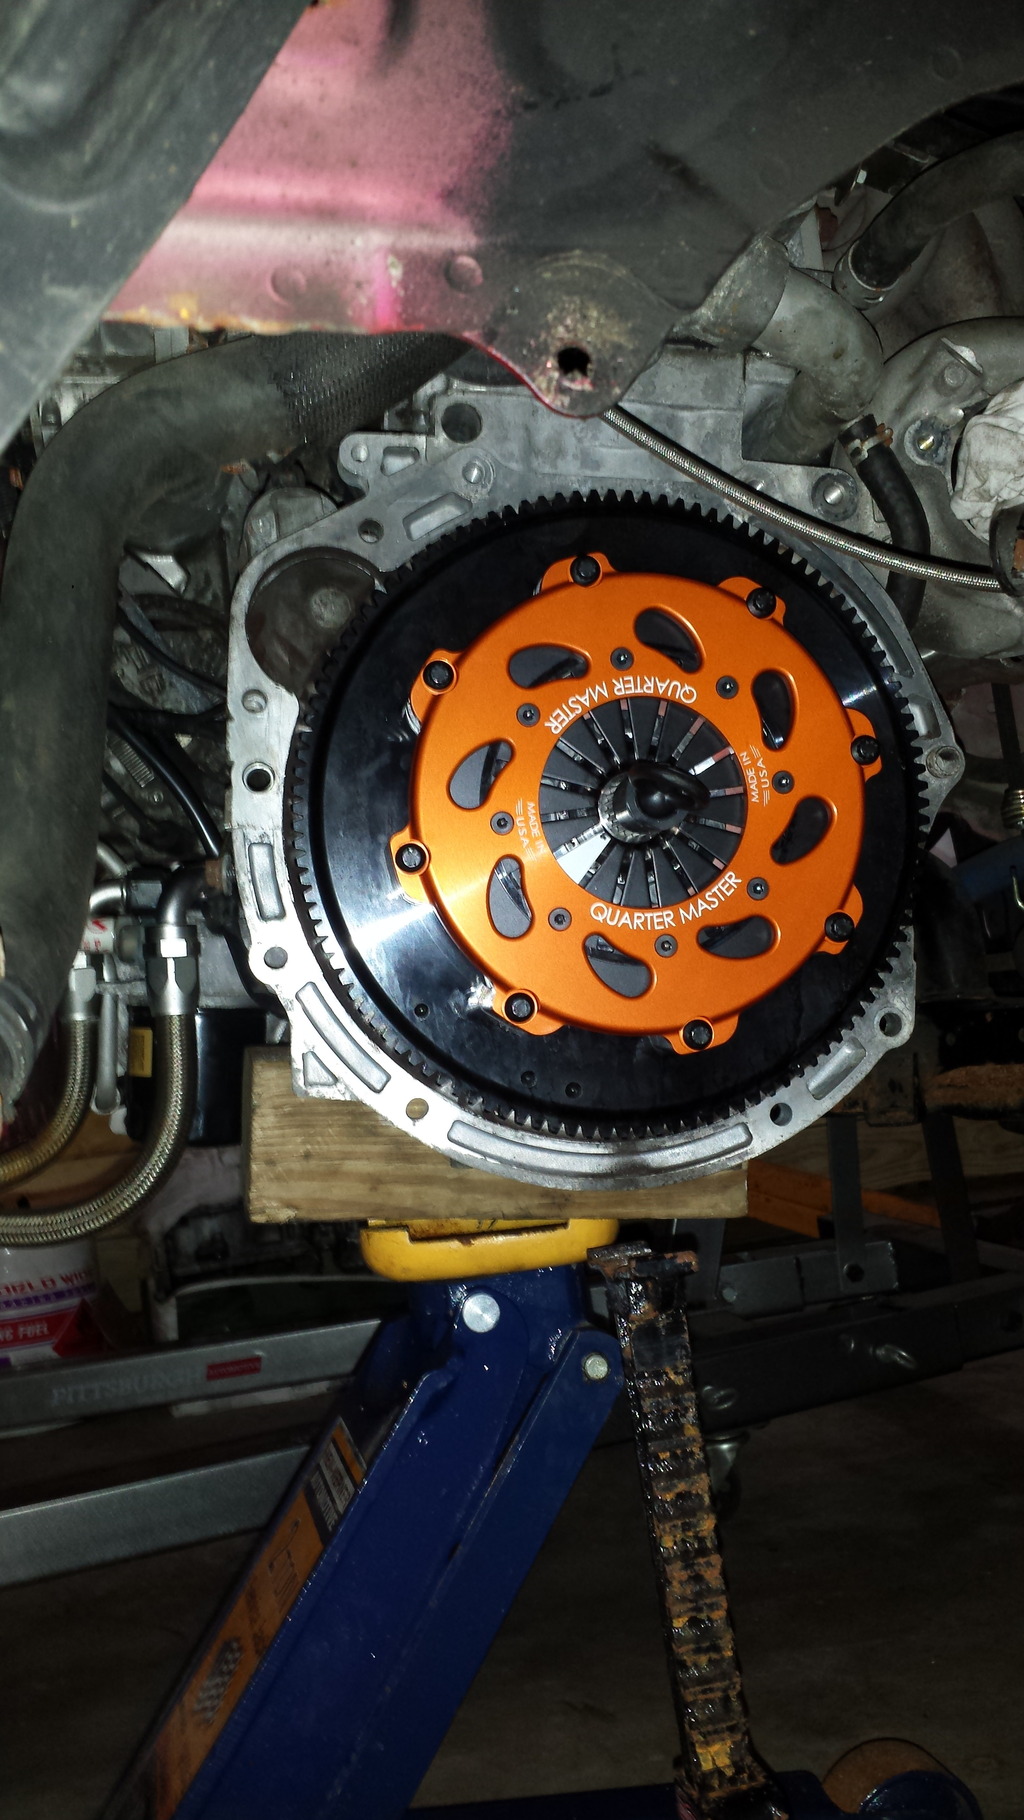
Finished Clutch Install
Install Clutch Cover, torque 8 x 8mm head ARP PRO bolts with washers to 110-120 in./lb use Loctite "Blue" 242 on the threads.
Hydraulic Throw Out Bearing Install & Measuring Proper Bearing Clearance
Proper TOB Clearance
Sorry No Pics, Forgot to Get them before install.
However here are the instructions.
Tools:
Straight Edge 8-12" / Contractors Level 24"
Digital Calipers
Install HTOB
Require new bolts M6 x 1.00 x 50mm Long. I used SS with split spring washers and Blue Loctite 242 with them being torqued down to 120 in / lbs.
4x 92290A339 Type 316 Stainless Steel Socket Head Cap Screw, M6 Thread, 50MM Length, 1MM Pitch
4x 94241A540 Type 316 Stainless Steel Split Lock Washer, for Socket Head Cap Screw, M6 Screw Size
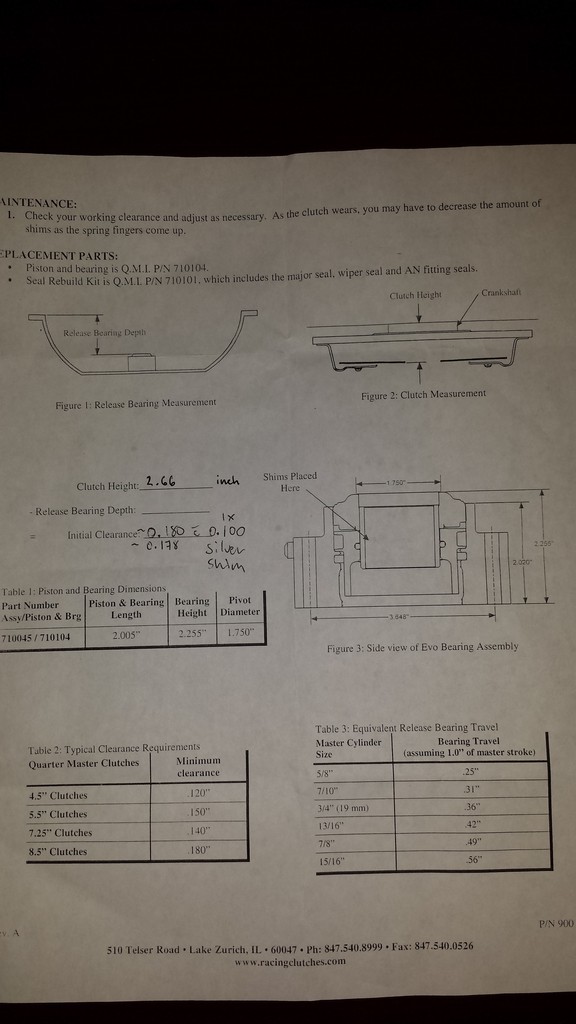
My Values for my Evo X:
TOB to Transmission Edge to Edge: 2.930"
Crank to Top of Diaphragm Fingers: 2.650"
2.930" - 2.650" = 0.280"
I added one Silver Shim (0.100" in measurement).
Final Clearance 0.180" Recommended: 0.160"
I gave my self a 10% measurement cushion as well as other factor cushion. You are better off with more clearance than less.
Bleeding Procedure & 2Ga Accumulator Upgrade Mod
Here is the 2G Accumulator it is hooked up inline between the Evo IX / Magnus CMC kit and QM HTOB

Bleed Procedure:
Position 2G Accumulator with the CMC feed line at the bottom and outflow in the top. Pump the Pedal 2-3 times. Fluid should fill the chamber up. Push air out. Connect to hydraulic HTOB.
Have a second person pump the clutch while you open the bleeder to get rest of the air out. Same as car brakes. Once no more air bubbles are in the fluid. We are done.
2G Accumulator Mod
https://www.evolutionm.net/forums/ev...-friendly.html
Custom "Homemade" Clutch Pedal Stop & Adjustment Procedure
PARTS TO MAKE SAME ONE PICTURED (McMaster-Carr for all parts)
FOR PEDAL STOP:
1x 9546K212 Metal-Core Bumper, with Threaded Hole, Rubber Bumper, Hard, M6X1 Thread
1x 92290A339 Type 316 Stainless Steel Socket Head Cap Screw, M6 Thread, 50MM Length, 1MM Pitch (had to thread it the rest of the way with M6x1.00)
2x 94150A345 Type 316 Stainless Steel Hex Nut, M6X1 Thread Size, 10MM Wide, 5MM High
FOR CLUTCH SWITCH ACTIVATOR: (you can also deactivate the switch by disconnecting it, with a properly adjusted pedal stop it will not activate the switch to crank the engine, needs a same M6x1.00 threaded hole)
1x 9546K235 Metal-Core Bumper, with Threaded Stud, Rubber, Hard, M6X1 Stud Thread
2x 94150A345 Type 316 Stainless Steel Hex Nut, M6X1 Thread Size, 10MM Wide, 5MM High
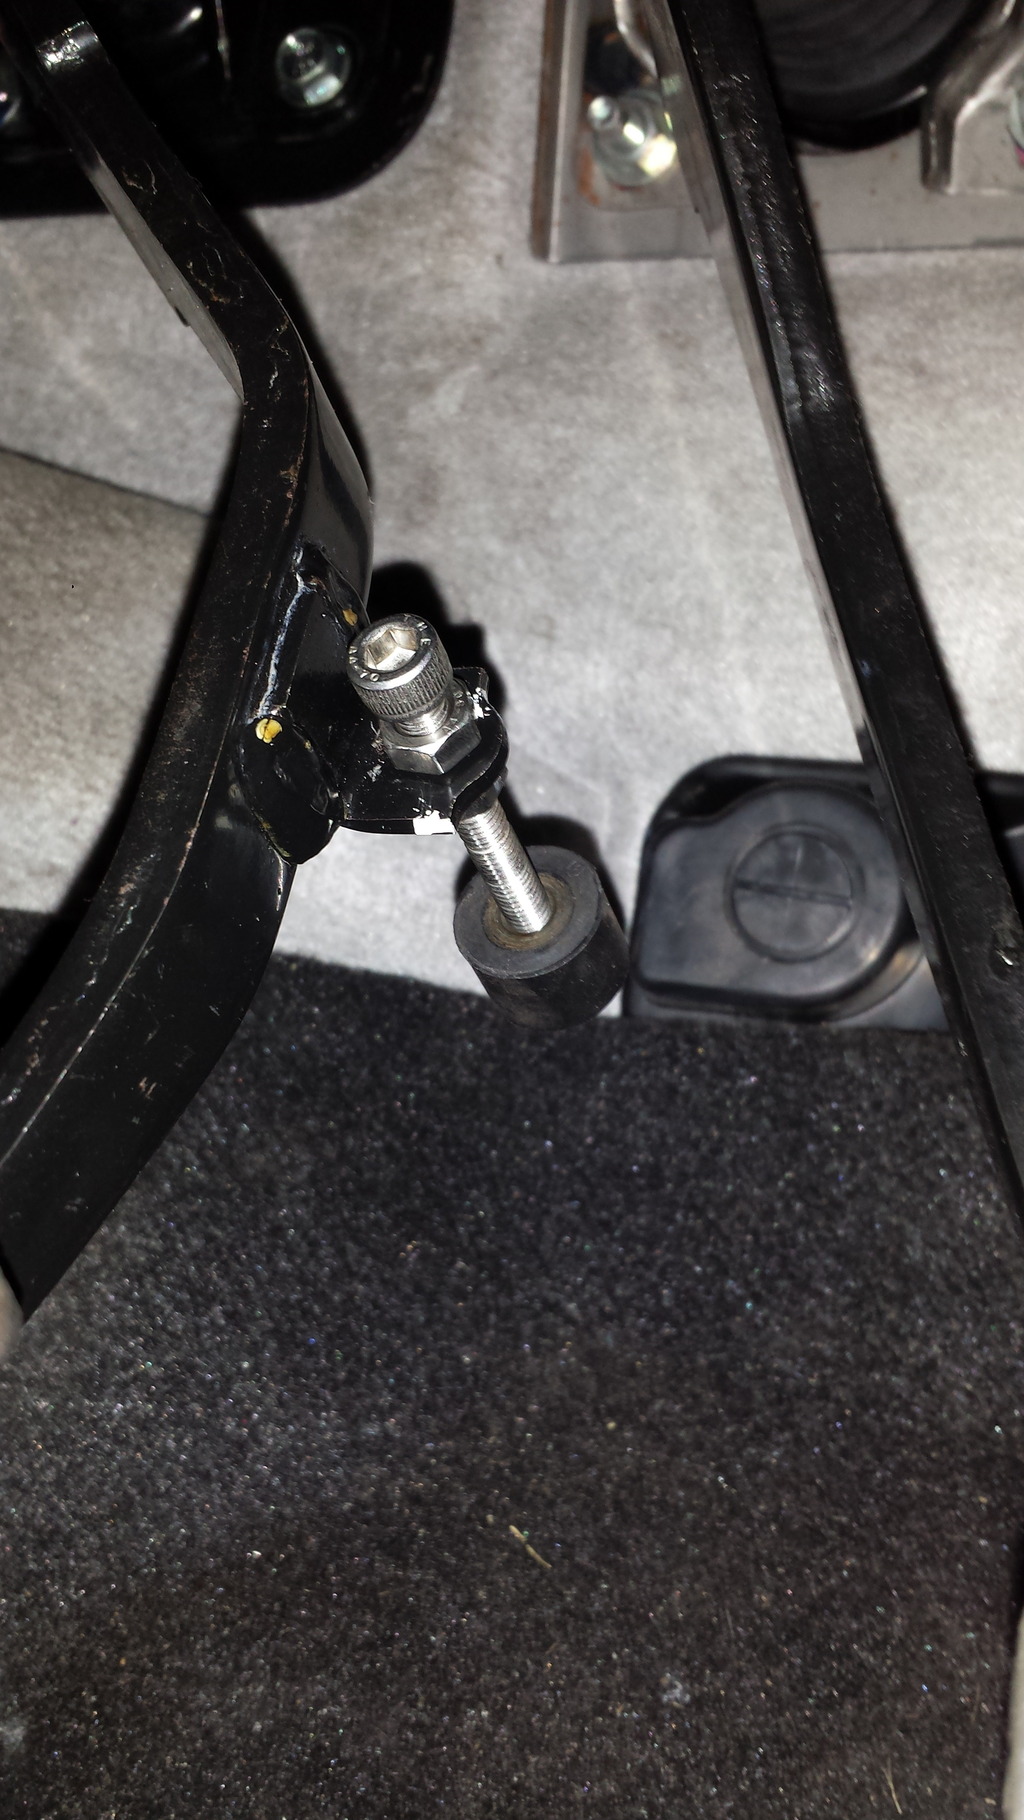
Clutch Pedal Assembly Modification - Note the Rubber Stopper that is the OEM version.
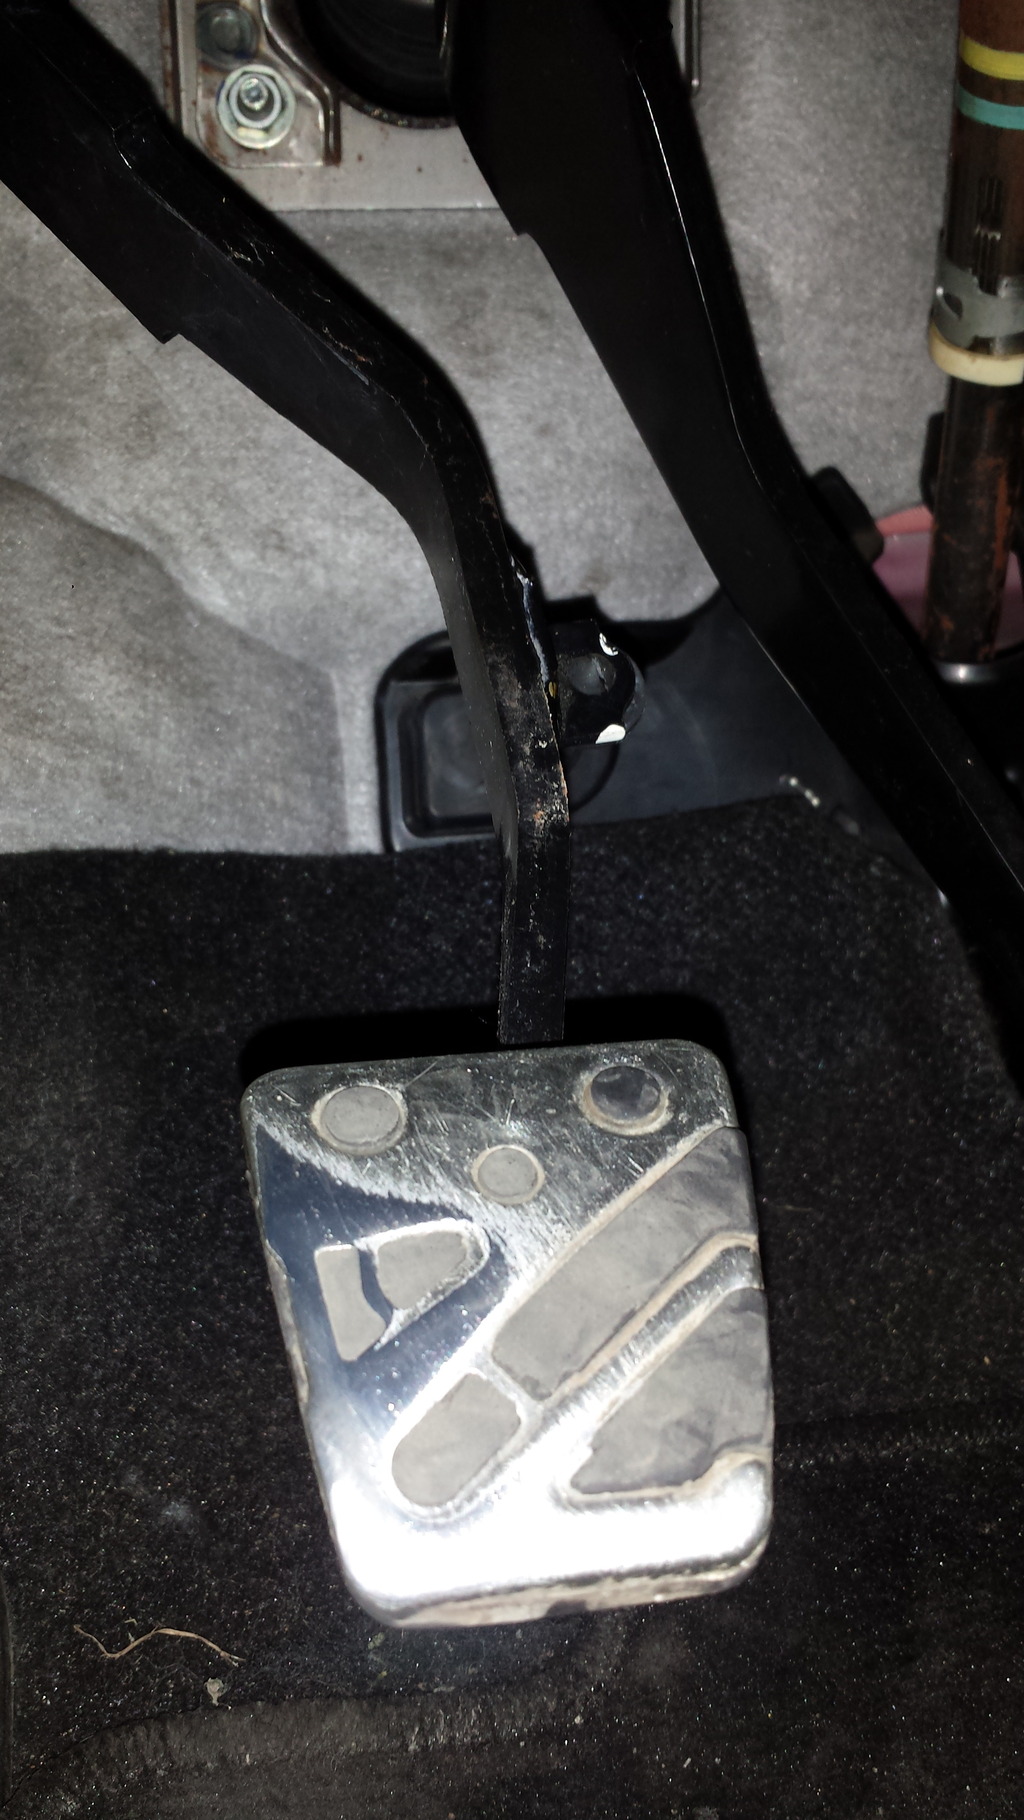
The hole the rubber stopper goes through is ~ 5.25 mm. You will tap it to M6x1.0 for new clutch pedal adjuster to bolt in.
Will look similar to this:
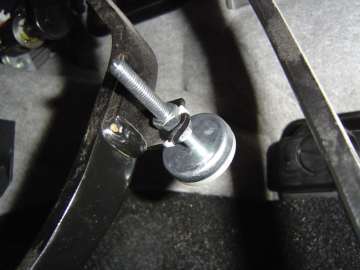
Pending Arrival of Parts for more pics.
Adjusting the Clutch Pedal Stop
1.) With the engine off and the transmission in first gear have someone attempt to roll the car. This can also be done on jack stands with one person trying to turn the wheels by hand or driveshaft.
2.) Press the clutch pedal slowly until the clutch disengages and the car begins to roll. This is considered as Position A.
3.) Adjust the clutch stop to allow travel of the clutch pedal 1/4" to 3/8” past Position A to bottoming out on the pedal stop. The pedal stop would be considered Position B.
4.) Do not stroke the pedal any further than Position B throughout the procedure or you could possibly damage the clutch.
5.) Pedal Stop will need readjusting after break-in and longer period of driving and the components of the clutch wear down.
REVIEW:
PENDING FULL INSTALL :duh:
Big Thanks to Chris Carey & Nate @ MAP for their help selecting and purchasing this clutch.
Originally Posted by Quarter Master
Drawing on an extensive, race-winning heritage, Quarter Master� has developed 7.25" 6- and 8-leg billet clutches to perform well in a broad range of street performance and racing import platforms. The two-disc, pull-to-push conversion clutches and included hydraulic bearing kits provide dependable performance in shifting, consistent pedal feel and torque-holding capacity. The 8-leg version also utilizes a steel leg for added durability. These Optimum-RR clutches can be used in stock, street/strip, drag, drifting, rally and road racing applications.

Weight:
Street Flywheel - 12.0 lbs
Clutch, Floaters, Pressure Plate, Diaphragm - 8.8 lbs
Clutch Assembly & Flywheel - 20.8 lbs
Order & Orientation from Flywheel --> Cover Plate
Flywheel

Clutch Disc - First

Floater Plate

Clutch Disc - Second

Pressure Plate

Clutch Cover & Diaphragm

Installation:
Clean Crank threaded bolt holes with brake cleaner.
Flywheel installed with ARP PRO 19mm head flywheel bolts torqued to 95 ft./lb. Apply ARP lube to under head of the bolt and 242 "Blue" Loctite to threads.

Install first clutch disc (note orientation) use alignment tool

Install floater plate & second clutch disc

Install Pressure Plate

Finished Clutch Install
Install Clutch Cover, torque 8 x 8mm head ARP PRO bolts with washers to 110-120 in./lb use Loctite "Blue" 242 on the threads.

Hydraulic Throw Out Bearing Install & Measuring Proper Bearing Clearance
Proper TOB Clearance
Sorry No Pics, Forgot to Get them before install.

However here are the instructions.
Tools:
Straight Edge 8-12" / Contractors Level 24"
Digital Calipers
Install HTOB
Require new bolts M6 x 1.00 x 50mm Long. I used SS with split spring washers and Blue Loctite 242 with them being torqued down to 120 in / lbs.
4x 92290A339 Type 316 Stainless Steel Socket Head Cap Screw, M6 Thread, 50MM Length, 1MM Pitch
4x 94241A540 Type 316 Stainless Steel Split Lock Washer, for Socket Head Cap Screw, M6 Screw Size
My Values for my Evo X:
TOB to Transmission Edge to Edge: 2.930"
Crank to Top of Diaphragm Fingers: 2.650"
2.930" - 2.650" = 0.280"
I added one Silver Shim (0.100" in measurement).
Final Clearance 0.180" Recommended: 0.160"
I gave my self a 10% measurement cushion as well as other factor cushion. You are better off with more clearance than less.
Bleeding Procedure & 2Ga Accumulator Upgrade Mod
Here is the 2G Accumulator it is hooked up inline between the Evo IX / Magnus CMC kit and QM HTOB

Bleed Procedure:
Position 2G Accumulator with the CMC feed line at the bottom and outflow in the top. Pump the Pedal 2-3 times. Fluid should fill the chamber up. Push air out. Connect to hydraulic HTOB.
Have a second person pump the clutch while you open the bleeder to get rest of the air out. Same as car brakes. Once no more air bubbles are in the fluid. We are done.
2G Accumulator Mod
https://www.evolutionm.net/forums/ev...-friendly.html
Custom "Homemade" Clutch Pedal Stop & Adjustment Procedure

PARTS TO MAKE SAME ONE PICTURED (McMaster-Carr for all parts)
FOR PEDAL STOP:
1x 9546K212 Metal-Core Bumper, with Threaded Hole, Rubber Bumper, Hard, M6X1 Thread
1x 92290A339 Type 316 Stainless Steel Socket Head Cap Screw, M6 Thread, 50MM Length, 1MM Pitch (had to thread it the rest of the way with M6x1.00)
2x 94150A345 Type 316 Stainless Steel Hex Nut, M6X1 Thread Size, 10MM Wide, 5MM High
FOR CLUTCH SWITCH ACTIVATOR: (you can also deactivate the switch by disconnecting it, with a properly adjusted pedal stop it will not activate the switch to crank the engine, needs a same M6x1.00 threaded hole)
1x 9546K235 Metal-Core Bumper, with Threaded Stud, Rubber, Hard, M6X1 Stud Thread
2x 94150A345 Type 316 Stainless Steel Hex Nut, M6X1 Thread Size, 10MM Wide, 5MM High
Clutch Pedal Assembly Modification - Note the Rubber Stopper that is the OEM version.

The hole the rubber stopper goes through is ~ 5.25 mm. You will tap it to M6x1.0 for new clutch pedal adjuster to bolt in.
Will look similar to this:

Pending Arrival of Parts for more pics.
Adjusting the Clutch Pedal Stop
1.) With the engine off and the transmission in first gear have someone attempt to roll the car. This can also be done on jack stands with one person trying to turn the wheels by hand or driveshaft.
2.) Press the clutch pedal slowly until the clutch disengages and the car begins to roll. This is considered as Position A.
3.) Adjust the clutch stop to allow travel of the clutch pedal 1/4" to 3/8” past Position A to bottoming out on the pedal stop. The pedal stop would be considered Position B.
4.) Do not stroke the pedal any further than Position B throughout the procedure or you could possibly damage the clutch.
5.) Pedal Stop will need readjusting after break-in and longer period of driving and the components of the clutch wear down.
REVIEW:
PENDING FULL INSTALL :duh:
Last edited by Clipse3GT; Aug 12, 2015 at 07:41 PM.


im in the process of installing mine.
bought from MAP also.....
following the same instructions as above.
i wasnt going to shim but i did measure per the above process (same as in instructions).
my clearance was .167.
dead on.
simply bolted it all up.
bought from MAP also.....
following the same instructions as above.
i wasnt going to shim but i did measure per the above process (same as in instructions).
my clearance was .167.
dead on.
simply bolted it all up.

Account Disabled
Joined: Nov 2017
Posts: 8
Likes: 0
From: Alaska
I have a 6 Speed Evo IX MR and could really use some advice. If you see this Text me @ 8136386140, I have the HRB and Full Twin Disk but I�m not sure what else I need to buy or where to buy it. I�d really appreciate it. I just want to have everything there when I bring it to my mechanic and not waste his time.

Thread
Thread Starter
Forum
Replies
Last Post
louiesevox
For Sale/WTB - Engine / Drivetrain / Power
2
Mar 1, 2016 06:50 AM
FS[Mid-Atlantic]: BRAND NEW QUARTER MASTER 8 LEG RACE TWIN DISK CLUTCH WITH HYDRAULIC TOB CHEAP! 5spd
ZanarkO
For Sale/WTB - Engine / Drivetrain / Power
3
Sep 4, 2015 01:53 PM
FS[Mid-Atlantic]: Brand new QUARTER MASTER 8 LEG STREET TWIN DISK CLUTCH KIT WITH HYDRAULIC TOB CHEAP!!
ZanarkO
For Sale/WTB - Engine / Drivetrain / Power
3
Sep 3, 2015 10:13 PM
WTB[SouthEast]: exedy triple or quarter master 8 leg street
danameisoj
For Sale/WTB - Engine / Drivetrain / Power
0
Jul 11, 2015 03:32 PM
mrfred
Evo Engine / Turbo / Drivetrain
96
Aug 5, 2012 09:46 PM